Where to begin
Don’t immediately try to come up with your own project on your own, but try to follow the manuals. For kids, cutting templates are a decent start. The procedure will be a form of self-expression and learning to craft.
The effect of such actions is joy in the home and a feeling of satisfaction from one’s work. The standard set of tools includes:
- stationery scissors and knife;
- colored sheets of various densities;
- cardboard;
- glue;
- ropes for hanging.
There are many tutorials available online that explain the entire process step by step. Of course, everything can be made from porcelain, beads or glass, but these options are quite labor-intensive (the last point can generally be performed by experienced craftsmen). We invite you to make Christmas tree decorations from colored paper, cardboard and other materials, following simple instructions.
Boomerang that returns
Yesterday we played for half a day with this cardboard boomerang. Surprisingly, it actually comes back, which was not noticed with store-bought plastic boomerangs.
Publication from Elena Selivanova (@daynotes.ru) Oct 20, 2021 at 5:24 PDT
The boomarang is not exactly made of paper, it’s made of cardboard, but I think you have some cardboard, you only need a very small piece. A wonderful toy for boys and girls.
- To make a boomerang you need 4 strips of cardboard 17 cm by 3.5 cm. You can take slightly different sizes, as in the pictures below. But ours are 100% working - verified! All strips should be as identical as possible and glued tightly so that it doesn’t get carried in the wrong place.
- Glue the PVA together so that one overlaps the other. There should be an empty square in the center.
- We reinforced it with tape because we didn’t want to wait long for the glue to dry. The main thing is that the parts are well glued and there are no gaps. Otherwise he may not return.
- Yes, it will not do without launching skills, but this comes naturally after several attempts.
Paper balls
You need to use the blank in electronic format - it will be printed with an inkjet printer (b&w versions are allowed with a laser).
The advantage of this method is the minimum number of materials. You will need patience - gain experience and improve the quality of the finished product: the lines will become smooth without any roughness.
As a result, you should end up with two-color spheres, where the segments are arranged in a checkerboard pattern. Do everything in this order:
- you want to print diagrams (stencils) with stripes and circles;
- cut out all the elements;
- The resulting parts should be arranged with a flower, and then fastened together with a circle;
- sequentially weave one edge to the other, and for reliability while working, fasten everything with clothespins or paper clips;
- Glue the opposite ends of the ribbons together.
The part of the circle that was connected by the circle is punched out (the hole should be small). A ribbon is inserted into the slot, on which everything will hang. It won't be perfect on the first try - over time you will understand and hone the technology.
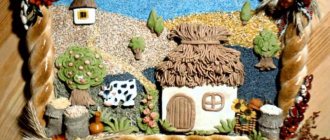
Advantages of volumetric crafts
Do-it-yourself voluminous paper crafts are more complex in practical execution than flat two-dimensional products. However, relief models have a number of advantages:
- Beautiful appearance.
- Lush forms of paper flowers allow you to create original compositions or bouquets for gifts.
- Creating complex models and applications develops the child’s imagination, and small details of three-dimensional crafts help train fine motor skills of the fingers.
To make it easier to find a suitable option, you should familiarize yourself with the photos of three-dimensional paper crafts. This will help to properly organize the work plan, sequence of actions and general idea of the craft.
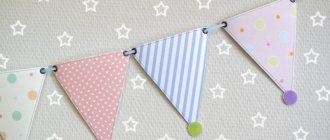
Unusual garlands
To do this, you just need to take scissors, a stapler, glue and paper of various colors. Cut the sources into pieces of various sizes - they will become the basis for decoration.
These elements will make lanterns, hearts, snowmen or pendants. You can use hearts as a test of strength. Production takes place in the following sequence:
- bending each strip of three in two (they are all different lengths);
- arrange each segment so that the longest is on the outside, and the shorter is on the inside;
- gluing the ends on one side and then on the other;
- After drying, secure the two parts with a paper clip.
Even a child who goes to 1st grade, 2nd grade (and even younger) can make these crafts. To make a heart 11 centimeters high, modules of 20, 25 and 30 cm in length are in demand. Christmas trees are an excellent alternative - they will require a little more attention, but having experience with hearts, you will no longer have any difficulties.
Another level of craftsmanship is provided by round lanterns resembling a top. For it you will need sections 30 cm long and 1.5 cm wide. It is advisable to use two colors - they will alternate.
You will need two circles with a diameter of 3 cm, which will be placed on top and bottom. Also take a needle and thread that will match one of the colors.
Everything will be decorated with balls or beads. They will be easy, and to achieve results follow the instructions:
- Decorations for the New Year: decor ideas and options for decorating a house and apartment for New Year's celebrations (135 photos)
- Window decoration - simple ideas and step-by-step descriptions of do-it-yourself window decoration (110 photos and videos)
- Diaper cake - a step-by-step description of creating a diaper cake. 115 photos and videos of creating a gift
- lay out all the areas on the table in the required order;
- bend each piece in two;
- fasten to the end of the thread;
- place the resulting peels on both ends;
- Twist a loop from the thread, on which it will hang;
- Separate the middles of the stitched strips, spacing them out.
Every person has already been familiar with bunches and chains since childhood thanks to their practice in kindergarten and elementary school. You can use them to decorate your apartment or office.
The production is simple, and the results will not take long to arrive. In addition to chains, you can come up with your own garland made up of pictures or shapes.
The sectors will be absolutely identical in size. Only the tone (optional) of the link will differ. All you need to do is securely fasten and glue the fragments together.
Let's start tinkering
Perhaps the first thing that comes to mind when mentioning paper toys is origami. This word itself translates as “folding paper,” and there is probably not a single person left in the world who does not know what it is.
The Japanese practice of making paper figures without the help of glue or other binding materials has been known since the 17th century and has since developed into a separate art form. Famous origamists create their own complex models of animals, plants, buildings, and equipment, striving for accuracy with the original. The diagrams of such models can contain hundreds of actions.
Simple schemes with a few simple steps are suitable for children. Many people have known since childhood how to fold a simple flower, crane or box. Here are a few more simple schemes for your piggy bank on how to make a frog, giraffe, mouse, and fox out of paper.
You can make not only animals and flowers from paper, but also various things, equipment, and buildings.
It is better to take thin paper. An ordinary notebook sheet will do, from which you will need to make a square, since most figures are made from a square sheet of paper. After practicing on regular paper, you can move on to colored paper - it is also thin, but the models will turn out more colorful.
Article on the topic: Crocheting a toy - RABBIT
The process of folding papers is very exciting and can turn into a game. You can play with the resulting figures and also make functional toys.
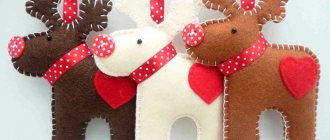
But voluminous paper toys can be made more simply, without resorting to the art of paper folding. It is enough to take the usual scissors and glue, and also be patient and be careful.
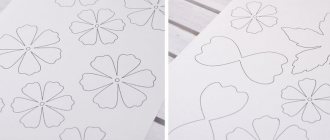
For such toys you need patterns - it’s better to take them ready-made. You can either print them on a printer (contour or color) or redraw them yourself, for example, by placing a sheet of paper on the monitor and tracing the translucent lines.
Thick paper, such as thin cardboard or drawing paper, is suitable for such toys. You can create characters that are well-known and loved by your child.
Assembling and gluing such figures is not difficult; a child can do it on his own. They are large and assembled according to the principle of a cube; some diagrams have letter or numerical designations so that the sequence of assembly and the correspondence of parts are clear (A - to A, H - to H).
After the parts are cut out, they must be bent along the agreed lines. All parts of the part are bent inward. When the figure is assembled, it can be glued according to special allowances.
This way you can create entire cardboard houses and settlements.
More elegant figures have the same assembly principle, but require more care and experience due to the small details. But you can glue together a beautiful model of a car, dolls or animals with the fewest corners - they look neater and prettier.
This principle of assembling models lies in 3D paper modeling, which is called “papercraft”. These are already complex professional models, but you can try to assemble them yourself.
Funny toys with which you can make up stories and even stage theatrical performances - so-called finger toys. They are made of thick paper the width of the palm with special holes for fingers.
Related article: Do-it-yourself fruits from candies: master class with video
You can draw and paint templates for such toys yourself or use ready-made ones.
Moving paper toys are an interesting activity for children. Usually the paws move both on their own and with the help of a thread. To make the legs and ears move, use rivets, nails or wire.
In order to create such a toy, you will need:
- thick paper;
- 4 rivets for each toy;
- scissors;
- pencils and markers.
Step-by-step instruction:
- Draw and cut out all the necessary details from paper - head (1 piece), torso (1 piece), front legs (2 pieces), additional parts (2 pieces);
- Don't forget to make holes on the parts;
- We fasten the legs with a rivet through the side holes (on the right and left sides) to each other and to the head and secure it;
- We attach additional parts to the legs (through the outer holes);
- We connect the parts with each other and with the body in the middle;
- Glue a holder to the head - a strip of paper folded in the letter “T”;
- We color the faces and body.
Now, in order for the animals to hide their faces behind their paws, you should pull them down by the lower paw (torso), holding them by the holder on the back side.
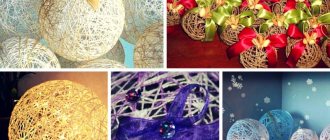
Corrugated balls - spectacular look
If you want something unusual, then you need to work hard, but the result will exceed your initial expectations after mastering the technique. During the 2019/2020 holiday season, such custom decorations will enhance any interior.
Please note: making corrugated balls requires following all instructions without deviation. You will need one roll of appropriate paper of any color, glue and scissors.
- Patchwork - technique and master class for sewing stylish and beautiful sewing with your own hands (80 photos)
- Tilda doll - a master class in sewing toys with your own hands. 125 photos of the best toy models
How to make a car out of paper: step-by-step description of how to quickly and easily build a high-quality car (75 photos + video)
The work is performed in this order:
- cut part of the roll so that the width of the cut fragment is three centimeters. Don't unwrap anything;
- unwind it, twisting it every three to four cm along the way. Maintain integrity and avoid breaks;
- in places where they are twisted, the crafts must be straightened to achieve a convex configuration;
- repeat enough times to complete the design; three-dimensional objects should be connected with glue.
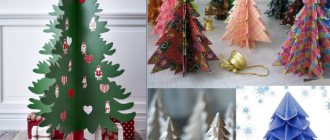
How to make a paper toy for a Christmas tree
100-150 years ago, Christmas tree decorations were mainly made by hand. And although today there is no shortage of factory-made garlands and balls, hand-made options continue to be in demand. For example, let's look at how to make a paper toy for a Christmas tree.
To work you will need:
- decorative paper or colored, not very thick, coated;
- Super glue;
- polystyrene ball;
- silver thread;
- compass;
- a long pin with a large head.
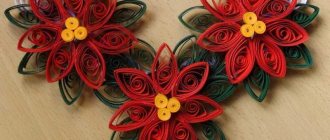
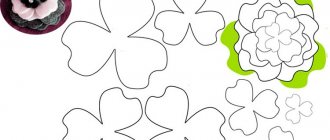
- cut out circles with a diameter of 5 cm in the amount of 20-30 pieces from decorative paper;
- cut out spirals from circles;
- wrap them to make buds;
- open the spirals so that the flowers open a little;
- open the circle located at the bottom and pour glue into the middle or apply silicone from a pistol;
- glue the flowers to the ball very tightly, so that the polystyrene is not visible;
- Using a pin, attach a ribbon to the ball and hang the toy on the Christmas tree.
Windows indoors
In this situation, you will need a regular A4 in white and other colors. Here you have room for imagination - the design can be anything: from a sleigh with deer to various cartoon characters.
Beginners can try making snowflakes. To do this you need:
- fold the sheet in half;
- draw outlines on the sheet;
- cut out the desired pattern along the joints.
There will be a symmetrical figure that can be fixed to the glass using double-sided tape, soap solution, or transparent tape.
You can also print blanks downloaded from the Internet onto the windows - all you have to do is notch everything - especially difficult places will require sharp thin scissors.
Dymkovo toy - modern collections, their creation and features of making Dymkovo toys (115 photos and videos)- Knitting openwork patterns - diagrams and step-by-step master class on how to knit an openwork pattern quickly and easily (95 photos + video)
Flowers from foamiran - how to make stylish and original crafts from modern material with your own hands
You can create your own stencils if you have a certain skill. The most aesthetically attractive will be large windows decorated in this way.
Don't forget to prepare the glass before gluing - clean the surface to hold it. Once removed, the glass is easy to clean.
Papercraft schemes. Volumetric paper crafts.
When my son and I accidentally discovered on the Internet such blanks for crafts, cutting out and assembling various superheroes, cartoons and animals, he was delighted! New horizons and variations for the game immediately opened up. There is even such a style - papercrafting (paper modeling). To be honest, I have never heard of this name before. See how easy it is to make such voluminous crafts – toys – with your own hands. You just need to print out the templates, and the child can cut them out and glue them himself, it’s not difficult: How to make a three-dimensional Spiderman in the Papercraft style, as well as other characters from your favorite cartoons: Templates for cutting paper - funny SpongeBob and Patrick: Those who daily plays Angry birds, they will be very happy to play with such a voluminous craft: This is how you can make minions: A smartphone for children made of paper with your own hands, like a real one: Diagram - panda: Good mammoth: Smeshariki using the papercraft technique: Almost all girls like these cute ponies: What There are also patterns for papercraft: Print out our templates for your children, and they will be busy playing with their hands for some time, and you will have a few free hours for personal matters.
Also interesting:
www.podelki-rukami-svoimi.ru
Christmas wreaths on the door
Recently, the tradition of attaching a wreath made of pine needles or materials that imitate it has become popular in our country, but this option is extremely impractical in apartment buildings, where there are often doors that cannot be pierced with nails. Cardboard wreaths are simple, light and beautiful.
At first glance, it may seem like they will take a long time to make, but all you need is a standard size page, a ruler with a pencil, glue and scissors. The wreath is made like this:
- bend the sheet in half;
- from the bending point, draw horizontal lines with a pencil at a distance of one and a half cm from each other. They should not reach the edge of the sheet by two centimeters;
- cut through all trajectories starting from the center;
- unfold the sheet, and then glue its edges along the larger side of the sheet without cuts (your house will be as presentable as possible with this element).
Decorate the finished product with sequins, bows and various patterns. A cardboard plate is an alternative base. You need to cut out the center evenly, then stick green decorations along the borders, replacing the spruce needles.
Paper toys (master class).
Rima Kalimulova
Paper toys (master class).
paper crafts for children.
Almost any craft can be made from paper
The quality and properties of the paper and its availability make it possible to create various shapes and models from it. DIY paper crafts are a pleasant and useful pastime for children and adults. Paper crafts help develop logical thinking for young children. paper toys for my kids . I use these crafts when I tell children nursery rhymes about a bunny, about chickens, we also sing songs, while we develop speech, memory, thinking, and the desire to come up with stories using these toys .
For the craft I used colored paper , scissors, and glue.
“Do-it-yourself crafts” Do-it-yourself paper crafts are a rather painstaking and time-consuming task. With the help of paper, you can make completely different things with your own hands.
We make preparations for Easter eggs ourselves. We make preparations for Easter eggs ourselves. Easter is coming soon and we will all be making various crafts with our children. This is what I found on the Internet.
Cubes with photographs
Such decorations are considered not only original, but also memorable for the owner of the installation. Photos can be placed on the edges of the figure. It is preferable to print them on a printer in order to select the correct measurements.
How to make a cube correctly:
- cut out six circles, rectangles or squares;
- bend the edges of each face so that the base is square;
- glue the bent edges together.
The fruit will pleasantly surprise you - it can be hung not only on a holiday tree. Choose a loop to your liking that will hold everything in place.
Japanese art
A great idea would be to make origami toys out of paper with your own hands. Although crafts made in this way often turn out angular and sketchy, the process of folding itself is calming and promotes the development of motor skills.
Craft stores sell an assortment of origami paper, but it is not at all necessary to use it. The vast majority of shapes consist of a square template, so you can use any square sheet.
The schemes, at first glance, seem complex, but only a little practice is enough to understand that all the schemes contain basic figures. Good results can be achieved much faster if you practice folding these figures separately.
Other ideas
Regardless of wealth and invention, there is always room for unusual adaptation of the simplest sources.
The decoration is complemented with sparkles, new colors, and fabric inserts. There are channels dedicated to making trinkets designed to encourage loved ones.
Be sure to watch thematic videos - you will find inspiration in them. Keep these aspects in mind:
- the process should bring pleasure to everyone involved;
- create as many things as you have in mind;
- do not be discouraged if you fail the first time - practice will improve your mastery of the appropriate tools;
- make it a family tradition - get together before the holidays, doing a common thing before both the last and first celebration of the year.
Now you can go to the retail outlet for the necessary art supplies to make New Year's toys out of paper with your own hands. It’s worth thinking about the upcoming event several months in advance. Spend more time on these activities in the evenings or weekends.
New Year decoration
The most obvious thing you can do to decorate your home for New Year or Christmas is snowflakes. They can be cut from either thick printing paper or napkins. In the second case, they will turn out to be light, almost weightless, just like real snowflakes.
If your imagination suddenly fails you, you can use sites offering ready-made snowflake patterns. All that remains is to print it, fold it in a special way and cut out the proposed ornament.
In addition to intricate patterns and chaotic cuts, you can try cutting out something meaningful, such as objects, plants, or even cartoon characters.
Balls for the Christmas tree
Why keep something at home for a whole year that will only be useful for a few weeks? If we are talking about Christmas tree decorations, then this makes no sense at all, because you can make them yourself just before the holiday. This makes it possible to make themed decorations every year, for example, in accordance with the sign of the Chinese calendar.
Photo of paper toys
Paper toy with beads
This New Year's craft is very simple to make; any child can handle it.
First you need to cut out a strip of paper 2-3 cm thick and 6 cm long, make an applique on it in the form of some kind of ethnic ornament and roll it into a ring. At the junction of the ends of the ring, place them on top of each other and make a hole. You need to insert the ends of a ribbon folded in half into the hole and put on 3-4 bright beads. After tying the knot, you need to pull the ribbon out from the side of the loop and hang the craft on the Christmas tree.