Rules for working with felt
Felt is a non-woven material, so it is simple and easy to use. There are a large number of different variations of this material, varying in composition, thickness and color.
If you are just starting to master working with felt, you should consider some of its features:
- easy to steam - you can remove folds or fold lines on felt sheets using a regular iron with a steamer. It is enough to simply iron the material thoroughly on both sides;
- easy to cut - when working with felt, there is no need to process the edges and cut lines, since the material does not fray and serves for a long time without deformation;
- easy to wash - dirt from finished products can be removed using warm water and any cleaning agent. Soak the item for 20 minutes, then wash without rubbing and hang to dry;
- easy to clean - sticky rollers used for clothing will perfectly remove all dirt from the surface of felt products;
- easy to sew - a product assembled from several elements will serve for a long time even as a favorite children's toy. The main thing is to sew all the details well to the base of the thing.
An important feature when working with this raw material is the ability to select a specific variety and color scheme.
Interesting: Stencils for windows for the New Year 2021 for cutting
If toys and souvenirs are made correctly, they retain their color and shape for a long time and can withstand repeated washing and constant use.
Note!
Water-soluble glue should not be used to fasten product parts. It is best to sew on all the elements, either by hand or with a sewing machine, using thread No. 40 or No. 50.
Felt hearts
Are you planning to celebrate the New Year with your loved one? Then be sure to prepare these romantic Christmas tree decorations made of felt in the form of red hearts with embroidery.
Props for creativity
To create products pleasing to the eye, a novice craftswoman will need a set of cutting and fastening tools; in addition, drawing devices are needed.
The set of necessary props is not limited to scissors, needle and thread, it is much wider and includes the following elements:
- scissors - high-quality stationery scissors are the main tool when creating felt products. Choose a small tool that is easy and comfortable to hold in your hand. Embroidery and curly scissors are also useful, which are indispensable when cutting out small parts and complex elements;
- roller knife - can handle even thick material folded in several layers, allows you to cut out elements accurately and accurately, forming smooth edges;
- punches - help in forming small round holes, have several diameters and are very convenient to use;
- threads are the most important requisite for connecting individual elements; the best choice would be polyester threads or floss;
- glue - you can use different types and textures, but pay attention that the glue does not dissolve in water and does not leave yellow stains on the material.
In addition to tools for cutting and fastening products, you will need devices for transferring the contours of the pattern onto the material.
In various cases, you can use needles, pins or tape; self-disappearing markers or a pen are perfect for drawing lines. Time-tested assistants for needlewomen are also tailor's chalk or small pieces of soap.
Note: New Year card with a picture of a deer
We sew the toy ourselves
You have finally decided to make Christmas tree decorations with your own hands. Even without sewing experience or skills in working with templates and patterns, you can create a unique little thing in a couple of hours that will become a highlight in decorating the New Year's tree. First you need to decide what exactly you will create: select patterns of figures that seem most interesting to you. You can create anything from thick felt sheets: hanging boots, snowflakes, Christmas trees, balls, funny images of animals, and, of course, the symbol of the coming 2021 - a pig.
Materials for making felt Christmas tree toys
To create a unique image for your Christmas tree, you will need available tools that every housewife has in her everyday life:
- several pieces of felt of different colors;
- sharpened scissors;
- various small decorations (sequins, beads, rhinestones, ribbons, buttons, sparkles, beads);
- cardboard;
- foam;
- pencil;
- markers;
- thread/floss;
- glue.
In fact, it is not necessary to collect all these items at once. A set of necessary materials is prepared depending on the type of toy being made. Felt products can be flat or voluminous. The simplest felt toys are flat. Their production involves transferring the template onto the material, which is subsequently cut out and decorated - the toy is ready. If this option is too mediocre for you, then we suggest sewing a voluminous toy. For such a product you will already need a filler. And although it will take more time to make it, the effect of such decoration will be more significant.
Technique for making felt toys
Working with felt is easy. This material is compressed fine wool with the addition of fluff. It is the down that makes felt soft, compared to felt, which felt is very similar to. Previously, felt was used to insulate winter hats and shoes. Today, the boundaries of the use of felt have expanded in many ways - designers and hand-made artists are happy to use dense but soft multi-colored sheets of felt.
Fact!
Felt is easy to cut - its edges do not fray along the cut line, it cuts “like clockwork.”
The simplest felt toys are flat. They can be one-sided or two-sided. The template you like is transferred to felt using chalk or a marker (circled), and then the pattern is cut out. You can decorate the toy on both sides at once - in this case the toy will be double-sided. Well, if you want to give the product strength, then one side of the figurine can be glued to colored cardboard.
When working with voluminous toys, two parts are cut out at once according to the template. To do this, fold a sheet of felt in half, fasten it with a needle for convenience (to prevent shifting) and cut it out. Two parts at the same time. Next, each detail is decorated based on the design of the composition, and only after completion the parts are sewn together. If this is your first time picking up a needle and thread, we recommend using the simplest type of seam, “forward needle” - it is used to connect small parts along the cut line. Professional seamstresses call this stitch a basting stitch. With this type of seam, the stitches alternate with skips. If such a seam is not suitable, then you can resort to the “back needle” technique. This is a very beautiful and even seam that will decorate any product. To sew voluminous openwork products, you will have to master the technique of gathering seam. It is performed in the same way as the “forward needle”, only with a stronger thread tension.
If you choose wool felt, then individual hairs may come out on the edges over time, which will not look aesthetically pleasing. In this case, to avoid this, an over-the-edge seam is used. The stitches are made over the edge, thereby securely connecting the parts together and securing the cut lines. The stitches are made at equal distances from each other with a slight inclination to the left or right.
The most effective stitch is considered to be a loop or wrap stitch. As the needle moves, the loops follow the edge of the material, thereby becoming almost invisible. This seam is very durable.
After the main part is sewn together, filler is inserted into the remaining hole, distributed evenly inside the toy, and then the area is sewn up to the end. If you planned to create a hanging toy, then a puncture is made in the upper part of the product and a satin ribbon or golden thread is threaded. That's it - the New Year's toy for the Christmas tree is ready!
Tips for making felt toys
- Felt sheets have different thicknesses. However, to create Christmas tree decorations, it is better to use sheets no larger than 1.5 millimeters. Thin felt is easier to roll and shape into the desired shape.
- Felt is sold in sheets of A3 or A4 format. Before purchasing, try to calculate the required volume of material, otherwise it will be a shame if there is not enough felt at the most crucial moment.
- For needlework, choose wool-blend felt with the addition of viscose or acrylic;
- To transfer the pattern onto the material, use a self-disappearing marker for marking. If this is not the case, tailor's chalk will do.
- Cut out the figures with ordinary stationery scissors. But if you get confused, you can find special curly scissors that cut in a “wave” or “zigzag”. With such scissors, the edges of the figure will be original.
- To glue the elements together, use PVA or textile glue. You can use a heat gun.
- If you are sewing a voluminous toy, then use not only foam rubber for filling, but also padding polyester and holofiber in balls. It is better to avoid cotton wool, as it seeps through the seams - such a toy will quickly lose its aesthetic appearance.
Which felt to choose
When using felt sheets for crafts, you should remember that depending on the composition, the properties of the material may change.
The most common types of felt are:
- pure wool is an expensive and high-quality material that is excellent for various types of crafts. It retains its shape well and has a comfortable texture, but after washing it shrinks slightly;
- half-woolen - soft and smooth appearance, containing viscose. This is a universal material suitable for small crafts and decoration;
- synthetic - inexpensive and high-quality material that contains acrylic or polyester. This type of felt is available in a wide variety of shades and has different variations in thickness and density.
Before making a choice in favor of one or another type of raw material, decide what product you will make. The result of your work, the beauty and durability of the product will depend on your choice.
Christmas ball made of felt
Try sewing a New Year's ball for the Christmas tree from felt , beads and sequins. It will take its rightful place on the branch of your New Year's beauty. You can give it to your relatives. And if there is a baby in your family, you can let him hang such a toy on a branch. It is impossible to break it. Master class by Nikitina Maria .
To create such a toy - a Christmas ball made of fabric , you will need:
- felt in pink and burgundy colors,
- 24 cm of silk ribbon 5 mm thick,
- padding polyester or stuffing for soft toys,
- large bead with a diameter of 0.5-1 cm,
- gold sew-on sequins (12 pcs.),
- transparent golden-colored beads (12 beads),
- needle, burgundy sewing thread, scissors.
Print out the pattern for one wedge for the ball.
Glue it onto cardboard for greater density. Transfer the outline of the workpiece to felt and cut out wedges. You should have 4 pink and 4 burgundy pieces.
Place the pink and burgundy wedges together. Sew them along one edge with a blanket stitch.
For greater seam strength, you can use double-fold thread. Sew the remaining pairs in the same order. Now sew the resulting pairs to each other so that you alternate burgundy and pink sectors.
Leave one seam unsewn and turn the toy inside out.
Pull one end of the ribbon through a large bead. Place the ends together and sew them together with a few stitches.
Turn the fabric ball inside out again. Insert the ribbon with the bead into the toy so that the beads are inside the finished toy.
Using several basting stitches, sew the felt around the bead and pull the thread as tightly as possible.
Now you need to sew on the sequins with beads. On pink sectors, sequins and beads should be located in the middle of the wedge. On burgundy - in the upper and lower parts of the sector. For strength, you need to sew on all the decorative details with one thread, without cutting it.
First, pull the thread from the wrong side to the right side at the point where the sequin will be. Then place the sequin on the thread, right side out, then the bead. Thread the thread through the same sequin and through the felt again. For reliability, you can make two stitches per pair of beads with sequins. Then, without tearing the thread, sew on the remaining decorative elements.
Now sew the remaining hole of the toy. When about 3 centimeters remain until the end of the seam, turn the toy inside out and stuff it with padding polyester.
Sew the remaining hole with a blind stitch.
The fabric ball is ready, you can hang it on the Christmas tree!
Christmas felt toys for New Year 2021
You can diversify the green beauty’s festive outfit with original handmade toys.
All family members can participate in making jewelry; a home creative workshop will be especially interesting for children.
Tools and materials:
- felt, it is better to choose a synthetic type;
- acrylic threads;
- felt cuttings (snowflakes, green leaves);
- beads;
- patterns (houses, Christmas trees, boots, mittens, etc.);
- multi-colored stones for decoration.
Manufacturing technology:
- From multi-colored sheets of felt, we cut out toys in duplicate using patterns. An important point is the absence of sharp corners, so we smooth out all the edges. To make it easier to work with patterns, we pin them onto the material with needles.
- We are preparing loops with which the toys can be hung on the Christmas tree; it is best to use a lurex cord.
- We decorate the products with prepared materials, sew snowflakes with threads using beads, stones with glue on Moment-Crystal.
- When sewing, you can add accents to the edges using a blanket stitch and bright shades of thread.
- We insert a lace folded into a loop into the product, thread the needle inside the loop and bring the thread forward. We divide the loop into two halves and make a stitch in the middle, grabbing the lace first from the right, then from the left side.
Toys can be made voluminous by filling them with padding polyester or holofiber. You can also use glitter, appliques made of soft material or rhinestones for decoration. On the eve of the holiday, everyone can try to make New Year's toys from felt; a large number of videos recorded by specialists will help with this.
Advice!
A soap dish with a bar of soap and a small amount of water will help speed up the work significantly. Before threading the needle, lather it a little. This simple step will make the end of the thread smooth and it will easily pass into the eye of the needle.
New Year's deer made of felt
Their cute faces will delight every child, and those made with their own hands will doubly delight. We suggest that beginners use our templates; experienced ones will do everything themselves according to the picture. If you want to get creative and save money at the same time, make a sparkling New Year’s deer from wire and garland yourself.
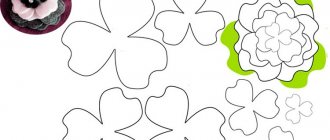
Patterns of New Year's toys made of felt
You can make patterns for creating New Year's masterpieces yourself or choose ready-made options. Among the festive templates, mittens, houses, images of the symbol of the year, snowmen and Christmas trees are especially popular. More experienced needlewomen can choose patterns of snowflakes, reindeer or Christmas angels.
You can take a common idea for creating a cheerful Santa Claus, an original Christmas tree or a bright snowman and modify it yourself. Change the size and number of parts, add non-standard elements and feel free to experiment. Each toy, even one made from a ready-made template, will be bright and original, and you can also show your creative imagination when decorating the product.
New Year's crafts made from felt
The flexibility and softness of felt allows you to improvise, use interesting and stylish ideas for New Year's crafts, and find various decorative elements.
How to make a snowman from felt
This lovely New Year's toy made of felt will be an excellent decoration for your home or Christmas tree, will delight little holiday guests and will give everyone a good mood. Making a felt snowman is very simple; this task is suitable even for novice needlewomen.
Tools and materials:
- felt;
- filler (wool or padding polyester);
- threads;
- needle;
- beads, decorative threads;
- scissors;
- acrylic paints.
Manufacturing technology:
- Make a blank for the body and head of a snowman; the easiest way to do this is to use a saucer and a cup.
- We retreat 7 mm from the edge of the cut and use threads to collect the blanks in the form of bags. Gradually tightening the thread, we fill the bags with wool or padding polyester.
- We pull the filled balls tightly together with thread and make several stitches to secure them. We connect two balls together and stitch them well.
- For the toy's hat, take a small rectangle, the length of which is a couple of centimeters greater than the circumference of the head, the width of the strip is at least 9 cm.
- We sew the cap to the head, tighten it in the middle with thread and cut the upper part of the cap into thin strips, making a fringe.
- The body of the toy can be decorated with embroidery or beads; we tie a scarf made in the form of a small strip of fabric around the snowman’s neck.
- The face of the toy can be painted with acrylic paints or highlighted with beads.
When fastening parts together, you can use a glue gun, but this method is less reliable, especially if the toy is intended for a child. If you plan to use the snowman as a decoration for the Christmas tree, sew on a bright cord.
Interesting: How to draw a Christmas tree with a pencil
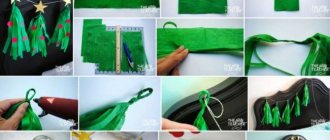
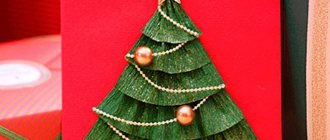
Simple felt Christmas tree
You will need:
- green and brown felt
- glue gun with hot glue (or PVA glue)
- scissors
- needle and thread
1. Using scissors, cut out 5 green felt circles. The largest circle has a diameter of about 10 cm, and the rest go downward (the diameter of each next circle is smaller than the previous one).
2. Cut out a small triangle from each circle (see image).
3. Roll each circle into a cone and secure the ends with glue.
4. Insert a thick thread into a needle and thread it through the smallest cone. Make a loop at the top and tie a knot.
5. Start stacking the cones on top of each other, adding glue to the top of each. You should start with the largest cone and end with the smallest one.
6. Cut a rectangle measuring 10 cm x 5 cm from brown felt. Roll the rectangle into a tube (widthwise). Secure the ends with glue so that the tube does not unravel. Apply glue to one end of the tube and glue it to the tree (to the bottom cone).
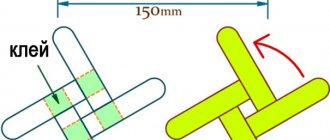
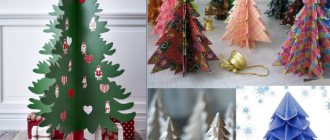
Making felt Christmas trees
When decorating your home for the holiday, you can make the main symbol of the New Year with your own hands. Felt toys can be hung on the Christmas tree, placed on the New Year's table or given to guests. To decorate the room, you can make Christmas trees on a stand, which look great in any interior. They will not only help create a festive atmosphere, but will also decorate New Year's photos.
Tools and materials:
- felt;
- gypsum or cement;
- cups;
- wooden sticks;
- beads;
- silver threads;
- White paint.
Manufacturing technique:
- Making the base for the tree. Mix plaster or cement in a small glass, gradually adding water. Level the surface and insert small sticks into the prepared mixture.
- Leave the stick to harden, then cut the glass and remove it. The hardened plaster base can be decorated with white mohair threads and mother-of-pearl beads.
- We cut out four Christmas trees of the same size from felt; you can use any color. Bright Christmas trees come out in a classic green shade, white looks very interesting.
- Glue the four cut out Christmas trees together. Apply glue to one half of the Christmas tree, glue the second piece to it, then fold the top Christmas tree in half. Apply glue on one side and glue the third Christmas tree, fold it and repeat all the manipulations with the fourth piece.
- We ended up with four Christmas trees glued on one side; finally, we connect the two remaining sides and glue them with superglue.
- We put the blank on the barrel and glue it well. The trunk of the Christmas tree can be painted over with white paint or left in its natural state.
You can decorate the resulting Christmas tree with beads and beads strung on a thread. Toys can be used to decorate window sills; crafts made in white will look especially beautiful.
Forest beauty made of felt
It is impossible to imagine the New Year 2021 without a Christmas tree. The forest beauty can be not only real, but also made from felt with your own hands. Many needlewomen make New Year's toys with patterns. As a result, you can get unusual souvenirs for the whole family.
Materials:
- needle;
- scissors;
- felt;
- filler;
- pins;
- glue;
- threads;
- sequins;
- ribbon.
Step-by-step description of the process:
- Let's prepare templates for the spruce, transfer them to the material, and cut out the elements.
- We fold 2 dark layers of felt and attach a light element on top. We sew the details together. We insert the tape, this will be the loop of the toy.
- As we work, we fill the branches with stuffing.
- We connect all the parts and sew them with a hidden seam. We decorate the product with leftover felt, sequins, and beads.
The craft is ready. All that remains is to hang it on the Christmas tree and you can admire the work done. If you haven’t yet decided what to give your relatives for the holiday, such souvenirs will come in handy.
Santa Claus made of felt
A favorite New Year's character will make a great gift for children. The felt toy is practical and suitable even for the youngest holiday visitors. There are a great many options for making this character; it can be a voluminous toy, a Christmas tree decoration on a string, or a bright souvenir with a large number of decorative items. The proposed master class is suitable for both beginners and more experienced craftsmen.
Tools and materials:
- felt;
- pattern;
- beige cotton fabric;
- padding polyester;
- wire;
- glue;
- scissors;
- wool for felting;
- needle;
- beige and black threads;
- pencil;
- black beads.
Manufacturing technology:
- We transfer the pattern to felt and use different colors to highlight the elements.
- We cut out two small circles from the fabric, fill one circle with padding polyester and sew it to another circle, this will be the face of Grandfather Frost. Using black beads we sew on the eyes.
- We tighten the face with thread and stuff it with padding polyester. We sew the face to the body of the toy cut out of felt. Using white wool we form the beard of a fairy-tale character.
- We glue eyebrows from wool and decorate Santa Claus's hat and fur coat with beige felt strips.
- We glue two blanks together and place arms and legs made of wire between them. We glue felt mittens and felt boots to the ends of the wire.
- We sew the toy along the contour with a light thread.
The fur coat and hat of the New Year's guest can be decorated with shiny threads, beads or snowflakes. You can attach a bell or a bag of gifts to a small piece of wire.
Advice!
To make a toy, clean wool felt is best suited. The souvenir will be dense, pleasant to the touch, and the shape of the product will be preserved for a long time.
Photo of DIY felt Christmas tree decorations
There are many ideas for creating simple and complex felt toys. Some of them consist only of felt and threads, others are decorated with embroidery, beads and braid. In order to make voluminous toys with your own hands, they are stuffed with any suitable material. The main thing is that he does not wake up through the seams.
A felt New Year's toy template is traced around the edge, cut out and decorated with simple embroidery.
The simplest option for a Christmas tree decoration is a star.
Snowflakes are also among the simplest Christmas tree decorations for the New Year. There are many one-piece patterns available, but you can also cut out individual segments of the figure and then glue or stitch them together. Snowflakes are embroidered on top with blue or blue threads and decorated with beads and beads. Snowflakes embroidered with silver threads look very elegant.
A beautiful pattern on snowflakes is obtained from a combination of glass beads and ordinary round beads
Using a pear-shaped blank, you can easily make several snowmen from matte felt, stuffed with cotton wool or padding polyester. To decorate such figures, pins, thick threads or buttons are used.
Additionally, such snowmen are often decorated with a hat or put on a sleeveless felt vest.
Separately, it is worth noting New Year's toys in the form of various animals. Such crafts are especially interesting for young children to make. For them, it is better to choose a simpler pattern, however, with joint efforts you can make more complex felt figures with your own hands. In this case, parents should not do all the work, but rather guide and help.
The laconic form of such toys is well suited for children's creativity.
A small set of Christmas tree decorations from different forest animals is perfect for decorating a New Year's tree in a house where there are small children.
You can even remove such toys from the Christmas tree and let your child play with them - they are soft and do not break.
Using the same base, you can make many small birds. Each figurine is decorated with smaller pieces of felt on top, thus creating wings, eyes and a beak.
By experimenting with flowers, you can make a whole collection of different types of birds with your own hands.
Despite their apparent simplicity, felt Christmas tree balls may seem too complicated for a beginner. It is advisable to make your first toys based on master classes and only after that try to improvise.
Advice! A simplified version of New Year's balls for the Christmas tree are flat figures on which you can place a small applique.
It will be difficult for a small child to make such a ball with his own hands, but he can cut out the main parts
Several elegant houses and Christmas trees can be connected with a dense thread into a garland
Simple toys usually have a two-tone color scheme. A combination of white with red, blue or green looks good.
A whole themed set of toys made with your own hands will become a stylish decoration for your Christmas tree.
In addition to individual Christmas tree decorations, you can make a whole garland with your own hands to decorate a New Year’s tree. Most often, strips of felt are cut for these purposes, after which they are connected into rings and made into a multi-colored chain, however, there are more interesting options. For example, a garland consisting of flat stars of different colors looks very elegant. It is made entirely of matte or glitter material, but an interesting combination can also be achieved by alternating regular and shiny figures.
Advice! Additionally, you can apply thermal appliqués, beads, seed beads or embroidery to the decoration, however, even without this, the garland looks excellent.
For garlands made of flat parts, it is better to choose stiffer felt, so the decoration will retain its attractive appearance longer
Toy houses can be decorated with small details of a different color or large beads. As a rule, the size of the product allows this.
For a white or silver tree, you can make your own toys in blue and blue shades
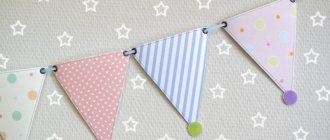
Felt Christmas garland
Garlands made from felt toys look very bright and festive. They are great for decorating any room, and the color palette of the material allows you to make various options for garlands. A design made from felt boots that even a child can make looks great. Carefully study the master class with step-by-step photos and try to make garlands to decorate your home yourself.
Tools and materials:
- scissors;
- white wool thread;
- felt;
- pencil;
- pattern.
Manufacturing technology:
- Place the pattern on felt and trace it with a pencil. We cut out the first felt boot along the lines, carefully align the edges and smooth out the sharp corners.
- We cut out six more blanks of the same size and lay them out on the table. A glue gun or superglue is suitable for connecting the elements.
- For better fixation, we use two layers of glue, first apply the first layer, let it dry, then apply the second layer.
- We distribute the blanks evenly along the thread, forming a garland vertically.
For the garland you can use various figures, snowflakes or the image of the patron saint of the year. The elements can be made voluminous, decorated with sparkles, and the thread itself can be supplemented with a light garland.
When working with felt, do not forget to stitch all the elements well, use sharp needles and carefully select glue. To make the toys bright and original, use various decorative elements. In craft stores you can find multi-colored ribbons, metal threads, stones, beads and all kinds of appliqués.
Felt star
There is still a lot of time until the New Year 2021. Therefore, needlewomen can think about what New Year's toys from felt to make with their own hands. Master classes with patterns will be understandable even for a beginner; with their help, you will be able to create a beautiful product. As an option, you can make a star - the toy looks interesting and unusual. It is unlikely that you will be able to find a similar souvenir in a store.
Materials:
- filler;
- glue gun;
- scissors;
- needles;
- pins;
- sequins;
- pattern;
- silver cord;
- beads;
- felt;
- threads;
- felt-tip pen.
Step-by-step description of the process:
- Draw a star on paper and cut it out. We bend the felt and transfer the pattern to the fabric.
- We fasten the material with pins and carefully cut out the parts.
- We sew the blanks. We don’t stitch one side; we’ll fill the toy through it.
- We cut off the excess fabric.
- We turn the workpiece inside out and fill it with filler. You can watch the video to see how to do this correctly.
- We make a loop from a dense thread. We sew up the hole, for this we use a hidden seam.
- We decorate the star along the contour with a silver cord.
- We decorate the toy. To do this, we pass the thread through the center of the product and lead it to the top. At the same time, we string beads onto the thread.
- We complement the composition with sequins. Glue a flower in the middle.
The star is ready. The craft will be a good holiday gift and will fit into the New Year's decor. The interior will acquire a zest, and decorations will help lift your spirits.