Vadim
1297 0 0
Vadim November 10, 2018
Some consider old upholstered furniture to be a burden that needs to be thrown away, while others send it into exile. But there is a more rational option - do it yourself. Next, we will conduct a step-by-step analysis of the main stages of chair restoration, starting with the selection of materials and ending with putting the product into operation.
The decor of the updated chair can be matched to any style of the room.
Types of chairs
There are many different types of chairs, varying in level of comfort, cost, and methods of placement in space. The design is an “improved chair”, which has a soft back and seat covered with textiles, leather, faux leather, fur, and in some cases, armrests, a footrest, and a rocking mechanism.
The main classification looks like this:
- by purpose - for relaxation (interior), for work (office);
- according to design features - with a rigid frame, without a frame;
- at the place of installation - in the living room, in the garden or on the veranda, office (computer), gaming (game) rooms.
The design of the item itself is also different, there are:
- ordinary - installed on four legs, have a soft back, armrests, coffee stands, poufs, and other details that provide maximum comfort;
- chair-beds - designed for cramped rooms, significantly saving space. It is not recommended to constantly sleep on such furniture, but it is possible to place an unexpected guest who is staying overnight on it, and also to use it in a summer cottage;
- rocking chairs - made classic (on ski runners), with a pendulum mechanism (have a fixed base), spring (rattan papsan rocking chairs), as well as “Viennese chairs” (runners are connected in a closed circle);
- advertisers are especially comfortable, expensive models that can be fully reclined and have a footrest. Transformable manually or electrically. A ventilation system, mini-bar, vibration massage, etc. are sometimes built in here;
- hanging - it can be a hammock, an “egg”, a ball, a “cocoon”. Hanging is done on the ceiling, wall, stand, beam.
Frame models are made of natural wood, metal, plywood, chipboard, and plastic. Usually several materials are used at the same time. Frameless options are pillow bags filled with foam balls and synthetic fluff. There are also convertible, lightweight inflatable items.
Features of do-it-yourself banners
Anyone who decides to remake an old chair into a more modern one is completely free to choose materials and the style of the future design. Before starting work, you should decide in which room the product will be placed and who will use it. For the nursery, “cheerful” colors are selected, but non-staining, natural fabrics. The kitchen uses materials that do not absorb liquids and odors. It is important that the updated item fits optimally into the existing interior. Depending on the design of the upholstered furniture and the accuracy of the craftsman, its repair will take from a couple of hours to several days.
Renewing ancient, rare items of historical value should be done very carefully; sometimes it is even worth entrusting such a task to specialists.
Advantages of upholstering a chair with your own hands
New life for an old but beloved chair with your own hands
Making something with your own hands is a fascinating process that allows you to unleash your creative potential. It is not for nothing that in the age of factory production, handmade products are valued higher than their factory counterparts. Such a thing will definitely attract the attention of guests and will decorate your interior.
An old chair with torn upholstery can be turned into a chic, exclusive piece of furniture.
Having decided to reupholster an old chair yourself, you are free to choose finishing materials, and you can also save on buying a new chair. Any design, texture, the only limitation is your fantasy and imagination. And things made with your own hands are much nicer and closer than those bought in a store.
Advantages and disadvantages
Hand-made reupholstery of home and office furniture has many advantages:
- significant budget savings - it’s easier to buy a couple of meters of textiles and a piece of foam rubber than a whole new chair;
- creative process - independently remaking even the simplest, nondescript chair will help you feel like a real master;
- the possibility of updating the interior - a freshly redesigned chair will be designed exactly as its owner intended;
- A quality restored product will last for many years.
There are also several negative points:
- the product will be very different from the store one - this matters if you want to create a specific model, but the skills are not yet enough;
- the labor-intensive process - if the chair is badly damaged, not only the fabric is replaced, but also the “filling” - foam rubber, springs, while completely disassembling it;
- For work you will need some tools that are not available in every home;
- You will need to organize a workspace, which will then have to be thoroughly cleaned, since the restoration process is quite dusty.
Fabric selection
The modern variety of fabrics and non-woven materials will allow you to choose the best option for decorating almost any design. Experts divide all textiles into nine types - from zero to eight, where the zero group includes the thinnest, cheapest, and quickly wiped, and the eighth group includes the most expensive, durable, wear-resistant. They are made from natural, artificial, and mixed fibers, differing in the way the fabric is woven. Non-woven materials are also used for upholstery.
The ideal upholstery material should be:
- wear-resistant;
- durable;
- durable;
- colorfast;
- hydrophobic;
- smooth;
- soft.
The most popular options:
- tapestry;
- flock;
- chenille;
- jacquard;
- scotchguard;
- thermojacquard;
- velours;
- matting;
- boucle;
- leatherette;
- microfiber;
- leather.
Some natural fabrics exhibit significant (more than 10%) shrinkage, which must always be taken into account.
Selection of materials
It is important to take into account the density of the fabric; it should hold its shape well. And easy to clean. The most commonly used are tapestry, flock, chenille, and jacquard. They are quite strong compared to other fabrics. The list of materials also includes leather and leatherette.
It is important to take correct measurements before purchasing. Don't forget to take into account the width of the hem and the height of the filler, this is approximately plus 15-20 cm to the original length of the fabric.
The color of the upholstery plays a big role. It should fit harmoniously into the interior. Dark colors are considered more practical, while light upholstery is more demanding to maintain. You can combine different materials in color and texture.
How to take measurements correctly and calculate the amount of fabric
The easiest way to find out how much textile and foam rubber you will need for upholstery is to disassemble the item itself, remove the covering from it, and trace it on a new piece of fabric. The disadvantage of this method is that during use the fabric could stretch greatly. They measure more accurately this way: take measurements directly from the chair itself, using a tape measure. Here the width, length, height of the soft part are taken into account, and 10-15% is added to the results obtained for allowances. For a standard “home” chair you will need a piece of fabric measuring approximately 350 by 140 cm, for an office chair – 170 by 140 cm.
If you plan to decorate the armchair with a valance or voluminous pleated elements, 40-70% more material will be required. When a large pattern is applied to the textile, which will have to be combined here and there, it is also taken with a reserve.
Necessary tools and materials for restoration work
To successfully repair a chair you will need:
- furniture stapler with a set of staples - for fastening fabric;
- foam rubber, batting - as padding;
- pry bar - for removing old staples;
- screwdriver, pliers - for disassembling the product;
- hammer, adjustable wrench - to assemble the structure;
- sewing machine;
- pins;
- fabric chalk;
- sharp scissors;
- stain, varnish;
- sandpaper or sander - to clean wooden parts from old varnish.
Step-by-step instruction
Work should be carried out strictly in a certain sequence in order to correctly assemble the chair after restoration.
- Unfasten the fabric from the bottom of the chair. We don’t throw away the removed fabric, but use it to make a pattern from new fabric. We remove the old foam upholstery by carefully unbending the staples. Using sheets of removed old foam rubber, we cut out blanks for new upholstery.
- Pattern of new elements from fabric, applying old ones.
IMPORTANT! When cutting out new elements, you should allow allowances of a couple of centimeters, because you cannot immediately predict how the fabric will lie.
- We fix the foam blanks on a suitable wooden surface. The resulting protrusions should be removed by simply cutting off the excess foam. We lay a padding polyester layer on top of the foam rubber. We fasten both materials using a furniture stapler to the chair frame.
- Fastening the fabric, the last stage in the restoration of your favorite chair. It starts with leveling and then checking the tension of the web. An important point is the correct location of the cut pieces. To avoid distortions when fixing, you should start from the middle of the workpieces, and then tighten and fasten each corner sequentially.
Covering a wooden surface with fabric is used for old furniture that did not have a fabric covering and is very similar to upholstery, only without replacing the foam rubber.
Therefore, the process is carried out in the same sequence. You just need to take the correct measurements for the patterns.
Step-by-step instructions for reupholstering a chair with your own hands
Reupholstery of upholstered furniture begins with complete disassembly of the product and inspection of existing damage. Afterwards, the soft filler and fabric are measured, cut, and secured. The structure is assembled and decorated at your own discretion. Before starting work, it is recommended to read the instructions on how to disassemble and upholster the chair step by step.
Disassembly
Most old chairs are made of wood or from materials such as chipboard, and the fastenings are made on a tongue-and-groove basis, using steel corners, self-tapping screws, and wood glue. To disassemble the product, place it on its back, unscrew the legs and armrests. Next, disassemble the bottom, removing staples and other fasteners from it. Then the upholstery is removed as carefully as possible, which needs to be detached without damaging it, since it will be needed to cut out a new cover.
When disassembling, it is important to remember where everything was attached, otherwise there will be difficulties with assembly.
Assessment, damage correction
When the product is completely disassembled, all parts are disconnected, the fabric is removed, a thorough examination is carried out for cracks, chips, and joint defects. If such are found, they are dealt with first - broken parts are replaced with similar, homemade ones, loose connections are replaced. You also need to evaluate the condition of the padding - when the soft surface has serious unevenness, the material is torn or crumbles, it is removed, and a new one is nailed into the vacant space with staples. To make the edges look aesthetically pleasing, the corners of the foam rubber are cut off and something like a chamfer is made along the edge.
Cutting and attaching new fabric
The chair must be covered with properly cut material. Its quantity is calculated based on the perimeter of the back, seat, height of the filler, a few centimeters of hem on the back side of the structure. After measuring the product, a piece of fabric of the required size is selected. The standard fabric width is 140-150 cm, the length depends on the size of the chair, the height of the backrest, and the number of parts. If the structure is folding, a small allowance for unfolding is also necessary.
The standard set of elements is something like this:
- the front part of the backrest and seat are sometimes made in the form of a single piece;
- back surface of the back;
- armrests – internal, external parts;
- a narrow strip along the bottom;
- Some designs require the presence of side parts for armrests and backrest.
All fabric parts are pinned together, tried on a chair, and if necessary, the patterns are slightly adjusted. Next, the elements are sewn down on a sewing machine, the finished cover is put on the chair, pulled tightly, and secured with staples in inconspicuous places. If the work is done manually, use a “sail” or “denim” seam. If you have an overlocker, all seams are sewn over it - this will make the upholstery denser and prevent the joints from unraveling.
If fabric with pile is used, its direction on different parts of the structure must be monitored, since the multidirectionality is too visible in the light.
Assembly, decor of the updated product
The most difficult thing to assemble is a folding chair, since you will have to carefully fasten the moving mechanisms without losing the bolts or putting the part upside down. If the mechanism creaks or jams, lubricate it with machine oil. At the same stage, wooden parts are processed - they are sanded, tinted with stain, and varnished. The legs and wooden armrests are screwed in at the very end.
Pillows are most often used as decoration. They are sewn from the same fabric as the upholstery, made contrasting, decorated with embroidery and appliqué. If a product has many wooden parts, they are hand-painted and patinated.
Do-it-yourself chair reupholstery
Let's take a step-by-step look at the process of reupholstering a chair
Replacing foam rubber
The next stage of do-it-yourself chair restoration will be replacing the foam rubber. List of brands used in furniture production:
| Album | Brands of foam rubber-1 |
| Album | Brands of foam rubber-1 |
| Album | Brands of foam rubber-1 |
| Album | Brands of foam rubber-2 |
| Album | Brands of foam rubber-2 |
- ST – standard type,
- EL – has a medium degree of hardness,
- HS – soft type,
- HL – super hard,
- HR – low degree of rigidity, most often used in the manufacture of upholstered furniture.
In our case, HR is the best option.
It is best to cut foam rubber with a knife with a long blade sharpened on an abrasive stone. We cut in several stages.
Replacing passes (belts)
After we have decided on the foam rubber, we check the passes. They can be made of rubber or thick canvas fabric.
They are fixed to a wooden frame with nails, and in rare cases they are punched through with staples.
We remove the old belts, measure their length and, with a little tension, replace them with new ones. The edges of the belt must be folded (folded at least in two). In this position they will last a long time and will not stretch under heavy weight.
The straps are tight, now you need to secure the foam. We coat the passes with foam glue and carefully adjust the seat first, and then the back.
After we have the frame ready, we proceed to choosing the fabric.
Chair upholstery with fabric
Today, the textile industry offers a wide range of fabrics for repairing and upholstering chairs.
Fabric for upholstery:
You need to remember one simple truth: if the fabric has a pattern or abstraction, you need to make sure that the image does not move during the pattern.
We cut out the front and back parts of the backrest from the first meter of fabric, and the seat from the remainder.
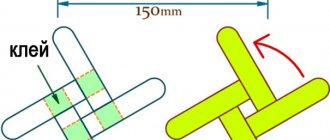
Having made the cut, we need to check whether we have maintained the dimensions correctly by covering the seat with a cut piece of fabric. Having set the angles correctly as shown in the figure, we begin to “shoot” our cover to the frame of the chair.
We fix the rest of the fabric with staples, and make sure to pull it towards ourselves.
The corners can be sewn by machine or, if not essential, by hand, using a fine seam.
At the moment of fixing the cover to the frame, we punch the staples at intervals of 3-4 cm. If these are nails with a wide head, then the distance should be slightly less.
Once we have changed the seat upholstery, we do the same with the backrest.
You should always remember that restoring a chair with your own hands always requires consistency in work, as well as attention.
When removing each of the parts, you need to remember where and how it stood. Some craftsmen use a camera for such purposes.
The nuances of restoring chairs with a spring mechanism
When upholstered furniture contains spring blocks, they can also “fail” over time. The springs are straightened with pliers, and the felt lining under them is changed if the latter is severely damaged. Sometimes it is necessary to tie and shrink the block itself - for this they use jute twine and belts. If there is a lot of damage, the spring structure is removed completely, replaced with several layers of foam rubber or a more modern design, where each spring is in a separate durable case.
Office computer chair reupholstery
In order to save the budget spent on updating the office environment, computer chairs are also restored by hand. If the frame is completely intact, only re-upholstery is required, which gives the structure an aesthetic appearance. Since the chair is used many hours a day, the most wear-resistant, durable fabrics, as well as genuine leather, are selected for upholstery. Leatherette and thin textiles will become unusable in a matter of months.
Measurements are taken separately from the back and seat, taking into account their thickness, allowances for turning and seams. If the filler is “leaky”, additional foam rubber is purchased. The product is disassembled using a screwdriver, the seat, back, and armrests are disconnected. In the process, it is important not to lose all the screws - it is better to put them in a box. Next, the upholstery is separated, and new foam rubber is attached in its place with construction staples. Afterwards the fabric is stretched - it is important that folds do not form on the surface. Now the chair is going back together.
Video: DIY furniture repair. Restoration of chairs.
If the old chair has already lost its original appearance, but you don’t want to throw it away, you can try to reupholster it. This procedure is not particularly complicated, and therefore can be successfully performed independently at home.
How to sew chair covers
To prevent the furniture upholstery from being wiped out or damaged by children and pets, a cover is sewn on it. It is advisable that within the same room all objects are decorated with the same material - this way the decor will not be disjointed. Fabrics used are cotton, velor, as well as flock, chenille, and microfiber.
Design solutions for capes are very different - they are country and loft, Provence and shabby chic, high-tech and baroque. Usually the cover completely covers the product, reaching the floor. Parts List:
- back – front, back, side;
- seat – upper, front part;
- armrests – two side, two end parts.
The patterns are traced on the fabric with allowances for a loose fit and seams, one or two cm. The parts are sewn on the wrong side, the cover is turned inside out and tried on. If the model provides for it, a valance skirt is sewn to the bottom. The latter is made multi-layered, lace, contrasting (the color matches the sides of the back and armrests), it will require a lot of fabric.
The cover is usually made from one or two shades of textile; it is not recommended to use more than three colors.