Installing a water tank in a bathhouse opens up a number of conveniences and advantages for the owner. Firstly, it becomes possible to prepare hot water while firing the furnace, which allows you to save energy resources and use them as efficiently as possible. Secondly, the use of such a unit in most cases makes it possible to refuse to install an electric water heater, which also benefits the budget allocated for the arrangement of the bathhouse.
How to make a stainless steel water tank for a bath
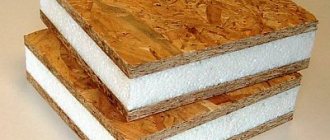
There are several basic requirements for water tanks: they must be spacious, durable, warm up in the shortest possible time and retain heat for as long as the needs of steam room visitors dictate. Among the options available to the average user, products made of stainless steel best meet the listed criteria.
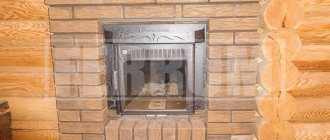
Stove with a tank on a pipe
Sauna stove Varvara classic with a hanging water tank
Next, you are invited to familiarize yourself with the key features of water tanks made of stainless steel, as well as study the manuals for self-assembly and installation of such structures.
Diagram - example of installing a remote water tank
Why stainless steel: key advantages of the material
The modern market offers a wide range of water tanks made of cast iron, stainless steel and enameled material. As practice shows, stainless steel is the most popular among bathhouse owners, which is due to the competent and acceptable ratio of operational and technical characteristics and cost indicators.
Stainless steel is characterized by excellent thermal conductivity, withstands temperature changes and objectively lasts longer than various ferrous metals.
Examples of stainless steel tanks
Stainless Steel Oven Mounting Tank
Stainless steel tank
Stainless steel containers
A logical question arises here: which of the existing brands of stainless steel is better suited for the manufacture of the container in question, intended for use in a bathhouse? Firstly, this is brand 08Х17 (430), secondly, 8-12Х18Н10 (304). The mentioned materials, among other things, are used for the production of tableware and are characterized by high resistance to high temperatures, are completely hygienic, do not rust or deform during use. In addition, such materials are unpretentious and extremely easy to maintain.
Composition and mechanical properties of different grades of stainless steel
To summarize the above, we can highlight 3 main advantages of water tanks made of stainless steel:
- the products do not require additional protection from high air humidity and can easily withstand operation in conditions typical for a steam room;
- Stainless steel has high thermal conductivity, which makes it possible to obtain hot water in the shortest possible time;
- Stainless steel tanks do not deform due to sudden temperature changes, or these deformations are insignificant.
Prices for stainless steel sheets
stainless steel sheets
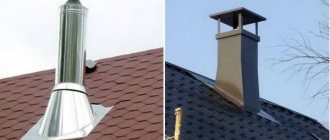
Chimney
Also on the drawing of the sauna stove it is necessary to indicate the place where the chimney will pass through the roof. This place must be carefully insulated, since the air passing through the pipe is very hot.
Chimney for a bath
To isolate the chimney from the roof, it is better to purchase ready-made solutions that are sold in specialized bathhouse stores.
Thus, making a sauna stove according to the drawings yourself is not so difficult. In addition, stores sell many ready-made solutions (grills, doors, tanks, pipes, chimneys, chimney insulation), using which it will be even easier to build a stove.
How to make a sauna stove with your own hands from metal video:
Design options for water tanks for baths
Water tanks designed for use in a bathhouse can have different designs. There are 3 main options: a built-in tank, a remote container and a unit installed on a pipe. You can see the features of each type of design in the following table.
Table. Stainless steel water tank designs
| Construction type | Description |
Built-in water tank | Installation of representatives of this category is carried out during the construction of a sauna stove, as a result of which the stove and tank become a single structure. Heating of water in a built-in stainless steel tank is carried out by the forces of fire, due to which the efficiency of the water tank itself is kept at a fairly impressive level. The key disadvantage of this design is the fact that a significant part of the heat is spent on heating the water in the tank, as a result of which the heat transfer directly from the sauna stove noticeably drops. Helpful note! Much easier to manufacture and use is a mounted/mounted tank installed on top of the heater. |
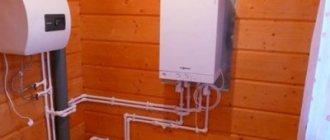
Remote water tank | A more convenient and practical option compared to the previous model, especially if the tank is designed and installed for permanent use. If desired, a ready-made stainless steel water tank can be installed in the washing room of the bathhouse, connecting it with a pipe system to a furnace heat exchanger. The optimal material for making pipes is copper or brass. The only significant drawback of an external water tank is the likelihood of getting burned in case of careless handling - this situation is especially important if children go to the bathhouse. |
Pipe water tank | A pipe water tank can be installed either directly above a sauna stove or in the attic space. In such designs, water is heated in the shortest possible time. At the same time, the heat transfer rates of the furnace unit do not decrease. The undoubted advantage of installing a water tank in the attic is the ability to “unload” the steam room by eliminating the container from its surroundings and providing more free space. |
The table does not include another possible option for installing the tank - on the side of the stove.
Stove with side tank
Stove with a side tank - photo
This method has been neglected for the simple reason that it is the worst. The water in such a tank will boil very quickly. If the steaming process drags on, the constantly boiling water will make the atmosphere in the steam room simply unbearable. Yes, and servicing such a tank is a complete inconvenience: in order to save space, the container is made high, but very narrow.
Built-in
Built-in tank
This is a kind of budget option. It is placed above the firebox, from which the water is heated. Water is drawn from such a tank directly or the tap can be removed from it in advance. This tank is easy to install - it is installed when laying the furnace.
Now all that remains is to choose the metal from which the tank will be made. The main materials used to make tanks are cast iron, stainless steel, enameled metal and steel. The choice of material also plays an important role in the design of tanks.
Recommendations for choosing the volume of the water tank
Having understood the features of stainless steel water tanks and choosing the most appropriate design option, all that remains is to determine the optimal volume of the container, after which you can proceed directly to the stage of its manufacture.
When choosing the required volume of a stainless steel water tank, you must, first of all, focus on the planned number of visitors who will simultaneously go to the bathhouse. For example, if the steam room, due to its physical dimensions, is not capable of accommodating more than 2-3 people, you can safely install a tank of 50-80 liters, at the rate of 25-30 liters of water for each bathhouse attendant.
Tanks come in different sizes - choose the one that suits you
Using the above recommendation, you can calculate the required volume of the water tank, taking into account the traffic of the bathhouse being equipped. For greater convenience, it is recommended to add at least 10-20 liters on top of the calculated value - each person’s needs and ideas about comfortable washing are different.
One of the possible water tank connection schemes
Step-by-step instructions for building a water storage tank
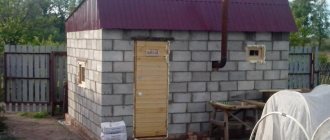
How are storage tanks used?
If your site has serious problems with regular water supply, it will be very difficult to do without a water storage tank. Both tap and rain water can be stored in such containers. Water supplies can be useful for organizing a summer shower, as well as in case of a possible fire. In addition, water from the reservoir is used for irrigation and for “bath needs”.
There are several common types of storage tank designs, most often they are rectangular or round.
In order to determine the optimal tank size in your case, you need to clearly understand the possible water needs of the site over a certain period of time. So, if you rarely use the container, there is a high probability that various harmful organisms will multiply inside it. This probability may be several times greater if the tank is not protected from sunlight. So, deciding in advance on the optimal tank volume is really very important.
Another important point: if we are dealing with a tank made of ferrous metal, then we cannot do without painting and priming, otherwise the structure will inevitably and quickly rust.
Making a stainless steel water tank with your own hands
Most factory models of water tanks are made of stainless steel 1 mm thick. For self-production, it is recommended to use thicker sheets - about 1.2-1.8 mm (the specific indicator is selected in accordance with the volume of the container). The costs of manufacturing the structure in this case will be higher, but for many years you will not have to think about the need for repairs, painting, coating with various special compounds and other similar maintenance of the tank.
As an example, you can use the following drawing - this is the easiest for self-assembly and one of the most popular design options.
Drawing of a simple water tank
You can change the dimensions proportionally in accordance with the required volume of the container. The volume is calculated using the standard formula, i.e. indicators of the length, width and height of the product are sequentially multiplied. For example, the volume of the container presented as an example will be about 25 liters.
Helpful advice! An even simpler version of a water tank is a product made from a piece of seamless stainless pipe. By choosing this solution, you get a number of advantages. Firstly, you won’t have to waste time and effort on cutting sheet metal, calculating allowances, reserves and other issues, i.e. the likelihood of errors is reduced to a minimum. Secondly, making a water tank from a pipe requires the use of welding in a minimal amount.
Stainless steel pipes with a diameter of up to 1020 mm and even more are available for sale, which allows you to purchase a product for making a container of the required volume without any problems. To determine the volume of the cylinder (namely, this is the final shape the storage tank will have), use the following formula.
Formula for determining the volume of a cylindrical tank
Helpful note! If you wish, no one will forbid you to make a tank from a profiled stainless pipe, and then the container will have a rectangular shape.
The further procedure for making a water tank yourself will be discussed using the example of using a piece of pipe as a workpiece.
Pipe - blank
Important! If you plan to install a pipe water tank, it is better to use a shorter but wider blank for its manufacture so that the smoke exhaust pipe can be passed through the internal cavity of the tank. It will look something like this.
Pipe mounted tanks
Samovar type tank
The procedure for making a water tank from a pipe is presented in the following table.
Table. Making a water tank for a bath
| Work stage | Description |
Cutting a piece of pipe | Previously, a formula was given to calculate the volume of a cylinder. With its help we find the required height of the water tank. For example, we want to get a tank with a volume of 30 liters and use a pipe with a diameter of 1020 mm to make it. Using simple arithmetic manipulations at the 5th grade level, we transform the formula into the following form: H = 30 / (3.14 * 0.512) = 37 cm - this is exactly the length that a pipe section should have to obtain a water tank of the specified volume. To cut a piece of pipe, we use a grinder. For working with stainless steel, discs with a thickness of 1 mm and a diameter of 11.5 or 12.5 cm are suitable. |
We process the cut areas | In order for the finished water tank to look beautiful, you need to properly treat the cut areas. In the future, similar actions will be performed when boring holes for connecting pipes with taps. The most convenient tool that allows you to quickly and efficiently solve the problems mentioned above is a hand drill. Such devices are equipped with a wide variety of abrasive attachments, which allow achieving maximum quality of processing of a particular material. In the absence of a hand drill, the seams will have to be tidied up using improvised means: a file, sandpaper, etc., which is definitely a more time-consuming and labor-intensive undertaking. |
Making the bottom and lid of the tank | At this stage we will need a sheet of stainless steel. It is recommended to make the lid and especially the bottom from a material that has a more impressive thickness compared to the walls of the pipe chosen for the manufacture of the body. The work is carried out in several stages: - a circle is drawn on a stainless steel sheet along the diameter of the holes that it will cover. You can simply place the pipe on a sheet of metal and draw a circle, tracing the contour of the product; - 2 blanks are cut out in accordance with the markings. For cutting and subsequent grinding of the edges, you can use the previously mentioned grinder and hand drill. If a pipe-based method of installing a water tank is intended, at the same stage, holes can be prepared in the bottom and lid according to the diameter of the chimney pipe (preferably 1 mm larger so that the chimney can pass through them; in the future, the gap will be leveled by welding). Also at this stage, you can prepare holes for further connection of pipes with taps, if they are mounted in the bottom (relevant for remote structures installed away from the furnace; in the case of over-fire/built-in and pipe-mounted tanks, it is more advisable to embed the pipes into the wall of the tank body). The nuances of drilling and welding stainless steel will be discussed in more detail in the relevant sections of the instructions. |
We connect the bottom and lid to the tank body | The photo shows a profiled pipe, but the welding process for this case and working with a round workpiece remains the same. Products made from the material in question can be connected in different ways: - by soldering using lead-free or high-temperature solders; — manual or automatic welding (in the case of stainless steel, work is carried out exclusively in a protective gas environment). The most preferable is the second option, the easiest to learn - manual arc welding. Argon is used as a shielding gas. Welding is carried out using a non-consumable electrode for working with stainless steel. In the international classification, devices intended for such welding are marked with the abbreviation TIG. When buying or renting a welding machine, do not forget to purchase/rent an argon cylinder and a reducer. The function of the latter is to reduce the pressure of the shielding gas at the outlet. The seams should be as neat and uniform as possible. It is recommended to clean them after completion. Recommendations regarding a suitable tool for this purpose have been provided previously. Helpful advice! If desired, the tank cover can not be welded, but attached using bolts and lugs, or simply made removable. This option is relevant for cases when water will be added manually by the user, and not supplied through the water supply. The container is ready. We begin to prepare the holes for further insertion of pipes. |
Preparing the holes | The structures under consideration are equipped with two pipes with taps. Cold water is traditionally supplied to the container through the upper pipe, and the heated liquid goes to the consumer through the lower pipe. The diameters of the plumbing pipes correspond to the diameters of the water pipes used in conjunction with them. The most commonly used pipes are ½ or 1 inch in diameter. An ordinary electric drill is suitable for drilling stainless steel. The main thing is that the work is performed at low speeds - no more than 100 rpm. In a drill with an electronic regulator, setting the required mode is not a problem. If there is no such regulator, you simply need to activate the start button with short presses - within a second the tool will not have time to accelerate to operating power. The holes are best made with a P18 drill. An even more convenient option is a special step drill (shown in the image). This tool does not lift up the edges of the hole, so it gets a perfectly round shape. Along with this, for drilling holes with a diameter of more than 14 mm, it is more convenient to use special attachments - the so-called. "crowns". |
Drilling bits | The presented diameters of such crowns correspond to both inch and metric gradations of plumbing pipes. Using appropriate drill bits, you can also prepare holes in the bottom and lid of the tank if it is intended to be installed in pipes. |
| Installation of pipes with taps | Branch pipes with taps to shut off the flow of water are available for sale. In combination with a stainless steel tank, it is preferable to use components made of the same material. In order not to waste extra time on arranging the threads, the pipes are simply welded to the previously prepared holes. Recommendations regarding tools and welding modes remain the same. After installing the water tank in accordance with the selected scheme (will be discussed later), water pipes (previously noted that it is best to use products made of copper or brass) of a suitable diameter are connected to the nozzles. The connection of the pipe to the pipe is made in any suitable way, for example, using a threaded adapter. |
So, the water tank is ready, and even the pipes for inserting pipes have already been installed. All that remains is to connect the finished device for its subsequent intended use.
The procedure for connecting a stainless steel water tank
Important notes before you begin
It was previously noted that the most common options for mounting the tank are: inside the stove, away from it and on the chimney pipe. We propose to replace the first option with a method in which the tank is installed above the stove. This method is easier to implement, and you can resort to its use even if the stove has already been built - suddenly you first thought that you would not need such a heater, but after studying the material presented, you understood all the advantages of using it and wanted to install it in your bathhouse .
Important! The mentioned replacement will be possible only in the case of a collapsible chimney. The proposed method involves the combined installation of a tank - it will be simultaneously placed above the stones and around the chimney pipe, which will make the efficiency of heating water as high as possible. Otherwise, you will either have to give preference to the built-in tank model (if the stove is just being built), or install the unit at a distance from the stove.
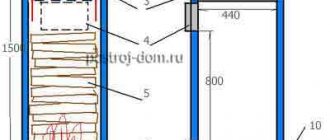
If the stove is brick, preparing the space for the tank and its direct installation are carried out during the laying process (the specific stage depends on the chosen stove design and the size of the firebox, most often it is row 10). When laying a row, an opening is left to accommodate the tank. The size of the opening should be several millimeters larger than the dimensions of the structure being installed to compensate for thermal expansion.
The diagram shows an opening for installing a tank
Note! In the spaces between the marked quarters of the brick, pipes are laid, the presence of which will help to increase the heating efficiency - these are the design features of this particular furnace unit; these pipes may not be present in the project you have chosen.
The stove with the tank installed looks like this.
Oven with installed tank
A plumbing tap is embedded into the wall of the tank from below. It is assumed that the user will draw hot water directly from the steam room. If desired, the design can be improved by cutting in the previously mentioned pipe instead of a faucet, connecting a water pipe to it and leading it to the washing room.
When the masonry is brought to the upper edge of the tank, 2 metal strips are laid on it, the presence of which will allow you to safely cover the storage tank with bricks.
Tank overlap diagram
Next, the tank itself is covered and subsequent laying is carried out in accordance with the specifically selected furnace design.
Covering and further construction of the furnace
In the case of metal sauna stoves, the water tank is welded above the firebox (recommendations regarding welding were given earlier). As a result, the container is heated by flame forces, which ensures the fastest possible preparation of water. The design looks something like this.
Example of a sauna stove with a water tank
Important! If preference is given to a built-in tank design, for its manufacture you should use metal with a thickness of more than 1 mm and, at the same time, ensure that the quality of the welds is as high as possible. Otherwise, the tank will either quickly burn out or leak through poor-quality seams.
Helpful advice! In the case of a brick stove, you can take a simpler route by placing a water tank on the stove body above the firebox. The design looks something like this.
Water tank above the firebox
Installing a water tank above the heater
This method, as noted, involves combining options for installing the tank above the heater and on the chimney. The distance between the heater and the bottom of the tank is usually maintained in the range of 20-35 cm, with the possibility of changing in both directions: the smaller this indicator, the faster the water will heat up, but the tank will last less, and vice versa.
It makes no sense to provide detailed step-by-step instructions - you already have all the necessary knowledge. Previously, we described how to prepare holes in the bottom and lid of the tank for passing a smoke exhaust pipe through them. Do it.
Next, you need to pass the smoke exhaust system element through the internal cavity of the tank and connect the pipe to the tank at the inlet and outlet points (in the bottom and lid) by welding. You also know how to do this.
Stainless steel water tanks are relatively lightweight (for example, cast iron is much heavier and a tank made of it would require fixing to the ceiling using chains or other suitable means) and do not require additional fastening. Further installation of the chimney is carried out according to the standard scheme, depending on the selected type of structure.
Ideally, the finished system will look like this:
Tank installation example
Rectangular tank of samovar type
In the example image, the pipes and taps are not visible. The next design is not so beautiful in appearance, but the connection of the water outlet is clearly demonstrated here.
The photo shows the tap and water supply pipe
As for the supply of cold water, it can be organized in several ways, depending on the characteristics of the specific situation:
- The tank is filled manually;
- water is supplied from a well/well;
- Water is supplied from a centralized water supply system.
We will not consider each of the listed options in detail, because... These are topics for separate lengthy instructions.
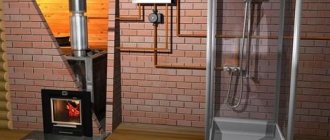
Installing a remote water tank
The setup of such a system is also not overly complicated. The only thing is that the circuit is supplemented with a new device - a heat exchanger. It can be built-in or external. For self-production, it is better to choose the second option - it is more convenient and easier to implement.
A diagram of a system with a remote water tank is shown in the following image.
Diagram of a system with a remote water tank
Here we see that the external heat exchanger is installed on the chimney pipe. The water in the heat exchanger is heated by the heat of the flue gases transferred through the walls of the pipe. If there is an open heater under the heat exchanger, additional heating will be carried out by the heat of the hot stones.
Heated in the heat exchanger, the water goes into the external tank, from there, cooling, back into the heat exchanger. Water circulation will be ensured through the created slopes and pressure differences in the container with hot and cooled liquid.
Remote tank
Remote hot water tank 60 l
You can make a heat exchanger yourself. In essence, this is the same water tank, the manufacturing instructions for which you have already studied, only of a smaller volume (usually up to 5 liters). The heat exchanger is installed in the same way as the tank in the previous instructions (on the chimney pipe).
Tube heat exchanger
Register – heat exchanger for sauna stoves
Installing a built-in heat exchanger in a sauna stove
Prices for heat exchangers
heat exchanger
You already know how to make the necessary holes, install pipes, taps and pipes. Where to do this - see the diagram. All that remains is to prepare all the required elements and assemble them into a single system, maintaining the necessary distances and slopes in accordance with the above diagram.
In this example, a remote water tank is installed in the washing room and is equipped with a standard plumbing tap for draining water. The pipes, like the mentioned tap, are embedded in the bottom of the container. Holes for laying pipes through the partition can be made using a suitable tool, for example, a hammer drill.
In accordance with the current provisions of current standards, cold and hot water supply pipelines, if they are laid through a partition, must be laid through a sleeve. The diameter of the latter is selected so as to be 0.5-1 cm larger than the outer diameter of the pipe being installed. To seal the gap between the sleeve and the pipe, fireproof soft material is used to ultimately ensure the possibility of moving the pipe along the longitudinal axis in the event of thermal expansion. This is shown schematically in the following image.
Passage of water supply through the ceiling
The gaps in the partition can be masked in any suitable way, for example, by filling with the mentioned soft fireproof material and covering it with an external finishing element (lining, etc.).
All that remains is to figure out how to mount the water tank on the wall. The simplest option is installation on metal corners, the power of which would be sufficient to support the weight of the water tank.
Fastening is carried out as follows. Having attached the corners to the wall, you place marks on the surface, drill holes according to the marks and install dowels in them. Next, screw the corners to the wall using bolts 8-10 cm long and 1-1.2 cm in diameter.
Tank mount
You can install your water tank on the corners. The method is extremely simple to implement, but not the most reliable (we made a mistake when choosing the corners - they bent - the tank fell), and it is objectively suitable only for rectangular structures of small volume. The fastening method used when installing household water heaters is more reliable. To implement it, you will have to work with the welding machine again. You already have all the necessary knowledge, so no additional explanation is required. The procedure is as follows:
- a strip of metal is cut (the same stainless steel will do) with a thickness of 1.5-2 mm, a width of 5-10 cm and a length so that it protrudes beyond the side walls of the heater by several centimeters on each side;
- holes are drilled in the strip according to the diameter of the fastening bolts (you will understand by looking at the image below);
- the finished mounting strip is welded to the rear wall of the tank.
Further actions are similar to the previous instructions, with the only difference that the water tank is not installed on the corners, but is attached to the wall through them using a welded strip. It looks like this.
Fastening the tank through the bar
The tank is installed. You can test and, if everything is normal (no leaks, excessive heating and other unfavorable phenomena), accept the structure for permanent operation.
If desired, the system can be improved almost indefinitely, equipped with a variety of automation, measuring instruments, etc. The possibility of installing additional wiring to connect the tank to the shower stall in the washing room cannot be ruled out - this will allow you to wash with maximum comfort. An example of the implementation of such an idea is presented in the following image.
Connection diagram for a remote tank and a shower cabin to a sauna stove
Helpful advice! Install the tank in such a way that it is minimally distant both from the sauna stove and from the point of hot water intake.
Having sufficiently mastered the art of welding stainless steel, if you wish, you can make a tank not from a pipe, but from sheet material - this is a more responsible job compared to the considered option. An example of its implementation is covered in detail in the attached video.
Good luck!