It’s nice to visit a well-appointed bathhouse, which not only has a well-built heater that provides light steam, but also has well-thought-out heating and water supply systems. If a heat exchanger is installed in the stove, then there will always be warm water in the washing room, and if a radiator is connected to the heat exchanger, even in the winter cold the bathhouse will be as warm and comfortable as possible.
Bath stove with water heat exchanger
Types of heat exchangers
The generally accepted classification of technical units divides all products into types, which in turn have their own subtypes. There can be a huge number of subtypes of heat exchangers; each bathhouse owner, by making minor changes to the design or manufacturing materials, can create his own personal subtypes. And according to the main design features, heat exchangers are divided into the following types:
At the location of the warm water tank
Bath tank
Wood-burning sauna stove with hanging tank
Tank with simple heat exchanger
Remote tank
Tanks can be placed in a steam room, shower room or in the attic. Each location has its advantages and disadvantages.
The first option is a tank in the steam room. Advantages - the length of water pipes is significantly reduced, and this has a great positive effect on the rate of heating of water. We will talk about these and many other features of the functioning of heat exchangers and the design requirements for their devices at the end of the article. The disadvantage is that an already small room “shrinks” even more.
Water tank in the steam room
The second option is a tank in the shower. In our opinion, the most optimal option, the disadvantage is that the length of the pipelines increases slightly.
Water tank in the shower - diagram
A common problem for the first two options is low water pressure. The fact is that the height of the bathhouse rarely exceeds two meters. If we subtract the height of the water tank from this value (approximately 50 centimeters), then the maximum height of the water intake pipe is reduced to 1.5 meters. What does it mean? This means that it is impossible to install a stationary shower; you will only have to wash with a flexible hose. And then do not raise it above 1.5 meters. Even less, more or less tolerable water pressure will only be with a height difference of at least 10 centimeters.
These problems can be solved by moving the container for warm water to the attic of the bathhouse (option three) .
Water tank in the attic
But in this case, problems arise - the length of the pipelines increases and heat losses increase; the tank must be insulated. But that’s not all – there is a problem with adding water to the container. Not every bathhouse owner wants to carry buckets up the stairs. But running water does not exist everywhere. It is impossible to give universal advice to all readers on the location of the water tank; everyone must independently navigate, taking into account their own individual characteristics of the structure, the presence of utility networks, the climatic zone of residence and the maximum number of people washing at the same time.
According to the location of the heat exchanger
There are two options for placing the heat exchanger - in the stove or near the chimney (the chimney in this case should be made of metal pipes). Both options are workable, but have their own characteristics.
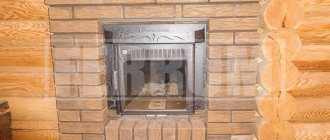
The first option, that is, an internal heat exchanger, allows you to heat the water relatively quickly, but there is a high risk of it boiling.
Heat exchanger inside a brick kiln
Internal heat exchanger in a metal furnace
In addition, there are great difficulties in carrying out periodic maintenance or replacement of heat exchangers.
Laying a furnace with a heat exchanger
There is generally a problem with replacement - you will have to disassemble the stove. As for maintenance, they can be done, but at the cost of considerable effort. The fact is that water forms scale inside the heat exchangers; one millimeter of scale reduces heat transfer by 10%, which is a significant loss. In many regions of our country, the water is solid (has a large amount of Ca ions), which is good for drinking water, but bad for all types of heat exchangers.
Heat exchanger made of stainless steel
For scale to form, it is not necessary for the water to boil throughout the entire volume. A small layer of water constantly boils near the overheated walls of the heat exchanger; the entire volume does not boil due to its continuous mixing by convective currents, but the calcium on the walls turns to stone. In some cases, after just a few years of using the sauna, the scale will reach such a thickness that this will noticeably affect the rate of its heating. The heat exchanger can only be cleaned with a concentrated solution of hydrochloric acid; commercially available special products are not very effective. Working with hydrochloric acid in violation of safety regulations has a negative impact on health.
Scale on the heat exchanger
The heat exchanger near the chimney does not have these disadvantages; the temperature of the pipe is not so high that the water near the walls of the heat exchanger boils. This advantage causes disadvantages - the heating time of water in the container increases significantly.
Heat exchanger for chimney
Sometimes there is another option for placing a heat exchanger - under the stones of the heater . You can, of course, place a heat exchanger there, but why then would there be stones in the steam room? Just look at them? The fact is that with this arrangement of the heat exchanger, the heating temperature of the stones will be insufficient for the formation of steam. And steam in a Russian bath plays a decisive role, and not only for warming up the body. Real lovers of Russian baths add an infusion of medicinal or fragrant herbs to the water for watering the stones. And if you add a little natural kvass or beer to the water (only natural, and not “churned up” from alcohol and paint), then the air in the steam room will be filled with the indescribable aroma of fresh bread. If you install a heat exchanger under the stones, you will deprive yourself of many pleasures.
Heat exchanger under stones
We have found out the general characteristics of heat exchangers and containers for warm water; now we can move on to a detailed consideration of the technology of their manufacture and installation. This topic is very large, it is worth breaking it into several parts. Let us consider separately the options for manufacturing containers, heat exchangers and methods of their installation.
Heat exchanger prices
heat exchangers
Installation and connection
How to mount the heat exchanger is shown in photo No. 1:
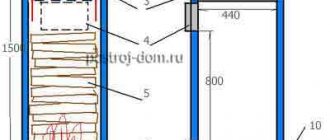
Photo No. 1 Connecting the heat exchanger
Photo No. 2 - required slopes and dimensions
Step-by-step instruction:
- Let's determine a suitable location for the remote container. It is hung on the wall, 100-300 mm above the heat exchanger.
- The tank should not be hung directly on the wall of the bathhouse. First, we attach the guides with dowels - 2-3 wooden dies. Then, already on them, we hang the tank. The gap between the wall and the container must be at least 20 mm.
- To strengthen the structure, use special brackets, securing them under the bottom of the container. When assembling the container, do not forget to provide holes through which it will be attached.
- We will need 4 pipes: one for direct supply, the second for reverse supply, the third for filling with cold water, the fourth for the consumer. Place a check valve on the third pipe, and connect the tap and shower to the fourth.
- Using fittings, connect the remaining 2 pipes (forward and return) to the heat exchanger using good copper or steel corrugated pipe. Don't forget to seal all connections.
- We install a valve on the return line to drain the liquid. It must be installed so that it is at the lowest point.
- We attach a low tank with a heat exchanger to the wall of the furnace. How to install a heat exchanger on a sauna stove is shown in photo No. 1, and the necessary slopes are also shown there (photo No. 2). It can be built-in. Work must be carried out in compliance with safety regulations.
- Using fittings, we connect the forward and return supply pipelines.
Making containers for warm water
There are several options for containers - from expensive stainless steel to cheap store-bought plastic ones. We will not consider these options; we will focus on the most successful, from our point of view, metal made from sheet iron. Its advantages are not only its relatively low cost (although this is important), but also the ability to make a tank that is ideally suited in terms of linear parameters to each room of the bathhouse. As for appearance, there is a large selection of durable paints; surfaces can be painted in any color or covered with self-adhesive decorative polyethylene film.
Simple water tank with lid
Table. Calculation of tank volume
| Stage | Description | Scheme |
| Find the volume of your tank | Multiply length (l), width (w) and height (h) | |
| Calculate filled volume (d) | For rectangular tanks, the filled volume is the same length and width, but less height. The new height is the filling height of the tank. | Tank fullness D |
Table. Making a tank
| Step, No. | Description of work |
| Step 1. Prepare materials. | You will need sheet iron with a thickness of at least 0.5 mm. We suggest making a rectangular tank, length 80 centimeters, height 40 centimeters, width 20 centimeters. The tank holds 64 liters of water, but you need to fill no more than 60 liters. You need to weld three metal pipes with threads into the tank; they are sold in stores. It is better to take the nominal diameter of the pipes at least 3/4 inch. This is the most commonly used diameter of pipelines and ensures normal natural circulation of water. To fully install the heat exchanger, you will need to have additional plumbing fixtures and fittings; we will talk about this below when considering installation issues. |
| Step 2. Mark the tank on a metal sheet. | You will need two plates 80x60 cm, two 40x20 cm and one 80x20 cm. We specially made the tank rectangular. The fact is that the distance between the inlet and outlet pipes should be increased as much as possible. This will allow warm water not to immediately mix with cold water; a significant difference in their temperatures will be achieved, which has a decisive influence on the speed of water flow in the pipelines. And not only the efficiency, but also the safety of using the heat exchanger largely depends on this criterion. |
| Step 3. Cut the blanks to size. | You need to use a grinder; when working with this tool, strictly follow the safety rules - it is very dangerous. Try to keep the cut as even as possible. Check the quality of cutting of each edge on a flat surface, eliminate large flaws. |
| Step 4. Assemble all the parts of the tank in pairs, making them absolutely identical. | Pay special attention to the corners, they should only be rectangular. |
| Step 5. Place the front part of the tank on a flat surface, and weld the side of the tank in several places with a short seam. | Do the same operation on the other side. Check their position; they will definitely move as the seam cools. |
| Step 6. Place the second large part on the welded sidewalls, check its position, and adjust the sidewalls if necessary. | Grab the elements. Make sure that the gap between the individual parts does not exceed 2–3 millimeters, otherwise during welding you will have to put wire in them, and this is undesirable. |
| Step 7. Place the structures upside down and grab the bottom. | Check and correct its position. |
| Step 8. If everything is fine, weld all the elements. | Monitor the quality of the seam; omissions are strictly excluded. You can “cheat” a little on the thickness of the weld seam; the container does not carry significant loads, but omissions are prohibited. |
| Step 9. Weld metal pipes into the bottom. | We have already said that the input and output should be removed from each other as much as possible. It is better to place the water intake pipe for the shower not in the middle, but closer to the drain; the water intake will speed up the circulation in the tank. |
| Step 10. Burn holes for the pipes. | For the pipes, you must first burn holes in the bottom of the tank; this can be done more conveniently by electric welding. |
| Step 11. Come up with a way to attach the tank to the wall. | You can weld special brackets to the back wall or install it on a stand. If you have the desire and the material, make a removable lid. |
| Step 12. Using a cylindrical grinder, clean all seams, pour water and check their tightness. | Seal holes if necessary. |
| Step 13. Prepare the front surfaces of the container for finishing. |
Video - Making a water tank (welding)
Video - Making a stainless steel tank
That's it with the water tank, you can install it in any room in the bathhouse. Now let's talk in more detail about heat exchangers.
Some design features of furnaces of this type
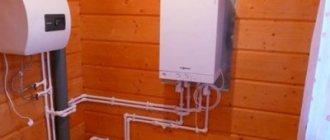
A typical wood burning stove with a water circuit consists of the following main parts:
- Directly to the oven;
- A cast iron or steel heat exchanger with a developed contact surface integrated into the combustion space;
- Heating radiators;
- Coolant flow lines, consisting of metal or plastic pipes, shut-off valves, a set of valves and splitters;
- Control and safety group equipped with temperature, pressure monitoring devices, as well as emergency valves;
- An expansion tank that compensates for the excess volume of water resulting from its heating and subsequent expansion.
- As an additional option, you should consider a circulation pump, which is a mandatory part of a system operating on the principle of forced circulation.
A metal or brick oven with a water circuit can be made according to the principle of natural or forced circulation. As a compromise option, a combined system based on the practical application of both principles should be considered.
System with natural coolant circulation
Natural or thermosiphon circulation is provided based on the principle of natural expansion of water when heated and its movement in the required direction, specified by slopes. A number of fundamental principles should be considered a prerequisite for the reliable functioning of such a system:
- The furnace heat exchanger should be located below the level of the radiators.
- The flow area of the main fittings pipes must be at least 57 mm, with the nominal calorific value of the furnace at the level of 15 - 17 kW.
- The system must be equipped with an expansion tank located at a height that ensures reliable circulation of the outgoing flow. As a rule, at least 215 cm from the level of the lower edge of the heat exchanger.
- The return flow line must be installed with strict observance of the slope level, guaranteeing free circulation of the cooled coolant along the way to the furnace heat exchanger.
The natural circulation system is absolutely energy independent, however, it requires a larger amount of coolant in the system. First of all, due to the large flow area of the highway.
Important! Most heat engineering specialists are convinced that the natural circulation system is inferior in thermal efficiency to its direct competitor, based on the principles of forced circulation.
System with forced circulation of coolant
Its operation does not require a sufficiently large cross-section of the pipeline, since the coolant is “pushed” under pressure through the operation of a vortex-type circulation pump. It is obvious that modern production also operates with other types of pumps. Reducing the volume of coolant due to a significant reduction in the cross-section of the lines leads to a significantly higher thermal efficiency of the system as a whole and fuel economy in particular.
In addition, heating radiators equipped with Mayevsky taps allow you to quickly and effectively eliminate air “locks” by creating excess pressure. The fact of active circulation also determines the presence of an expansion tank of a significantly smaller volume compared to thermosiphon systems. The most significant disadvantage of such furnaces is the fact of direct dependence on uninterrupted power supply. An attempt to combat this disadvantage should be considered the emergence of combined systems.
Combined coolant circulation system
It is a thermosyphon type system equipped with a circulation pump. An additional option is a bypass loop equipped with a rotary tap. Under normal conditions, the pump operates; in the event of a lack of power supply, the inlet pipe with the pump is closed, and circulation is ensured through a bypass loop made of a large cross-section pipe.
In essence, this is the same thermosiphon system, with all its inherent disadvantages, however, retrofitted with a pump. In this form, it is rational to see only a double-circuit stove for a bath, where the second circuit is used for hot water supply. Then a large volume of coolant can be used to meet the need for hot water.
Heat exchangers - manufacturing features
The most important elements, the comfort of washing largely depends on their correct design and effective functioning. We will consider several options for heat exchangers and express our comments; the final decision is yours. One of the main problems of all types of heat exchangers is the inability to regulate the water heating temperature. The water in the tank may not be warm enough or too hot. You have to manually dilute hot water with cold water. But that’s not all – the risks of water boiling in the heat exchanger are very high. The system will not suffer much from steam, it is an open type, but for the heat exchanger such situations will not be “in vain”. What to do if the water in the heat exchanger boils? Putting out the fire in the stove? How can you regulate the water temperature at least a little? Constantly put one log into the firebox and take half a log out of it? We will answer these questions at the end of the article.
Let's start with simple heat exchangers and end with more complex ones.
Features of the device
As mentioned above, a built-in heat exchanger is located between the convector casing and the firebox. In this case, exposure to open fire is excluded. The device with a capacity of 5 liters is capable of quickly filling a tank with a volume of up to 120 liters. The efficiency and correct operation of the device is ensured by the preliminary entry of water into the tank. After this, you can start lighting the stove. Failure to comply with the basic condition over time leads to the loss of tightness of the coolant and, as a consequence, its failure.
Heat exchangers near the chimney
The simplest, but very effective heat exchanger made of copper tube.
Copper tube heat exchanger
Depending on the diameter of the chimney, you need to purchase 1.5÷2.0 meters of copper pipe with a diameter of approximately 10 millimeters. The smaller the diameter of the tube, the larger the surface of its direct contact with the pipe, the faster the water heats up. But, on the other hand, the small diameter of the tube significantly reduces the speed of water flow, and this can cause it to boil. Taking into account both factors, we recommend taking a tube with a diameter of 10 mm.
Copper tube
Adapters should be put on the ends of the tube and flared. There are special devices for flaring.
Flaring
Flared copper pipes
Steel pipes can be connected to the ends of the tubes. Fittings are screwed to the nuts. The cone of the fitting should fit snugly against the flared end of the tube
Do the flaring carefully; the plane of the flared end must be even and smooth, otherwise there will be leaks at the junctions of the pipelines.
Prices for copper tubes
copper tubes
Video - Bending copper tubes
A more difficult to manufacture heat exchanger can be made from two metal pipes. The diameter of the first should be slightly larger than the diameter of the chimney, and the diameter of the second should be 5–10 cm larger than the first. How to make such a heat exchanger?
Step 1. Using a grinder, cut two pieces of pipe of different diameters, 20÷30 centimeters long. The ends of the pipes must lie in the same plane, be even and neat.
Example of tubes
Step 2. Cut two circles from sheet steel with the diameter of the larger pipe. In these circles, cut holes exactly in the middle with the diameter of a smaller pipe.
Cutting a circle from steel
The heat exchanger is almost ready
Step 3. Insert pipe sections into the holes and weld them. Weld carefully, do not skip a seam.
Step 4. At the top and bottom of the structure, weld metal pipes with threads at the ends; a hole needs to be made for each pipe. Check the heat exchanger for leaks.
Example of a finished heat exchanger
Heat exchanger for pipe
Heat exchanger for furnace
Connection diagram of the tank and heat exchanger
The structure is ready, you can install it on the chimney and install pipes. It is advisable to insulate both heat exchangers with mineral wool with a top coating of aluminum foil. This will greatly reduce unproductive heat losses and speed up water heating.
Conclusion
Installing a heat exchanger on a sauna stove does not require much work. To do this, just follow the instructions above. The main principle is compliance with slopes. Photo No. 1 shows one of the heat exchanger options for a bath and its installation. Otherwise, problems will arise with the pressure. When organizing water heating, you should adhere to the following rules:
- The length of the forward and return pipes should not exceed three meters.
- The remote tank is placed at such a height that the slopes are maintained. The excess must be at least 100 mm.
- Pipes for the heat exchanger of a sauna stove for heating water must be made of stainless steel or copper.
- The water in the system must not be allowed to freeze; it must be drained after each use of the steam room. A special valve is provided for this. It also serves as an emergency drain if an accident occurs.
- The power should be selected so that the device heats the required amount of water to +700C in 2 hours. The liquid in the system should not boil. Scale quickly damages the device.
- The diameter of the pipelines should not be less than 24 mm.
By following these simple rules, you will always have hot water and save money on installing an electric boiler.
Heat exchangers in the furnace
Heat exchangers in the furnace
With the help of such heat exchangers, the water will heat up much faster. Heat exchangers in a furnace can be made of tubes in the form of various geometric designs or be ordinary flat. The efficiency of flat-plate heat exchangers is lower. But they are much more durable and easier to manufacture.
Flat-plate heat exchanger
Heat exchangers must be installed simultaneously with the laying of the furnace. Taking into account the parameters of the firebox, the dimensions of the heat exchangers are selected. The pipe outlets can be either on one side of the furnace or on both. The option of cold water entering from below and exiting from above the plane of the furnace is allowed. In a word, there are a great many options both in terms of the heat exchanger material, type, geometry, linear dimensions and design features. It is impossible to give unambiguous universal advice; you must make your own decision, taking into account the characteristics of the sauna stove and the modes of use of the shower and steam room.
The heat exchanger is installed simultaneously with the furnace laying
To make a heat exchanger, choose durable, high-quality materials; welding seams must be made in accordance with the rules and characteristics of the materials. Keep in mind that in many cases it is impossible to fix a damaged heat exchanger in a furnace without disassembling it. It’s not worth explaining what it means to disassemble and reassemble a stove.
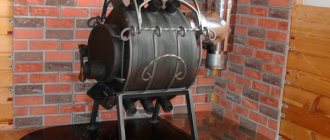
The easiest option is to purchase a factory-made metal sauna stove with a built-in heat exchanger. But such furnaces have one drawback - the low efficiency of the heat exchanger.
Furnace with heat exchanger
How to calculate the heat exchanger area
It is not uncommon for home craftsmen to undertake making such a device with their own hands. To do this, they should learn to calculate the necessary parameters related to providing the bath room with sufficient heat and the volume of hot water for washing.
When calculating the dimensions of the device, rounding is allowed. So, when installing a heating system with a power of 5 kW, you will need a device whose useful area is defined as 1 m². This example is quite approximate, since a device with similar parameters will also be provided with heat using a stove with a power of 9 kW. In this case, it is still better to calculate the size of the area, leaving some margin. During cooling of the unit, the power is significantly reduced, and the reserve allows you to maintain the temperature in the room until the next heating of the stove.
When choosing a heat exchanger, the last thing you should pay attention to is the shape of the device. There are no special requirements for this parameter, so you can safely rely on your imagination. Often, heat exchangers, like the pipe system, are made of stainless steel. This is a fairly durable and efficient material. The only negative is that some difficulties arise when performing welding work.
Some general tips
When using heat exchangers, some problems arise that can “spoil your mood.” What are these problems and how can they be solved?
Temperature of heating water in the tank
Temperature of heating water in the tank
You need to “catch” the moment when it will be acceptable, but such a “moment” is almost impossible to catch. The fact is that while taking a shower, the stove continues to burn, and accordingly, the water temperature constantly rises. What to do? Putting out the fire in the stove? This, of course, is not an option.
We suggest solving the problem using a mixer. If there is a water pipe in the bathhouse, great; it will help not only create a comfortable temperature, but also, using simple automation, make filling the water container automatic. It will be possible to wash without saving water, and the risk of it boiling in the heat exchanger will be somewhat reduced. If there is no water supply, we recommend installing an additional container for cold water next to the warm water tank. It must be connected to the shower through a mixer.
Connection diagram
Water boils in the heat exchanger
Water boils in the heat exchanger
This happens especially often during installation of the heat exchanger directly in the furnace firebox. We guarantee that you will never be able to calculate the parameters of the heat exchanger in such a way as to completely eliminate such a phenomenon. The calculations are too complex and there are too many unknown and unregulated indicators. Calculations based on the speed of water flow can only be performed by a qualified design engineer who has an excellent knowledge of the laws of heat engineering, hydraulic engineering and installation. But the most important unknown quantity is the flame in the furnace.
No one will ever be able to say exactly how much heat a stove produces in each individual unit of time. It is impossible to quickly increase or decrease the flame intensity depending on the water temperature. We propose to solve the problem of boiling water using ordinary single-phase water pumps for heating systems. They are built directly into the pipeline, the power of the devices is 100÷300 W. Installing a circulation pump not only eliminates the risk of boiling, but also significantly speeds up the water heating time.
Circulation pump connection diagram
We hope that our information will be useful for bathhouse owners and will make it possible not to solve problems with heat exchangers, but to prevent their occurrence at the stage of manufacturing and installation.
Circulation pump prices
circulation pump
Main advantages
The undoubted advantages of using a heat exchanger in the furnace design are:
- Simultaneous implementation of several functions: heating water, air in several rooms, as well as steam generation;
- Options for installing the tank at a considerable distance from the stove (even in another room);
- Durability. When using modern materials and following installation technology, the service life reaches 20 years.
- Aesthetic appearance
- Availability of care;
- Easy installation;
- High efficiency;
- Possibility of installation both in a Russian traditional bath and in a modern Finnish sauna;
- Space saving due to compact dimensions;
- High power and, as a result, fast heating to the required temperature;
- Absence (or insignificance) of deformation during heating
Types of fuel for furnaces with a water circuit
The entire range of combustion furnaces can be divided into three large groups: solid fuel, liquid and gaseous.
Solid fuel stoves
Wood-burning stoves with a water circuit continue to remain a true and timeless classic. The design, classic for a traditional bath, is complemented by a heat exchanger, mains and heating radiators. However, fuel efficiency sometimes makes one look for more innovative and technologically advanced options. These include products such as a pellet stove with a water circuit. This design is justified in places where there is no mass logging, but wood processing is sufficiently developed.
Wood processing waste is the main raw material for the production of pellets. Agriculture is also an important supplier of raw materials. Straw, corn and sunflower stalks, buckwheat husks and seeds are successfully used in the production of fuel pellets. An important advantage of this design, compared to a conventional wood-burning one, is the possibility of partial automation of the processes of storage, loading of fuel and its combustion.
If you have at your disposal a large amount of wood waste, or even just outright plant debris, then you should pay attention to long-burning stoves with a water circuit. Their operation is associated with the combustion process with a small amount of oxygen and is more reminiscent of smoldering than full combustion.
Especially from the cohort of solid fuels, it is worth mentioning coal sauna stoves, to which we have already devoted separate material.
Liquid fuel stoves
Fuel oil, boiler and heating oil are used quite rarely in the bathing industry. Basically, liquid fuel is the lot of outdated large public baths and more modern mobile bath complexes.
In private bathhouses, designs such as waste oil stoves have found particular application. Users of such units are primarily attracted by the low, and sometimes even free, cost of fuel.
Attention! In our materials, we never tire of saying that the bathhouse is a stronghold of environmental friendliness and the kingdom of natural materials. An exhaust furnace with a water circuit is very weakly associated with this. Therefore, if you are attracted by cheapness, then do not be lazy to arrange a separate room for the boiler room, and you should completely forget about such a concept as a flow-through heater.
Gas-fueled stoves
They are a good alternative to traditional wood stoves. Significant restrictions on their use are imposed by the fact of weak gasification of the domestic periphery and increased requirements for the culture of their operation, due to the high explosion hazard of gas fuel.
We deliberately did not mention one more type of stove. Based on electrical heating. But since furnaces of this type are a very broad area, it would be better to separate the story about them into a separate topic.
Separately, it is worth mentioning the independent production of such a stove. Since, after all, seeing once is better than reading twice, we cover this topic in video format, where everything is clear, understandable, and visual.
Mechanism of operation
A metal stove placed in a house, garage or bathhouse must be equipped with a chimney to remove carbon monoxide and organize draft. During the process of heating the furnace, this pipe can reach very high temperatures, about 200-500 ℃, which is unsafe for people in the room.
If you install a heat exchanger on the chimney, you can significantly increase the efficiency of the stove, and also protect yourself from direct contact with a hot surface. In a tank or coil installed on the chimney, the coolant will be water, however, you can also install an air heat exchanger on the chimney pipe. Due to the direct contact of the chimney with the coolant, their temperature indicators are balanced, that is, the water or air gradually heats up, and the walls of the pipe cool down.
As the temperature of the water inside the register rises onto the pipe, it rises upward, where it enters the water tank through a special fitting. Through the inlet fitting located at the bottom of the heat exchanger, cold water enters it, replacing warm water. This circulation continues constantly, and the water can heat up to very high values.
An air radiator on a chimney pipe has a similar operating principle. Cold air enters the heat exchanger from below, and after heating it rises up and is supplied through the pipeline to the heated rooms. In addition, the radiator fins also give off heat. An air heat exchanger is optimal for heating attics in a country house or dressing rooms of a bathhouse, if such rooms are heated only from time to time. It is not advisable to organize water heating in them, since you will have to constantly fill and drain water from the system.