The simplest type of crafts are applications using cereals. In every house, housewives have unused cereals. Therefore, the material is very affordable and easy to use.
To perform such crafts you do not need to have certain knowledge and skills, everything is very simple. Even a child can cope.
Execution technique
The most common techniques when using this material are:
- sprinkling;
- indentation
For the first type, you will need to draw the outlines of the design on a piece of paper. It is best to take colored cardboard. Drawings for crafts made from cereals are thought out in advance, in advance, or are found on the Internet and printed. Then you need to cut it out and glue it onto cardboard.
Next, you need to grease the pattern with PVA glue. For starters, you can use buckwheat, millet cereal and rice. These materials are easier for children to work with.
The next step is to pour the cereal onto the contours of the parts and press down a little so that it sticks. You can shake the excess onto a piece of paper.
For the second type, instead of glue you will need plasticine. Creating a drawing on cardboard is the same. The resulting contour is filled with plasticine. Next, the cereal is taken and pressed into it. For this work, you can take peas, coffee beans, beans, and seeds.
In order to develop imagination in children, you can fill the entire sheet with plasticine and let the child come up with what to depict on the sheet.
Crafts made from plasticine and cereals are suitable for kindergarten when you need to do something using natural materials.
These two techniques are easy to use, but if the child masters them perfectly, then you can create works of a complex level with him.
Available offers
Crafts made from cereals for children are the simplest large drawings with a theme that is understandable to them. Applications of animals, landscapes, still lifes or abstractions, first from one and then from several varieties of cereals, are in demand. It could be:
- Teddy bear;
- Kitty;
- Bullfinch;
- Butterfly;
- Flowers;
- Turtle.
Adults draw the outlines of the future picture on cardboard, and the child places the selected raw material on the glue, without going beyond the line.
The work may be monochromatic or multi-colored. After drying for five hours, the necessary small details are marked on it and covered with transparent varnish.
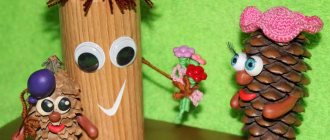
The boletus mushroom is easy to make. The hat is made from red lentils, and the leg from semolina. Pea bottom imitates green grass, and an entire family of mushrooms can grow from it.
A magnificent sunflower on a yellow disposable plate, which is collected on plasticine. The middle is sunflower seeds, and pumpkin samples will serve as the petals.
A simple variation is to sculpt a plasticine hedgehog and stick sunflower seeds into it, point up, to get a three-dimensional, believable figure.
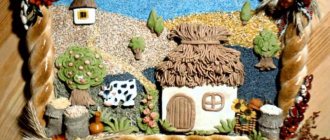
Decorative panel of cereals
The most interesting craft for children using cereals is creating a picture. The first time you perform it, you need adult supervision. Before starting work, you need to prepare cereals of different colors, cardboard, glue, and paints.
First you need to select cardboard in the color you are making; if this is not available, then paint it with paints. It is important to draw a sketch of all components of the picture. Then all this is smeared with glue and covered with various types of cereals, beans, and seeds.
For ease of implementation, you can find a sample, or think in advance which part should be filled with which grain. You can create step-by-step examples for your child, or find ready-made ones on the Internet.
Cereal applications
The first type is flat applique. You need to take a sheet of cardboard and draw a sketch on it. It can be a drawing, a pattern, a variety of ornaments. The inner parts of the contour must be filled with glue. Cereals, grains, seeds, and so on are poured on top.
You need to determine where what color is needed and stick to the idea. This is important in order to get the image. It turns out flat because everything is on the same surface and at the same level.
Another type is called volumetric applique. The peculiarity of this work is that it requires a volumetric base to complete. You can make it yourself from polystyrene foam, plastic, it can be a bottle, a tin can. You can also purchase special ones in the store.
Since the surface on which the materials are to be glued is not smooth, and the process becomes more complicated, PVA will not cope in some cases. It is necessary to use silicone, hot melt and super adhesive adhesives.
Work should be performed under adult supervision.
Children's crafts
For children, the process of creating crafts from cereals and seeds is not only an exciting activity, but at the same time, working with such materials helps develop fine motor skills.
As the work progresses, attention develops, coordination noticeably improves, the child becomes more patient, more diligent and learns to be careful. You can also note that when you touch granular substances, you get a massage of your fingertips.
You can make a “Sunflower” craft. To do this, draw this plant on cardboard. Each part is laid out in a different way. The inside of the flower can be lined with seeds, flower petals with millet, or semolina painted yellow.
In order to make a craft from grain and cereals, you will need a glass bottle, glue and elements for decoration.
The part that needs to be decorated is primed, grains and cereals are attached to it in the form of patterns, which can be alternated with stripes. The end result will be a beautiful bottle for decoration.
Panels for kitchen decoration
What better place to decorate with crafts made from edible materials than the kitchen? A simple panel for wall decoration can be made using different types of cereals. To work you will need:
- base with frame – cardboard with a printed pattern;
- different types of cereals;
- PVA glue or Moment;
- varnish – decoupage or colorless construction varnish.
To begin, draw the outline of the design onto the cardboard. Beautiful templates for crafts made from cereals can be found on the Internet or you can use large drawings from children's coloring books.
Read here: Clay crafts: a step-by-step master class for beginners on how to learn modeling at home (95 photos)
We select which grains to use for certain areas of the drawing. A painting that uses grains of different sizes, colors and textures will look impressive.
Apply a thin layer of glue to each area one by one, filling the entire surface. Carefully, without going beyond the contours of the area, pour the cereal onto the glue. We fill in the next section of the future panel in the same way. The cereal must be glued so that the entire surface of the picture is filled.
Attention! To enhance the effect, you can separate the fragments using a stained glass contour.
At the end of the work, wait until the glue has completely dried, then cover the panel with varnish for preservation and place it in a frame under glass or without it.
Decorative topiary from cereals
Making this craft can have several uses. First of all, they can decorate a room and make it match the interior. You can also take part in exhibitions at school and kindergarten:
- The foam ball is painted green with a brush. After this, you need to take time for everything to dry. Using a skewer, a small hole is made at the bottom; this is necessary to insert the barrel.
- Slowly, the gluing of the peas begins. To do this, coat a small area with glue and attach peas to it (preferably split ones).
- After the entire ball is filled, it is left overnight.
- When everything is dry, the ball is inspected and the voids are filled with peas. The barrel is attached to the hole using glue.
- You need to take a pot that was specifically purchased for topiary. It should be filled with floral foam filling. Then the barrel is stuck in. The area in the pot needs to be filled with moss.
- The craft turned out to be complete.
- It turned out to be original, simple and will delight the child. He will see his results.
- You can also use coffee beans instead of peas.
Small home decor items
It's easy to make topiary that will decorate the interior of your home. Before you make a craft from cereal at home, stock up on the following materials:
- a small flower pot, bowl or mug;
- a strong but short tree branch or stick for the trunk;
- foam ball;
- cereals or coffee beans;
- small decor, ribbons;
- glue;
- gypsum.
First you need to strengthen the trunk in a container by pouring gypsum into it. Then use glue to secure the foam ball to the barrel. Using glue and grains, form a ball. You can pre-paint the base with acrylic paints.
Attach the decor: voluminous flowers and butterflies, leaves. Wrap the topiary trunk with floral tape or satin ribbon or tulle. Decorate the container in the same style. You can use burlap, sisal, etc.
The simplest master class on crafts from cereals:
- take a bottle or small vase made of transparent glass;
- pour a little grain of one type on the bottom;
- Carefully, so that the grains do not mix, pour a layer of other cereals or seeds on top, preferably of a contrasting color and a different texture;
- fill the container layer by layer. It can become a kitchen decoration or a vase for a composition of dried flowers.
Be inspired and impressed, come up with your own ideas for crafts from inexpensive and always available materials. Involve children in creativity, and your home will become unique, filled with the warmth of the soul invested in every craft.
Read here: Wood crafts: interesting DIY crafts. The best ideas and instructions for beginners (75 photos)
Painting
In order to make a spectacular picture with cats you will need black and white beans, a work surface, glue, a brush, and a pencil.
An image of two cats is drawn on the canvas. And there is a circle around them. Using paints and a brush, animals and the area around are painted. It will be easier for children to navigate which color of beans to glue.
The dark ones are attached to the black areas with glue, and the area around the cats is smoothed with white beans. The result is a painting that can be used to decorate a room or as a gift.
After completing this work and understanding the principle, you can create your own sketch and make a personal painting.
In general, the process can be divided into several stages
Preparing the basis for the painting and materials
A drawing is first applied to the selected cardboard, plywood or other base using a simple pencil. To do this, you can use carbon paper. The outline of the sketch should be neat, even, barely noticeable and outlined with a thin line. Then you need to decide on the materials. Select the desired grains, determine the quantity and color. If necessary, the grains are colored with paint. When choosing the color of grains, you need to follow one rule - do not choose materials that are similar in color for placement in adjacent areas.
Coloring of grains
The dyeing process is not complicated, but it requires certain manipulations. The selected grain, most often rice, is placed in a container. Then add a few drops of paint to it and mix. Then the material is laid out on film and stirred periodically so that the grains do not stick together. After complete drying, you can use them.
Laying out the grains
Gradually, the pattern is filled with grains of the desired color, placing them on the glue with tweezers. To ensure that the grains lie flat, they can be straightened with a needle. After completing the creation of the design, the grains are allowed to dry and varnished using an aerosol.
Particularly popular are paintings with patterns or ornaments, as well as paintings reflecting simple geometric shapes. The finished painting needs to be placed in a frame and you can decorate the interior and be sure to take a photo of the cereal painting as a keepsake.
Lampshade for a table lamp - step-by-step instructions for beginners with photo examples
Photo frame with magnets
To make the photo look much brighter, you can make a photo frame with your own hands, using cereals. And if you add magnets, then such products are attached to the refrigerator.
On the surface of the cardboard, the boundaries of the frame are outlined with a ruler and pencil. It should be cut out. It is necessary to think over a drawing that will decorate it. To make it easier to navigate, you can mark out the areas and imagine what type of material will be suitable.
After this, glue is applied and cereals, grains, and beans are glued.
Magnets are glued to the back side.
Decoration for Christmas
A popular attribute of this holiday is the Christmas wreath. It creates a special atmosphere, improves mood and decorates the interior:
- The basis of such a craft will be a ring made of polystyrene foam, straw or a cardboard ring.
- You can make a purely craft from cereals and pasta. Since pasta comes in a wide variety of forms.
- The base should be primed in a neutral tone. Depending on where it will hang, you need to decide whether to decorate the reverse side.
- The gluing work begins from the inside and gradually moves towards the edges.
- It is best to use silicone glue.
- You can create a pattern, an ornament, and as an additional decoration you can use patterns decorated with cereals in the form of bells, stars, and Christmas trees.
- After the decoration is completed, a ribbon or linen thread is tied to the wreath.
To create a more festive option, it is best to use painted material. Gold paint in cans is also used and applied to already glued pasta.
We decorate furniture
Try to imagine how impressive a small coffee table decorated with cereals and seeds will look in the interior of a country house. To do this, it is enough to apply the outline of the design onto the base - the tabletop - and fill it with grains of different textures.
Read here: Crafts from ribbons: original ideas for using silk and satin ribbons. 110 photos of beautiful textile jewelry
The table will look especially impressive if you make a three-dimensional contour in a contrasting color - white or dark, depending on the color of the table. Cover the tabletop with glass and secure it.
Beans, pumpkin seeds or coffee beans can be used to decorate a mirror frame. The manufacturing principle is the same: we apply glue, attach the cereal to it and cover the frame with varnish. The varnish will additionally fix the grains and add attractiveness and durability to the interior item.
Christmas tree decorations
In order to create a Christmas tree decoration, you need to study the types of craft patterns for using cereals. The execution is very simple, children will really like it.
It is safest to use plastic balls, but it is realistic to use old and unnecessary plastic Christmas tree decorations as a base.
First, you need to pour the cereal into a plate. The ball-shaped blank is covered with glue. Next, you should roll it out in cereals. If you choose peas or buckwheat, then roll it once. When using rice and millet cereals, you need to make 2 layers.
Then the product is set aside to dry. At the end it is decorated with satin ribbons. You can find options on the Internet or come up with them yourself.
Decorating Easter eggs
Celebrating Easter is not complete without the tradition of decorating eggs. You can involve children in this work and make a craft for Easter with cereal:
- Boiled eggs must be used. Take one and apply glue to everything with a brush.
- It should be dipped into a plate of cereal, which was chosen at personal discretion.
- For example, you can roll it in millet.
- Not the entire surface can be filled. If you use your imagination, you can make a hat on the egg using cereal, and use felt-tip pens to draw a face.
- It is also possible to make different patterns on them. The main thing is to fantasize and not be afraid.
The design can be bean flowers, pea lines, alternating strips of rice and buckwheat, and so on. There are no limits to ideas.
Table of cereals
At the very beginning, you should remove the back part from the frame and cut a panel of the same size from plywood:
- The panel is glued to the stool using liquid nails or wood glue.
- Wood putty is used to seal the joints.
- The frame is applied to the stool and secured with 4 screws.
- To prevent the room from getting dirty, you can lay oilcloth on the floor. A layer of primer is applied to the resulting table, and after drying it is painted 2 times with the same color.
- Using a ruler and a simple pencil, mark the location with the appearance of the croup. Can be divided into squares.
- Gradually, from the first section, work begins on coating with PVA glue and attaching the cereal. And so everything is done until the very end.
- In order for the cereals to stick together, you need to apply a layer of glue on top and leave to dry.
- After it has dried, you need to place the table level and fill the tabletop with the substance. Epoxy resin is used. If bubbles appear, you need to blow on them using a straw.
After the first layer has dried (a whole night is required), it is filled with a second layer of resin. And everything dries up. As a result, the table is ready. It's nice to look at and touch.
Small and useful secrets for creativity
With the help of bulk or pressed cereal appliqué, you can implement any idea; all you need to do is choose the right template. Its individual elements are covered with a layer of PVA glue and covered with cereal of a certain color to make the craft beautiful, you can use a few tips:
- for the base it is better to choose strong and dense cardboard that does not get wet from glue;
- You don’t have to skimp on the glue; after the PVA dries, it becomes transparent;
- It is better to pour colored cereals directly from the bag without getting your hands dirty.
The child will definitely enjoy making such original and beautiful crafts that will retain their attractiveness for a long time. Using this technique, you can create full-fledged paintings with different motifs, decorations for the home and children's room, and exclusive holiday cards.
To use the cereal appliqué technology, you don’t even need a master class, it’s so simple. If traditional colors of cereals were previously used only for crafts with autumn motifs, then using dyeing technology, you can make bright and interesting crafts for every taste.
How to paint cereals
In order to give unusual shades, it is best to take white beans, rice, and pumpkin seeds for this procedure.
You will need thick plastic bags. They are filled with cereal. Alcohol is added there in the amount of 2 tablespoons or 4 tablespoons of vinegar. The next step is to pour the dye into the bag. It should then be closed and shaken so that everything turns into the desired color.
The contents of the bag are poured onto the surface of the plate and time is given to dry. And the result was colored grains.
You can create products for every taste using cereals, beans, and grains. Effective for children. Since this is a great activity, and at the same time has a great impact on the development of the child.