Create!
Try making knitted beauty yourself. We will tell you how to crochet both regular and unique rugs with diagrams and descriptions. Before starting work, you need to decide on the color scheme and choose a model that is organically suitable for your home or country interior.
For inspiration, look through photos of similar items on the Internet. Many of them are simply amazingly beautiful. We will show you what knitted rugs can be like and teach you how to knit models that are popular today, simple and beautiful.
It is not always necessary to have extensive experience and craftsmanship to create a knitted masterpiece. There are patterns that even a beginner can do, but the grace and beauty of the knitted product will be undeniable.
Cozy shaggy rug
To make a soft carpet that can adequately decorate your home, you will need carpet canvas or fillet mesh. This knotless base is traditional. It is better to use canvas, tarpaulin mesh, burlap or matting. Synthetics, wool or silk can become electrified and slide across a smooth floor. Carpet canvas can be bought in a store; as a rule, it is sold in rolls 1 m wide. For the decorative part you will need threads. You can use any leftover yarn; the more shades, the more fun and bright the product will be. A hook with a foot will be useful for this work, but you can also use a simple crochet hook.
Shaggy rugs
[Show slideshow]
To make it more convenient, we will divide the whole process into several stages:
- The first step is to prepare the threads that will become a decorative component of the future carpet product. Cut the yarn into pieces of equal length. The “fluffiness” of the pile will depend on the chosen length of the threads.
- Let's proceed to the most labor-intensive but interesting stage - tying the threads on the warp. Using a hook, we pass the thread through the canvas square and tie a knot. So we “dive” the hook into each cell and fill each one with yarn.
Advice! The rug can be made monochromatic, made into an ornament, or made into a whole picture. For patterned weaving, you can use embroidery patterns or apply the design directly to the base. When marking, you need to leave a couple of centimeters around the perimeter of the product for the canvas.
- At the final stage, we need to “comb” our rug a little so that it looks neat. During the process of tying the threads, their length may differ slightly from each other, so the pile must be trimmed. The principle is as follows: the shorter the pile, the more clearly the pattern is visible.
Tips for beginners. Master class on crocheting a rug.
There are several ways to tie threads to the base. For example, using a special hook with a foot, you can make loops that do not need to be trimmed at the end of the work. In this case, the knot is still tied, but the ends of the threads are not pulled out completely. For this technique, you can also safely use embroidery patterns.
Making a rug with your own hands
Knitting techniques
Home carpets knitted from yarn can be in the form of a continuous fabric of any shape with different knitting algorithms. For example, rectangular ones are knitted in straight rows, like on knitting needles. And the round ones start from the central loop, then knit in the round.
Knitted rugs made using the fillet technique are based on a base mesh, to which a pile of yarn, such as grass, is added. And uniform in style, separately knitted fragments in the form of any shapes are combined into a magnificent canvas of “motifs”.
We will show beginners step by step how to create a rug of different shapes from yarn with your own hands.
Rugs made from old things
Recently, handmade rugs have come back into fashion. A soft knitted or wicker rug will be nice for your bare feet in the morning, and in the bathroom the rug will absorb excess water and prevent you from slipping on a wet floor; you can wipe dirty shoes on the door mat and leave them to dry on it.
Of course, similar rugs can be bought in a store, but it’s much nicer if this thing is made by you with warmth and trepidation. Such a thing will look different, and will last much longer, and the question of where to put unnecessary things will be solved in the best possible way.
Editorial “So Simple!” invites you to learn some interesting ideas on how to make an original rug with your own hands from different materials. I especially liked the way I used old scarves!
- Rug from pompoms In order to make a soft rug from pompoms you will need: thick woolen threads for knitting, a mesh base for the rug and scissors. First you need to make pompoms of different colors to create a smooth gradient color transition. Although you can try to make a plain rug or lay out unusual patterns from different colors - it all depends on your taste preferences.
You can also play with the size of the pompoms, using large, smaller and very small ones.That's all, the pompom rug is ready.
Well, if you couldn’t find a suitable mesh base, don’t be upset, because pom-poms can simply be sewn onto any fabric.
- Bright woven rug made of rope and wool Cardboard, scissors, rope and yarn of different thicknesses are all you need to weave such a magical rug.
- A fluffy rug made from old fleece scarves. This idea is suitable for those who have old fleece scarves lying around at home. Thanks to them, you can make a fluffy rug for the living room or hallway. You will need: 6 fleece scarves, a fabric or denim circle for the base, scissors and sewing supplies.
Fold each scarf in half and sew the edges with a basting stitch.Fold the resulting piece in half lengthwise again to mark the middle, then use scissors to cut the “pile” - transverse strips of fleece 1-1.5 cm wide to the fold line.
Now sew the resulting pile to the base in a circle.
This is what you should end up with!
To see the entire process in more detail, watch these videos.
Editorial Board
It can be quite difficult to get rid of unnecessary things. The closet with bedding, which can lie there for years, flattened and wrinkled, is especially noticeable.
Therefore, I suggest you familiarize yourself with unusual ideas on how to use old sheets. I bet you never even thought of such ways to use bed linen.
Don’t be lazy and be sure to use one of these great ideas, or all of them at once! Your family and guests will certainly appreciate such an original and useful decorative item.
And don’t forget to tell your friends about these ideas, because inspiration is so contagious!
Anastasia Davidenko Nastya practices yoga and loves traveling. Fashion, architecture and everything beautiful - that’s what a girl’s heart strives for! Anastasia is an interior designer and also makes unique floral-themed jewelry. She dreams of living in France, is learning the language and is keenly interested in the culture of this country. He believes that a person needs to learn something new all his life. Anastasia's favorite book is “Eat, Pray, Love” by Elizabeth Gilbert.
Round rug
Most versatile for home use. Looks great in any interior. Made from yarn of different textures and thicknesses. It can be elegant, openwork knitted or solid, tightly knitted. Openwork and “airy” - for covering the dressing table. Voluminous, with a continuous large knit and knitted “cones” - for a nursery or living room, it holds heat well.
To create a round fabric from yarn, you need to make the first three air loops, connect the first loop to the last. Then knit a row of six single crochets. In each next row, add new loops evenly, increasing the length of the circular row.
Note!
- How to crochet a mouse and a rat: video master class on crocheting the 2020 symbol
- How to knit a warm hat with ears for a newborn boy and girl - video tutorials with patterns, instructions for beginners
How to crochet a beautiful scarf: video master class on creating unusual, beautiful, simple scarves for boys, girls, men and women
Crochet rug made from plastic bags
This unusual use of simple bags became a real discovery for housewives. Linens made from bags are usually placed on the floor of a bathroom, kitchen or toilet because they are moisture resistant. If water gets in, just shake it off and dry the product. Knitting such a rug is very simple and it will not be a problem even for beginners. So, you need to take about 4 dozen garbage bags and cut them into strips about 3 cm wide. The strips need to be sewn together or glued together with a warm iron, ironing them through the fabric. Roll the finished thread into a ball. Knitting must be done with crochet number 4. We cast on 12 air loops and 3 lifting air loops. From the 4th loop from the edge of the chain, knit 5 double crochets. Then from each chain stitch, knit 1 double crochet 10 times. Turn the product and knit the other side in the same way, thereby forming an oval. The row should be closed with a connecting column. The second and subsequent rows must be knitted according to the pattern. The result will be an oval canvas. Its central part will be straight, and the edges will widen and be rounded, because they made increases on semicircles.
Oval rug
Harmonious for geometrically elongated rooms. Before knitting it, divide the width of the future product in half and subtract it from the length, find the length of the initial chain. For example, if we plan to make a rug measuring 40 cm by 100 cm, then the desired length is 80 cm.
Remember that the cast-on chain will stretch by about 30-40% when knitting.
Next, knit in the round according to the pattern, with gradual addition of loops on the semicircular sides.
A beautiful oval rug can be made from store-bought knitted yarn or from yarn made from discarded knitted clothing.
The first and last loops must be discreetly secured with a thin thread, and to increase strength they must be glued or sewn to a dense base.
The popular model “Miracle of May” is an oval rug made on the basis of three magnificent Patricia Kristoffersen napkins. Stylish and elegant, it fascinates with its beauty and grandeur, good in any color and interior. A video master class on napkins from Patricia Kristoffersen is easy to find on the Internet.
Note!
How to knit a hat with a lapel using knitting needles or an elastic band: step-by-step instructions for beginners
- How to crochet a winter hat: 95 photos of new models of warm, fashionable, original knitted hats with a lapel and a beautiful pattern
- How to knit a beanie hat correctly with knitting needles: video master classes, patterns, knitting patterns for fashionable models
Oval mat with wedges
Telling beginners how to crochet an oval rug, professionals offer not only a simple option, but also a more original one. Its implementation technology can be studied in the diagram presented below. In this case, the wedges are made in the same way as described earlier. The size of the product can also be adjusted depending on your own wishes. By the way, if you wish, you can knit a small oval rug and add round fragments to it. This will also look very original.
Rectangular crochet rug
It is laconic, its placement at home or in the country will add uniqueness to the home. Convenient as a floor runner in a country-style room or in a nursery. It is extremely easy to knit; even a beginner in needlework can handle it. The basic model is done in single crochets.
We make a chain of air loops the length of the width of the future product. Then we knit a row. Turn it over. We knit the next row in the same way as the previous one. Turn it over again. Repeat until the desired length is achieved.
For decoration, after completing the main fabric, we make tassels from the same yarn. A rectangular carpet made from square motifs is also quite accessible for beginning craftswomen.
Crocheting a Japanese-style round floor mat for beginners
This type of rug is easy to make and has excellent results. The yarn should not be very thick and should be crocheted No. 6-8. It is better to choose a brighter color scheme. First you need to knit the round part of the product. To do this, we collect a chain of 6 air loops, and then close it into a ring.
Then we knit 7 stitches with 2 double crochets, each of which starts with 3 air loops for lifting. The 2nd row should consist of 5 unfinished double crochet stitches knitted together, between which you need to make 3 air loops. The number of air loops can be adjusted depending on the thickness of the thread. In the 3rd and 4th rows we knit 2 stitches each from four unfinished double crochets, knitted together under the chain loops of the previous row. The 5th row is a chain of air loops, which must be attached to the previous row with a half-column.
Next we need to knit rings of any size. We collect air loops in a chain and close the ring with a half-column. The diameter of the ring is equal to the length of the chain. Then we tie the ring with a double crochet stitch. The first ring is ready. We immediately begin knitting the second one. To do this, we need to collect a chain of air loops, thread it into the first ring and only then connect the first and last loops with a half-column. Below are diagrams where this is clearly depicted. The next ring will be threaded into the second circle, etc. The last ring must be connected to the second to last and to the first. Rings can be sewn to the circle or attached while knitting.
Ring connection diagram
Square rug
So seemingly simple, but in the hands of a creative craftswoman it turns into a designer model. The square will fit harmoniously into a bathroom, glassed-in loggia or hallway. This is done in one of two ways:
- The first is similar to knitting a rectangular rug, but in compliance with the new proportions characteristic of a square: the length is equal to the width.
- The second method is using the granny square technique. We cast on eight chain stitches of the initial chain. We connect it with a half-column into a ring. We knit a row, knitting three double crochets in each corner loop. And so on in every row.
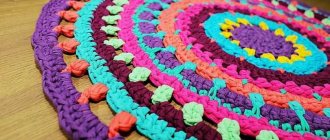
Round crocheted fabric rugs or “grandmother’s rug”
To create this product we will need old knitted or linen items. The color scheme can be very diverse. For example, different tones of the same color or several bright colors. Before starting work, we need to make yarn. To do this, we cut things into strips approximately 3 cm wide. The strips need to be sewn together or tied, and then rolled into a ball. The hook must be twice as thick as the thread itself. The pattern of this rug is suitable for both experienced needlewomen and beginners.
First you need to cast on 3 air loops and connect them in a circle. Then knit 6 single crochets into these loops. After this, the circle needs to be divided into 6 parts and in each row add 6 single crochets. You will get the 1st row - 6 columns, 2nd row - 12 columns, 3rd row - 24 columns, etc. To make the rug embossed, the posts need to be knitted through the back wall of the loop. Below is a diagram of the relief knitting method.
The finished rug can be placed on the floor.
Flower
Attractive and airy, the knitted flower is quite complex to make. Only experienced needlewomen can cope with it, since each loop must be made strictly according to the pattern. Skipping at least one of them will ruin the entire drawing.
However, there is an option to make a “flower” in a simple way. We knit five identical circles with double crochets. Then we connect them as follows: we bend each circle on both sides so that a flower with five petals is formed. We sew the “petals” into a “flower”. We decorate the middle with a button or a knitted small circle.
How to make fluffy rugs from leftover yarn
First, let me remind you that I told in one of the articles how you can make fluffy pillows from leftover yarn by attaching short threads to a knitted mesh base.
Using this method, Svetlana Dyubina-Laikova, the author of the site Prostofelicita, dedicated to the art of embroidery, made a wonderful fluffy pillow-toy: the cat Freckles, which can be seen in the same article about fluffy pillows.
You can make fluffy rugs with your own hands using the same method. Some dreamers make such rugs on garden mesh and even on construction mesh!
Shaggy rugs can also be knitted from fluffy Grass yarn.
Today it is with great pleasure that I introduce you to the craftswoman Anna Zhukova.
Knitted rug in the interior
Will add comfort and grace. For the bedroom - soft, calm colors. In the living room - bright, catchy. Pleasant to the touch textured carpets will find their application in the hallway. Rectangular ones will decorate the interior in an industrial style.
In light colors and round shape - for a room in the Provence style. Soft, colorful, with a fairytale motif, but at the same time environmentally friendly, safe and easy to clean - a rug for the nursery. It can be in the shape of a pencil, an animal, a favorite character, or your child's hobby item, such as a guitar or palette.
It is very easy to create a knitted rug in the shape of an animal: just knit simple figures in the form of elementary geometric shapes and assemble everything into a single composition.
For example, a “bear” rug looks like this: the muzzle is a simple gray circle, the ears are two white-gray semicircles, the nose is a white circle and a black triangle, the cheeks are two pink circles.
How to choose a hook
Each craftswoman has her own priority type of hook; she chooses it at her own discretion: aluminum, plastic, steel (metal), wood, bone or a combination. However, the thickness of this tool is selected in accordance with the thickness of the yarn used for knitting and the desired knitting density.
When choosing, pay attention to how the hook feels in your hand, whether it will create tension in your fingers during prolonged use. Aluminum ones are most in demand by knitters because of their lightness, strength and availability.
Mat material
Classic material - thick yarn from camel, sheep, any other wool, ribbon yarn. In accordance with its thickness, hooks are selected to work with numbers from five to eight. For durability and preservation of appearance, the best material is synthetic yarn, acrylic. Lovers of eco-friendly materials will prefer yarn made from natural cotton. It is pleasant to the touch, but does not hold heat well.
A simple model of a rug made from plastic bags
An excellent discovery of our housewives was the use of plastic bags for knitting household items. Rugs made from crocheted bags are good because they can be easily washed and dried, and they are pleasant to the touch. For the bathroom, toilet and kitchen - this is simply an irreplaceable thing. The polyethylene product is not afraid of water; it will be enough to chicken out and dry it.
First, we need to prepare the packages themselves. To do this, any plastic bags are cut into strips 2-3 cm wide, sewn with thread or glued with a warm iron through the fabric and rolled into a ball. Knit with crochet number 4. The photo above shows a rug made from multi-colored garbage bags. One such instance requires about 40 packages.
Two types of stitches are usually used: chain stitches and double crochet stitches. This rug model is oval in shape.
Cast on the required number of loops. This sample contains 12 vp. + 3 v.p. rise = 15 v.p.
1 row. Insert the hook into the 4th loop of the chain from the edge and knit 5 tbsp. s/n. Further in each century. p. knit 1 tbsp. s/n. 10 times. In the last v.p. knit chains 6 tbsp. s/n. Turn knitting. We knit the other side in the same way, forming an oval. Close the row with a connecting column.
Row 2 and all subsequent rows are knitted according to the pattern. Thus, the middle of the canvas will remain straight, and the edges will widen and round, thanks to the increases in semicircles. Thus, an oval canvas is obtained.
Knitting pattern for an oval rug made from garbage bags:
To decorate the product, you can knit decorative elements: flowers, leaves, bows.
The product turns out shiny and bright. And the main advantage of this product is its cheapness and practicality. See the video for examples of work:
Knitting carpets from cord
Cord carpets are very textured. They add charm to the interior. Two types of cord are used in this work: cotton and polyester. Carpets made from all-natural cotton cord are more environmentally friendly. They turn out to be heavy, due to this they lie stably on the floor.
Rugs made of polyester cord are popular due to the practicality of their material and its hypoallergenicity. They are easy to clean and do not lose their shape and color even with prolonged use. It is better to choose a simpler scheme for them.
Wicker rugs from old clothes
Most often, wicker accessories are made from old clothes: shirts, T-shirts, nylon tights. Instructions on how to make a rug with your own hands from old things:
- All items of clothing are cut into thin strips of fabric. It is enough to cut nylon tights into two parts.
- A single thread is tied from the flaps.
To knit a rug, use a hook or large-diameter knitting needles. Depending on the chosen weaving technique, the rug may have a round or square shape.
The second way to make stylish rugs from old T-shirts (or other clothes) with your own hands is to pre-weave “braids”. The finished braids are placed on a prepared base (silicone mat). Fastening the textile part is most often done with durable glue.
Carpets made from knitted yarn
With a skillful approach, they turn out to be original, with their own individuality. You can buy knitting yarn at the store or make it yourself. To do this, you need to cut old knitted items into strips and knit them into a single thread. Knit according to any pattern you like, suitable for thick yarn.
DIY rugs made from old things photo
Unusual rugs made from old things with your own hands, photos of which you can see in our article today, are mainly created in two main ways. This is a well-known patchwork technique or patchwork, when pieces of fabric are sewn either together or sewn onto a single base to obtain the most attractive appearance. This method is good for its simplicity, but not every fabric is suitable for realizing the plan, since it must be quite dense
Firstly, this is important for the comfort of your feet, because you don’t need to step on a cold floor, but on pleasant and warm textiles. Secondly, dense fabric will provide much better wear resistance and the item can serve you for a long time
crochet rugs from old things for the home from
In the nursery, like nowhere else in the rest of the apartment, things of unusual, original design “take root.” Therefore, the following denim ideas can be used in decorating a children’s room with your own hands. As you can see, all denim parts will work: pockets, legs, tops. The only caveat is that all this needs to be skillfully connected to each other to make a solid fabric, it’s better to start with selection, then baste and only then finally stitch it together.
DIY rugs from old things step by step
In the article on how to crochet a rug, we mentioned the use of threads and the hook itself of the greatest thickness, due to which the yarn ends up being coarsely knitted, openwork and very attractive in appearance. But for “yarn”, which is fabric flaps, perfect knitting or even loops are not necessary, so you can use hand weaving. Let's talk about this in more detail, looking at popular ways to create rugs with your own hands from old things step by step.
.
Before we knit rugs from old things with our own hands
, you need to prepare the yarn itself. Of course, you don’t have to fool yourself too much, just cut the strips and tie them together, but the longer the continuous tape is, the easier it will be for you to work. Old bed linen is ideal for this, but if you want to use a T-shirt, it is better to cut it diagonally, as if unraveling the fabric in a spiral.
When the skeins are already formed, you need to weave a braid from them, throwing the ends from one side to the other. This long braid needs to be laid out in a spiral, like a snail, and on the reverse side all the layers should be fastened with thin threads to match the main yarn so that they are not visible from the face. Additionally, you can decorate such a rug with applique or embroidery, you can add tassels and fringe, it will look very beautiful.
In another case, the basis for work will be a large hula hoop. It is on this that we will get a large-scale round rug that is woven by hand. You can find detailed master classes on similar do-it-yourself rugs made from old things, video
with whom you are online. The principle of making the craft is as follows: the main diagonals are pulled onto the hoop, which will divide the future rug into sectors, and the materials for them will be circles from the bottom of T-shirts or T-shirts. We tie the end of the strip into the center and begin to scroll it in a circle, moving it above and below the guides in a checkerboard pattern. With each new turn, your rug will grow more and more until it reaches the desired size. The last row is to cut each guide from the hoop one by one and tie it with a knot. At the same time, you will get an elegant fringe, which will come in very handy if we are decorating the Provence style with our own hands.
Carpet made from old things
The material can be leftover homemade yarn, synthetic tights, old bed linen, rope, strips of polyethylene from garbage bags. When crocheting circles on the floor from rags, you often get quite interesting and original products. They serve perfectly in the country or in a summer house. When knitting, try not to be too colorful to make the rug look stylish.
Rug made of small circles
The technology being studied is not new. Our grandmothers were also fond of knitting circles on the floor. Amazing products were created by crocheting from rags, bags, and in villages even from straw. At this point we would like to suggest making a rug from openwork fragments. It will look much more original and unusual. Moreover, you can make each circle a different color or combine several shades in one. There cannot be a single recommendation in this case. Each knitter can develop and execute her own idea. We can only offer a simple scheme. It can be studied in the photo presented below.
Exotic crochet Japanese rugs
Although Japanese rugs with their unique pattern look complex, the technique for making them is simple: hollow rings are knitted, which are then connected to each other. The lightest model consists of four rings filled with a fabric of double crochets. Another version of the Japanese rug: we make a knitted ring, a chain of hollow rings connected by a standard weave is sewn to it. A Japanese rug will add ethnic motifs to the interior. The carpet configuration can be changed.
It is difficult to imagine all the variety of knitted rugs. Give free rein to your creative imagination - crochet a rug yourself exactly the way you want it, best suited to the design of your home. An exclusive decorative interior element will bring comfort, coziness and warmth to your home. Don't be afraid that what you knit will look old-fashioned.
We recommend choosing the exact color of the yarn, this will add modernity to knitted interior items. The color of the materials used, in contrast with the interior color scheme, will enliven the room and add a bright personality to it.
However, try to avoid excessive variegation and the melange effect, and maintain clear boundaries between the colors of the yarn used. Apply a smooth transition from one color to another. This will give a good effect. Get inspired and start implementing your “knitted masterpiece”.
Stylish pebble rug
A stylish rug with a massage effect, created with your own hands from sea or river pebbles, is perfect for the bathroom. You will also need a strong adhesive sealant and a silicone base.
Instructions on how to make a rug with your own hands:
- Wash and dry all the stones.
- Apply a layer of glue to the silicone base and distribute the pebbles evenly over the entire surface of the silicone carpet.
On top of the attached pebbles, you can apply 2-3 layers of acrylic varnish, which will give the surface of the accessory a glossy shine.
Photo examples of crocheting rugs
Please repost
0
