What owner of a country plot has not dreamed of building his own bathhouse, where you can have fun with family and friends, relax and gain strength after hard working days.
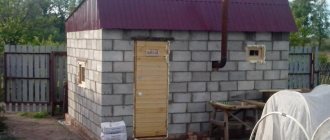
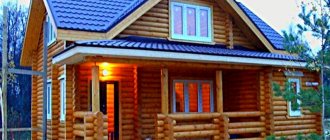
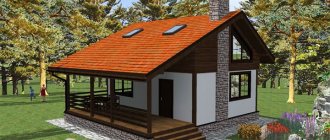
Layout of a bathhouse with an attic 5x5 meters
The layout of the bathhouse for the average citizen of our country, who does not own a huge piece of land, is standard: a dressing room and a steam room. However, after some time, opportunities and funds may appear to modernize the original bathhouse design. Naturally, it is very impractical to build a new bathhouse and demolish the old one. What to do? The wisest option is to build an attic.
A bathhouse with an attic is a very functional solution that allows you to place both the bathhouse itself and auxiliary rooms in a small area. The construction of such a bathhouse will be less expensive than the construction of a two-story steam room, and such a structure will look no worse. Most often in the attic there is a recreation room in which you can put billiards, karaoke and other things.
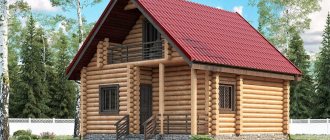
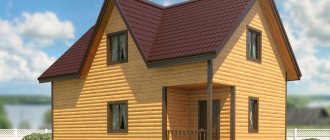
Project of a bathhouse with an attic built from timber
Features of the arrangement of the attic above the bathhouse
The attic above the bathhouse is a compact and functional room. Basically, bathhouses with attics have become so popular because on the top floor you can arrange a room to suit every taste. Most often, a rest room is equipped here.
Creating a relaxation room has undeniable advantages:
- Spectacular appearance of the bathhouse.
- The structure is lightweight, since its construction does not involve the installation of a powerful foundation.
- Minimizing bath heat loss.
- There is no need for individual heating of the attic, thanks to the heat coming from the steam room.
An attic over an already built bathhouse can be equipped in two main ways: the roof is torn off the finished, already used bathhouse, and the side walls are built to a higher height;
Conversion of the attic space above the bathhouse into an attic floor. Before you start drawing up a bathhouse attic project with your own hands, you should decide on the type of roof. An attic is equipped only if there is a special broken roof shape. Of course, the smaller the angle of inclination, the more usable space indoors you will save.
Completion of an attic floor or conversion of an attic into an attic does not require any approval or obtaining permits.
Brick baths: projects, photos
Design is an important stage in the construction of a bathhouse. At this stage, you need to draw up a drawing, decide on the location of the bathhouse and the amount of material required.
You can create a project yourself or take a ready-made one.
It is believed that it is better to take ready-made brick bathhouse projects, photos of which are easy to find on the Internet. The advantage of ready-made drawings is that they have already been tested in practice, every detail has been thought out in them.
If you still prefer an individual project, then it is better to turn to professionals. If the drawing is drawn up with errors, then the building will not turn out as expected. Correcting a project is easy; making changes to an already erected building will be quite difficult.
An option for those who are poorly versed in design and are not confident in their abilities are turnkey brick bath projects. In this case, the project will be drawn up by specialists; many companies also provide a 3D project where you can see your future bathhouse in full.
Prices for brick bathhouse projects vary depending on the complexity of the drawing. If the service includes drawing up an estimate with a list of materials required for construction and an indication of their quantity, then this also increases the cost of specialist services.
When drawing up a project, you first need to decide on the size of the bathhouse. The larger the bathhouse, the greater its capacity and the area required for construction. But keep in mind that as the area of the steam room increases, fuel consumption increases, as well as the time it takes to heat the room.
If you are going to the sauna with a small group (2-4 people), then a 4x4 sauna is suitable. If you plan to come here with your whole family and friends, then it is better to make the room larger - from 6x6.
Depending on the size of the building, there are designs for brick baths with or without a rest room. If you are planning to build a small 3x3 bathhouse, then it will consist of only three rooms: a steam room, a washing room and a dressing room. In this case, instead of a rest room, you can make a gazebo. But then visiting the bathhouse in the winter season will be difficult. This option is usually chosen if there is no space to accommodate a larger building.
If possible, it is better to make a bathhouse consisting of the following premises: a dressing room, a steam room, a washing room and a relaxation room.
The presence of a gazebo in this case is not excluded. It is good to relax in the rest room in bad and cool weather; on a warm day it is much more pleasant to sit in nature. Projects with a gazebo can include an open, semi-open and closed terrace. Gazebos can be located on any side of the house, have a door leading to the bathhouse or not.
An interesting option are projects of brick baths with a swimming pool. After leaving the steam room, it is useful to plunge into cool water, but not everyone has a pond near their house. In this case, a swimming pool will come in handy.
The pool can be located both outdoors and indoors. In the first case, it is recommended to provide a canopy that will protect the pool from leaves and other debris. In addition, if there is a canopy, you can swim even in the rain.
Brick baths can be one- or two-story. The second option is suitable for those who own a small plot of land. On the ground floor there is a dressing room, a washing room, a steam room, and there may also be a gazebo or a relaxation room. A guest room is being made on the second floor.
Brick is the material that is suitable for building a house. You can build two rooms at once.
Designs of brick bath houses are also different. The bathhouse can be attached as a separate extension or located on the ground floor. It is not customary to make a bathhouse on the second one, since in this case it is more difficult to create a sewer system and install water. And in the summer, you will probably want to go outside after the steam room, and going downstairs is not always convenient.
The advantage of building a bathhouse is the savings on materials, electrical wiring and sewerage. Also, some people make a mini-gym in the bathhouse, install a font, make a barbecue area, etc. There are many options for planning bathhouses.
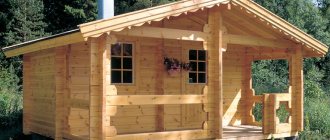
Bathhouse project made of bricks 3×3
A small brick bathhouse is suitable for a small summer cottage. It is not difficult to build; even a person without serious experience in the construction industry can handle it. Since the size of the bathhouse is small, few materials will be needed, therefore, the construction price will be low.
Of course, a whole company cannot fit in such a bathhouse. But if you have a small plot of land and want your own steam room, then such a project would be an excellent option.
The project provides for the presence of a minimum set of necessary premises: a steam room, a washing room, a dressing room combined with a rest room.
Bathhouse project made of bricks 6×4
Quite compact, but at the same time quite roomy option. Such a bathhouse usually contains not only the main premises, but also a relaxation room, and often also a small veranda. The advantage of a bathhouse of this size is that, if necessary, you can increase the steam room in the project, making other rooms compact, or allocate a smaller area for the steam room, increasing the relaxation room.
Bathhouse project made of bricks 6×6
This option allows you not only to make a bathhouse, but also to build a guest house-bathhouse. The rest room in such a project turns out to be quite spacious; you can make a mini-kitchen in it and place a sofa. The project may also include a bathroom. It is possible to stay overnight in such a bathhouse.
Selection of materials for the construction of an attic bathhouse
As a rule, the attic is built over the bathhouse from the same material as the entire building.
However, combinations are also not uncommon: the first floor is log or brick, the attic is a wooden structure. The easiest way is to complete the attic above the bathhouse from timber. This design is lightweight, so the foundation of the building will hardly feel any additional load. And an almost ideal rectangular layout will make it possible to avoid unnecessary expenses and efforts when creating a complex project and bringing it to life. It is also worth noting that the timber looks quite aesthetically pleasing when assembled and does not require additional cladding or complex interior decoration.
As for the roofing material, you can choose it based on your own taste and financial availability. Experts advise using metal tiles or bitumen shingles for such buildings. These materials are easy to install and look attractive. In addition, they are quite light, which is important when adding an attic to a finished building, since the additional floor should place as little load on the walls and foundation as possible.
Particular attention should also be paid to means of steam, hydro and heat protection. The attic above the bathhouse is a specific place, which in its characteristics differs from the usual attic in a residential building. In particular, the aggressive environment that is present in the steam room has a huge impact on the second floor. Therefore, the issue of isolation should be approached carefully. Mineral wool is most often used as insulation.
Brick baths: advantages and disadvantages
Brick buildings have the following advantages:
- environmental friendliness. When making bricks, no harmful substances are used that will be released when heated. Brick is a safe material;
- fire safety. Brick does not burn; according to this indicator, it is many times safer than wood;
- rot resistance. Brick baths are not damaged by fungus and other harmful microorganisms;
- no shrinkage. There is no need to wait months for the building to shrink; you can move on to the interior decoration of the bathhouse immediately after completion of construction;
- ease of construction. The process of laying bricks is quite simple and even a theoretician can do it;
- the ability to erect structures of any shape and configuration. When working with brick, you can give the building any shape;
- affordable price. Most believe that a wooden sauna is much cheaper than a brick sauna. This is true if you use new expensive bricks for construction, but if you choose a cheaper one, then the construction will be cheaper;
- long service life. A brick building can last much longer (up to 150 years) than a wooden building.
Despite the many advantages of brick, it also has disadvantages:
- hygroscopicity. Over time, the brick absorbs water, so it is necessary to do hydro- and vapor barrier;
- high thermal conductivity. It is equally important to ensure high-quality thermal insulation, otherwise you will need a lot of fuel and time to heat up the steam room;
- the need to make a high-quality foundation. If a regular lightweight foundation is suitable for a wooden bathhouse, then a more reliable option is needed for a brick one.
Rules for dismantling an old bathhouse roof
Before starting work on the construction of a full-fledged attic floor, you should calculate the attic for the bathhouse and the rafter system.
If it does not correspond to your project, it will have to be dismantled along with the old roofing, only after which can you begin installing new rafters. Before dismantling the roof over the bathhouse, you should clear it of all communications - wires, antennas, drains. Stock up on the necessary tools and materials - a screwdriver, a nail puller, a rope, a saw, a crowbar. Be sure to take care of your own protection and insurance. It is also recommended to install a block system for lowering roofing materials to the ground.
We carry out the work in the following sequence:
- We begin disassembly by removing the roofing material around the pipes and walls.
- To remove metal tiles, we start with the ridge, wind and valley linings. We disassemble the sheets of material from top to bottom.
- To dismantle the layered rafters, we remove all metal parts. After this, we remove the loose elements. First, we tear off a couple of boards 1-1.5 meters from the ceiling. Through the resulting hole we remove the boards that lie below.
- We dismantle the rafters, formwork and sheathing using an electric or chainsaw or crowbar. If we are dealing with hanging rafters, then every 4-5 lathing should be left in order to avoid the collapse of the rafter system.
- We lower the rafter legs down one at a time.
If you are removing a soft roofing covering, then work on its dismantling should be done in cool or cloudy weather. Under the sun, soft roofing materials heat up and soften, making the removal process more difficult.
Construction of a new rafter system for a bathhouse with an attic
Before you begin to build a rafter system over the bathhouse, you should lay a new layer of waterproofing on the ceiling of the building.
In such cases, it is optimal to use roofing felt or roofing felt. If the floor is wooden, then there is no need to lay beams under the main beams. We carry out further work in this order:
- We prepare wooden beams with a cross-section of 10x10 cm. We place the racks at a distance of about 2 meters from each other. They will form a kind of skeleton of the attic floor. Make sure each post is perfectly level (use a level to do this).
- We sheathe the installed racks on both sides. We use plasterboard or plywood on the inside, and slab on the outside.
- We lay insulation (mineral wool) between the racks.
- We secure each rack separately with spikes and staples. Make sure they don't lean during the process. To do this, you can secure them with temporary braces.
- We lay the top beam. It should have a similar section of 10x10 cm. We secure it with nails or self-tapping screws.
- We install the Mauerlat. It will require a beam of 40x40 cm. Do not forget to install a layer of waterproofing under it to avoid rotting of the wood in the future.
- We fasten the rafter legs. To do this, we make markings on the Mauerlat and the rafter frame in the places where the rafters will be installed. As a rule, the step is 1-1.2 m. For rafters, you can use boards measuring 5x15 cm. Do not skimp on the quality of the rafter boards, so as not to become a victim of roof collapse due to low-quality wood.
- We install fillies. We carry out the process by analogy with rafters. We start with the outermost pair, stretch the twine between them and align ourselves with it during subsequent work.
- We nail the hem board to the fillies. It will prevent winds and precipitation.
- We strengthen the rafters in the places where the skylights are installed. To do this, you need to install cross bars. They will serve as the upper and lower parts of the opening, where the frame will be fixed.
Remember that all wooden elements that are used in the construction of the attic must be treated with antiseptics and fire retardants. Before moving on to the next stage of insulating surfaces, make sure that all supporting structures are in order. All small flaws and cracks must be sealed with foam.
How to escape from moisture - arranging a vapor barrier
An attic above a bathhouse is not at all the same as a second floor above an ordinary room. It's all about the temperature and humidity conditions, which differ significantly from normal conditions. After all, the main problem of the second floor of a bathhouse is high humidity. After all, a lot of steam comes from below, from the steam room, and therefore a special layer for such a construction is simply necessary. If the bath attic is equipped like an ordinary one, it will always be too stuffy and humid. Therefore, the interfloor pie here should be like this: on the side of the bathhouse, below, a vapor barrier must be placed (this can be foil or film), then insulation, and the finished floor on top of it. The “pie” will look something like this if you look at it from the bottom up:
- Finish ceiling: lining, suspended or plasterboard.
- Rough ceiling.
- Vapor barrier: film or foil.
- Thermal insulation: basalt wool between the rafters.
- Ventilated bottom gap – 50 mm.
- Roofing membrane - Tyvek, Isopan or Utah.
- The upper ventilation gap is also 50 mm.
- Lathing.
- Roofing covering.
You can read more about how to use foil for a bath here:
In addition, all wooden elements of a log bath with an attic must be carefully treated with fire retardants and antiseptics. Before you start insulating, it is important to make sure that all its supporting structures are in order - cracks and minor flaws need to be caulked or sealed with polyurethane foam.
If metal tiles were chosen as the roof over such a veranda, a film under it is simply necessary so that condensation does not accumulate on its inner surface. And the ventilated space between the insulation and the roof itself will significantly extend the life of the rafter structure - the wood will breathe.
You can also build a more budget-friendly option: use ordinary reinforced film as a vapor barrier and seal its joints with tape. And as insulation, use Ursa for the floor, for walls - slab insulation, placed in a spacer between the existing frame posts. The cheapest of them are Knauf, Techno and Rocklight.
Installation of a roof for a bathhouse with an attic
Once the roof skeleton has been created, you can begin installing the roof and installing the sheathing.
The step in this case depends on what roofing material you will cover the roof with. If you choose soft tiles, then a continuous sheathing is installed for it, which is made from tongue-and-groove boards. We install a solid sheathing on a sparse one in increments of 30 cm. Thus, we get a double sheathing.
Next, we install a hydraulic barrier on the sheathing. Usually, ordinary polyethylene is used for this; the layers are laid with an overlap from bottom to top. We put a layer of thermal insulation, for example, mineral wool, on top of the film, cover the insulation with a layer of vapor barrier and secure it with tape.
We install the roofing material according to the same scheme as the waterproofing material. We lay the roofing elements from bottom to top, overlapping. Make sure that in places where the roof breaks, the top layer of the roof protrudes above the bottom. We install the ridge so that its design prevents water from entering under the roof.
Bath house with attic: project on the site
If they plan to erect only one building on the site, namely a bath house, where the built-on floor acts as a living space, then the location of such a structure depends on the location of communications. The main thing for a bathhouse is the supply of a water supply system and sewerage system. When choosing gas heating, it is necessary to locate the building directly next to the gas pipeline.
Important! If you install a gas furnace, you must obtain permission from the relevant services to connect to the gas pipeline.
When choosing a project for a bath house with an attic, the location of the future building is chosen while observing the minimum standard distances:
- to the outer fence - 3 m;
- to a well or well - 12 m;
- to the fence of the neighboring plot - 8 m.
Otherwise, the necessary permits will not be obtained.
Installation of skylights in the roof of a bathhouse
Skylights look great, although installing them is a rather labor-intensive process, and this needs to be done at the stage of constructing the rafter system.
Proper ventilation and lighting in this room is ensured precisely thanks to the proper arrangement of windows. To make the most of window openings, we carry out the work in the following order:
- We install a large semi-oval panoramic window on the pediment. You can also choose any other shape except square and rectangular. Non-standard lines will visually expand the space.
- We install a wide wooden window sill near the window opening on the roof slope and insert a transforming window that opens in the vertical direction. It can easily transform into a small balcony. The upper doors will serve as a canopy, and the lower ones will be used as a fence.
- We install small vertical windows around the perimeter of the roof.
- We place blinds for inclined structures on the windows on the slopes. They are equipped with special supports and fasteners that make it easy to adjust the position.
- We install double curtain rods above small windows and attach roller blinds made of lightweight material in a soft pastel shade to them.
To ensure good ventilation, give preference to high-quality double-glazed windows. The best option would be “breathable” windows made of wood. The use of wooden structures is preferable, since PVC windows will not fit the overall style of a room decorated with wood.
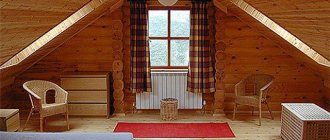
Technology of interior decoration of the attic bathhouse
In most design projects for finishing this room above the bathhouse, preference is given to natural materials.
Of these, wood is the most popular. Finishing surfaces with wooden materials makes it possible to create a relaxation room in almost any style. Brief instructions for interior decoration of the attic above the bathhouse:
- We treat the floorboard with antiseptic compounds and fire retardants in several layers, and install the wooden flooring.
- We attach the sheathing to the ceiling, covering it with wooden clapboard. We place the panels along the length of the room.
- We cover the surfaces of the roof slopes and struts with edged boards.
- We attach the lining to the walls of the attic, having previously secured the sheathing.
Please note that it is better to make the floor in one plane. Podium structures are an unsuccessful solution for an attic space.
Do-it-yourself exterior decoration of the attic bathhouse
Immediately upon completion of construction, the attic made of timber should be caulked using tow, flax or jute.
From the outside, the completed attic should be decorated in the same style as the entire bathhouse. Regardless of the chosen finishing material, the timber structure needs shrinkage. Therefore, before starting exterior finishing work, you should wait a couple of years.
If both the bathhouse and the attic are built from timber, then it is enough to wait for all the structures to shrink and cover them with varnish, which is suitable for the exterior finishing of wooden buildings.
How to build an attic over a bathhouse - watch the video:
Knowing how to build an attic in a bathhouse, you can cope with all the work yourself, without the help of professional builders. The main thing is to choose high-quality building materials, because the reliability of the structure will depend on this, and to strictly follow the instructions.
Insulation - internal and external options
You can insulate the attic of a bath either externally or internally. Each of these methods has pros and cons, but the choice of insulation will depend more on the construction method. For example, the most appropriate is external insulation, when the layer is laid in the ceilings and walls of the structure - but this can only be done during the construction of the bathhouse itself with an attic made of timber, and not after it.
If you are interested in finding out what costs are required to insulate a bathhouse, we recommend that you watch the video
But if the steam room was built a long time ago, and the attic is only now being insulated, then you can resort to the internal method. But here it is important not to achieve a greenhouse effect - for this it is necessary to take care of waterproofing between floors and a reliable ventilation system. Mineral and basalt wool, heat insulation with aluminum foil, isospan and foam sheets are suitable as insulation. Waterproofing with decorative finishing panels is laid on top of it. As for basalt wool, according to SNiPs for the Moscow region, for example, you need to take at least 20 cm. But in practice it turns out that even at 15 cm it is very warm on such a roof.
As for finishing the walls of the attic, the best option is lining made from softwood - simple and reliable to use, it is installed very quickly and requires a minimum of effort. A good alternative to them can be modern plastic panels, which amaze the imagination with a variety of colors and textures - with their help you can create any interior design. And, finally, occasionally sheets of plasterboard are used to decorate this room, which will later need to be plastered or painted.
All that remains to be taken care of is the safety of the stairs to the attic - after all, a person after the steam room can be in a relaxed state, which is why it won’t take long for him to slip. Therefore, the staircase should be as comfortable and safe as possible: the angle of climb, the material of manufacture, the enclosing parts. It can even be made the central and most striking element of the steam room design - and the photos of the bathhouse with the attic will be no worse than on the pages of glossy magazines.