A shower drain or gutter drainage system is a universal design designed to effectively remove non-aggressive liquids, including water, from the floor surface in special rooms.
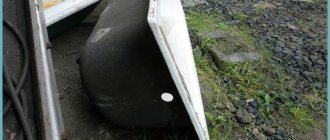
Shower drain
Long grated shower drain
Structural characteristics and purpose
The shower drain belongs to the category of complex plumbing devices, and is fixed directly to the pipeline through a special floor hole. This design includes:
- funnel-shaped water inlet or housing;
- siphon, responsible for creating an effective hydraulic seal;
- a flange through which the waterproofing membrane part is sealed;
- a grate that prevents clogging and failure of the sewer system;
- outlet coupling part connected to the drain part of the sewer system.
Drain drain assembly diagram
During operation of the drain ladder, the entire device must be securely fixed, and the removable part is represented only by a lattice cover. Most shower drain devices are installed in the floor, but some models are built directly into the wall.
Decorative drain gratings
Despite their apparent simplicity, drainage structures have a wide range of functionality:
- transport the water flow to the sewer riser;
- provide optimal tightness of the joint with the floor;
- carry out primary filtration of wastewater and prevent sewer clogging.
The built-in hydraulic seal prevents all unpleasant sewer odors from entering the room.
Main types of ladders
The choice of drainage device should be approached competently and carefully, having studied the features of each type of product and the possible service life.
Decorative round grille point drain
Helpful advice! When choosing a drain, you take into account not only its functional features, but also its appearance, which should be in harmony with the overall design of the bathroom.
All shower drains differ from each other in their design, height and shape. The shape of the outer grille can be rectangular, round, square or oval. Depending on the design, the devices can be linear, point and wall.
Point products can be located anywhere in the room. Linear shower drains are placed mainly along the edges and corners of the room. Wall drains are installed near the walls.
Helpful advice! For the elderly, children and people with disabilities, linear slotted shower drains are ideal.
Linear drain with narrow drain hole
The height of the ladder can be 90-150 mm. The drainage capacity is 0.8-1 l/s. Depending on the suitable sewer pipe to the drainage point, the drain may have a horizontal or vertical outlet. Horizontal drains provide more convenient drainage of water. But drains with vertical water drainage provide greater throughput.
If the sewer pipe comes from the basement or lower level, or if the shower stall is located on a platform, you should choose a floor shower drain with a direct outlet.
If the trench for the drain pipe is laid in the floor on a slope, it is possible to buy a shower drain with a side outlet. To be able to turn the drain pipe to the side, you should choose a drain with a sloped outlet.
The shower drain under the tiles can be with a dry, water or mechanical shutter. A drain with a water seal is considered the simplest and cheapest option. Here the function of the plug is performed by the water itself, which is retained in the siphon and prevents sewer stench from entering the room. If you use the shower constantly, dampness may occur, which contributes to the development of pathogens. Disinfection should be carried out here constantly.
Drain ladder with LED lighting
If the shower is not used for a long time, the water dries out, and all odors from the sewer safely penetrate into the shower room. This type of drain is ideal for warm rooms where waste water is discharged frequently.
The most acceptable and popular option is a shower drain with a dry seal. It does not cause dampness. Here all the water immediately goes down the drain. This system is ensured by the presence of a ball in the design of the ladder, which is placed in a funnel. When the ladder fills with water, it begins to gradually float, thereby opening the drain. After the water drains, it returns to its place and blocks the access of air from the sewerage system. Suitable for rooms with infrequent wastewater discharge.
A drain with a mechanical shutter is ideal for installation outdoors or in poorly heated rooms. Here, thanks to the non-freezing design and specially non-retaining liquid, the possibility of unpleasant sewer odors getting into the shower room is eliminated.
The most popular products today are vertical drains with a dry seal, which provide maximum throughput and protect the room from unpleasant stench.
Floor drain under tiles in bathroom
Helpful advice! To eliminate the possibility of such a valve failing as a result of debris accumulation, it should be cleaned regularly.
The height of the ladder plays an important role when choosing it. It directly depends on the height of the floor screed. A taller ladder has better throughput than a lower one. It is better to buy a shower drain for tiles in the floor with adjustable height.
Also, shower drains for tiles should be selected taking into account the diameter of the sewer pipe. For residential buildings, it is recommended to install a drain with an outlet diameter of 50 mm, the throughput of which is 0.7 l/s. For public premises, bends with a diameter of 100 mm are used, providing a throughput of 2.1 l/s.
Materials for the manufacture of sewer drains
A dry floor shower drain can be made of plastic, cast iron and stainless steel. Plastic products are lightweight, easy to clean, resistant to aggressive environments, and durable. They are often used for shower rooms in private houses and apartments. Wastewater drains through the gap between the shower tray and the grate, as well as through the through holes on the top of the grate.
Glass drain in modern design
Plastic drains are equipped with decorative removable or non-removable gratings of various shapes and patterns. The height of the product is 75-180 mm. You can install a shower drain in the floor under the tiles near a wall or in an open area of the room.
All components of the sanitary element, except for the legs and grille, are made of high-strength plastic. The siphon is often made using floating ball technology. Although this design reduces capacity, it does provide a dry valve. After the complete outflow of water, the balls sink to the bottom, thereby blocking the access of air with unpleasant odors from the sewer channel.
To reduce the cost of the product, the legs can be made of perforated steel tape. Then the required height of the ladder is achieved by bending the tape. Adjustable screw feet can be used instead of a steel band.
For the installation of public showers, sports and bath complexes and health centers, 110 mm plastic sewer drains are often used. This compact element is built into the floor with a slight slope. It is compatible with almost any floor covering.
Round plastic bathroom drain
It is recommended to install stainless steel sewer drains for rooms with increased hygienic requirements. The products are most relevant for children's institutions, swimming pools, medical and health institutions.
Not only the body, but also the decorative grille can be made of stainless steel. A modern solution is linear stainless steel strips, which are used to collect large quantities of wastewater. They are practically invisible in the floor and are filled with stone or ceramic tiles. They may have a curved “U” shape.
For rooms with harsh operating conditions, cast iron ladders are used. These products have the highest throughput and increased resistance to corrosion, which ensures a long service life of up to 50 years. Most often they are made with a water seal. Such drains are installed in laundries, swimming pools, showers, and specialized laboratories. To ensure the removal of rain and household wastewater, only cast iron vertical drains with a diameter of 100 mm are used.
Types of gratings for ladders
Gratings for drains can be made of various materials. The best quality is considered to be a grill made of stainless steel. Plastic grilles are less durable, but they are much cheaper than metal ones. Also in stores you can find a more modern type of glass grate, which looks very good in shower rooms and is not inferior in service life to a stainless steel grate.
Stainless steel corner grate for drains
Which siphon to choose?
Siphons for shower stalls, also known as drains, differ from their relatives in that they cannot be closed with a stopper. They can be small in size and this makes shower trays easy to install.
The design of the siphon can be corrugated, bottle-shaped, or the siphon can be made of a rigid pipe. There are simple, automatic, and siphons with a close-open function.
Possible locations of the drain in the shower
The plumbing drain can be located in the following areas of the bathroom:
- In the center of the shower room. Here it is necessary to ensure a slope of the floor on four sides.
- In one of the corners. With this solution, the floor slopes in two planes, ensuring water flows to the desired angle. This is the best option that does not attract unnecessary attention.
- Near the wall. The floor is sloped towards the drain in one plane. In this way, slotted linear shower drains are installed in the floor under the tiles, which provide high throughput. They look good on the floor and are much less likely to clog.
Layout of floor drains under tiles
Recommendations for selection
When choosing a special element of plumbing communications intended for drainage of wastewater into the sewer system, you must first of all pay attention to such a very important parameter as throughput indicators, indicating the amount of water that the drain can consistently discharge per unit of time. As a rule, the standard calculation of the required throughput is based on the following data:
- with a diameter of the upper shower head of 300 mm, the average water supply per hour varies between 30-90 l;
- using a cascade shower requires water consumption in the range of 1500-1800 liters per hour.
When choosing throughput, it is advisable to take into account a small margin of 5-10%, which will prevent emergency situations and flooding.
If you need to perform independent installation and have no experience in plumbing work, it is not advisable to purchase round models. It will be quite problematic to perform a perfectly smooth and beautiful installation of the floor covering when installing such a ladder with your own hands.
Corner round drain
Specifics of materials
When designing a system, it is necessary to take into account the specifics of the pipe material. They will be immersed in concrete, so there will be no possibility of correction. You need to pay attention to the following factors:
- thermal expansion of materials. Since the pipes will be tightly filled with concrete, there will be no room for them to change sizes. In this regard, plastic channels pose a particular danger. They have a high coefficient of thermal expansion. If the screed layer is thin, cracks or tears in the surface may appear;
- load-bearing capacity or strength of pipe walls. If cast iron ducts are used, no problems can be expected. Plastic parts are weaker and may not withstand the pressure of concrete or other structures. They need to be reinforced with corrugation;
- adhesion of plastic elements to cement is low. If cast iron combines well with the solution, then PVC or propylene pipes easily lag behind it.
Given these features, it is recommended to use cast iron pipes. they are more reliable, stronger and better connected to concrete. If you are building a sewer system in the floor of an apartment where large loads on the system elements are not expected, you can install plastic parts. Before pouring, it is recommended to apply a layer of concrete contact primer to them.
Installation technology
A properly selected shower drain is resistant to corrosive changes, and is also characterized by reliability and durability. If necessary, this structure can be disassembled and cleaned independently.
Step 1. Areas of all joints of the floor and walls, as well as corners, are carefully treated with mastic, which prevents the ingress of moisture, as well as the formation of mold and foci of fungal infection.
Step 2. Assembling and subsequent installation of the drainage system, which should be located on a straight line between the section where it inserts into the sewerage system and the junction of the floor tile elements.
Step 3. Inserting into the sewer and processing the connection using silicone plumbing sealant. If it is necessary to connect drain pipes from a large number of plumbing fixtures, use a standard adapter for several outlets.
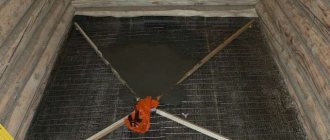
Step 4. Additional thermal insulation of the concrete base using granulated or extruded polystyrene foam sheets. The contours of the installed elements of the drainage system are carefully cut out using a construction knife.
Additional thermal insulation of the concrete base
Laying thermal insulation
Laying insulation and installing a ladder
Installing a siphon
At this stage, it is possible to replace heat-insulating materials with a cement-sand screed.
Step 5. Lay plastic deformation borders or damping self-adhesive tape along all walls.
Step 6. Mixing the cement mortar and applying it to the polystyrene foam surface in a layer of 3.5-4.0 cm. The mixture to be laid should completely hide the installed drain without a flange. Leveling the cement mixture is carried out according to construction rules.
Insulation
Screed
Further work should be carried out approximately three to four days after the concrete screed has hardened well and gained full strength.
Cladding walls while the screed is drying
Step 7. Prepare a gasket with a diameter of 15-20 cm from an isoplastic membrane with a hole in the central part, and then fix it with a screw around the flange.
Step 8. An additional layer of waterproofing should also be provided in the corners, at the joints and along the entire surface under the shower stall. After treatment with the primer, a layer of coating mastic is applied.
Application of primer
Additional layer of waterproofing and installation of a drain pipe
Step 9. Connecting the siphon and the grille with a gasket in the form of a rubber O-ring.
Sealing ring
Waterproofing
When installed correctly, the decorative grille can be easily dismantled, making the inside of the drain accessible for work. The cover must be covered with polyethylene, which will prevent cement mortar from getting into the drain system.
Step 10. Applying another layer of cement screed. When the drain hole is located in the central part of the shower room, guides are installed in a diagonal direction, the lower corner of which should converge at the drain. The resulting triangle is also filled with the mixture.
Guides
Pouring the mixture
Pouring a screed with a slope
The hardening cement mixture must be periodically moistened and thoroughly leveled. At the final stage, the guides are removed, and the freed space is filled with cement mixture.
Installation of beacons
In my experience, there are two methods of installing beacons: simple and fast, which has a number of disadvantages, or more complex, but of very high quality. Let's consider both methods. By the way, in both cases it doesn’t matter at all whether the ladder is in the center or shifted to the side. Also, do not forget about the individual slope, suitable for a specific case.
For a simple method, you will need only three beacons: two parallel ones, as close as possible to the opposite walls and one middle one, along the axis of the ladder. The middle lighthouse is also parallel to the other two, with both halves sloping towards the gangway. Wall beacons do not have a slope, but are set to the maximum height.
The main advantages of the method are speed and ease of installation. An important feature is that rectangular tiles will not need to be trimmed at fracture edges, even if the drain is located far from the center of the room. As can be seen from the diagram, as a result, four slope faces are formed, which are perpendicular to each other, regardless of where the floor is installed. This scheme is well suited for elongated ladders; the angle between the edges does not change and therefore the rectangular tiles do not have to be cut at the fractures of the planes. If you plan to cladding with mosaics, then this point is not important.
The main problem with this solution is that the planes turn out to be slightly “screwed”.
The smaller the room and the stronger the slope, the more clearly this effect manifests itself and causes problems. Therefore, when tiling, significant layers of tile adhesive can come out closer to the walls.
This solution has a couple more disadvantages: wall beacons need to be brought as close as possible to the walls, since, as a rule, placed on one outer and central beacon, it will inevitably rise higher than it should in the gap between the wall and the outer beacon. The rule will not rise evenly along the entire length of the stretch, but less at the edge of the room and more towards the installation point of the ladder.
The second disadvantage is that the edges of the screed will approach the center of each side of the ladder, and not the corners. Because of this, when tiling, the tiles at the corners of the ladder will be slightly higher than in the middle. When using a round drain, the disadvantage does not matter. Also, the disadvantage will be automatically eliminated if you initially install the square drain diagonally.
The second method of installing beacons is traditionally considered to be of higher quality. To be fair, I would like to note: in order for rectangular floor tiles not to be cut along sloped edges, the plane must have perpendicular edges. This can only be achieved with a square or round ladder installed clearly in the center of the square room. When using a rectangular, elongated ladder, if placed in a non-square shape, the edges will be at different angles to each other and you will have to trim the tile along some of the edges. As usual, there should be no problems with the mosaic.
This scheme is good in some of the situations described above, but it is more tedious to place beacons, and such a screed is also a little more difficult to fill. The result is four planes with slopes, each plane clearly facing one of the four sides of the ladder. Thanks to this, when tiling, a perfect junction between the ladder and the tile is obtained.
The disadvantages of this method are obvious: with a non-square room, a rectangular ladder and not in the center, it is more practical to use the first method.
What slope should I keep?
For normal drainage of water, a slope of at least 1 cm per meter is required. This means that the longest lighthouse (with the first method, this is the central one) should have a slope of a centimeter of a meter or more. When installing the drain not in the center, but, for example, closer to a wall, the slopes on short beacons will be steeper. This will allow you to achieve the same level around the perimeter of the screed.
If you plan to cover the floor of a small shower room and the tiles are not of the mosaic type (small in size), then the best solution would be to create an individual slope system, different from those described above. Slopes are planned based on the specific size of the floor tiles. Here is one such example:
Expert advice
The most convenient, from the point of view of self-assembly, reliability and durability, is the purchase and installation of the most modern, ready-made type-setting structures, represented by perforated metal-plastic. It is recommended to apply red lead to the mounted surface of steel structures.
The ceramic floor covering used in the construction of the drain must meet increased requirements. The surface of the tile should not be slippery or absorb significant amounts of moisture. The moisture absorption level should be 1.5% or less of the weight of the tile itself.
Finishing work
The ladder is installed
Video: Laying tiles on the floor using MAGIC part 1
Video: Laying tiles with a slope under the drain in the shower, part 2
Video: Laying tiles on the floor, with a slope to drain water, part 3
Surface roughness increases operational safety and prevents slipping when water enters. Installation is carried out using special adhesive contact compounds. All seam joints between the elements of the tile covering are sealed exclusively with waterproof grout, which can be the same color as the main coating or have a contrasting color. Learn how to install a heated towel rail in a bathroom using this link.
Floor drain
Where is the installation of hidden pipelines allowed?
The design and installation of sewerage networks in the floor are carried out in accordance with the requirements of SNiP 2.04.01-85, or its more current edition SP 31-106-2002. The use of hidden installation is prohibited in the following rooms:
- in load-bearing structures or ceilings of residential premises;
- in children's playrooms or bedrooms;
- medical offices or wards;
- in the dining rooms;
- in reading or auditoriums, classrooms, auditoriums;
- at power sections, substations, switchboards.
Pipelines are laid:
- inside walls, ceilings and other building structures with pouring concrete (sealing);
- sewerage in the floor screed, in the ground under the ceiling, in channels;
- between the ceiling slab and suspended ceilings;
- in sanitary facilities (baths, toilets, showers);
- vertical or inclined shafts.
In apartments or residential buildings, sewerage in the screed or wall is carried out in special recesses (trays). To do this, the thickness of the walls or ceilings must correspond to the size of the pipes. For panel houses, laying pipes is not possible in all structures, since due to the recess in the slabs their strength is compromised. The system is allowed to be installed only in internal walls that are not load-bearing structures.