Construction Features
Typically, technology allows you to install floors on the ground in a strip foundation. The method is not applicable for complex types of supporting structures that combine two or several types of foundation, for example, pile-strip.
Strip foundation in a private house Source betonbase.ru
There are several types of subfloors. Among them, concrete screed. Rely on: the structure can:
- on load-bearing walls;
- a cushion of soil backfill.
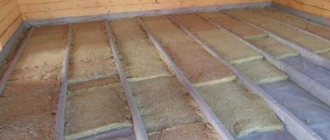
As a base, you can use plank flooring on wooden beams (joists). For each type of structure, a floor pie of a certain composition is constructed. Concrete cannot be poured directly onto the ground or clay.
Clay floor in outbuildings. Source 9ban.ru
It is necessary to prepare an intermediate base layer that provides:
- rigidity;
- thermal insulation;
- waterproofing;
- stability;
- ability to withstand loads.
Advice ! It is easier and faster to install wooden flooring. To arrange such a foundation, you do not need to carry out serious preparatory work.
The decision to lay floors on the ground is made based on the results of a soil study. It is important to know whether there is water lying close to the surface under the building.
Wooden floor on the ground Source prd.ru
Positive and negative sides
Floors on the ground have several advantages:
- ease of installation;
- efficiency;
- sustainability;
- ability to withstand significant weight;
- minimal load on the walls or its complete absence;
- wear resistance;
- maintainability;
- suitability for coating with any type of finishing materials;
- possibility of installing a “warm floor” system.
Design disadvantages include:
- the need to lay a layer of insulating materials;
- impossibility of installation over a layer of bulk materials more than 60 cm thick.
Important ! Floors on the ground cannot be laid in areas of flooding, river floods and swampy soil with an unstable level and close groundwater. The design of the floors must be created according to technology.
Groundwater lying close to the soil surface Source avatars.mds.yandex.net
Creation sequence
The rough plank floor is easy to install. A sand cushion is made on top of the soil, which is covered with geotextiles. The insulating material is covered with insulation.
It is more difficult to create a concrete floor on the ground in a private house. Filling is done on top of several layers of building materials:
- sand;
- gravel;
- metal mesh (can be replaced with fiberglass);
- ten-centimeter concrete screed;
- waterproofing material;
- insulation (expanded clay, polystyrene foam, penoplex);
- additional protection from moisture;
- top concrete screed.
It is advisable to reinforce the last layer to avoid cracking when drying. If the homeowner decides to equip the home with a “warm floor” system, the structure will have to be assembled and configured before pouring the concrete screed. This is how floors are built on the ground; the correct pie provides high-quality heat and waterproofing, stability, and wear resistance of the structure.
Sand backfill Source izhevsk.ru
The combination of wallpaper colors in the interior
There are two main ways to combine wallpaper of different colors in the interior: simple - a combination of two colors and complex - several colors and shades. Colors are divided into warm and cold, light and dark, compatible and incompatible.
If you wallpaper a room with different light shades of pastel colors, you will get an airy, weightless, light interior. The combination of black and white materials is always popular when creating a classic or high-tech interior. Combining dark wallpaper is a more difficult task; try to avoid an oppressive, heavy impression of the design. This option combines dark brown, black, green, and red shades well. Wallpaper of gray or beige tones is used, varying with color accents you can get both bright modern and strict baroque.
Based on the main color of your interior, you need to consider that:
- red wallpapers are combined with brown, purple, shades of gray, gold and blue;
- orange goes well with caramel, brown, white, gray, greenish, but doesn’t go with all shades of red;
- yellows are muted by beige, brown, and do not combine with red and pink;
- brown, beige perfectly complement each other, combined with blue, gray, green, gold, not suitable for burgundy or red;
- greens are combined both with calm warm tones and with wallpaper of bright colors;
- blue goes with white, light blue, gray, brown, burgundy, gold and silver, but does not go with green;
- purple goes with gold, all shades of yellow and orange, beige and pink, does not go with red.
Colored wallpaper in Scandinavian style
Consider these simple rules when creating your own personal, unique design interiors and you are guaranteed an excellent result
It doesn’t matter whether it will be among the top best design projects of the year, the main thing is that it brings you joy
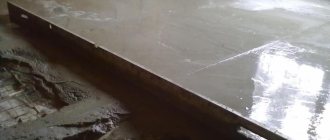
Concrete screed
Before carrying out work, it is necessary to collect information:
- about the composition of the soil;
- about the level of groundwater.
On swampy soils around the building, a drainage system is created to remove soil moisture during the rainy season and active snow melting.
The preparatory layers of backfill are applied one by one after the previous building material has been thoroughly compacted.
Thick layers of sand and gravel are difficult to make dense enough. Over time, the backfill will shrink, which will be greater the thicker the preparatory layers. Therefore, it is better to pour the rough screed directly onto the geotextile fabric. This technology ensures high-quality crystallization of the material.
When concrete is poured over a layer of gravel or sand, the liquid leaves the mixture. The hardening process is disrupted and the strength of the screed is reduced.
Important ! Each previous layer is carefully compacted, and when pouring the screed, the period necessary for hardening and drying the material is maintained. It will not be possible to make a high-quality concrete floor on the ground in one or two days.
The screed cracked due to a violation of the laying technology Source remontik.org
Violation of the manufacturing technology causes:
- deformation, destruction of the lower layers;
- loss of structural strength;
- formation of bumps, depressions;
- cracking of the screed.
Before work begins, hot and cold water and sewage pipes are installed. After pouring the concrete, in order to introduce communication systems into the house, you will have to break the tightness of the structure and break part of the floor pie.
Installation of floors on the ground is carried out in several ways, which differ in process technology and applicable materials. Each method has pros and cons. The choice of technology depends on the foundation, soil, tastes and preferences of the homeowner.
Pouring a concrete screed requires knowledge and skills from craftsmen. During work, “wet” solutions are used. The concrete hardening process takes time. Each new layer of building materials is placed on top of the completely finished previous one. A poorly dried rough screed may burst if the concrete is not allowed to gain sufficient strength.
Pros and cons of concrete floors on the ground
Advantages
- Reliably protect the room from the cold. No matter what the weather is like outside, the soil will always be warm.
- Any insulation and waterproofing materials are applicable, as well as any coatings for finishing the floor.
- The main load is distributed over the ground, there is no need to make additional calculations. If a large load is expected, you simply need to increase the thickness of the three lower layers.
- It is possible to organize heating of the house through the floor, which will heat up quickly and distribute heat evenly, preventing drafts.
- Protect the house from mold and proliferation of microorganisms.
Concrete floor on the ground
Flaws
- It is necessary to take into account the location of the groundwater level.
- They can significantly reduce the height of the room with certain design features of the house.
- The technology is not applicable for pile and columnar foundations.
- If problems arise in the system, its repair and dismantling is a very time-consuming and financial undertaking.
- Installing floors is a lengthy and complex procedure in terms of volume of work, as well as costly in terms of finances; it is best to carry out such work during the construction of a house.
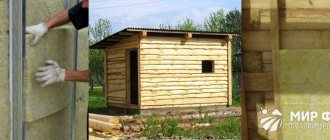
Due to the number of layers, concrete floors on the ground can make the room lower
Video description
How to properly create a floor pie for pouring a concrete screed can be seen in the video:
See also: Catalog of companies that specialize in finishing materials and installation of stoves and fireplaces.
Work must be carried out under certain conditions:
- Filling is done at temperatures above +5 degrees.
- The construction site or room must have a roof or canopy that protects from direct sunlight.
Sequence of work:
- Step 1 . First, a sand cushion with a thickness of 20 to 60 cm is poured. The layer is leveled and compacted to the maximum possible density. The backfill is filled and compacted using heavy rollers.
- Step 2 . Crushed stone is poured on top of the sand. Ideally, the layer thickness should be about 20 cm. By tamping the crushed stone, the density of the sand cushion increases.
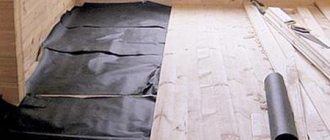
- Step 3 . The backfill is covered with geotextile. The strips of fabric are laid overlapping by 15–20 cm. An overlap is made on the walls from the side of the foundation strip. A damping tape is installed around the entire perimeter. It provides a decoupling between the floor and the foundation strip.
- Step 4 . A metal reinforcing mesh is placed on top of the fabric and filled with concrete mixture. The rough screed must harden thoroughly. Work cannot be continued until the material has acquired sufficient strength.
- Step 5. Double roofing material is used for waterproofing. The material is laid on a rough screed, then treated with bitumen mastic.
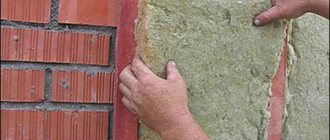
Laying penoplex for insulating a concrete floor Source altpol.ru
- Step 6 . The insulation layer is created from penoplex. Choose brands intended for the foundation. This insulating material is characterized by increased density, resistance to moisture, temperature changes, and the effects of bacterial and fungal infections.
- Step 7 . The next layer is a vapor-waterproofing film placed on the penoplex. The material is laid so that there is an overlap along the entire perimeter over the damping tape on the walls. Its height should be 18-22 cm. The film strips are positioned so that they overlap each other. The sides are taped with construction tape.
- Step 8. A reinforcing fiberglass mesh is laid under the finishing screed. Concrete is poured on top of this material. The thickness of the last layer can be from 5 to 10 cm.
If a warm floor is created on the ground, then before pouring the finishing screed, the system is installed and pipes are laid. Concrete is poured after all commissioning work has been carried out.
Reinforcing mesh with damper tape around the perimeter Source vse-postroim-sami.ru
Manufacturing technology
Before pouring the floor on the ground, it is necessary to prepare the base and lay all layers of the structure. It is advisable to lay the mixture in one go, using beacons and a fine fraction of concrete filler.
Substrate
Before pouring the floor in your home, you should take into account the nuances of the foundation soil:
- despite the fact that ground floors are created from concrete of class B12 and higher, they are easily destroyed when the soil beneath them shrinks, so the fertile layer should be completely removed;
- the underlying layer of non-metallic material must be compacted in layers of maximum 15 cm with a vibrating plate or manual tamper;
- sand has capillary absorption of soil water, it is used only at low groundwater levels of 1.5 m;
- crushed stone can be used on wet soil, since capillary rise is not possible in this material.
To reduce the construction budget and improve the quality of living, it is important at the initial stage to plan the floor level on the ground in all rooms of the building, taking into account the requirements:
- the step near the front door is extremely inconvenient to use; the floor covering should be located at the same level as the threshold;
- it is prohibited to rest the screed on elements of the plinth or foundation protruding relative to the internal walls;
- When compacting sand, it is forbidden to spill it with water; you should wet the layer with a watering can.
Advice! If you have a limited budget, you can do without concrete footings by leveling the crushed stone layer with sand. In this case, the film, membrane or roll waterproofing will not be torn by crushed stones. However, in this case, the surface of the underlying layer must be spilled with cement laitance to form a crust, for the convenience of sealing the waterproofing seams.
Footing and waterproofing
The main requirement for a waterproofing layer is its continuity. Therefore problems arise:
- Rolled bitumen materials (Bikrost, TechnoNIKOL) and polymer films are difficult to lay on the ground properly, since when walking on them in the future, the joints diverge;
- Heavy EPDM membranes have a large format, are laid without joints, but are very expensive.
Therefore, first a concrete base 5–10 cm thick is poured, providing a rigid, even base for gluing polyethylene film or fusing bitumen material.
Important! The footing is also prohibited from being rigidly connected to the elements of the foundation or plinth. This layer does not need to be reinforced; lean concrete with a minimum cement content can be used.
It is not enough to know how to properly make a floor on the ground; it is important to place the layers of the structure relative to each other in the right order:
- many individual developers lay insulation on the sub-concrete or underlying layer and cover it with waterproofing on top;
- or they duplicate the film under and on top of the insulation, increasing the consumption of the construction budget.
Both options do not provide any advantages, since the membrane, film or roll material must prevent the extruded polystyrene foam and the top screed from getting wet by soil moisture, which can also be in a vapor state.
Under normal conditions (constant heating), the temperature under the concrete slab and insulation is always lower than in the room. Therefore, the penetration of excessively humid air from the room into the floor through the ground is impossible according to the laws of physics. Vapor barrier inside this structure is unnecessary and even harmful.
Important! Bitumen roll materials are fused onto the concrete base in two layers with an overlap of 15 cm at least perpendicular to each other. Films are glued in two layers in any direction. The EPDM membrane is installed in one layer.
Read more: Waterproofing the floor on the ground.
Insulation and damping layer
The ground floor functions as a ceiling, but does not have rigid pinching around the perimeter. Therefore, the insulating properties of this technology are by default higher than in joist floors and PB and PC slabs:
- the bottom layer of insulation reduces or completely eliminates heat loss at the junction points with the base;
- the floating screed is cut off from the walls by a damping layer, structural noise and vibrations are not transmitted into the room;
- the quality of the concrete surface is higher than that of slabs; sealing of joints and leveling screed are not required;
- there is no underground, and therefore no harmful accumulation of radon gas from the ground;
Important! The damper layer is usually a special tape or strips of polystyrene foam. The perimeter of the plinth or foundation is covered with tape. The insulation strips are installed edge-to-edge against the walls along the entire height of the screed, starting from the base of the concrete footing.
The thickness of the thermal insulation material depends on the region of operation, ranging from 5 to 15 cm. Expanded polystyrene slabs are laid staggered, the joints are filled with polyurethane foam.
Communications and reinforcement
The ground floor built using this technology is a floating slab. Therefore, before laying the mixture, it is necessary to install risers of engineering systems into the premises - heating, cold water/hot water supply, sewerage. Electrical and gas lines are installed at the finishing stage, grounding - depending on the specific building project.
Advice! The maintainability of communication input nodes is zero by default. Therefore, it is increased by laying risers inside pipes of larger diameter, from which, if necessary, a clogged sewer or rusted water supply pipe can be pulled out for replacement without destroying the screed.
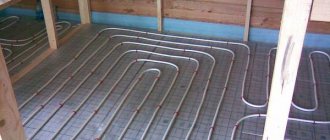
To ensure that a heated floor made on your own has a margin of safety during possible redevelopment, the structure is often reinforced in the lower third. Wire mesh BP, complying with GOST 6727, available in rolls and cards, is optimally suited for this purpose.
The reinforcement is made in one layer, the overlap is at least one cell, the mesh is laid to provide a lower protective layer on concrete or plastic pads.
Read more: How to reinforce a floor on the ground.
Laying the mixture and maintaining concrete
The best option is to concrete the screed in one step with a mixture that is made at the factory and delivered to the building site with a mixer. The main difficulty when laying concrete is the inability to walk on the wire mesh. Therefore, the following filling options are used:
- ladders - spacers of suitable format (pieces of brick, pieces of timber) are installed in the mesh cells, on which the boards rest; as they move, they are moved to a new location;
- “paths” - since the pouring begins from the corners farthest to the doorway, the concrete is poured as the craftsman moves towards the workplace, the mesh inside the concrete receives the necessary rigidity, and the resulting paths can be walked on without mixing the reinforcement in neighboring areas.
Laying concrete from the ladder.
Installing beacons increases the productivity and quality of the screed. Depending on the thickness of the layer, plaster beacons or profiles for gypsum plasterboard systems are used.
Important! If the project includes a heated floor, its contours are laid on top of the wire mesh before pouring. In this case, the thickness of the screed automatically increases. You can turn on the heating only after the structural material has reached 70% strength.
Dry screed
The technology for making dry screed is simpler. This method makes it possible to obtain results faster than when pouring wet mixtures. Expanded clay is used as a substrate for the finishing level.
Expanded clay backfill Source ad-cd.net
The installation of a floor on the ground begins with backfilling a sand cushion and pouring a rough screed. After the concrete layer has hardened and acquired the necessary strength, proceed to the following stages of work:
- The waterproofing film is laid using the standard method. Strips of fabric are laid in overlapping rows. One sheet overlaps the other by 10-13 cm. The side sections of the film are covered with adhesive construction tape. The edges of the canvases along the entire perimeter are raised onto the wall. The lifting height corresponds to the thickness of the dry screed.
- To create a flat horizontal plane of the floor, plaster profiles are used. Beacons are installed around the perimeter of the room. Their height is determined using a building level.
- Create a pillow from expanded clay. The bulk material is compacted and leveled along the beacons.
- The expanded clay layer is covered with available building material (tongue-and-groove plasterboard, plywood).
- The slabs are covered with finishing material.
Installing a floor on the ground yourself
Next, we will look at how to properly make a floor on the ground. For this, two materials are used: concrete and wooden logs. Both options have positive and negative qualities.
Wood floors on the ground are distinguished by the presence of ventilation; this is achieved by raising the floor above the ground.
Instructions for installation of wooden floors
Creating a Solid Foundation
- 5 cm of crushed stone is poured onto the ground and compacted thoroughly, then covered with bitumen.
- They set up beacons, then screed the floor along the ground.
- Next, we will install brick bedside tables over the entire area, with a distance of approximately 80 cm. The height of the supports is approximately 15-20 cm, because if there are columns, with a lower height there will be less air circulation. And with a higher column height, heat losses will increase.
- To prevent high humidity, the ends of the columns are covered with roofing felt and an overlap of 4 cm is made on the brick.
- Logs are installed on the posts, the distance between them and the walls should be 2 cm. Plastic dowels and steel screws are used as fastening.
- Wooden logs must be treated with antiseptic agents before use. Such measures will protect you from pest invasion.
- Next, lay down the boards and nail them in place. We check the slope of the boards with a level and if there are any deviations, remove them using an electric plane.
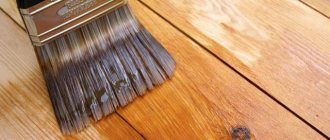
- The nail heads must be masked with putty, then the boards are coated with primer.
After all the procedures, the wooden floor is ready for installation of the final layer; now it can be painted or varnished. And also, if desired, the floor is equipped with sound insulation and insulation.
Instructions for installation of concrete floors
This method is called suspended because the soil acts as formwork for the reinforced concrete slab. This design is considered strong and durable.
The floor is poured over the ground according to the following steps:
- Set the upper boundary for the fill, selecting the doorway as a guide.
- We compact a layer of gravel and then sand, due to this we obtain a filter pad.
- We do a vapor barrier. We use 0.3 decimeter plastic film as a material for vapor barrier; it is laid in the base in two layers and overlapped on the walls.
- We make a lattice from reinforcement to increase the strength of the screed.
- Using dowels and screws, we install beacons.
- Next, mix the solution, the ratio of ingredients should be 1:3.
Pour the finished mixture into strips, aligning it with the beacons. After the concrete has hardened, the floor is insulated and the installation of the finishing layer begins.
In order to simplify the concreting process, it is recommended to use a ready-made concrete-sand mixture.
Plank flooring
The most budget-friendly ground floor on a strip foundation is constructed from boards. Wooden structures have a large number of advantages. They can be built in houses made of wood, stone, brick and concrete blocks.
Advantages of wooden structures:
- are cheaper than concrete screed;
- Wood beams can be installed independently;
- for the construction of a supporting structure and a plank floor, complex specific materials and tools are not needed:
- Wood structures put less pressure on the foundation of a house than a concrete screed.
Negative aspects of rough plank flooring:
- Wood degrades faster than concrete. It rots under the influence of moisture and fungus.
- The boards catch fire quickly.
- Wood is not resistant to moisture.
To protect wood from harmful insects and infections, building materials are treated with antiseptics, resins and other impregnations. Well-dried wood lasts up to half a century.
Video description
The sequence of installing a subfloor from boards in the video:
The plank floor is mounted on a support system of longitudinal beams and cross beams. Inside the room, columns are laid out along the walls of bricks. All free space between the supports is covered with expanded clay. For ventilation, leave 10-15 cm between the backfill and the plank floor.
A lag system is installed on the posts. The height of the supports is leveled. A plank subfloor is laid on top of the bars. The boards are laid:
- waterproofing film;
- insulating substrate;
- finishing material (laminated coating, linoleum, carpet).
There are several options for creating a floor pie along the wooden beams of the first floor. In the old days, logs were built from thick straight logs.
The building material was treated with resin. This impregnation provided protection from soil moisture, insects, and putrefactive bacteria.
Floor on joists Source lestnitsygid.ru
This design option consists of:
- from a clay pillow;
- waterproofing fabric, film;
- brick support pillars;
- beams and beams connected to each other by corners or any other types of fasteners;
- insulating material.
Briefly about the main thing
Laying the floor on the ground is done on one type of foundation, for example, strip.
The construction of the floor on the ground is based on concrete, dry screed or wooden flooring.
Concrete pouring results in a high-quality, durable structure. Before installing it, you need to install water supply and sewerage.
Dry screed and wooden flooring are easier to create. Expanded clay and insulation act as filler in the layers of the floor pie. Waterproofing must be used to protect against moisture.
Ratings 0
Floor structure on the ground
Sole
In order to make floors on the ground that will comply with SNiP, it is necessary to start work with a high-quality base.
To begin with, by half a meter, it is necessary to remove the layer of chernozem and replace it with sand with a coarse fraction. A layer of sand is raised above the ground level and compacted with a vibrating plate.
In the process of compacting the sand, its surface is watered. This is necessary for better shrinkage. You can also use soil to which gravel has been added.
Litter layer
This layer serves to distribute pressure on the base. After all, if one corner of the house sags, dire consequences cannot be avoided.
In order to make the bedding layer, five centimeters of concrete is poured.
An innovation in the design of this level is a profiled membrane, due to which the work time and price are reduced.
Waterproofing
Waterproofing is necessary to protect against moisture and is important for maintaining the good condition of the floor covering.
If waterproofing materials are not used, fungi, mold, and rot may form.
In the future, these unfavorable factors can destroy the foundation and disrupt the comfortable stay in the room.
Waterproofing materials
The following materials are required for waterproofing:
- Bitumen mastic for floors;
- Fiberglass;
- Polyester;
- PVC membrane
The same alternative to the above materials is polyethylene film three millimeters thick and folded in half.
Thermal insulation
A large amount of heat escapes through the floor. To avoid heat loss, it is necessary to make a thermal insulation layer from special materials.
The following materials are used for thermal insulation:
- Mineral wool;
- Expanded clay;
- Polyurethane;
- Glass wool;
- Expanded polystyrene;
- Styrofoam.
The choice of insulation depends on your desire and finances.
A good solution would be to install a heated floor system (water or electric). This solution, however, will cost you a pretty penny, but a warm floor on the ground will allow you to save on heating in the future.
Support layer
This layer is considered the most important support of the building.
Such a layer is a reinforced concrete slab and it consists of class B12 concrete; steel mesh; crushed stone, ranging in size from 5 to 20 mm.
Leveling screed
Before final coating, the floor must be leveled.
Level it using a cement-sand mixture and fill it using beacons.
Finishing layer
For the final coating, you can choose any material you like. For example:
Vinyl, tiles, linoleum, 3D flooring, parquet.
To choose the material of your choice, you need to understand the technical purpose of each floor layer. Then you can independently calculate the floor based on the ground.