Features of cement-sand screed for heated floors
When creating a warm floor, its design consists of four layers :
- rough screed;
- heat insulator;
- coolant;
- finishing screed.
In order to level the base and make it strong, reliable and durable, it is necessary to make a high-quality cement-sand screed .
In addition to the fact that the rough screed under a heated floor can withstand heavy physical loads, it is also subject to thermal stress.
The rough screed must be strong, since its peeling or the appearance of cracks can not only lead to the destruction of the finishing coating, but also to significant heat loss. In addition, damage to the pipes may occur and then they will have to be replaced, and for this it is necessary to completely disassemble the floor structure.
To create a rough screed , you can use ready-made mortars or make your own cement-sand mortar. When making it, it is necessary to add a special plasticizer , at the rate of 1 liter per 100 kilograms of cement, or it can be replaced with PVA glue, of which you will need 1 liter per bag.
Experts assure that a cement-sand screed with a thickness of 2.5-3 cm will be sufficient for a warm floor.
Required material and tools
The installation process of cement-sand screed is simple, so any home craftsman can handle it independently. To complete the work, you need to prepare tools and materials, for this you will need:
- container for mixing the solution; if the volumes are large, it is better to use a concrete mixer;
- drill with attachment or construction mixer;
- metal profiles for the manufacture of beacons;
- spatula and trowel;
- building level;
- laser level;
- rule;
- cement;
- sand;
- water;
- plasticizer or PVA glue.
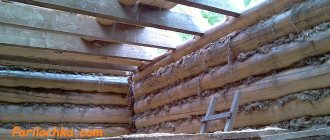
Before you start creating the screed, you need to plaster the walls and ceiling so that dirt and plaster do not get on the floor later.
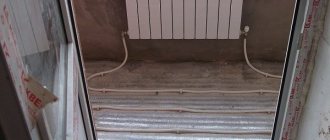
To prevent the water floor pipes from bending, differences in the rough screed are allowed + - 5 mm.
Step-by-step instructions for creating a screed for underfloor heating
Once you have removed all debris from the floor surface, you can begin work. First, marking is carried out using a laser level.
Keep in mind that after the rough screed, you will still have pipes and a finishing screed laid, so the thickness of the floor can reach 10 cm.
Determination of height difference
You can determine the curvature of the floor using a regular level, or use a water or laser level for this.
To determine the height difference using a rack level , the procedure will be as follows:
- All debris and anything that will interfere with the work is removed from the floor;
- mark the height of the base level on the walls along the entire perimeter, this line should be parallel to the floor;
- determine the highest floor height from the base level;
- now we draw a new line, which should pass exactly 1 m above the highest line;
- All that remains is to draw a line for the future finished floor, which is marked from the previous one at a distance of 100 cm minus the height of the screed.
It is much easier to carry out this whole process using a laser level , but you must be able to work with it and it must be configured correctly. It is convenient to work with self-adjusting devices , in this case the order of work will be as follows:
- all garbage is removed;
- the device is installed at the highest point;
- the laser beam is directed at the wall, and lines are marked on all walls;
- the height of this line does not matter much, since from it you can move to the desired height using a tape measure;
- after determining the highest point, fix the painting cord there and pull it to the opposite and adjacent walls;
- if there are no bumps, then this point can be taken as the starting point;
- We measure the height of the screed, mark its level and proceed to installing the beacons.
When working with a laser level, you must wear glasses (usually they come with the device), since its beam is dangerous for your eyesight.
Installation of beacons
After marking the zero level, beacons are installed, usually metal profiles are used . The beacons are fixed to the solution and set to the required level. You can use alabaster for fixation , as it hardens quickly, and you can immediately begin pouring the solution.
The distance between beacons will depend on the size of the rule, usually within 1 meter. The beacons must be securely fixed so that they do not sag during the process of pouring the solution.
While pouring the solution, it is necessary to protect door jambs and other wooden elements from contact with it; to do this, they can be sealed with tape. If there are drain holes, then they are closed with plugs so that the solution does not get inside; if necessary, hide them in a cable tie; they must be fixed in a semi-movable state.
Preparation and pouring of the solution
The cheapest and most accessible option would be to prepare the solution yourself; for this you need to mix cement and sand in a ratio of 1:3 and a plasticizer , as well as water to obtain the required consistency.
The amount of plasticizer will depend on its brand and is indicated on the packaging; instead, you can add a liter of PVA glue to a bag of cement.
A large amount of water can lead to cracking of the solution , and if there is not enough water, it will be difficult to work with and you will not be able to knead it efficiently by hand. The pouring process is simple and accessible, so even a person who is doing it for the first time can handle it.
The finished solution is poured into the space between the beacons and the surface is leveled using the rule . The rule must be moved in wave-like movements towards you. When depressions form, they are filled with solution, and the surface is leveled again. These strips are used to fill the entire floor surface with mortar.
Screed care
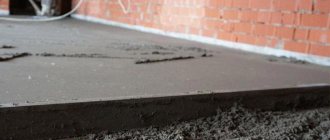
A feature of the cement-sand screed is that during its drying, shrinkage occurs , so it is imperative to control this process. After pouring the solution, it is best to close the room from sunlight and there should be no draft in it, this will create an optimal microclimate and at the first stage, moisture will evaporate evenly.
The first day there is no need to touch the screed, but on the second day it is completely covered with plastic wrap and left until the surface is completely dry. By following this technology, the risk of cracks is minimized, which means that you will not experience heat loss generated by the heated floor.
Laying the finishing screed
Once the rough screed has acquired the necessary strength, you can begin further work. on it . For a water floor, polystyrene foam is used ; it is fixedly attached to the base using glue or dowels, resulting in an insulated floor screed.
A damper tape is attached around the perimeter of the room , which will allow the finishing screed to expand slightly during heating and cooling, and at the same time cracks will not appear on it.
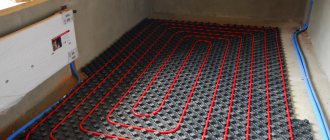
At the next stage, the water floor pipe is attached and securely fixed to the base using special dowels. Reinforcing mesh can be laid either under the pipes, on top or on both sides . If the mesh is at the bottom, then it will be convenient to attach pipes to it, but it does not perform a reinforcing function.
If the quality of the solution is high, the reinforcing mesh can not be installed, but simply add fiber fiber to the solution .
Now you need to check the performance of the heated floor and if everything is fine, you can fill in the finishing screed. The floor should be poured in one go. If the room is small, then you can do without beacons, but in large rooms they must be installed, otherwise you will not get a flat surface.
All you have to do is wait until the screed above the heated floor dries and you can begin installing the finishing coating.
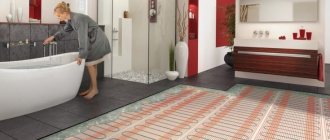
Functions of a floor screed
Underfloor heating screed makes it possible to simultaneously level, if necessary, subfloors and create a protective coating for heating elements.
Concrete transfers heat well from the heating element
In addition, concrete serves as a mediator of heat transfer from the heating structure to the internal volume of the room.
Concreting of floor heating systems should be done if an electric cable or metal pipes are used as a heating element.
When installing infrared heating systems, floor screed is allowed only as a leveling base.
Leveling the base
It often happens that interfloor ceilings or subfloors have some slopes in the horizontal plane. The reasons for this can be very different - from the negligence of builders to the subsidence of the foundation of the house.
A concrete screed for a heated floor is necessary if the base has a vertical difference of more than 1 cm per 1 meter of length. A leveling screed is especially relevant for a warm water floor, since a difference in height can negatively affect the circulation of coolant through the pipes of the system.
For electric heated floors, a level base, although not so critical, is still desirable. Otherwise, when pouring the top layer located directly under the finishing, the depth of the heating elements may be different, and this will not have the best effect on the uniform heating of the room.
Heating element protection
Concrete protects the heating circuit from mechanical damage
The concrete layer poured over the heating elements performs a protective function for them. Particularly vulnerable places in this case are the insulating braid of electrical cables and plastic pipes through which the coolant circulates.
Under the weight of furniture, household appliances and people moving around the room, the insulation of the wires gradually wears out, and the cables themselves can be broken by an accidental blow through a soft floor covering (linoleum, carpet).
Polymer pipes of water heating systems are even more susceptible to external influences.
Under external pressure, the pipe can be easily pinched, which will create problems for the circulation of the coolant, and, consequently, for heating the room. Concrete for heated floors in this case is a kind of protective armor.
Related article: Replacing a siphon in the kitchen with your own hands
Heat transfer function
Concrete screed for heated floors also plays the role of a “mediator”, a conductor of heat from the heating elements to the entire volume of the room.
Electrical wiring or pipes embedded in a concrete screed work much more efficiently for heating than if they were located under a plank or polymer flooring.
This is due to the high thermal conductivity of concrete, which far exceeds that of all other flooring materials.
For this reason, it is not recommended to lay heat-insulating materials on top of concrete floors: insulated linoleum, carpeting, laminate underlay, etc. This can minimize the efficiency of underfloor heating systems. The best option for finishing coating over a concrete layer is tiles, porcelain stoneware, clinker.
That is, such materials whose heat transfer coefficient is comparable to that of concrete.
Useful tips
All work on laying the screed must begin from the farthest corner and gradually move towards the entrance.
The solution is distributed evenly so that it does not protrude beyond the level of the beacon.
To ensure optimal hardening of the solution, after pouring it, it is recommended to spray the floor with water 2 times a day during the first week , since the screed should harden and not dry quickly.
Before you pour the finishing screed,
make a drawing of the pipe layout and save it .
When carrying out further work, it may be necessary to drill holes in the floor and, knowing the location of the pipes, you can avoid possible damage to them. expansion joints must be made in the finishing screed . The thickness of the screed in a warm water field should be: rough 3-5 cm, and finishing thickness 5-10 cm, it all depends on the purpose of the room, 5-7 cm will be enough in the apartment.
Before pouring the finishing screed, it is necessary to create a pressure of about 1.5-2 atmospheres in the water floor system, but the water cannot be heated to more than 25 degrees for 3-4 weeks.
Selection of filling material
When choosing a material for filling, there are two options:
- Use a ready-made dry mixture for screeding heated floors, sold in construction stores.
- Prepare the concrete mixture for the heated floor yourself.
Both of these options are equally popular today, and, like any other construction technology, they have their pros and cons.
Ready mixes
The modern market for finishing materials offers a wide range of various ready-made concrete mixtures, including those specially designed for pouring cement screed.
The advantage of this option is the ready-to-use composition, the proportions of which have already been precisely calculated.
As a rule, the solution already contains coarse sand, Portland cement and various additives that improve the quality of concrete. To prepare concrete, you just need to add water to the dry mixture in the amount specified in the instructions for use.
When describing ready-made dry compositions, I would especially like to mention such a high-tech material as self-leveling floors. These mixtures contain a large number of special polymer additives-plasticizers, which give the finished solution the property of increased fluidity.
Ready-made mixtures are usually more expensive
When pouring the base, this mixture self-levels, spreading over the entire floor area. Typically self-leveling floors are used to create a perfectly flat surface and are poured in a small layer of 0.5 - 1 cm.
Among the disadvantages of this option is the higher cost of concrete prepared from ready-mixes compared to self-prepared concrete.
Self-mixed concrete
Preparing a concrete mixture for heated floors with your own hands is a budget alternative to ready-made dry mixtures. Pouring a heated floor under a concrete screed in this case can cost you several times less than when using factory-made dry compounds. For more information on how to make a heated floor screed, watch this video:
The financial benefit will be especially noticeable with large volumes of pouring, and also if you have the opportunity to get free concrete fillers - sand and crushed stone.
The last factor is decisive in choosing one option or another: if it is quite easy for residents of rural areas or small towns to get fillers, then in large cities it will be very difficult to purchase 300 - 400 kg of sand or crushed stone.
Firstly, delivery of such materials is usually carried out in much larger volumes; secondly, problems may arise with storing purchased sand or crushed stone in the local area.
Making your own cement mortar
For thin screeds, sand is suitable as a filler.
Related article: Do-it-yourself installation of interior doors: photos, videos
When making concrete for floor screed, special attention should be paid to the composition and ratio of its ingredients. If the thickness of the concreting layer does not exceed 4–5 cm, you can get by using coarse sand of 3–5 mm, the so-called sand concrete, as a filler for concrete.
With a thicker concreting layer, you will have to add crushed stone to the solution. It serves as an additional connecting link that increases the strength of concrete. In addition, additional plasticizer additives can be used as an additional component.
With a large layer of fill, in order to avoid excessive pressure on supporting structures and ceilings, it is recommended to add porous fillers to the solution - perlite or expanded clay, which reduce its density.
To better connect the components together, you can use micro-reinforcing fibers, which reduce the likelihood of the screed cracking when it dries.
To obtain the highest quality cement mortar, it is necessary to strictly adhere to the proportions of components recommended by building regulations.
The approximate ratio of components in the manufacture of various types of cement mortars is given in the table presented.