Home/Heated floors – Questions about floor repair, installation./Heated floor pie: Water floor and electric
Underfloor heating systems are an excellent alternative to radiator heating. Their design is located under the floor covering, which increases the free space of the room. And the uniform distribution of heat will create the most comfortable temperature for living. But when installing heated floors, there is such a term as - heated floor pie. Many beginners wonder what it is and what its purpose is for the heating system. This article will help answer these and related questions.
What is a heated floor pie and its purpose?
Every consumer of heated floors wants not only to create the optimal temperature for living, but also to ensure that the floor remains level and fits into the interior of the room. But, as you know, wooden coverings and old concrete screeds are susceptible to deformation and rotting over time. Therefore, if you place one heating system under the floor covering, the heating of the room will not be of high quality, and the system itself will quickly fail. For this reason, a design was developed for layer-by-layer installation of heated floors using additional materials, which visually resembles a layer cake.
So, a heated floor pie is a multi-layer structure for all types of heating systems. Each material is laid in a specific sequence and performs specific functions. The general task of the floor pie includes:
- Reduce heat loss at home.
- Avoid moisture in the heating elements of the system and the building structure.
- Direct the flow of heat in the right direction.
- Create sound insulation.
In addition, a heated floor pie will help protect the heating model from the negative effects of the environment.
But here it is worth paying special attention to the fact that the design of the pie is influenced by the model of the heated floor and the ceiling of the building. Therefore, in order to avoid mistakes, each type of heating system installation should be considered in more detail.
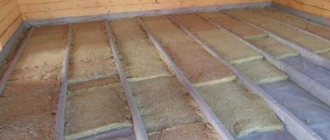
Basement pie in a frame house
The basement floor requires increased attention to insulation, since it is this part of the house that is most vulnerable to cold weather. The basement ceiling borders the cold zone of the basement, while other ceilings do not have such contact.
Basement floor pie. 1 - floor joists.
The correct arrangement of the plinth overlap guarantees:
- Moderate costs for heating the premises on the first floor.
- No mold or fungal growths.
- No rotting of wooden floor elements.
The floor pie along the joists is described in detail in the section “The correct floor pie along the joists of a frame house.” The installation of a basement floor requires additional attention to detail:
- The required insulation thickness is at least 200 mm. Otherwise the floors may be cold.
- The wind barrier should be extended to the edges of the room and carefully glued.
- The mandatory use of bars along the joists ensures the presence of a ventilation gap between the floor boards and the insulation. This prevents the formation of rot and mold.
The floor of the 1st floor requires high-quality insulation in order to maintain a comfortable temperature throughout the house.
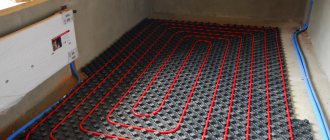
Layout diagram of the water system cake
Before you begin laying the cake under a warm water floor, you first need to prepare the materials that will be needed for installation.
So, the water system can be made of the following types of pipes:
- Corrugated pipe. This pipeline is made of stainless steel with a protective top layer against oxygen penetration. Such products are selected if the water system is compatible with central heating.
- Cross-linked polyethylene. These flexible, durable pipes are becoming increasingly popular when laying underfloor heating. To impart strength and resistance to temperature changes, the material was subjected to high pressure treatment several times.
- Metal-plastic pipes. These products were developed specifically for the installation of heated floors. They have good flexibility, efficient thermal output, durability, fast heating and corrosion resistance.
Regardless of the choice of pipeline for heated floors, its outer diameter should not exceed 2 cm.
In addition to pipelines, the water heated floor cake also includes materials such as:
- Thermal insulation layer - designed to prevent heat loss. The recommended thickness of the material should be about 10 cm.
- Waterproofing material - will prevent moisture from penetrating into the heating system. Recommended layer thickness is 5 mm.
- Reinforcing mesh - designed to strengthen concrete screeds and lay pipelines. Recommended thickness is 4 mm.
- Damper tape - used as protection against cracking and deformation of concrete screed.
- The foil layer is used as a good heat reflector.
Having prepared all the necessary equipment and materials, you can begin laying the cake, with different ceilings of the room.
Underground floor heating pie
Before you start building a water system under the ground, you first need to prepare the base. To do this, all debris is removed from the soil surface and plants are dug up by the roots. Then, having removed the fertile layer of soil, everything is compacted well. Next, sand is poured onto this base in a layer of 10–15 cm. After watering the sand twice by air-drip method, crushed stone is laid and compacted onto it 10 cm thick. Thus, having prepared the base, it will be possible to proceed with the following installation of the floor pie:
- A metal mesh is installed.
- Cement mortar is poured in a layer of 5 - 10 cm (acceptable norms for unevenness are 2 - 3 mm)
- Waterproofing material is laid (roofing felt, PVC or polyethylene film)
- Lay down a thermal insulation layer. (foam polystyrene or EPS)
- The red screed is poured.
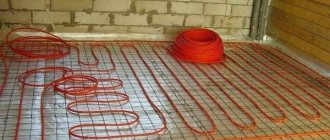
- Reinforcing mesh is laid for laying and securing pipelines.
- The contours are laid in the form of a spiral or snake.
- A clean concrete screed is poured.
It will take about 30 days to dry the concrete screed, after which the finishing coating is installed.
Pie under dry screed
A dry screed is a system of loose leveling materials, over which plywood or drywall is placed for strength.
The heated floor pie in this case will be installed according to the following scheme:
- a damper tape is laid along the entire room;
- sand or fine karamzit is poured onto the base of the room.
- the sand base is well compacted;
- the coolant circuit is installed;
- Heat distribution plates are installed along the contours;
- Drywall is laid on top of the structure in 2 layers.
To avoid damaging the heating system during installation and movement, you can build wooden bridges.
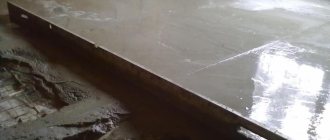
Floor pie under concrete screed
Since in this case a wet screed will be used, the sequence of laying the component materials will be slightly different.
So, the floor cake under the concrete screed is performed in this way:
- On the prepared base, waterproofing layers are laid on top of each other along the perimeter of the walls.
- Lay down a layer of insulation; in this case, it is better to use polystyrene foam or extruded polystyrene foam.
- The insulation is covered with foil.
- Damper tape is glued along the walls of the room.
- The coolant circuits are laid.
- Reinforcing mesh is installed.
- Beacons are installed on the grid for pouring concrete screed.
- Cement mortar is poured along the beacons.
With this installation, before laying the floor covering, it will also take 30 days for the concrete screed to harden and dry.
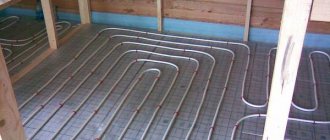
Pie water system under a wooden floor
This is a fairly new type of laying heated floors, where pipes will be installed between the joists. The sequence of work occurs in the following order:
- Thermal insulation material is laid on the red floor. Since the entire floor structure will be light in weight, glass wool can be used as insulation.
- Then follows a layer of foil, which will serve as a heat reflector.
- Pipelines are laid between the joists.
- GVL slabs are installed as a load-bearing floor.
A distinctive feature of the pie under a wooden floor is that the flooring can be installed immediately after laying the structure.
Technology for creating an insulated pie on beams
The constituent elements and layers of the first floor are clear. Now we should consider the installation process and the nuances of each layer.
Priming
Soil compaction
Soil preparation should be carried out during the construction of the house, before the start of work on arranging the floor.
- Inside the strip foundation, a layer of soil with vegetation is removed to a depth of 15-20 cm. In this case, local soil removal can be done in the places where the pillars are installed.
- An uneven base is leveled with sand with a moisture content of no more than 4%. Dry soil is poured on top of the sand at the level of the removed soil and compacted thoroughly.
- The backfill base is moistened and crushed stone or gravel several centimeters deep must be pressed into its structure.
- On top of the bulk soil there should be a layer of sand-crushed stone mixture, which is compacted and compacted.
Attention! Replacing soft layers of soil is necessary in advance, because crushed stone and sand on the surface are compacted over time and form a stable surface for laying brick pillars.
Brick pillars for beams
On the compacted soil surface, a layer of roofing felt waterproofing should be laid under the posts. Brick pillars are built on top of the waterproofing layer, on which the beams for the floors will be laid.
It is advisable to apply a waterproofing layer between the pillars so that moisture cannot penetrate into the underground space.
We recommend: Optimal bed size: what should be the width of the aisles
Brick pillars
Brick pillars must be lined up at the level of the foundation, because the beams will lie on the foundation, and the pillars will perform a reinforcing function.
The distance between the pillars should be 70-100 cm in one row, and between the rows - 180-220 cm. The beams are used with a cross-section of 150x150 mm.
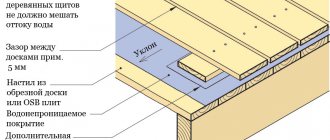
Installation of lags
The logs are laid perpendicular to the incident light so that the finishing coating lies along the windows. If the sun's rays are in the direction of the boards, then the gaps between them are better visible.
Support system for finished floor
First of all, the outer ones are placed, establishing a gap of 2-3 cm from the wall. Subsequently, intermediate ones are laid.
For supports under the final coating, bars with a cross-section of 150x50 mm are used, which are attached to the beams with angles. If the previous structural elements are correctly installed level, the bars will be laid faster and easier. In this case, it is still necessary to check the level with a rule of 2 meters, because there may be individual defects in the bars.
Skull bars and subfloor
It is impossible to use insulation material without using subfloors.
A subfloor is installed from unedged boards or low-grade plywood on 4x4 cm cross-section screwed into the skull blocks.
Skull block
The cranial bars are attached either from the lower end side across, or from the lower side between the lags longitudinally. The second option is preferable because this method of fastening ensures the strength of the structure.
A subfloor of 20 mm boards is laid on top of the skull blocks and a layer of vapor barrier is placed on them. Thus, when attaching 4 cm cranial bars and 2 cm boards, 7 cm out of 9 remain for insulating material. As already mentioned, lay the insulation without a gap flush with the upper end side of the bars - do not allow air to ventilate above it.
Insulation circuit
Rolled mineral wool
Various materials can be used as insulation. The most common and popular material is mineral wool. It is worth noting several nuances of laying mineral wool slabs.
- There are different thicknesses of mineral wool. It is better to use a thermal insulation circuit made of mineral wool slabs in 2 layers, rather than 1. This will allow the top layer of slabs to cover the joints of the lower layer.
- If it is necessary to insulate 7 cm out of the 9 remaining board heights, you can use slabs of various thicknesses of 45 and 30 mm.
- When choosing mineral wool as an insulation material, you should pay attention that there is a standard material width of 61 cm. Thus, the bars can be installed in increments of 60 cm so that you do not have to cut the slabs.
- When using another step, it is worth considering that you need to cut the width of the slabs 1 cm wider so that the material fits between the boards with emphasis on the sides.
Important! If you use expanded clay as insulation, then with the same thickness of the insulating layer, the heat-shielding properties will be 2 times less.
Insulation layers
The insulation material must be protected from moisture and water from the upper side of the room, therefore a waterproofing layer is laid.
Polyethylene film can be used as a waterproofing material. The sheets are laid overlapping each other by 20-25 cm and secured with construction tape.
Finish floors
Finish floors can be made of tongue and groove boards. With a step of support bars of 60 cm, convenient for laying mineral wool, the optimal thickness of the boards will be 35 mm. When using a smaller pitch, you can use smaller thickness of boards.
On top of the bars you can lay plywood or OSB boards with a thickness of 16-20 mm, on top of which there is a finishing coating.
The floor pie along the beams of the first floor has a multi-layer structure. In order for wooden structures to serve the required period, it is necessary to comply with the technical rules for laying each layer.
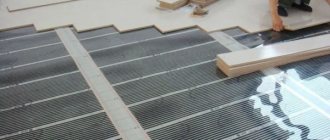
Laying a cake under an electric floor
Unlike a warm water floor, laying out the electrical system structure will not require much free time. And the installation itself is much easier, since no preliminary work is required to prepare the red base. The main material of the electric floor will be cable mats or infrared film, and as additional equipment a heat regulator and temperature sensor.
The process of laying an electric heated floor cake is carried out in the following sequence:
- lay insulation on a concrete or wooden base;
- foiled polyethylene is laid to reflect heat;
- the heating product is installed and fixed;
- a waterproofing layer is laid from dense polyethylene;
- At the end of the cake, laminate and baseboard are laid.
When installing a warm electric floor, do not forget that it is also not recommended to place it under large furniture and electrical equipment.
Conclusion
Before installation, it is better to once again go for a consultation with knowledgeable specialists. Their experience and knowledge will help you visualize the entire order of work in the correct sequence. Only this approach will eliminate serious errors and provide high quality performance.
- Related Posts
- How to choose a wire for a heated floor?
- How to lay heated floors on a balcony?
- How to lay heated flooring under laminate on a concrete floor?
- Do you need warm floors in your home?
- How to lay cable heated flooring?
- How to calculate the power of a heated floor?
Tips for Newbies
One sequence when installing a heated floor pie will not be enough for high-quality heating of the room. To achieve the desired temperature for comfortable living and at the same time extend the life of the underfloor heating system, you need to familiarize yourself with the following expert advice:
- It is best to leave the design of a heated floor system to experienced professionals.
- The heating system must be installed exclusively on a flat surface.
- To reduce the temperature load on the concrete screed, the area where it is poured should not exceed 40 sq.m.
- Pipelines must be laid no closer than 10 cm from the walls of the building.
- The water system circuits must be made of solid material.
- When laying the cable system, sharp bends of the heating elements are not allowed.
- Laying the floor covering should be carried out only after checking the heating system for functionality.
So, summing up this article, about the cake of the heating water heated floor and electrical system, it is also necessary to add that during installation it is very important to observe the sequence of laying and the thickness of the materials. And also follow the advice of experienced specialists. Otherwise, these errors at the initial stage of installing systems can lead to irreparable consequences, including failure of heating models.
AdminAuthor of the article
Did you like the article?
Share with your friends:
Fill the rough screed and determine its thickness
For a warm floor to be durable, a rough screed is required. Before pouring, it is recommended to divide the surface with slats, the step between them should be 1 meter. In this way, you can fill the solution in strips.
READ MORE: How to lay cork underlayment under laminate flooring with your own hands: useful information and installation tips, options for laying laminate flooring yourself
The process begins with laying 1 m2 of reinforcing mesh 3 cm thick in the center of the room, and the joints of the floor and walls are taped with damper tape. It is better to take concrete grades M100 or M200. Cement should be poured from the far corner of the room, towards the door, with a thickness of 50 to 100 mm.
When the mixture dries a little, the slats need to be removed and the gaps filled with solution. The screed is covered with polyethylene and constantly moistened until it completely hardens. After this, everything is cleaned of dust and primed.
It is possible to use dry screed; it is gaining popularity today, since there is no work with concrete, thereby making the process faster.