In this article I will not go into detail about how make a heated floor with your own hands. Believe me, there are too many nuances, and possible mistakes are very expensive. Especially if we are talking about the water version. However, I will allow myself to introduce you to the technology, show what underfloor heating systems exist, what are their advantages and disadvantages. I am sure that if you have never encountered such tasks, you may not even be aware of some aspects. The result of “daring” experiments can be wasted money, damaged nerves, and wasted time. However, a properly made heated floor is a great thing. For the sake of convenience and comfort in the house, sometimes it makes sense to go to certain expenses and then walk barefoot on the floor for the rest of your life. And how happy your cat will be!!! In a word, let's see how it all works. Maybe you need such a thing, but you don’t know

Do you need heated floors?
My favorite thing to do after lunch is lie on the floor. You know how great it is! You stretch out, sometimes, on a hard surface, straighten your crooked bones and begin, like a boa constrictor, to slowly digest food. At home, having a warm floor is really convenient. But when I come to visit my parents and lay down on a regular floor, after a while I begin to feel some discomfort - concrete! Cold! Even on warm summer days the floor remains cool. You won't stay on it for long. You have to put something under your back.
But the house is beautiful! You lie as if on a beach by the sea. There the stones are heated by the sun, here a gas boiler works. It is he who drives warm water through plastic tubes and warms up the floor fairly evenly. It's especially great to feel a warm floor under your feet in winter. It used to be that if you took a walk around the neighborhood, your feet would freeze. But as soon as you come home, you feel as if you are walking on warm sand somewhere on the seashore.
But this is all, of course, lyrics. Sometimes you have to install warm floors in your home not on a whim, but because of a very real need. For example, a house stands on soil rich in groundwater. The foundation is a reinforced concrete slab (driving piles into such soil is a thankless task). The constant movement of water underground does not allow the soil to warm up to a certain depth. The cold of the underground river constantly cools the foundation, and with it the floor of the first floor. The feeling is like being in a dungeon. It’s unpleasant to walk without slippers even in summer, not to mention the colder season.
And if a family lives in such a cottage with a child, or two or three, whom you don’t feed with bread, let them sit on the floor and play? At this point you inevitably start to think and start Googling.
If you turn to the masters of their craft, they will tear off three skins. Moreover, they will start to scare you with lifetime extortionate electricity bills or the need to chisel a concrete floor to lay pipes. Maybe there is some option that is both inexpensive and easy? Surely there is! We are not in the 19th century... Yes, by the way, heated floors, so you know, this is not a modern technology. They were known in ancient Rome, some other countries and even in Russia. True, back then stove heating was used to heat the water. Nevertheless, there are scientifically proven facts confirming that heated floors are, as they say, “a well-forgotten old thing.”
As a rule, digging through the Internet ends with the same thing. We find out that heated floors for a private house or apartment can be made using two different technologies. Either water from a boiler , or electric from an outlet . In either case, different variations and even combinations are possible. Let's try to at least roughly understand which option may be right for you personally, taking into account the combination of advantages and disadvantages.
Operating modes of heating boilers: summer mode, for heated floors, etc.
Modern gas boilers have convenient operating modes that allow you to optimize the operation of the heating and hot water supply systems at different times of the year. There are a lot of brands of boilers, but the operating modes of all models are similar. Let's figure out what settings exist and what benefits they can bring.
Heating boiler operation settings and why they are needed
Imagine you bought a gas boiler and successfully connected it. Winter is just around the corner, so you want to be prepared for the heating season. As soon as there is a need to warm up the room.
When there is a need for hot water, the boiler automatically switches to heating the water. In other cases, the boiler is in standby mode and performs other functions so as not to freeze itself.
The boiler operating modes allow the user to understand how the boiler operates, what tasks it performs, and how priority is structured. They help you understand concepts like cycling, temperature and warming up. Knowing these concepts, you can guess how to profitably save on resources for the boiler.
Basic settings of a gas boiler:
- work only for heating;
- hot water priority;
- summer operating hours;
- "warm floor" mode;
- frost protection.
Some boiler models have their own modes. Basically, they are focused on marketing and emphasize their “zest”. But the standard set is always the same.
To select a boiler, watch this video:
Winter mode
In winter mode, the gas boiler operates at full capacity. It can be roughly divided into “heating only” and “hot water priority” operating modes. In the first case, the device turns on and off independently, bringing the room to the desired air temperature level.
A cyclicity is created. It depends on the cooling rate of the room, square meters, and the power of the boiler itself. Set a comfortable temperature, paying attention to cycles. Adjust, reducing the load and saving on gas consumption.
In heating mode, adjust the temperature from 35 ºС to 85 ºС, gradually achieving optimal values. After adjusting the temperature, elements such as water pressure, pressure switches, NTC sensors and others are checked.
Hot water priority
In the hot water priority mode, we observe a clear sequence of actions and cyclic switching on for heating. If you want to turn on one of the hot water taps, the boiler will forget about heating and begin to heat the water. This is called hot water priority.
The heating works around the clock, the boiler knows when to turn on and off, maintaining the required temperature in the house. The need for hot water is much less frequent than the need to heat a house. When you turn on the water, the house is “already warm,” but the water is “still hot.” Therefore, priority for heating hot water is higher than for heating.
In most modern gas boilers, the water temperature can be adjusted separately in the range from 35 ºC to 55 ºC. The procedure is similar to the heating procedure. Set the appropriate temperature and use hot water.
Summer operating hours
At home, heating is not needed in summer. There is no desire to wash dishes in cold water or take a cold shower. For such purposes, a summer mode was invented, when the heating of the room is in hibernation mode (sleep mode). But when you open a hot tap, the water begins to heat up (for double-circuit boilers).
When summer comes, the heating circuit does not switch off automatically. There are three options for the development of events:
- let it be as it is;
- switch to hot water mode;
- turn off the boiler completely.
In the first case, the heating mode will be active. In this mode, the heating circuit will always be on and internal checks of the equipment will continue to be carried out. Don't waste resources just like that.
Switching to summer mode (hot water mode) is available if the boiler allows it. You will receive hot water, the heating will be turned off. The boiler performs a minimum of conservation procedures.
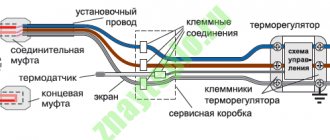
Warm floor mode
The heated floor mode does not exist in all heating boilers. Works only in winter mode. The floor heating mode involves heating the water under the floor, bringing the water to the temperature specified by the user.
There are no separate installations that work separately with the floor. By adjusting the temperature on the boiler, you limit its power. Power is consumed to heat the room or heat water.
Electric heated floor. Film coating, heating cable, thermomat
An electric floor heating system has two undeniable advantages.
- It is quite easy to install it yourself,
- it can be used in an already finished apartment - there is no need to chisel the floor.
To simplify the idea very much, it is as follows. You measure the area of floors that need to be heated. This may not be the entire apartment, but, for example, only the children's room and bedroom. Moreover, heating the floor under cabinets and beds is also not so necessary. It will be enough if only the place where we walk is warm.
Infrared heated floors
Infrared systems use special heating elements mounted on a polymer base, inside of which there is a carbon mixture. When electricity passes through the filler, it generates thermal radiation in the infrared spectrum, which easily penetrates through the floor covering into the room. Here it is absorbed not by the air, but by objects in the interior - the air is heated by the heat released by the heated objects. As a result, heating efficiency increases significantly.
Another important fact is that IR rays do not burn up the oxygen in the room. Therefore, a comfortable and healthy microclimate is maintained in the house. Also valuable properties are immunity to even the most severe frosts, quick access to operating temperatures and relatively economical energy consumption.
Infrared floor heating systems are manufactured in 2 types - film and rod. To understand which one is best for you, consider their key features:
| Film IR floor | Rod IR floor |
| It is laid dry on a leveled base under the finishing coat. The whole process takes a minimum of time. If necessary, you can remove the system and reinstall it. | Installed in a concrete screed or tile adhesive applied in a layer of at least 2 cm. The rough base must be thermally insulated. The substrate should not contain foil. |
| Does not fit well with carpet, rugs, and felt-based linoleum - they significantly reduce the heating efficiency. The film system can be laid under parquet and thick floorboards at a maximum operating temperature of 28°C. | Possibility of self-regulation: if there is excessive local heating of the floor, for example, under furniture, the power consumption and heating are reduced. With a local decrease in temperature, the intensity of the heaters increases. |
| The film can be cut and laid in any way. This way you can heat complexly shaped floors or only certain areas of the space. | Suitable for installation in any room Can be placed under large objects. |
| Failure of individual sections does not affect the performance of the system as a whole. | The principle of parallel connection: if several heater blocks fail, the complex as a whole remains operational. |
An important feature of IR floors is the ability to use them outdoors. In particular, they can be used to protect steps and porches from icing.
How much does underfloor heating cost?
Next we go to the store and buy electric heating elements. They are different. For example, infrared film is very convenient for installation. Relatively speaking, we lift the linoleum or laminate, first lay out the thermal insulation (such a silvery shiny material - polystyrene foam), then place the film in the right places on the floor, bring the wiring out from it so that you can “plug it into a socket.” After that, we lay out the laminate or linoleum again, turn it on - it works!
Infrared heated floors can be used with a thermostat, which allows you to choose the heating temperature and is capable of automatically maintaining the set room temperature. Moreover, advanced versions of thermostats can be programmed and it will itself lower the temperature (=energy consumption) when you are not at home or when you are sleeping, and increase it when you come home and start wandering from room to room. In principle - a very good solution.
In general, it’s like a scene from a movie about the future: you go up to the wall, press a couple of buttons on the regulator, and the room becomes warmer or cooler, depending on your desire. Each room can have its own temperature setting. Some people like warmer climates, others prefer cooler climates.
Everything would be fine, but this is a rather expensive solution. The film itself and, especially, the electricity it will constantly consume cost a lot.
Example:
The thermostat costs from 2 to 6 thousand rubles. If you have three rooms and a kitchen and you put one in each room, then the cost (we take the arithmetic average) is 16,000 rubles. These are just regulators, we haven’t gotten to the film yet.
The film itself, of course, also varies. If we take, for example, Caleo Line, then the cost of 6 square meters of film will be about 9,000 rubles:
Thus, if our children’s room has an area of, say, 12 meters, then we will need 2 sets, and, accordingly, about 18,000 rubles. Fortunately, this amount can be reduced a little. After all, it is absolutely not necessary to “sink” under a closet, bed or other furniture. I think 6 square meters would be enough for us.
If we add here 2 more rooms with an area of 14 and 18 square meters, conditionally dividing their area in half (there is also furniture there), then we get an additional cost for the film of 10,500 and 13,500 rubles, respectively (everything is rounded for ease of calculation).
Thus, to warm the floor only in the rooms we will need 33 thousand rubles for the film and 4 thousand for each regulator. The minimum is 37 thousand (there is only one regulator for the whole apartment - terribly inconvenient, but cheap).
In principle, the amount does not seem astronomical. Someone can buy all this literally tomorrow on the way from work, someone needs to save up a little money. Everyone's salary is different. But by installing an infrared heated floor, you can forget about the problem of cold in the apartment (if standard radiators can’t handle it), you can lie and sit on the floor, play with the children... in a word, the game is clearly worth the candle.
And everything would be fine, but now you have to cool your ardor by calculating your energy consumption. After all, you have to pay for everything. For electricity too. Let's estimate how much this pleasure will cost us.
Let's take January - the coldest month. You have to heat, as they say, to the fullest.
The average energy consumption of a heated floor can be calculated from the table above. Look at column 4. If we buy the largest film in area (6 sq. meters), then its consumption will be 0.78 kW per hour. Many people think so. However, this is not at all a meaning that is worth “dancing” with.
In fact, the average power consumption of film heated floors ranges from 46 to 220 W per square meter per hour.
Now we count again. We take the minimum values:
46 x 6 meters x 24 hours x 30 days = 198 kilowatts - then we multiply this by 5 rubles per kilowatt and get 990 rubles.
In other words, if your heated floor barely “smolders” for a whole month, then it will burn almost 1000 rubles worth of electricity.
If we have three rooms with the above parameters, it will be about 3-4 thousand rubles. per month.
In principle, this is also quite a tolerable amount. But... something tells me that you will still want to “turn up the temperature.” Well, it's true! What is the use of a heated floor that provides almost no heat at all?
Evil tongues (that is, the clients themselves who have already gotten themselves into trouble) are talking about slightly different figures. Some people get about 10-15 thousand rubles a month in winter for a 3-room apartment, others 25-30 thousand for a cottage. It is clear that to some these amounts do not seem fantastic. They'll pay and won't blink an eye. But what about those who have a more modest salary? I'm afraid something very, very bad could happen to many people when they receive their first electricity bill.
If you look at other types of electric heated floors, the situation does not change radically. Of course, you can install such a floor yourself, it seems safer, but huge electricity bills cancel out all the advantages.
It's true that sometimes people don't have much choice. For example, when buying a house, they believed the agent’s tales that gas would be piped here in the next month. Then it turns out that gas is not expected in this particular place in the near future, and if there is, then “for the pipe” you will have to pay through the nose. So we have to heat the house with electricity. What this entails has already been mentioned.
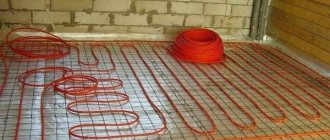
Water heated floor
This is a different approach. Here warm water acts as a heat carrier. It is heated in a boiler - electric or gas - and circulates through pipes embedded in the concrete floor screed. It is clear that such a pipe system can only be installed at the construction stage or, in extreme cases, finishing the house. Of course, there are extreme people who make grooves for laying pipes in a finished floor. However, this is the exception rather than the rule. If the main concrete floor screed is poured, it is more realistic to make a false floor, raised above the main one and lying on wooden blocks. Heating pipes can be placed in the resulting space.
The greatest benefit from a water heated floor can be obtained if you have a gas boiler. If there is no gas, then running an electric boiler to heat the water will simply be unreasonable. This combination embodies some of the negative aspects of each technology: inconvenient installation + constant high heating costs. If there is no gas and is not expected, then it is better not to mess with the pipes and do the usual electric heating described above. At least this floor is installed much faster and easier.
However, if there is already gas, or it will be “iron” in a year or two, then it is still worth thinking about pipes in the floor. To begin with, the system will operate from an electric boiler, and then, when the gas is turned on, it will be switched to a gas one. In all likelihood, this will be one of the happiest days of your life, because your monthly electricity bill will drop dramatically.
The cost of installing a water heated floor, subject to pouring a concrete screed, averages 500 rubles per square meter. If you have an apartment with an area of 60 square meters and decide to heat it all, then prepare an amount of 30,000 rubles (not counting the cost of equipment and materials). In principle, these are again not such unaffordable costs. This is why you should entrust the installation to real specialists, instead of “learning from your mistakes.”
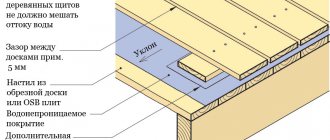
Polystyrene water floor system
Dry screed for water heated polystyrene floors is laid on any flat base. Any material can be used as finishing material. Polystyrene boards of the required thickness, in which the grooves for the pipes are located at the pitch you need, are laid on the subfloor or old coating. Then metal plates are placed on top and pipes are secured in them. If there is a hard covering on top (laminate, floorboard, parquet), it is enough to lay a layer of waterproofing on top (in the simplest version, polyethylene film). For soft floor coverings you will need a rigid base - gypsum fiber board or chipboard.
Let's take a look at the technology for installing heated floors just for fun.
If you look at this photo, you can roughly imagine what will be required to lay the pipes:
If you go from the bottom up, then on the concrete floor slabs there is a heat insulator - a shiny material - extruded polystyrene foam. Don't be put off by the name; This kind of thing is sold in all construction supermarkets and even in hardware stores. It has very low thermal conductivity and sufficient mechanical strength. If we don’t put it in, part of the heat will go into the foundation, which we have absolutely no need to heat.
On top of the heat insulator we see a metal reinforcement grid. It will not strengthen the concrete screed, it is just convenient to attach pipes to it. The grate is attached to the floor so that the entire structure does not move from side to side:
The only thing that is not shown in this photo is the wall damper tape. It prevents contact between the warm floor screed and the cold wall.
Next, pipe laying begins. This is the most responsible process. The fact is that the tube should have only two connections and those with the distribution comb next to the boiler. Otherwise, it should be a solid loop, with a total length of 60 - 100 meters (depending on thickness). The tube itself is quite dense. It must be bent very carefully to prevent creases.
Many novice craftsmen make the same mistake, which greatly complicates pipe laying or even makes it impossible. Look at the tube roll:
The peculiarity is that the tube cannot simply be removed from the top, ring by ring. At the same time, it twists, creating tension that will greatly interfere with work. The coil must be “unwound”, that is, it must be twisted like a reel.
Another "ambush". Before starting work, you need to know exactly what length the loop you are installing will have. There are special computer programs for calculations. If oh, then at best you will have to cut off the excess unused ends, which you can only throw away. In the worst case, the tube may not be enough, and expanding it is extremely undesirable.
Of course, there are special connectors for this - fittings:
However, it is always worth remembering that there are no absolutely reliable connections. If such a thing “leaks”, you will have to chisel the floor. Do you need this? Therefore, you should very carefully calculate the length of the loop so that it is enough from the inlet to the outlet of the distribution manifold - the comb.
According to the methods of laying out the loops there are “snakes” and “snails”. It is easier to lay out the snake, but in this case there will be a clear temperature difference at different ends of the room. Where the circuit begins will be warm, as you move towards the opposite wall the floor will become colder. The difference can be from 5 to 10 degrees.
The snail is better in this regard. Here the temperature decrease goes from the walls to the middle of the room and is not felt so strongly. It is more difficult to lay out a snail, but this is exactly the case when it is better to do it properly once than to curse yourself for the rest of your life for being lazy.
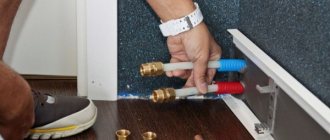
All ends of the red tubes from all heating circuits “meet” near the distribution manifold:
Please note that the return pipes (through which cold waste water returns to the boiler) are covered in a thermal insulation “jacket”. This is done so that they do not cool the hot water that has just left the boiler and goes through adjacent pipes to heat the rooms.
Blue control knobs can be seen on the distribution manifold. When the system is installed, we will use them to balance the circuits.
It usually goes without saying that different circuits go to different rooms of the floor. This is convenient because you can adjust the heating in each room separately. However, it is usually not possible to make all the loops equally long. As a result, we get several loops of different lengths and, accordingly, with different hydraulic resistance.
It is not surprising that the main coolant flow, choosing the path with the least resistance, will rush along the shortest circuit. The room where it is installed will have the warmest floor in the entire house. In the longest circuit, the water will flow slower, so problems with heat removal and, accordingly, heating the floor of the corresponding room will be ensured.
A natural task arises - to deceive the coolant by convincing it that all loops in the system are the same length. This is achieved by analyzing the position of the flow meters and correspondingly adjusting the position of the “blue handles”:
The procedure for balancing circuits is quite ornate and complex to describe in this article. In any case, real specialists can complete it with an “A”. The main thing then is not to “touch anything” unnecessarily
In order for water to circulate through the system, we need a water pump. It is connected to the place in the “pipe” where the already cooled waste water arrives.
On the left side of the pump there is a pumping speed regulator. The temperature of the heated floor throughout the house depends on it. They wanted to make it warmer - they started the pump faster. At the same time, the boiler itself continues to work with the same intensity. They wanted to make it cooler - they reduced the pumping speed.
Then the circuits are filled with water from the water supply. If the water quality is low, you should use a filter. It is necessary to rinse all the circuits of the heated floor so that there is no dirt, technological lubricant or chips left in them. The water outlet is directed to the sewer. It is advisable that the connected drain tube be transparent - this makes it easier to monitor the amount of water bubbles and dirt.
After each circuit has been washed (they should be washed separately), it is necessary to inspect all circuits. If leaks are detected, they must be eliminated. If none are found, the crimping .
Using a special pressure test pump, a pressure of 6 atmospheres is created in the system. This is twice the normal operating value. All circuits and connections are inspected again (ideally, connections should only be on the manifold - comb). Half an hour later - re-examination. If leaks are detected, they must be repaired after releasing the pressure.
If no leaks are found, then the system is left under a pressure of 6 atmospheres for a day. If in 24 hours the pressure in the system has dropped by no more than 1.5 atmospheres, the system can be considered working.
Please note: when pressure is applied, the tubes will tend to straighten. They may even rip off the mounting brackets. They must be carefully installed in their original places and reinforced with additional ones.
Next, the concrete screed is poured . This should occur with a filled floor heating system under operating pressure. It is highly advisable to align the screed according to the beacons:
It's quite a dirty job. Many people are intimidated by the need to tinker with cement mortar and are inclined to dry install electric heated floors. We have already discussed how this could turn out in the future. Again, this is the same case when it is better to “take off like a pig” once, but then not pay through the nose for electric heating. Look at these pipes one last time. They will most likely never be clean or see sunlight again:
However, everything in the world comes to an end. The concrete hardens, then the screed is filled with a finishing self-leveling mortar and we have a finished heated floor.
Now you can lay linoleum or other coverings on it. Please note: some types of laminate or parquet are not intended for use on heated floors. When choosing a coating, check that the packaging has the appropriate symbol:
Make the floor warmer
In apartments on the 1st floor and in private houses, the floors are not very warm, which causes discomfort to residents, and heat leakage through the floors reduces the weight of their wallets. How to quickly and inexpensively make a floor warmer?
Since there are many design options, there is no clear answer. Let's consider the basic principles of how to make floors warmer, as well as insulation technologies for floors that are often used.
Make the floor warmer quickly from cheap materials
Often no one wants to undertake long repairs. But at the same time there is a great need to make the floor warmer.
To quickly, slightly insulate the floor, you need to put a layer of heat insulator on top of the existing coating, but it is elastic, and you can walk on it. We are talking only about felt up to 2 cm thick. On top of the felt you can also put a carpet up to 0.5 cm thick. You will need to put boards, for example, made of laminate, under the legs of the furniture so that it does not load too much.
So, you can quickly, in one fell swoop, make the floors a little warmer. But such insulation will not radically correct the situation with cold floors. Why?
A little theory about floor insulation
A significant part of the heat from the house (apartment on the 1st floor) escapes through the floors if they are not insulated. This requires increasing the heating power to keep the indoor temperature normal. And the floors themselves become cold, forcing residents to hold their feet higher.
You can change the situation and make the floors warmer only with the help of insulation. Those. We need a barrier made of insulation that would significantly reduce the escape of heat through the floors.
Floors above cold undergrounds and basements must have a certain resistance to heat transfer, which is regulated by the standard. For the south-temperate climate zone this value is 3.7 m2C/W (while for walls only 2.8 m2C/W). But when there is outside air below the floor, for floors above driveways, or when the house is on stilts... - 4.2 m2C/W is already required.
The further north, the greater the heat transfer resistance of the floors should be - for the north-temperate zone - 5.5 and 6.2 (m2C/W), respectively.
Based on economic benefit
The requirements of the standards are “invented” based on economic feasibility. The state does not order the creation of lower thermal resistance, because it is not profitable in the first place.
For ordinary floors, the resistance to the movement of thermal energy is very low - it is either just a concrete slab or a 40 mm board. Therefore, to achieve the required thermal resistance, a significant thickness of insulation will be required.
To make the floor warmer in the south-middle regions, you need to use 10 centimeters of polystyrene foam or 13 cm of mineral wool. And for the northern ones - 15 and 20 cm, respectively.
One might argue - why do we need to comply with the standards? 10 cm is expensive. And 5 cm will do. Unfortunately it won't work. It will be cool and not economical, and as a result, it will be much more expensive. It is recommended to follow the requirements of the standard, which are based on obtaining the final economic benefit from heat conservation.
Insulate floors from the outside or inside
Insulation from the inside will “eat up” the height of the room by at least 12 cm, but can be as much as 25 cm in cold climates. In some rooms this is simply unacceptable.
It is usually preferable to insulate from the outside - from the underground side.
For wooden floors, if there is no access from below, then the boards are torn off and insulation is made between the joists.
But when the floors are built on the ground, or are on a concrete base that is inaccessible from below, then it is necessary to add additional insulation along the top. Sometimes the thickness of the insulation (warmth) is sacrificed in order to maintain internal dimensions.
Next, we’ll briefly look at how to make a floor warmer in various situations (detailed descriptions of some floor insulation technologies can also be found on this resource).
How to make a floor warmer on a concrete base
If the base of the floor is concrete, monolithic or the floors are made on the ground, then there are no special questions about how to make the floors warmer from the inside of the room.
It is necessary to use rigid, durable insulation. - extruded polystyrene foam under a concrete screed. This insulation is a vapor barrier, but in combination with concrete this is not bad - the base will simply remain at the mercy of its climate.
A steam-waterproofing barrier is laid on the base (soil) with a fold over the wall, a side is laid along the walls made of insulation 1-2 cm thick to the height of the concrete screed.
Next, polystyrene foam boards are laid out as a continuous carpet in 2–3 layers until the standard thickness is reached. A cheap plastic film is usually placed on top of the insulation and a concrete screed 5 cm thick is poured on top (the strength of the base should allow it).
With minor modifications, heated water floors are also made using this technology.
We thermally insulate the concrete slab from below
If there is access to the concrete base from the basement, then you can avoid reducing the height of the rooms and stick extruded polystyrene foam on the underground side. Although this process is much more complicated and expensive. The work is carried out using the “wet facade” technology. But with protection of the insulation from rodents by attaching a metal mesh to dowels.
Is it possible to use polystyrene foam in this case? It all depends on air humidity. If the humidity under the floor is the same as outside, i.e. If there are frosty winds, then cheap polystyrene foam is preferable. But if the underground is not well ventilated and the humidity there is high, it is better not to risk it and insulate it with waterproof polystyrene foam.
Double floors
Double floors are not a difficult option for making floors warmer from the point of view of performing the work. When the height of the room allows, you can lay new floors on joists over the old base. This can also be done on old wooden floors.
You can also learn how to make floors warmer by creating new sheathing from this video.
How insulated floors are created
It remains to pay attention to three mandatory design solutions:
- continuous vapor barrier under mineral wool;
- ventilation gap above the mineral wool;
- coating of mineral wool with a vapor-permeable membrane that prevents the spread of microdust.
More recommendations for arranging double floor insulation:
- Polystyrene foam should not be used under a combustible coating.
- Instead of hard mineral wool boards containing phenol, it is better to use glass wool without fillers, which needs to be checked according to the documentation. Phenolic derivatives should not evaporate into the room.
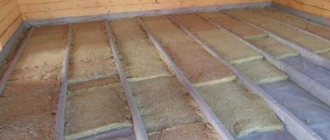
How to insulate a wooden floor
The classic option to make the floor warmer is to lay insulation between the joists. But here it is also important to perform a vapor barrier on the insulation, only now it should be on the side of the room, since from below, on the cold air side, ventilation of the insulation must be organized. Otherwise, there is a risk of water accumulation and destruction of the floors.
Ceramic beams are placed along the sides of the logs. A wooden flooring is laid on them, mineral wool insulation is laid, then it is covered with a vapor barrier membrane, above which a ventilation gap is left up to the flooring of 2 cm.
Thermal insulation of floors with heavy materials
Floors can be made warmer using cheap materials. Which have no small specific gravity. For example, using slag, expanded clay, foam concrete fragments.
But the layer thickness must be significant, in accordance with the thermal resistance coefficient of the materials - up to half a meter.
Typically, such heavy insulation is poured in a layer directly onto the ground, and floors are made on top of them on joists. But a vapor barrier is placed on the ground, and convection air movements are prevented in the insulation layer by covering it on top with a diffusion membrane, or at least with newspapers sprinkled with a layer of sand.
Bulk, loose materials
Vermiculite, bulk stone wool, ecowool, dried algae - all these materials absorb water very well. They can be placed between the lag and the design layer, but with the obligatory use of reliable vapor barrier against warm air in the room.
It is necessary to organize good ventilation of the floor, and do not forget that the insulation will be moistened with vapor from the ground in case of insufficient ventilation.
You can also pour a thick layer of materials that were previously used for insulation into a low underground - straw, leaves, sawdust.
They are pre-mixed with lime to prevent rapid biological decomposition. The layer also needs to be covered with a membrane to prevent the spread of small particles and to avoid waterlogging of the material. It is also advisable to protect such insulation from below from ground moisture and from rodents.
Several of the technologies discussed will help make floors warmer in any case, even if there is no special design option required. Making floors warmer is not difficult in any situation, if you do not skimp on insulation and prevent it from getting wet.
Some numbers
Now let's look at some very average cost of heating a room with water heated floors using a gas boiler. Of course, this value can be easily disputed, since it is calculated based on a variety of initial data.
Remember, we tried to calculate the cost of heating a 12 square meter room using infrared film. If you forgot, I remind you that electricity costs amounted to about 1000 rubles. Of course, this is also a very approximate value.
Now we take the same room, but use a water-heated floor for heating. On average, based on the cost of gas, the amount is approximately 3-4 times less, that is, about 200-300 rubles. For heating the entire apartment it will cost 1000-2000 rubles, which is much cheaper than the option with electric heating.
It would be long and boring to talk about how this figure came about. Some may doubt it and they will be right. A lot depends on the characteristics of the premises itself, the cost of equipment, and communications.
One thing is absolutely clear - a water heated floor with a gas boiler “heats cheaper” than the same option with an electric one or all kinds of film-cable electric options.
URSA brand products
The company produces a wide range of different types of insulation materials designed specifically for thermal insulation of electric and water heated floors. Extruded polystyrene foam in rigid boards URSA XPS N-III-L is one of them. The slabs can be installed both on a concrete base and on the backfill or directly on the ground. Although the properties of the slabs allow the use of the last two options, the manufacturer still recommends starting with arranging a screed to level the base. In this case, the risk of slab deformation or destruction is eliminated.
To seal the joints, special protrusions are provided along the side edges, resembling steps. During installation, they engage and the plane becomes monolithic. The slabs are excellent for insulating large areas in one layer. Cold air and dampness do not penetrate through the joints.
Technical characteristics of the plates:
- compressive strength - 0.25 MPa = 25 t/m²;
- thermal conductivity - 0.032 W/mK;
- flammability group - G3;
- temperature range of use - -50...+75 oC.
Slabs are produced in a standard size of 1180x600x50 mm. One package, which includes 8 slabs, covers an area of 5.6 m2.
URSA GEO P-60 is also used for thermal insulation of heating systems. This is a semi-rigid fiberglass material based on fiberglass. With small thickness and weight, it provides not only reliable thermal insulation, but also noise protection. With a thickness of no more than 25 mm, noise absorption exceeds 35 dB.
In the production of insulation, the patented Water Guard technology is used, which reduces the level of moisture absorption to almost zero. In case of accidental contact with liquid water, or storage and transportation of the material in humid conditions, it absorbs very little moisture and steam. After being placed in normal conditions, URSA GEO quickly dries and returns to its condition.
- dimensions - 1250Х600Х20-25 mm;
- thermal conductivity - 0.032 W/mK;
- flammability group - NG;
- water absorption - no more than 1 kg/m3.
The insulation is part of the brand’s group of absolutely environmentally friendly materials produced in the GEO series.
URSA mats are available in roll form and are designed for installation on a solid base. They contain only natural ingredients that do not cause allergies and do not emit fumes when heated. During installation, certain safety regulations regarding working with fiberglass materials must be observed. Workers must wear gloves and respirators to protect themselves from tiny glass particles.
Also, TERRA URSA series slabs are used for floor insulation and sound insulation. The material is quite hard, non-flammable, and moisture resistant. URSA TERRA Floating floor is suitable for heating systems, the technical properties of which allow it to be used under a screed. The material is chemically resistant and does not react with cement, gypsum, tile adhesive and other building substances. The slabs are quite rigid and are produced in the standard format for URSA materials - 1250X600 in thicknesses of 25 and 50 mm. This allows them to be used both in small rooms and in spacious rooms.
Another convenient modern material is Ursa PureOne 34 PN. These are mineral slabs with an excellent thermal conductivity coefficient (0.034 W/(m*K)), optimal for underfloor heating systems. The material is distinguished by a wide temperature range of application - -60 ... +220 ° C. Such properties allow the use of slabs for thermal insulation under:
- water pipes;
- heating cables and mats;
- emitting films.
All URSA brand materials are universal. They belong to the best heat and sound insulators, are very easy to install and are practically not subject to external influences of a mechanical and chemical nature. When laying fiberglass materials, it is recommended to fill the screed, and only then lay the heating elements.
The choice of floor insulation should be made taking into account the expected loads on the coating, requirements for the heating temperature of the elements, and environmental safety. Also, the price of the material and installation costs play an important role among the selection criteria. In terms of price/quality/durability ratio, Ursa brand products are best suited for private and industrial construction.
All materials are developed for domestic construction technologies. At the same time, they interact well with imported building mixtures and underfloor heating components, without causing the risk of incompatibility. But among the company’s entire assortment, it’s easy to get confused and buy the wrong product. To guarantee success, it is best to consult with professional builders or official dealers of the brand.
Bibliography:
- E. Pisarev “Warm floor, water or electric” Robur, 2012, 47 pp., ill., (13.1 mb pdf);
- L. V. Leshchinskaya, A. L. Malyshev “Heating - water, electric, stove” Literary Boulevard, 2010, 336 pp., (44.1 mb. pdf);
- Nizovtsev M.I., Sakharov I.A. DETERMINATION OF THERMAL AND DESIGN PARAMETERS OF WATER HEATED FLOOR. Institute of Thermophysics SB RAS, Novosibirsk;
- . Bearzi V. Warm floors. Theory and practice // ABOK.- 2005. No. 7.- P. 70-82;
- SNiP II-3-79. "Construction heating engineering".
- GOST 13732-2-2008. “Ergonomics of the thermal environment. Methods for assessing human reaction upon contact with surfaces. Part 2. Contact with a moderate temperature surface."