System elements
Regardless of which one you choose from the variety of heated floors from Teplolux, Profi or another, in any case, the set consists of the same system elements:
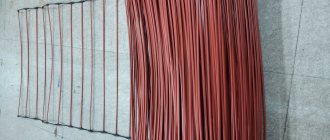
- Heating sections, which are sections of heating cable with special mounting ends through which voltage is applied. The heating cable can be made in one single-core or two-core version, depending on the power and the type of connection to the power supply network.
- Mounting tape, which is sold as a kit and serves to simplify installation of the system.
- A special programmable thermostat, which is necessary to monitor the energy consumption of the system.
- If the system will be used as the main source of heat in the room, it is recommended to provide additional insulation using polystyrene foam. In case of contact of the working surface with open ground, it is necessary to additionally place slabs of mineral materials or foam plastic in front of the screed.
How to properly install a thermostat for a heated floor and other questions
How to turn off a heated Teplolux floor
Heated floors are not new in a modern home, but for the average ordinary user this equipment still raises a lot of questions about installation, maintenance and repair. One of the main elements of an electric heating system is a thermostat, which works in conjunction with a temperature sensor. The sensor takes readings about environmental changes and transmits them to the regulator, which in turn makes adjustments to the operation of the heated floor. It is these two elements of the heating supply system in the house that we will try to consider from the point of view of the average user.
Where to install the thermostat when installing a heated floor?
When choosing a location to install the thermostat, you must be guided by the following considerations. The thermostat must be installed on the wall in a convenient and accessible place
It is also important to take into account the fact that when arranging furniture, you can block access to the device with a large sofa, wardrobe or other piece of furniture. It is unacceptable
The temperature sensor is located in the screed inside the corrugated pipe. Uncured cement or tile adhesive must not come into contact with the sensor. If necessary, the user or repairman must be able to replace equipment that has failed the temperature sensor.
A thermostat designed to regulate the operation of a heated floor in rooms with high humidity (sauna, bathhouse, swimming pool, bathroom) must be located outside the room.
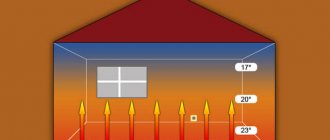
The diagram below provides basic recommendations and dimensions for installing a thermostat and sensor.
Why doesn't the floor heating thermostat turn on?
A popular question from the “why” series is the underfloor heating thermostat does not turn on/does not work. To find out the reasons for such an incident, it is necessary to check whether power is supplied to the regulator terminals. To do this, after first turning off the circuit breakers in the distribution panel, remove the thermostat filling from the mounting box. Turn on the power supply again and use a tester to check the presence of voltage at the supply terminals. If there is no voltage, then the fault should be looked for in the electrical wiring, and not in the underfloor heating system. If during the test it turned out that the phase cable is connected to the zero terminal of the regulator, then it is necessary to perform a phase change, i.e. just swap the wires. If there is power, the wires are correctly phased, but the thermostat display does not light up, then the device itself has failed. To restore system operation, the thermostat should be replaced.
Why doesn't the floor heating thermostat turn off?
Another common problem in the operation of heated floors is that the thermostat does not turn off and, accordingly, the system operates around the clock. In this case, the thermostat does not turn off because it does not reach the specified heating mode. Most likely, the thermostat itself is faulty; to be sure that it is broken, set the maximum heating temperature. If in this case the device does not turn off, it means that it is definitely faulty and requires replacement.
Why does the heated floor heat up with the regulator turned off?
In fact, there may be several reasons for this behavior of the heating system.
The first reason is the inertia of the heated floor. It does not cool down instantly, it takes some time, about 1 hour, so it seems that after turning off the heated floors continue to heat.
The second reason is that the heating system is somehow connected directly, bypassing the thermostat. In this situation, it is necessary to put the electrical wiring in order and everything will work as it should.
Why does the floor heating thermostat click?
Clicking of the thermostat is a sign that the heated floor is on/off. If the thermostat “clicks” frequently, it means that when installing the heating you installed the temperature sensor too close to the heating elements. The floor does not have time to heat up, and the sensor already reacts to temperature changes. The sensor mounting point needs to be changed. Loud clicks of the thermostat are typical for a situation where the conductive contacts are loosely tightened in the corresponding terminals.
We answer questions about home renovations for heated floors, how long it should take to heat, etc.
On the one hand, an underfloor heating system can of course be individually configured based on the heat generated, just like a classic radiator.
On the other hand, you can still save a lot of energy in the “background” if you set up the floor heating or have this setting done directly by a specialist. The outside temperature plays a decisive role.
In addition, factors such as the warm-up phase and the cooling phase are also important. In this article you can read about the connection and settings of the heated floor that you should make for the best effect.
Adjust the heated floor using the thermostat
Settings can be made for the consumer directly on the room underfloor heating thermostat. In general, underfloor heating has a thermostat separate from the main radiator. In this way they can be adjusted independently of each other.
The information given here, especially in terms of timing, is a rough standard. Depending on the model, it may be that a heated floor from one manufacturer behaves slightly differently than another model from a different manufacturer.
As a rough average, this information definitely helps if you want to adjust your underfloor heating.
Pay attention to the cooling and warming up phases
Time settings can be made on the thermostat. Make sure the cooling period is usually two hours.
If you do not want to heat up any more from 22:00, you should adjust the floor heating so that it switches off already at 20:00.
At the same time, floor heaters have a warm-up period of about three hours until the desired temperature is reached. This should also be taken into account, for example, if you want to wake up in the morning in a pleasant atmosphere.
What to pay attention to
One of the important points is the correct choice of heating control device.
Its main characteristic is power (usually no more than 3 kW), that is, what maximum load the device can withstand.
If the power of the heating element is higher than this value, then an additional relay is installed between it and the thermostat. It can be single-phase with the required power.
Installation is carried out in a hidden box or in a distribution panel. Additional wiring and power supply to the electrical floor are laid from the control unit to the relay.
If you plan to use the system as the main heating, then for its correct operation you need two sensors that monitor the temperature of the floor and air.
There are different types of thermostats. The simplest are mechanical types. They are ready for use immediately after installation, but the programmable Teplolux models need to be configured.
Depending on the installation method, they can be overhead or built-in. It is easier to attach overhead ones to the wall; there is no need to make a hole as for built-in models.
For safety reasons, the installation wires of the mat into the wall should be laid in a corrugated pipe. For the same reason, it is not recommended to install the thermostat in rooms with air humidity above 80%. The device is located where direct sunlight will not fall on it. At a height of no more than 150 cm and no lower than 30 cm.
Heat-generating cables with a power of more than 2 kW should be connected using special wiring and a separate circuit breaker, which will remove the load from electric floors during power surges. It is not recommended to connect the regulator to a regular outlet. This may place unnecessary stress on the electrical wiring.
Each room must have its own control unit. This is very convenient, since for each room you can determine its own temperature regime.
Repair of underfloor heating and heating cables in Moscow and the Moscow region
Possible causes of malfunctions:
- heating cable burnout;
- damage to the heating cable, for example, drilled when installing a door stop;
- the floor temperature sensor has failed;
- The floor temperature controller has failed.
Burnout of the heating cable can be due to:
- Damage to the heating cable during installation, before pouring the screed or before laying the tiles, was not immediately noticed and the heated floor works for some time (a month - six months).
- Drilled a cable into the floor (for example, when installing a door stop).
In these cases, call the service team. The service engineer, without opening the floor, uses testing equipment to determine the location of the damage, open one or two tiles and apply a repair sleeve, thereby restoring the operation of the cable.
Tip After finishing the repair, save two or three tiles!
The temperature sensor has failed. In this case, the warm floor will work, but at full power, it will not turn off when heated to the set temperature and the energy consumption will increase, and it will not be possible to reduce the floor temperature.
This sensor must be replaced with a new one. Neither the floor nor the walls are opened, since the sensor (according to the instructions) is placed in a corrugated tube, it is simply pulled out of the corrugation, and a new one is easily inserted in its place.
If the old sensor is not placed in a tube, but is immured in the floor, then you can install an air temperature sensor. It is a semicircle, about 3 cm in diameter, attached directly under the thermostat. Using such a sensor is not very effective, since the warm floor will turn on from air movement (for example, from a draft), and not from heating the floor.
The floor temperature controller is faulty. Replace the regulator.
Connecting the temperature sensor
Warm floors Teplolux
The temperature sensor is installed in a fire-resistant corrugated pipe, placing it directly inside. This device should generally be located at one end. The other end of the pipe is for electrical wires that connect to the main system.
The corrugated pipe leads from the thermostat directly to the place of its schematic connection. During the installation process, it is recommended to avoid unnecessary bends.
The part of the pipe in which the temperature sensor is directly located must be isolated from the external environment to avoid damage during work with concrete. , maintaining a distance from the wall of about 50–60 cm.
The next step is to check the temperature sensor for mobility. This is done so that later, if it fails, a quick replacement can be made. To check the required mobility, the sensor is simply removed from the pipe and reinserted.
How to turn on Teplolux underfloor heating
What does Teplolux underfloor heating consist of?
Connection procedure
Review of the electric heating field in the apartment
After laying the heating elements and connecting the sensor wires and heat-generating cable to the installation site of the thermostat, as well as the electrical network, it is necessary to connect the Teplolux regulator.
Installation of Teplolux cable systems is carried out in the following order:
The connection is made through an RCD, that is, a residual current device, with a rated current of 30 mA. It is placed in the electrical panel. All work is carried out with the mains power turned off.
A mounting box for the thermostat is installed in the prepared hole. Then the front cover is removed. The housing shows a connection diagram for the Teplolux regulator, in accordance with which the connection is made. More detailed information can be found in the instructions.
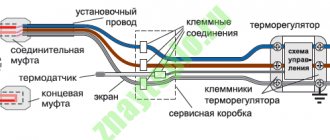
The installation wires have different colors that indicate its purpose:
- brown (white, black) – phase (L),
- blue – zero (N),
- yellow-green – grounding.
For Teplolux devices, the connection is made as follows:
- A sensor is connected to terminals 1 and 2. It is not necessary to observe the principle of polarity here. Connections can be made in any order.
- A power cable with a voltage of 220 V is connected to terminals 5 and 6. The phase (an indicator is used to determine it) is supplied to 6, and zero to 5.
- The heating section or mat is connected depending on its type: single-core or double-core. In the first case, the insulated conductors are connected to terminals 3 and 4, the uninsulated conductor, that is, the shielding braid, to 5. In the second case, the phase (core in brown insulation) is supplied to pin 3, zero (blue insulation) is supplied to pin 4, screen output (yellow-green) – 5. If the network is three-wire, then the grounding conductors are connected to the common ground loop through the PE terminal.
Next, the back cover is inserted into the box and secured with two screws. The front panel is returned to its place. After this, the functionality of the system is checked. To do this, first turn on the electricity, and then the thermostat.
It sets the minimum heating level. Then it switches to maximum heating, and a characteristic click of the circuit closing should be heard. Within 1-2 minutes it is checked whether the section is heating up or not. Switching off is carried out in reverse order.
Installation of Teplolux heating mats is carried out in the following order:
What to pay attention to
One of the important points is the correct choice of heating control device. Its main characteristic is power (usually no more than 3 kW), that is, what maximum load the device can withstand. If the power of the heating element is higher than this value, then an additional relay is installed between it and the thermostat. It can be single-phase with the required power.
Installation is carried out in a hidden box or in a distribution panel. Additional wiring and power supply to the electrical floor are laid from the control unit to the relay.
If you plan to use the system as the main heating, then for its correct operation you need two sensors that monitor the temperature of the floor and air.
There are different types of thermostats. The simplest are mechanical types. They are ready for use immediately after installation, but the programmable Teplolux models need to be configured.
Depending on the installation method, they can be overhead or built-in. It is easier to attach overhead ones to the wall; there is no need to make a hole as for built-in models.
For safety reasons, the installation wires of the mat into the wall should be laid in a corrugated pipe. For the same reason, it is not recommended to install the thermostat in rooms with air humidity above 80%. The device is located where direct sunlight will not fall on it. At a height of no more than 150 cm and no lower than 30 cm.
Heat-generating cables with a power of more than 2 kW should be connected using special wiring and a separate circuit breaker, which will remove the load from electric floors during power surges. It is not recommended to connect the regulator to a regular outlet. This may place unnecessary stress on the electrical wiring.
Each room must have its own control unit. This is very convenient, since for each room you can determine its own temperature regime.
How to turn off the Teplolux heated floor
Techniques for controlling household electrical appliances should be understandable to any family member. Not every person understands the effects of electric current, but everyone knows how to turn on the lights or TV. Control of electric floor heating systems is designed to create a comfortable temperature during various periods of activity of the residents of the house, and to guarantee the safety of the structure.
Thermostat for heated floors "Teplolux" TP 520, operating instructions
The device is equipped with:
- thermostat with built-in air sensor;
- remote floor temperature sensor;
- a strip with terminals for outputting ground wires;
- instructions for the Teplolux thermostat.
Installation work on the thermostat and temperature sensor can be done independently if you have the appropriate skills. Otherwise, you need to contact specialists. Do not forget that the power of an electric heated floor can reach 6 kW. Even a small deviation from the rules for installing electrical equipment can lead to irreparable consequences.
Thermostat "Teplolux" tp 520, installation instructions
This model of thermostat allows its installation both in a socket niche inside a wall and on top of a wall in a protective box.
The device is connected to the working network through a machine equipped with a residual current device. The wires of the heating sections and the floor temperature sensor are connected to the terminals of the device using screws. The leads from the protective braiding of the heating cables are connected to the grounding bus through an external terminal block.
The thermostat model 520 is democratic and can work with floor sensors from other manufacturers, the main thing is that its resistance corresponds to the parameters of the original one - 6.8 kOhm. An external temperature sensor is connected to the corresponding terminals of the regulator without determining the polarity.
After installation of the heated floor is completed, its performance is checked using the Teplolux thermostat. The operating instructions for the device describe in detail the options for setting certain parameters of the heater. The front panel of the device contains four main buttons and a liquid crystal screen that displays the current state of the heating system.
Temperature regulator "Teplolux" TP 520, operating instructions
Programming of equipment operating modes is performed using the following buttons:
- the first is the most comfortable and favorite mode for the whole family;
- the second is a menu button to reduce the temperature;
- the third is a menu button to raise the temperature;
- fourth – performs several functions depending on the combination: on/off, selection, confirmation.
The display shows all actions performed by the owner.
Symbols confirming the operations performed and the established modes:
- The specified heating parameters are maintained automatically
- The temperature is maintained between +5 °C and +12 °C, so that the room does not freeze in cases where the owners are absent for a long time
- Favorite mode is turned on for a certain time
- Working in programming mode
4.1. Maintaining a comfortable temperature level, set at two intervals per day
4.2. Economy mode
4.3. Self-learning function allows you to heat the room at the desired moment
4.4. Displays the operation of the floor sensor
4.5. Air sensor enabled
4.6. Heating the room according to specified parameters
4.7. Sets specific temperatures
4.8. Menu work in progress
4.9. Changing parameters is blocked
4.10. Days of the week – the current day is underlined, weekends are marked with the top tick
4.11. Icons to indicate working days and weekends.
All programming steps are performed sequentially. Changing the parameters of any mode is only possible by scrolling through the menu to the desired operation. In case of unforeseen situations, errors will be displayed on the screen, the meaning of which is described in the instructions.
For optimal operation of underfloor heating electrical equipment, the heating system must match it in terms of heat transfer, and the room itself must be well insulated from heat loss.
pol-hot.ru
Where is it used?
First of all, you need to figure out where this heated floor can be used.
This type of underfloor heating is especially popular in those regions where gas heating is impossible or problematic.
Also, this heating can be in demand as additional heating in private and apartment buildings. Even if there is a main heating system, Teplolux underfloor heating can create comfort in other rooms.
For example, in some rooms it can be quite cool due to poor thermal insulation. To increase the temperature, you can install electric floor heating.
Among other things, Teplolux underfloor heating will be effective in cases where in late spring and early autumn the central heating is already turned off, and the room is still cool.
This type of heating can help out by creating a comfortable temperature.
Varieties
The modern market offers a wide range of heated floors. Each system has its own technological differences. The differences boil down to the fact that in different systems the number of wires inside the cable varies, as well as the thickness of the heating element.
So, on the market you can find the following brands of Teplolux underfloor heating:
- Warm floor Teplolux tropix. Warm floor Teplolux tropix is an ideal solution for rooms that have a small area. The heating element of the Teplolux tropix heated floor is about 3 mm. As for installation, installation of the Teplolux tropix heated floor is carried out using a special self-adhesive tape. Compared to other types of systems, Teplolux tropix heated floors have undeniable advantages.
- Teplolux pro. Great for rooms that have a large area. The heating mat itself has a thickness of up to 3.5 mm. The package includes a powerful cable. Thanks to this, the entire area of the room is heated evenly and efficiently. You won't find any cold spots on the floor.
- Mobile heated floor. It is presented in the form of a thin mat. It can be easily placed under any rug. This is what a mobile heated floor is all about. It is lightweight, so it can be easily moved from one room to another.
- Warm floors mini. This type of heating can be placed in a thick screed without any problems. The heating element is only 3 mm.
These are the main types of electric heating systems. With all this, it doesn’t matter whether you buy Teplolux express, mini, mobile, pro or tropics, choose a reliable supplier who guarantees high quality products.
What does the heating system consist of?
Although there are different models of the Teplolux underfloor heating system on the market, their basic configuration is almost the same. Let's look at the package:
- A heating element. This means a special mat or a piece of heating cable. It must have a mounting end. Through them, voltage is supplied to the heating system. There are two cable options: single-core and double-core. This factor affects the power of the entire heating system.
- Mounting tape. It is necessary to make the installation process much easier.
- Thermostat. Thanks to its presence, you can program the Teplolux underfloor heating system to the required mode. Plus, thanks to its presence, you can control energy consumption.
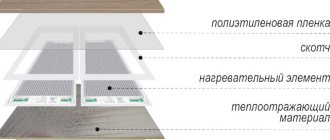
This is the basic package. However, for improved and efficient operation of the entire system, it is necessary to additionally purchase some additional equipment. We are talking about thermal insulation. It is necessary so that heat is retained in the room and does not erode. Moreover, a reflective film can be laid under the heated floor system, which will direct all the thermal energy to the top of the room.
Installation technology
The process of installing Teplolux underfloor heating involves several sequential steps. Below are instructions for installing them.
First of all, it is necessary to carry out high-quality preparation of the surface on which the heated floor system will be installed. You should also consider the location of the entire system.
So, under large-sized objects, such as a sofa, wardrobe, etc., you cannot lay a Teplolux heated floor.
Among other things, it is recommended to check all electrical systems in your house or apartment. If it is weak and old, then it may need to be replaced. This is important, because electric heating will put a certain load on all the wiring.
As for the installation technology, it all comes down to the following steps:
- The floor surface is prepared and cleaned of all kinds of contaminants.
- You also need to make sure that the floors are relatively level.
- Next, thermal insulation is laid.
- Teplolux mats are evenly distributed over the entire surface, according to a pre-developed project.
- The temperature sensor is being connected.
- The thermostat is installed. It will greatly simplify the operating process.
- It is advisable to power the Teplolux heated floor with a separate line from the electrical panel and to an individual RCD.
- Afterwards the whole system is connected into one whole. It is important to ensure that all connections are secure and strong.
- Now you can start pouring the screed.
After all the work has been completed, you can turn on the Teplolux underfloor heating system only after at least 30 days. During this time, the screed will gain all its strength. In principle, the installation procedure is very simple. Absolutely anyone can handle it, even a non-specialist. It is worth noting the fact that this installation scheme is suitable for any type of Teplolux.
Easy programming of floor temperature
A programmable controller is a more complex controller model compared to mechanical thermostats.
Setting up a programmable controller during operation is usually intuitive, but at first you may need instructions to learn all the capabilities of the controller and control them correctly. However, this nuance more than compensates for the economical energy consumption, because the heated floor will only work at certain hours of certain days of the week.
To set the operating time of the heated floor, the thermostat has built-in programs, from which the user selects the most suitable one and independently sets the operating hours. The following algorithms are possible from the built-in programs:
- maintaining the same temperature on the floor day and night any day of the week
- automatic reduction of floor temperature day and night
- Automatic lowering of floor temperature only at night
- automatic reduction of floor temperature day and night on weekdays, on weekends only night reduction.
Each day of the week is divided into 4 periods of time: morning, afternoon, evening and night. The start and end times of each part of the day are programmed independently.
In addition to time programming, the user can configure the temperature sensor selection parameters:
- operation of heated floors using a floor temperature sensor in rooms with existing heating
- operation of heated floors according to data from air and floor temperature sensors in rooms where heated floors are used as the main and only source of heating
- operation of a heated floor without a floor sensor using one air sensor.
Additional options for the thermostat include such useful functions as setting the maximum and minimum floor temperatures, child protection with button locking using a hidden button (it must be pressed with a paper clip or a pin), frost protection in rooms that can cool down to street temperature with maintaining a minimum air temperature of +5°C, a hard reboot of the thermostat with a return to factory settings if programming is incorrect, a warning about a malfunction of the regulator (clock failure due to a power outage, overheating of the regulator, break and short circuit of the temperature sensor, overheating of the floor above the set temperature).
How to turn off underfloor heating - By floor
Warm floors have long been nothing new in a modern home, but for the average user, this equipment still raises a lot of questions about installation, maintenance and repair. One of the main elements of an electric heating system is a thermostat, which works in conjunction with a temperature sensor. The sensor takes readings about environmental changes and transmits them to the regulator, which in turn makes adjustments to the operation of the heated floor. It is these two elements of the heating supply system in the house that we will try to consider from the point of view of the average user.
When choosing a location to install the thermostat, you must be guided by the following considerations. The thermostat must be installed on the wall in a convenient and accessible place. It is also important to take into account the fact that when arranging furniture, you can block access to the device with a large sofa, wardrobe or other piece of furniture. It is unacceptable.
The temperature sensor is located in the screed inside the corrugated pipe. Uncured cement or tile adhesive must not come into contact with the sensor. If necessary, the user or repairman must be able to replace equipment that has failed the temperature sensor.
A thermostat designed to regulate the operation of a heated floor in rooms with high humidity (sauna, bathhouse, swimming pool, bathroom) must be located outside the room.
The diagram below provides basic recommendations and dimensions for installing a thermostat and sensor.
Why doesn't the floor heating thermostat turn on?
A popular question from the “why” series is the underfloor heating thermostat does not turn on/does not work. To find out the reasons for such an incident, it is necessary to check whether power is supplied to the regulator terminals. To do this, after first turning off the circuit breakers in the distribution panel, remove the thermostat filling from the mounting box. Turn on the power supply again and use a tester to check the presence of voltage at the supply terminals.
If there is no voltage, then the fault should be looked for in the electrical wiring, and not in the underfloor heating system. If during the test it turned out that the phase cable is connected to the zero terminal of the regulator, then it is necessary to perform a phase change, i.e. just swap the wires. If there is power, the wires are correctly phased, but the thermostat display does not light up, then the device itself has failed.
To restore system operation, the thermostat should be replaced.
Another common problem in the operation of heated floors is that the thermostat does not turn off and, accordingly, the system operates around the clock. In this case, the thermostat does not turn off because it does not reach the specified heating mode. Most likely, the thermostat itself is faulty; to be sure that it is broken, set the maximum heating temperature. If in this case the device does not turn off, it means that it is definitely faulty and requires replacement.
Why does the heated floor heat up with the regulator turned off?
In fact, there may be several reasons for this behavior of the heating system.
The first reason is the inertia of the heated floor. It does not cool down instantly, it takes some time, about 1 hour, so it seems that after turning off the heated floors continue to heat.
The second reason is that the heating system is somehow connected directly, bypassing the thermostat. In this situation, it is necessary to put the electrical wiring in order and everything will work as it should.
Why does the floor heating thermostat click?
Clicking of the thermostat is a sign that the heated floor is on/off. If the thermostat “clicks” frequently, it means that when installing the heating you installed the temperature sensor too close to the heating elements. The floor does not have time to heat up, and the sensor already reacts to temperature changes. The sensor mounting point needs to be changed. Loud clicks of the thermostat are typical for a situation where the conductive contacts are loosely tightened in the corresponding terminals.
Share on social networks:
Thermostats are widely used in both underfloor heating control systems, air conditioning and ventilation control systems, as well as in anti-icing and snow-melting systems. Regulators are used in underfloor heating systems both for comfortable (additional) floor heating in rooms with other heating sources, and for main heating, when the underfloor heating is used as the main and only source of heating.
Overview of thermostats
Maintaining a constant floor temperature
Easy programming of floor temperature
For open wiring
In this article we will talk about regulators that are used to heat underfloor heating. Comparison of thermostats for anti-icing and snow-melting systems in another article.
Review of Devi thermostats for heated floors
Thermostats that control heated floors operate mainly on one principle: they are triggered to turn the heating cable on and off by a temperature sensor.
The response algorithm for turning on a heated floor for all regulators is as follows: the sensor, sensing a decrease in the temperature on the floor, changes its resistance, and when the floor temperature drops below the set value, the thermostat closes the contacts of the switching relay and begins to supply 220V power to the heating cable of the heated floor, and this heating The cable, accordingly, heats up, and along with it the floor structure heats up.
The floor temperature sensor, under the influence of heating, begins to change its resistance in the opposite direction, and when the temperature value set in the regulator is reached (i.e., when the floor is heated to the temperature you specified in the regulator), it sends a command to turn off the relay. The warm floor begins to cool down.
The cycle repeats an infinite number of times. The only difference with programmable regulators: they control the time of day and day of the week, and if you and your household are not at home or you are sleeping, and the regulator knows about this through the settings you have set, then the warm floor will not turn on. In addition, some regulators have a built-in air temperature sensor.
Maintaining a constant floor temperature
Mechanical regulators for internal wiring (for hidden installation in apartments, when the wiring is hidden in the wall under the plaster). Models differ in the number and nature of floor temperature sensors.
All mechanical thermostats work on approximately the same principle: maintaining a constant warm temperature on the floor. The heated floor is turned on and off using a button, and the floor temperature is adjusted with a wheel.
Temperature sensor at the thermostat:
- located in the floor (this is a remote sensor),
- the temperature sensor in the regulator is built inside the housing and it reacts to changes in air temperature (not the floor),
- has two temperature sensors - an external floor sensor and a built-in air sensor; accordingly, the regulator operates from a combination of these two temperature sensors.
An additional function of thermostats is monitoring the temperature sensor; a green LED at the moment when the heated floor is not heated indicates that everything is in order.
More details
Easy programming of floor temperature
A programmable controller is a more complex controller model compared to mechanical thermostats.
Setting up a programmable controller during operation is usually intuitive, but at first you may need instructions to learn all the capabilities of the controller and control them correctly. However, this nuance more than compensates for the economical energy consumption, because the heated floor will only work at certain hours of certain days of the week.
To set the operating time of the heated floor, the thermostat has built-in programs, from which the user selects the most suitable one and independently sets the operating hours. The following algorithms are possible from the built-in programs:
- maintaining the same temperature on the floor day and night any day of the week
- automatic reduction of floor temperature day and night
- Automatic lowering of floor temperature only at night
- automatic reduction of floor temperature day and night on weekdays, on weekends only night reduction.
Each day of the week is divided into 4 periods of time: morning, afternoon, evening and night. The start and end times of each part of the day are programmed independently.
In addition to time programming, the user can configure the temperature sensor selection parameters:
- operation of heated floors using a floor temperature sensor in rooms with existing heating
- operation of heated floors according to data from air and floor temperature sensors in rooms where heated floors are used as the main and only source of heating
- operation of a heated floor without a floor sensor using one air sensor.
Additional options for the thermostat include such useful functions as setting the maximum and minimum floor temperatures, child protection with button locking using a hidden button (it must be pressed with a paper clip or a pin), frost protection in rooms that can cool down to street temperature with maintaining a minimum air temperature of +5°C, a hard reboot of the thermostat with a return to factory settings if programming is incorrect, a warning about a malfunction of the regulator (clock failure due to a power outage, overheating of the regulator, break and short circuit of the temperature sensor, overheating of the floor above the set temperature).
More details
For open wiring
Thermostats for open wiring are simple mechanical thermostats; in fact, they are analogues of thermostats for hidden wiring - both are designed to maintain a constant floor temperature with switching on and off on command from the floor temperature sensor in the regulator (floor and air).
The main difference between such thermostats is that they are designed for open wiring (for example, in a country house, where the wires are laid openly along the wall or in a cable duct).
In addition, we can add that a regulator with a floor sensor is more convenient to use for heated floors in city apartments; a regulator with a floor and air sensor is more convenient to install in country houses, where it can control not only the floor temperature, but also the air temperature in the room.
More details
More on the topic:
User manual
After completing all installation work, you must wait the recommended time of 30 days and only then turn on the system. Now it remains to figure out how to turn on the heated floor and enjoy the cozy and comfortable environment of your room. After completing installation, it is advisable to read the documentation. The operating instructions very clearly outline all aspects of the system’s operation and the procedure that must be performed to enable and further operate the system as a whole. In the future, you will independently make all the settings at your discretion and the level of comfort of your room.
After the concrete screed has completely hardened and then decorated, the first turn-on can be performed. The first step is to turn on the temperature controller and set the maximum temperature.
The maximum temperature is set to quickly warm up your room. After establishing the desired temperature inside the room, you can reduce the operating temperature parameter to the required level.
It is important to note that when turned on for the first time, the floors will take a long time to warm up; the process can take from 8 to 48 hours, depending on the area of the heated room.
Temperature regulator "Teplolux" TP 520, operating instructions
Programming of equipment operating modes is performed using the following buttons:
- the first is the most comfortable and favorite mode for the whole family;
- the second is a menu button to reduce the temperature;
- the third is a menu button to raise the temperature;
- fourth – performs several functions depending on the combination: on/off, selection, confirmation.
The display shows all actions performed by the owner.
Symbols confirming the operations performed and the established modes:
- The specified heating parameters are maintained automatically
- The temperature is maintained between +5 °C and +12 °C, so that the room does not freeze in cases where the owners are absent for a long time
- Favorite mode is turned on for a certain time
- Working in programming mode
4.1. Maintaining a comfortable temperature level, set at two intervals per day
4.2. Economy mode
4.3. Self-learning function allows you to heat the room at the desired moment
4.4. Displays the operation of the floor sensor
4.5. Air sensor enabled
4.6. Heating the room according to specified parameters
4.7. Sets specific temperatures
4.8. Menu work in progress
4.9. Changing parameters is blocked
4.10. Days of the week – the current day is underlined, weekends are marked with the top tick
4.11. Icons to indicate working days and weekends.
All programming steps are performed sequentially. Changing the parameters of any mode is only possible by scrolling through the menu to the desired operation. In case of unforeseen situations, errors will be displayed on the screen, the meaning of which is described in the instructions.
For optimal operation of underfloor heating electrical equipment, the heating system must match it in terms of heat transfer, and the room itself must be well insulated from heat loss.
Source: pol-hot.ru
Installation
Installation rules are described in detail in the operating instructions. According to statistics, malfunctions in the operation of the system often occur when the manufacturer’s recommendations are not followed when laying the structure with your own hands.
Before installing heated floors, you need to carry out preparatory work. Any selected modification of the heating system must be laid on a level base. To level the surface, it is recommended to use self-leveling self-leveling floors.
During the work, you need to make grooves in the wall. They are necessary for routing wires, sensors and the regulator box. A remote temperature sensor should be connected to the thermostat. The control unit must be installed in the same room with the heating system at a distance of more than 15 cm from the floor. The wires are connected to the temperature sensor according to the connection diagram. After all connections have been made, you need to turn on the system to ensure its functionality. A switched-on lamp in the control panel indicates that the design is working. After checking, the power must be turned off.
In order to improve thermal insulation, thermal insulation material should be laid. You can use polystyrene foam or polystyrene foam. Do not neglect work to improve thermal insulation. In this way, it is possible to increase the efficiency of floor heating and provide maximum protection of the floor surface from heat loss.
The next stage is laying the heating structure. It should be noted that the distance between the cables should not be more than 10 cm. Installation of mats must be carried out taking into account the fact that massive pieces of furniture should not stand on the structure. It is recommended to lay warm floors at a distance of 10-15 centimeters from the wall.
The last stage is the screed. To do this, fix the heating cable with a solution, stretching the composition along the entire length of the structure (height up to 12 mm). Fill the floors with screed (layer thickness should be within 3-5 cm).
In order for the underfloor heating system to function without interruption for a long time, the following rules must be observed:
- do not walk on resistive cables so as not to damage their integrity during installation work;
- make sure there are no air gaps near the heating elements to avoid possible risks of overheating;
- to check the wires after installation, use the resistance measurement method;
- It is not allowed to use the system until the screed is completely dry.
When you first start up heated floors, it may take 48 hours for the structure to warm up.
To ensure that heated floors last as long as possible, follow the manufacturer’s recommendations specified in the instructions:
- After installing the heating structure, the system cannot be started for 28 days. After this period, you are allowed to turn on the thermal regulator. When starting the system for the first time, it is recommended to set the maximum permissible temperature parameters. After the room has warmed up, you need to use programming on the remote control to reduce the temperature to the optimal one.
- Be sure to include a temperature sensor in the circuit. Due to forgetfulness or the desire to save money, the heating system may soon fail.
- Do not use cheap control devices from Chinese manufacturers. The use of “non-native” equipment often leads to malfunctions of the heating system or its complete failure to function.
If any malfunctions are detected in the operation of heated floors, the heating structure must be turned off immediately. The use of faulty equipment is prohibited.
How to turn off the Teplolux heated floor?
Laminate is a very popular floor covering due to its decent and varied appearance. At the same time, it is affordable compared to, for example, parquet, and, compared to the same parquet, it requires much less maintenance.
Among the disadvantages of laminate flooring are usually called “hydrophobia”, squeakiness and “coldness”. However, installing a “warm floor” under a laminate allows you to cope with two of the three disadvantages - good news for those who like this material.
What kind of “warm floor” should I install?
Among modern types of laminate you can find suitable models for any “warm floor”, but infrared heating remains the most convenient, safe and reliable:
— IR film is practically unable to reach temperatures dangerous for the laminate (unlike cable systems);
— it does not create a risk of flooding, which would require increased moisture resistance from the laminate (unlike water-based “warm floors”);
— film flooring can be easily and quickly installed by yourself;
— laying infrared “warm floor” under the laminate practically does not raise the floor level and saves living space.
Which laminate is suitable?
— Eco-friendly, i.e. with a minimum emission class – E1 or E0.
— Resistant to high temperatures (marked +°C).
— Equipped with a click type lock. This type of connection allows you to lay laminate flooring in a floating manner.
— No thicker than 8.5 mm.
- With good thermal conductivity. The thermal resistance coefficient should be in the range from 0.5 to 0.15 m²K/W.
Based on the combination of characteristics, class 32 or 33 laminate is most often chosen for installation on top of an infrared “warm floor” . However, before you buy the laminate you like, study the accompanying documentation - it should indicate whether this particular material is suitable for combination with “warm floors”, and with which ones, what temperature it can withstand, etc.
Correct styling
2 requirements for the premises:
- the base of the room should be relatively flat, without cracks or bumps;
— the room must have the technological ability to connect a “warm floor” to an AC power supply with a voltage of 220 V.
What you will need:
— rolled thermal insulation material;
— polyethylene film with a thickness of 160 microns for waterproofing;
— film carbon “warm floor”;
— connecting power wire;
— mounting tape;
— floor temperature sensor;
- thermostat.
Step-by-step installation of “warm floor” under laminate
Stage 1. Preparing the base for laying “warm floors” under the laminate
1) Before you begin laying infrared carbon film, you need to draw up a detailed diagram of the room where installation is planned. On the floor plan you need to indicate the location of the heating zones, indicating the distance between the strips of the heated floor film, as well as the location of the power connecting wire and temperature sensor.
This is useful:
— The area of coverage of the surface of the room with infrared film directly depends on the functionality that the “warm floor” will perform. If the “warm floor” will subsequently be the main heating system, then at least 60% of the total area of the room must be covered with infrared film. If the “warm floor” performs an auxiliary function, then 40% of the area is sufficient.
— Infrared “warm floors” do not fit close to the walls, so a space of 10-40 centimeters is required.
— The optimal distance between individual strips of infrared film is 1-5 centimeters. DO NOT lay the film overlapping.
— To ensure the least number of joints and connecting wires, you need to lay the film along the room.
— It is best to place the connection points of wires and contacts as close to the wall as possible - under the baseboard or next to it.
2) The base of the floor must be cleared of debris and dirt.
3) Before laying the infrared film, you need to lay thermal insulation. When installing a “warm floor” under a laminate, the heat-reflecting substrate must cover the entire area of the room. The most optimal thermal insulation material for laminate is isolon with a thickness of 2-5 mm.
4) The connecting seams of the heat-insulating material should be taped on the top side with mounting tape.
Stage 2. Installation of electric infrared film floor
1) First, you need to select a place to connect the “warm floor” to the electrical network and equip this point for installing a thermostat.
2) If the need arises, we cut the infrared heated floor film, following the cutting lines.
3) The film floor is laid directly on a layer of heat-insulating material - with the surface with conductive copper strips facing down - and fixed with tape.
4) A temperature sensor is attached to the infrared film from below and sealed with insulating tape.
5) Then you need to connect to the electrical network. Individual strips of infrared film are connected in parallel to the thermostat. Connections of conductive copper tapes with power wires are fixed with contact clips. The joints, as well as the free ends of the copper tapes, must be sealed with insulating tape.
6) The joints must be placed in pre-prepared recesses in the substrate and secured with tape. It is important to ensure that the connections do not come into contact with the heating elements.
7) Next, you need to turn off the voltage and connect the required wires, guided by the diagram, to the thermostat.
 Before laying the laminate, you need to make sure that the “warm floor” is working: connect it to a power supply with a voltage of 220 V, set the thermostat to the middle position and turn on the heating for 15-20 minutes.
9) If everything functions correctly, then a layer of vapor barrier material is laid on the surface of the infrared film - and then you can begin laying the laminate.
Information provided by Stem Energy
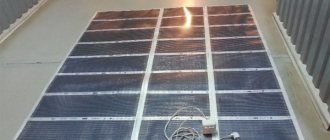
Warm floor Teplolux: description and instructions
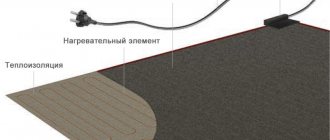
Warm floors annually occupy a leading position in the heating appliance market in Moscow. The advantage of such a heating system is not only the saving of working meters in the room, but also the uniform distribution of heat.
There are two types of heated floors: water and electric.
In apartment buildings, it is customary to use only electric heated floors, as they allow you to control the temperature and eliminate the risk of flooding of the lower floors, which is possible when using water heated floors.
Therefore, legislation prohibits the use of water floors in apartments. Today we will talk about the Teplolux mobile heating field.
Warm floor Teplolux
Mobile heated floors of the Teplolux brand are actively used in the construction of functional structures that create an atmosphere of comfort and coziness in a living space.
The Russian product is no different from its famous analogues, heating the coating to the required temperature in a couple of seconds.
Installing this heated floor is possible with your own hands, but at the time of carrying out the measures you need to take into account the list of construction nuances on which the success of the final work depends.
Design Features
Mobile heated floors for Teplolux are manufactured using modern technologies at one of the large factories in the Russian Federation, which specialize in the manufacture of electronic equipment.
Adjust the heated floor using the thermostat
Settings can be made for the consumer directly on the room underfloor heating thermostat. In general, underfloor heating has a thermostat separate from the main radiator. In this way they can be adjusted independently of each other.
The information given here, especially in terms of timing, is a rough standard. Depending on the model, it may be that a heated floor from one manufacturer behaves slightly differently than another model from a different manufacturer.
As a rough average, this information definitely helps if you want to adjust your underfloor heating.
Adjust the heated floor using the heating curve
A warm floor, of course, like any other heating element, consumes energy as soon as it starts working. Anyone who wants to save on consumption can significantly reduce their energy costs. To do this, you should pay attention to the rules of underfloor heating.
A very important component is the setting of the so-called heating curve. This term forms the relationship between the energy supply temperature and the outside temperature. Here, the flow describes the temperature at which the water is heated on its way from the heat source to the underfloor heating.
By the way, the flow temperature in heated floors is significantly lower compared to other radiators.
Modern heated floors work depending on the weather
Depending on the outside temperature, the supply temperature is adjusted using the actual heat demand. Of course, it is important not only how cold or mild it is outside, but also how individual heating looks.
For example, do you need a slightly higher room temperature or are your space heating costs particularly high? If the heating curve has to be set manually, this means: when the outside air temperature drops, the flow must be set higher.
Modern flooring models also make these adjustments automatically.
This is fundamentally important because based on the outside air temperature, the flow temperature must adapt in order to actually achieve the desired temperature as quickly and economically as possible. If the room temperature drops too quickly during the coldest winter days, the slope of the heating curve must be increased. This ensures that the desired temperature is achieved with the least loss.
In adjusting underfloor heating there is no single rule of thumb for the heating curve
The steeper the heating curve, the higher the flow temperature in degrees Celsius. There is no rule of thumb with the heating curve. Because the heat actually felt varies depending on different aspects.
There are people who tend to tolerate cold worse than others. At the same time, activity also plays a role. Because those who move around the house more experience the cold less.
Therefore, the heating curve should always be based on personal preference and circumstances if you want to customize your underfloor heating.
Other Important Factors
In addition to the settings on the thermostat and the floor heating curve, other factors also play a role. It should be noted in advance that underfloor heating has different heating circuits. Here too the flow and return are separated. They are found in the so-called heating circuit. This allows home owners to regulate the space in different ways.
If it is necessary to hydraulically balance the heater to ensure optimal temperature distribution, this must also be taken into account. By the way, this should always be done by a specialist who sets different pressures for each circuit. So what should the flow rate be for it to become warm enough?
The following factors should be noted:
- Required heating power in the respective room
- Flow rate
- Pipe length
- Grounding and its thickness
- appropriate supply temperature
Conclusion
Adjusting floor heating has many practical advantages. It will give you more comfort by making changes to the thermostat in terms of automation.
In addition, the above settings can of course also reduce energy costs, especially if the shutdown is chosen intentionally.
Changing the heating curve, however, ensures ideal heating of the room and optimal energy use, depending on the season.
We answer questions about home renovations for heated floors, how long it should take to heat, etc.
On the one hand, an underfloor heating system can of course be individually configured based on the heat generated, just like a classic radiator.
On the other hand, you can still save a lot of energy in the “background” if you set up the floor heating or have this setting done directly by a specialist. The outside temperature plays a decisive role.
In addition, factors such as the warm-up phase and the cooling phase are also important. In this article you can read about the connection and settings of the heated floor that you should make for the best effect.
Equipment
There are many modifications of underfloor heating systems on the market (more on this below), but their basic equipment is almost the same. The kit includes:
- Heating element. This is a special mat or a piece of heating cable. It must have a mounting end. With its help, voltage is supplied to the heating system. There are two cable options: single- and double-core. This feature affects the power of the entire heating system.
- Mounting tape. Required to facilitate the installation process.
- TeploLux. He will program the system for the desired mode. In addition, it helps control electrical energy consumption.
This is basic, but for greater efficiency of the entire system, additional purchase of some equipment is required. For example, thermal insulation. It is needed to maintain optimal indoor temperatures and to retain heat. Plus, under the heated floor system you can lay a heat-reflecting film, which directs all the heat energy upwards in the room.
It is especially important to purchase backup equipment for thermal insulation of the floor when the heating installation takes place on the ground floor, and there is soil underneath. .
Installation rules
The installation technology, if briefly stated, boils down to the following operations:
- preparing and cleaning the floor surface;
- leveling its surface (if necessary);
- laying thermal insulation;
- uniform (according to the project) distribution of mats over the entire floor surface;
- connecting a temperature sensor;
- installation of a thermostat;
- powering the heated floor with a separate line from the electrical panel to an individual RCD;
- connection of the entire system. Checking the reliability of connections;
- filling the screed.
After completing all the work, the system should be turned on at least 30 days later, since the screed must become strong enough. This installation scheme is suitable for almost any type of Teplolux scheme. Preparatory activities include checking all circuit parameters and their compliance with the designated installation location, as well as checking compliance with the following rules:
- installation of heating sections is carried out in places where massive furniture is not located;
- to use the circuit as an additional heating source, its specific power is 110-120 W per square meter. m;
- in case of installation of a basic circuit, the specific heating power should be at the level of 130-150 W per square meter. m, and the area corresponds to approximately 70% of the total heating area;
- To install the devices, grooves are prepared for laying the wiring. The control unit is mounted at a distance of at least 15 cm from the floor. Before starting, the connection diagram is checked by a tester and configured;
- The functionality of the circuit is tested after installing the cable, laying the screed, and installing the floor covering.
The sequence and installation rules are explained in detail in the operating instructions, according to which you can configure the heating system
For uninterrupted operation of the system for a long time, it is important to adhere to the following rules during its installation: . Do not walk on a resistive cable to avoid damaging it; The appearance of air bubbles near the heating conductor is not allowed, as this can lead to its overheating; after installation, test measurements of the system resistance are made; You cannot turn on the circuit until the screed is completely dry.
- Do not walk on a resistive cable to avoid damaging it;
- The appearance of air bubbles near the heating conductor is not allowed, as this can lead to its overheating;
- after installation, test measurements of the system resistance are made;
- You cannot turn on the circuit until the screed is completely dry.
Possible problems with the system
A common mistake in the operation of heated floors of this brand is a violation of the normal functioning of the system. Check if the cable is heating up:
- The system should warm up at a rate of approximately 1-2 hours after startup. When you turn it on for the first time, the surface will warm up for about a day;
- The functionality of the system is checked using resistance measurements at the edges of the cable or thermostat terminals. Deviations from the standards specified in the operating sheet may be a maximum of 5%;
- Do you use consumables and control devices of another brand? The organization "Special Systems and Technologies" produces all the required accessories for the TeploLux floor. If you use equipment from another brand during installation and at the time of use, this will disrupt the operation of the system;
- thermostat and temperature sensor - you can find out about the problem using a tester. When replaced, the functionality of the heating system is completely restored.
To avoid damage to heated floors, you should strictly follow the recommendations regarding installation and use. This is the only way you can count on maintaining the system’s functionality for at least 20 years.
Now you know about all the features of TeploLux heating floors. As you can see, they have different types and their own opposite sides. In addition, you can handle the full installation even if you do not have enough experience. If a malfunction occurs while using the system, do not hesitate - contact specialists who can help resolve your problem. In addition, there is enough information and reviews on TeploLux heated floors on the Internet. Therefore, you can easily find the most objective information regarding the choice of heating system.
Final screeding after installation
The final stage of installation work on laying a heated floor can be considered a screed with cement-sand mortar. First, fix the heating circuit cable with a small amount of solution, which must be stretched over the entire length of the wire.
This way you will insulate the heating cable and ensure safety during further work to avoid accidental damage during the final screed. You can also use special fastening strips that secure the cable and ensure its uniform laying.
For heated floors Teplolux. When working with concrete, it is recommended to use polymer reinforcing mesh. This will prevent unwanted cracks from appearing as the solution dries.
After the completed screed has completely dried, you can begin decorating and laying the floor covering.
Peculiarities
Warm floor "Teplolux" is a system consisting of cables. Depending on the design variation, the device can use single- or double-core sections with different lengths, power and other technical characteristics. All types of heated floors have one configuration. In the box you will find:
- Heating sections. They are sections of cables. They are equipped with mounting rings through which electricity is supplied. The cable can be either single-circuit or double-circuit.
- Styling tape.
- Installation instructions.
The main element of the system is the cable. Its task is to convert electric current into thermal energy. This conversion is carried out by shielded heating cores protected by an insulating layer. During long-term operation, the temperature of the section can reach 70°C. The insulating shell can withstand temperatures of 100°C, which ensures the reliability and safety of the entire system.
Calculation
Teplolux warm electric floors are installed only after certain calculations have been made. The main criterion for them is the required thermal power per 1 m² of surface. This indicator can be determined through complex calculations, which take into account the material of the walls and the degree of their insulation. With normal indicators, the following data can be taken into account:
These values are taken into account only if there is a main heating system. If the installation is done in an unheated room, you should choose more powerful models.
The company's product range includes two-core and single-core models, differing in thermal characteristics and heating area.
In addition, you should take into account the controls, which include a temperature sensor and a thermostat for the Teplolux underfloor heating. The optimal option for completing the system is the multifunctional device SE 2000. A convenient touch panel, the ability to select several heating programs and 2 temperature sensors in a complex will make it possible not only to efficiently, but also economically heat the room.
System components
The system, regardless of the model used, consists of several components:
- sections for heating - cutting cables, one or two wires with an estimated length. They are equipped with the mounting ends necessary for connection to the network.
- thermostat for heated floors Teplolux is a device that, according to user-specified temperature parameters, regulates the supply of electricity to the system, that is, it contributes to more economical operation. As a rule, a thermostat is not included with this floor. To reduce electrical costs, it is recommended to additionally use insulating material. The company produces it in the form of a special mixture.
On a note
Good floor insulation provides heat savings of up to 30%. When installing a heated floor, it is recommended to choose insulation with a thermal conductivity value of about 0.05 W/m*C.
When installing insulation systems for complete heating of a room, the thermal insulation can be made, say, from solid sheet polystyrene foam (from 30 mm), for additional - foam material (3–10 mm) is recommended, etc. The cost of a heated floor depends on both the number of components and on their quality.