What are the advantages of infrared floors
Laminated panels with their thermal conductivity are simply created for laying an additional heating system under them. The optimal solution in this case would be a warm floor - a film under the laminate. No other type of heating - water pipes, electric heating mats or cables - will be such a good option.
Infrared film for laminate has the following differences from other types of heating:
- Possibility of smooth temperature control
. Laminate is very sensitive to strong temperature fluctuations, so over time it can become deformed, begin to creak, and gaps may appear between the slats. In the case of water heating, its heating can only be controlled if it is autonomous and equipped with a thermostat. However, such a system also requires pouring an additional screed that raises the floor level, which is not always appropriate or feasible in the room. - There is no need for additional screed
. Infrared heated floors under laminate do not require additional screed. But other electric-type heated floors, such as heating mats or heating cables, are based on the principles of resistance, and therefore require screeding. In addition, these types of heating heat the surface unevenly.
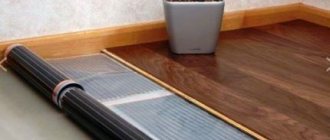
Infrared film flooring is very suitable for laying under laminate flooring. Its thickness is less than 1 mm, so it does not have any noticeable effect on the level of the floor covering. In addition, laying an infrared floor under a laminate is much faster and easier, because there is no need to spend additional time and money on pouring the screed (read: “Infrared film for heated floors - operating principle and installation diagram”).
Warming up of the room occurs due to infrared heat waves with a length of 5-20 microns, which increase the temperature of the air and all objects in the room.
Advantages of film heated floors:
- uniform heat distribution throughout the room;
- heating efficiency, as well as energy saving of infrared heating systems, is 30% higher compared to resistive heated floors;
- the heating temperature of the film does not exceed 30-40 °C, which does not harm laminated panels;
- the density of the elements emitting heat waves ensures uniform heating of the room;
- quick start of heating the room;
- ease of installation, dismantling and moving, as well as the durability of the heating system - reaches several decades;
- does not dry out the air in the room, eliminates unpleasant odors, ionizes the air, promoting an anti-allergic effect.
The only drawback of infrared heated floors under laminate is its high initial cost, which, however, pays off within a couple of years of use.
Which warm floors are best to use under laminate?
When choosing a specific floor heating system, evaluate the economic feasibility of using each option, take into account the material of the floor base, the heating area location and features of the room's location. The permissible rise in floor height is also important.
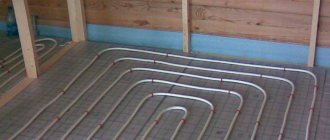
Warm floors under laminate on wooden floors are laid without a concrete screed, otherwise the floor may not withstand the weight of the structure. The concrete screed raises the floor surface up to 60 mm, so any type of warm floor can be laid at this height.
This is interesting! When installing floor heating systems, the heating area increases, so the room warms up faster, even despite the resistance of the laminate. The floor heats up evenly, usually from one point deep into the room.
If you do not want to raise the floor above the base level, use thin heating systems - without a concrete screed, for example, a film infrared floor.
Any system, including water, is suitable for use in a private home.
Source: https://sst-vlg.ru/
When choosing a laminate, pay attention to some important characteristics; the laminate and heating system must match each other.
The 3 tasks of the substrate are to compensate for surface unevenness and transfer the heat of the coolant to the finishing coating. Concrete screed is difficult to level, and using a thick substrate is ineffective, since the thicker it is, the lower the heat transfer. Thin material will not hide the unevenness of the floor and will not protect the board from overheating; the laminate will lie unevenly, the board will bend and begin to crack.
Without reducing the heating capacity of the flooring, the correct choice of underlay will help to level it.
Choose a base with a thickness of no more than 4 mm, a rational option is 3 mm. Thicknesses of 1-2 mm and 3-4 mm are also allowed, depending on the quality of the floor base. If it is impossible to compensate for differences in height or irregularities, the laminate will begin to creak.
With a greater thickness of the substrate, the heat transfer will decrease, and trying to compensate for this shortcoming, you will increase the heating temperature, therefore heating costs will increase, and the system will overheat and fail. However, it’s also impossible to do without a substrate - over time, the laminate will begin to creak, the locks will break, and the coating will become unusable.
For heated floors, choose a material with a high degree of thermal conductivity. Common substrates with these parameters are:
- polyethylene foam backing - is a layer of foamed polyethylene mass with a thickness of 2 to 8 mm in a roll. 3-sound, moisture and heat insulating. This substrate is resistant to temperature changes. Among the disadvantages - it does not recover after strong physical impact, since the bubbles of which it consists burst in places of damage and do not recover;
- polystyrene foam is a wear-resistant material that can withstand physical impact, such as rearranging bulky furniture. It has high thermal conductivity, noise insulation, and protects the coating from condensation. Unlike polyethylene, the material is denser in structure, deforms less, and therefore will last longer.
- rubber-cork backing is cork chips with the addition of synthetic rubber and polyurethane glue. Thanks to the elasticity of cork, elasticity, sound insulation and thermal conductivity increase, it can be used with warm floors.
Substrate materials should not have a foil layer, since foil prevents the penetration of heat into the laminate panels and reduces heating efficiency, leading to an increase in temperature y inside the floor. When choosing, pay attention to the markings; you need a substrate approved for use with underfloor heating systems. Today, the most suitable material is a rubber-cork backing.
Laminated boards are made from wood fiber with low thermal conductivity, and by using materials of poor quality and ignoring the recommendations, you risk reducing the temperature it is possible even up to 3 times.
Operating principle of film infrared floor
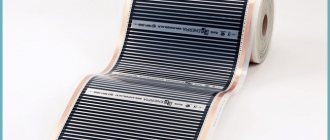
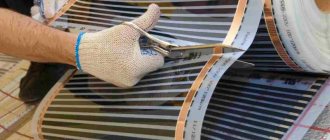
The operation of infrared heated floors is based on film heaters. They are strips of carbon paste located at minimal intervals, soldered between two layers of polyester film. When voltage is applied to these rods, they begin to emit IR waves.
The carbon elements are connected to power via copper busbars with silver-plated contacts. In this case, all strips and individual sections of the film floor are connected in parallel, which eliminates the failure of the entire system in the event of a breakdown of one of the elements.
Infrared film heated floors for laminate are available in widths of 50 cm or 1 m, and the length of the rolls also varies. The choice of heating film sizes depends on the room parameters. If necessary, the film can be cut to length along special lines located every 25.7 cm. The film cannot be cut in any other places.
Infrared heating film is available with specific power of 150, 220 and 440 W/m2. These indicators are taken into account when calculating the load on the electrical network in the apartment before installing a heated floor system. As a rule, a film with a power of 150 W/m2 is used under the laminate, which can heat up to 40-45 °C, since higher heating is undesirable for this coating.
Thermal sensor and cable for temperature control, a set of terminals for connecting the film to the network, insulation and switching wires are supplied complete with heated floors. Thermostats are purchased separately and installed in each room, in places where they have easy access. The thermostat is connected to the electrical network, and the power cables for the film floor diverge from it.
Work progress
Preparing the base (base)
The rough flooring must be smooth and unstained - litter and large-sized debris are not allowed, it is also important to remove stones, dust, and sand. It is recommended to test the flooring for strength, repair cracks and gaps, and level them according to applicable specifications.
Important! To prevent the concrete base from becoming so dusty, it is recommended to treat it with a primer mixture, but this operation is not necessary.
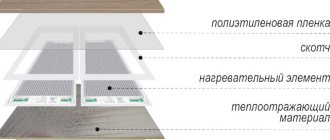
A thermal insulation layer should also be laid on the subfloors. It is recommended to use foil. The shiny side must be at the top. The strips are laid end to end.
The thickness of the foil layer that was used should be approximately 2-3 mm. It is more comfortable to strengthen the layer that was used only with the support of double-sided tape, and the gaps between the individual strips can be covered with simple tape.
Next, small recesses will be cut into it to accommodate terminals, wires and other communications. Then the base for the laminate will become smooth. It is also recommended to spread a layer of waterproofing coating on the base of the floor.
Materials that were used and equipment
What can you need to install an infrared heated floor system?
The following devices and materials that were used will be useful to us:
infrared heating film;- heat reflector;
- temperature sensor and temperature threshold stabilizer;
- simple and double-sided tape;
- electric wires;
- clamps and material for wire insulation;
- waterproofing element (for example, film (polyethylene));
- knife;
- scissors;
- pencil;
- ruler;
- roulette.
At the beginning of our article, the display of infrared film was given, but in fact, it is not only carbon.
Heatflow film uses a carbon fiber sheet as a heating agent, which produces a mixture of carbon fiber and carbon paste.
There is also another discharge of IR film. It arose relatively not so long ago, but has already become in great demand. Unlike conventional carbon IR film, the material that was used actually does not fail in any way if there is a defect - that is, the floors will always be warm.
Important ! If you destroy one or several strips of a conventional infrared floor, then it will not be steamed at their location. But when using a film with a continuous strip of carbon, the flooring will begin to warm up, even if it has been damaged. Elementary - in the place of a cut or breakage of the material that was used, it will become a little cooler, but heating will continue.
Installation features
And finally, here are a few recommendations for installing an infrared heating system:
- the humidity in the room where the work is carried out must be no more than sixty percent;
- installation of infrared floors is done at a temperature threshold of zero degrees or more;
- Thermal film, including for testing, must be connected to the network only in an unrolled state - it cannot be turned on in a roll;
- if the film was damaged at the location of the graphite (dark) layer, then the defect space is certainly isolated on both sides;
- the temperature sensor must be turned on so that, if necessary, it can simply be changed;
- If there is a flood in the living space, then the floors must be turned off immediately and not reconnected until they are dry.
If the IR floor heating system was connected correctly, it will serve you for more than ten years. It is important to carry out all work carefully and carefully - only in this case you will be able to get the desired result!
Laying film heated floors under laminate
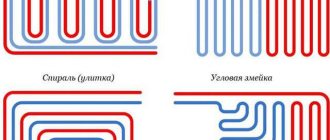
Before you begin installing an infrared heated floor under a laminate, you should draw up a diagram of the location of the heating elements and wiring in the room.
First, determine the mounting location of the temperature controller, to which all wiring cables will be connected. The outer part of the cable, connected directly to the thermostat, can be routed through a corrugated tube and hidden in a groove in the thickness of the wall, or left outside, covered with a protective box.
The layout of the film elements must be marked on the diagram, taking into account all precautions and restrictions. It is important to take into account that the surface of the heating film has markings along which it can be cut.
It is better to roll the roll of film along the room to avoid unnecessary cuts and joints. The distance from the heating film to other heating devices and walls should be at least 25-30 cm.
Preliminary preparation of the base
If you plan to install an infrared floor under a laminate on a concrete base, then it must be properly prepared - leveled, strengthened, primed and dust-free. Next they move on to preparing it for laying the film elements.
The screed is removed from dust, dirt and any microparticles using a vacuum cleaner.
In order to save electricity, a thermally insulating foil substrate is placed under the heating elements. The thickness of this layer is 2-3 mm.
The foil layer is laid with the metallized side facing out. This underlay is attached to the floor with double-sided tape, and the seams between the sheets are taped with adhesive tape.
The thickness of the substrate allows you to disguise all communication cables, terminals, and a temperature sensor in it so that they do not extend beyond the general level of the heated floor when laying laminated panels.
Warm floors under laminate: pros and cons
Heated floors are a good alternative to carpets, electric heating devices, convectors, which heat the room unevenly and heat the air, which leads to stuffiness and dryness, which is especially unpleasant for allergy sufferers.
The underfloor heating system only heats the floor covering and is safe. In addition, walking barefoot eliminates many problems for both children and adults.
When choosing, you should rely on the characteristics described above and give preference to the material, relating it to the purpose of the room and heating features.
A water floor is safe and cheap to operate, as it is less energy intensive. The disadvantages include: the high cost of installation, possible noise from moving the coolant, leaks and the difficulty of repairing them.
Also, a warm floor based on a liquid coolant requires additional space for the collector and it is not able to maintain the exact temperature. If installation is incorrect, it becomes possible for condensation to form under the coating, which leads to damage to the coating from the inside, and repair is a labor-intensive and expensive process.
The advantages of an electric floor include its relative cheapness, easy installation, silent operation, you can set the temperature and even set a timer to turn it on, debts th operating period.
The disadvantages include: energy consumption and insignificant electromagnetic radiation (does not exceed the maximum permissible indicators from quality manufacturers).
Important! When choosing a heating cable, pay attention to the presence of an ISO 14000 certificate - it is a guarantor of environmental safety.
Laying heating film
According to the diagram prepared in advance, the heating film is cut and laid out over the area of the room. When cutting the film and moving over it after installation, you should be careful not to damage the conductive and radiating segments. If this happens, the defective area should be removed.
Along the cut line, you should insulate all exposed contacts that are not needed to connect the film to the network. For these purposes, bitumen tape is supplied with the material.
The film pieces should be placed with the copper elements facing down. In this case, you can fix the position of the heating elements relative to each other and on the substrate using tape.
Clip-terminals are inserted into special gaps in the film, and the protruding parts are recessed into the thickness of the substrate. After this, the clips are crimped for subsequent connection of the heating element to the power cable.
Having laid out the cable according to the diagram, the ends are stripped and connected to the terminals, after which they are crimped.
When laying heating elements, it is important not to forget about the temperature sensor. It is placed under the thermal film, approximately in the center of the canvas so that its working element falls on the emitting dark stripe. The sensor can be secured with bitumen tape supplied with the film floor.
In addition, after connecting the wires in the terminals, they should also be insulated with bitumen tape. It is attached above and below the terminal, aligning the edges with each other to achieve complete tightness of the connection.
After connecting the wiring to the film floor, all cables with connection points are hidden in an insulating substrate, making cuts in it, and then secured with tape.