Design and principle of operation
Rod floor refers to a type of electric carbon heating devices. It has a rather complex design, which consists of thermal elastic mats. They, in turn, are equipped with flexible rods filled with a carbon fiber mixture.
The system has a parallel connection circuit. Each rod in it is made of a polymer material with high heat resistance. The carbon elements are fastened together with a copper multi-core cable. All wires have a film sheath that limits the access of moisture.
The device is equipped with a temperature sensor and thermostat. When connected to an electrical outlet, rod-type heating elements emit infrared heat. At the same time, the floor covering is heated evenly, and the parallel connection allows the system to remain in operation if one component of the carbon element is damaged.
Installation of a core floor
The wire between the two rods can be cut with scissors.
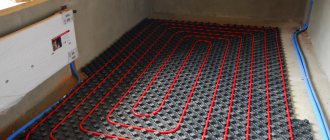
After all the preparatory work, installation can begin. Gradually roll out the roll. When you get to the point where a reversal is needed, take a pair of scissors and cut the wire between the two rods. Then turn the roll 180° and roll the coating in the other direction. Repeat the procedure until you cover the entire surface.
There is also another faster way. You can purchase several small rolls of the required length. Then you can get rid of cutting the rolls. There are rolls from 1 to 7 m or 25 m.
Thus, if the area of your room is 6 m2, you can purchase two strips of 3 m2 each and place them side by side, or one roll per 6 m2, but then you will need to cut it. Moreover, the price for both cases is almost the same.
Having laid out the rolls, secure them with tape to the insulation and fasten them together. Then cut holes in a checkerboard pattern for better attachment to the surface.
After all the procedures have been completed, you can proceed to connecting the wires.
Specifications
The rod electric floor heating system is available in a width of 83 centimeters. Each rod has a thickness of 3 to 3.5 millimeters. The distance between heating elements is no more than 10 centimeters.
Almost all rod-type heated floors have the following characteristics:
- initial power consumption – 140 W/m2;
- maximum heating of the rod – 60 °C;
- operating power of the mats – 105 W/m2;
- spectral range of IR radiation is from 8 to 14 microns.
The amount of energy consumption during heating depends on the power of the device. At the same time, its statistical consumption ranges from 70 to 160 watts per square meter.
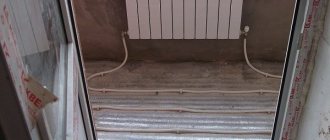
Under-tile installation options
Installation diagram: carbon heated floor in a dry heated room on a concrete floor, on top of old tiles, on boards
- Tiles (tiles, porcelain tiles)
- Tile adhesive (1 cm) or cement screed (3-5 cm)
- Mounting tape (for fixing the rods)
- Carbon infrared rods
- Mounting tape (for fixing the backing)
- Reflective perforated underfloor heating
- Floor leveler (optional)
- Subfloor (concrete floor, old tiles, boards)
Rice. 1. Installing infrared rod floor under tiles
Criterias of choice
On the modern market, electric rod floors are represented by various manufacturers. When choosing such a heating system, the following parameters should be taken into account:
- Power. This indicator depends on the volume of the heated area. It also takes into account for what purpose the equipment is purchased. If a rod-heated floor is provided as the main source of heating, then maximum power is required.
- Material and workmanship. It is recommended to purchase floor heating equipment from trusted manufacturers who can provide a product quality certificate. The system design elements must not contain substances harmful to the human body.
- Availability of temperature sensor and thermostat. These devices must be included in the kit for the main heating elements of the heated floor.
- System integrity. When purchasing equipment, it is recommended to visually inspect the product. This check will eliminate the presence of cracks, scratches or broken structural elements. A big plus is the warranty documentation for the product.
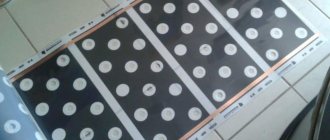
What does a rod-type heated floor look like
? A rod-type heated electric floor must comply with all declared technical characteristics.
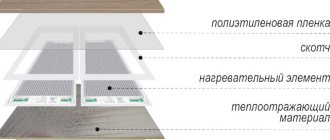
What is needed for installation?
In order to properly install a rod heated floor, it is necessary to collect all the fixtures and materials. So, you will need:
- A backing that will direct heat upward. Please note that foil materials are not recommended.
- Several heat-shrinkable tubes with thick walls, sleeves.
- Two heat shrink tubes with thick walls for each strip. They are used to insulate ends.
- Thermostat.
- Corrugated tube with plug and probe. A temperature sensor will be inserted into it.
- Connecting wire. Please note that it must be equipped with double insulation.
- Pliers (thanks to them you can remove some of the insulation from the wires).
- Wire cutters.
- Crimping pliers.
- Scissors and knife.
- Screwdriver.
- Construction tape.
- A special construction hair dryer for heating heat-shrinkable tubes.
Scope of application
The carbon electric floor rod system is used for almost all types of flooring. Due to its high technical performance, the device is widely used for heating in residential areas.
This type of heating can be used as primary or additional equipment. It is often installed in separate rooms, on balconies and loggias or bathrooms. Warm core flooring has also found its application in gyms, offices, winter gardens, and large public or warehouse spaces. It is not uncommon for an electrical system to be installed as an anti-icing device.
Advantages and disadvantages
Rod heated floors are perfect for installation in rooms with complex layouts. Its main advantages include:
- Possibility of installation under any type of floor covering;
- ease of construction;
- fire safety of the entire device;
- economical use;
- duration of operational life;
- safe use for rooms with high humidity levels;
- absence of harmful electromagnetic radiation;
- the ability of the system to function in the event of failure of its individual elements;
- ensuring uniform heating of the entire floor area;
- resistance to corrosive formations.
The design of the rod heated flooring includes protection against overheating.
Among the disadvantages of using such floor heating systems are:
- high price for the product;
- Possibility of installation only in a layer of cement-sand or adhesive screed.
Among the disadvantages of a rod-based heated floor is its high cost.
Sometimes the disadvantages include the difficulty of connecting the system to the electrical network. But if you entrust this to professionals, then such a defect does not matter at all.
Unimat rod heated floors
Rod underfloor heating Unimat is a Korean manufacturer of electric panel heating. The brand produces 2 types of heating:
- Rod heated floor RHE Unimat. It is a simple design with a width of 830mm. Product power – 120 W. It is recommended to install it in an adhesive liquid under the tile or in a thin screed. In this case, the thickness of the floor covering should not be less than 2 cm.
- Rod heated floor Unimat Boost. This type is characterized by a shorter step between the heating components. The distance between the rods is 9 cm. The rated heating power is 160 W. Suitable for heating rooms with large heat losses. Used in unheated basements, balconies and loggia-type extensions.
Such floors are produced in batches. Each kit includes: mats, connecting elements, wires, corrugation for connecting a temperature sensor, “End” kit. Attached is a warranty card, printed instructions and video materials. This is quite enough to install the heating yourself.
Installation technology
The installation of a rod-type underfloor heating system has its own characteristics that must be taken into account for the correct functioning of the device.
Preparation for installation
To install rod floor heating, you need to make a layout diagram for the entire system. It indicates the places where the mats will pass, as well as their placement under pieces of furniture. It is taken into account that the heating elements should not come into contact with each other.
Before starting installation work, you must select a place in the room to install the thermostat. The device should be positioned so that the electrical wires of the system and the temperature sensor are conveniently connected. If the equipment is to be installed in a room with high humidity, it is recommended to mount the regulator outside the room. The distance from the floor to the device should be within 50 - 70 centimeters.
Having identified the necessary areas for installing the system, you can proceed to preparing the base:
- Installation of equipment is carried out on a subfloor, which is completely cleaned of dirt and dust.
- A layer of thermal insulation material is laid on a clean base, which should be located over the entire floor area. The thickness of the substrate depends on the characteristics of the room. For cold apartments located on the ground floors, a fairly dense insulating material is required.
The edges of the substrate are fixed with double-sided tape or a stapler. To avoid significant temperature differences between the flooring and the supporting structures, it is recommended to insulate the walls. The heat-insulating layer in this case protects against the formation of cracks.
Installation
Having finished preparing the base, you can begin laying the components of the heating system. Installation of a warm rod floor is carried out from the place where the thermostat is attached. Subsequent installation consists of the following steps:
- the roll is laid out evenly on the floor area between the walls;
- to rotate the structure, carefully cut the connecting cable, which is located between the rods;
- then the canvas needs to be rotated so that it can be laid against the opposite wall;
- thus, mats must be laid over the entire floor surface.
Scotch tape is used to secure the sheets. When installing mats, contact of heating elements should be avoided.
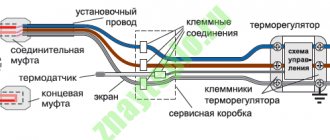
Connection
After laying the mats, you can connect the system to the electrical network. Initially, you should connect the wire where the mats are cut. To do this you need:
- strip the end of the wire one centimeter from the insulation;
- take out the connector - the connector that is included in the kit for the heating system, and insert the cable into the socket;
- clamp the connector;
- strip the end of the second cable;
- pass the wire through the heat-shrinkable tube and connect the second contact;
- to secure the tube, warm it up using a hair dryer;
- To make an isolated connection, this procedure must be done with the second contact;
The layer of solution should be approximately 20 cm.
According to this diagram, you need to connect all the wires in areas where there are cuts. The temperature sensor is placed in a corrugated pipe. To do this, make an opening in the screed according to the size of the device. The wires coming from the sensor are connected to the thermostat. All devices are connected to each other according to the diagram specified in the instructions for the warm rod floor.
After all connections, you can check the operation of the system. The entire surface of the mats should warm up within fifteen minutes. If the equipment is functioning correctly, you can begin screeding. The layer of solution should be at least twenty centimeters.
Installation of a rod heated floor, how to lay it?
Installing a rod-type underfloor heating system is a simple procedure. Even an inexperienced user can handle it if desired.
First you need to decide on the installation location of the thermostat. You need to make sure that it is in an accessible place. Most often, the ideal location for residents is near the light switch. In cases where heating a bathroom or swimming pool is being designed, the device should be placed in a dry room.
Unlike other heating methods, installation of a rod heated floor does not require a sketch of the room divided into zones. This is due to the fact that decorative elements can be placed on the mats. If you want to see in advance how the heating will look, then drawing a sketch is not prohibited.
The mats should be located at a distance of 15-20 cm from the walls.
The strips of heating rods should be placed so that they are slightly distant from each other. No intersections or contacts between them are allowed. Laying is carried out on a flat, clean floor to maintain the uniformity of the screed.
In order to reduce heat loss, you can lay heat-insulating material along the walls. It is best to use damper tape or a strip of polystyrene foam.
After screeding or laying tiles, you need to clean the room from excess and other contaminants. At the end of the work you need to install the baseboard.
Finish coating
Electric rod flooring is universal in that it is used for almost all floor coverings.
Laminate
The laminate is laid on a floor heating system, provided that the rod-heated floor will be used as additional heating of the room. This is due to the fact that the material cannot withstand regular high temperatures.
When using laminate, the floor should warm up to twenty-one degrees. Otherwise, the coating will begin to deform from drying out.
Linoleum
The temperature regime does not have much effect on such material. The condition for its selection is heat resistance.
Linoleum is laid on a completely flat screed with a thickness of more than twenty centimeters.
Tile
This type of finishing coating is the most common for heated floors. Before laying the tiles, the surface of the mats is covered with special heat-resistant solutions. It is recommended to apply a layer of glue and mixture no more than two centimeters thick.
Tile is one of the finishing options for a rod-heated floor
It is allowed to connect the power supply to the rod-heated floor system only after all solutions have completely dried.
Tree
Material from certain types of trees is laid on the heated floor. The thickness of the coating must be at least 8 centimeters. The best option is to finish the floor from acacia, oak or ash.
Sudden changes in temperature can cause cracks to form in wood material. Therefore, laying wood as a finishing coating for a warm electric floor is done quite rarely.
Features of operation
If the underfloor heating is installed correctly, there should be no problems when using it. But still, in order to ensure the safe operation of such a heating system and extend its service life, some points should be taken into account:
- It is recommended that only qualified electricians connect the equipment to the power supply.
- wire connections must be made according to the diagram indicated in the instructions for the system;
- installation of mats with rods should only be carried out in a screed or in a tile adhesive mortar;
- The equipment may only be connected to an electrical network whose voltage corresponds to the values specified in the instructions;
- installation of mats from the wall should be carried out at a distance of at least thirty centimeters;
- do not allow the system to overheat by exceeding the power indicated on the thermostat;
- in the area where the mats are placed, you cannot drive nails or drill holes into the floor;
- the thickness of the carpets laid on top of the heated floor should not exceed ten millimeters;
- During the summer, the thermostat should be turned off.
Connection features and operating points for each type of underfloor heating system are always indicated by the manufacturer in the instructions supplied with the equipment.
The rod system is a common floor heating option. Due to its high technical characteristics and the absence of electromagnetic radiation, equipment of this type is often installed in living rooms. Proper organization of the installation of an electrical rod device will create a comfortable microclimate in any room in winter.
Connecting the Electrical Circuit of the Stud Floor
In the place where the connecting wire was cut and you will need to make an electrical connection. First of all, strip the insulation to about 1 cm. Then take the connector that comes in the package and insert the bare wire into the contact. Using pliers, clamp it and check the connection for tightness. To learn how to connect a thermostat to the floor, watch this video:
Then install a special heat-shrink tube on the wire, strip the insulation and attach it to the second contact of the connector.
After checking the strength of the connection, use a hair dryer to heat the heat-shrinkable tube into which the connector was inserted.
Then install the second one and heat it until the connection is crimped. This way you will get an isolated connection. The whole circuit is assembled in the same way.
Insulate unused wires using the end kits supplied.
Warm the heat shrink tube with a hairdryer.
After assembling the circuit, you can proceed to installing the temperature sensor. We recommend installing it in a corrugated hose so that, if necessary, you can replace it without complications.
For hidden installation you will need to make a hole in the screed. A hose is placed in it and then the sensor is inserted.
Afterwards, the wires are led to the thermostat and connected to the required sockets. Then you can start applying power.
Please note that it is better to entrust the power supply to an experienced electrician. Be sure to test by turning on and heating the equipment. If everything went well, you can move on to finishing.