Laying tiles on a wooden floor is not the best option in many ways. It's all about the completely different characteristics of two materials - ceramics and wood:
- Ceramics require a strong static base, and wood changes its dimensions within significant limits with changes in humidity and temperature. As a result, the tiles separate or crack during active movements.
- For normal operation, wood needs air, which does not pass through dense tiles and water-repellent glue. This situation causes the wood to quickly deteriorate.
- The service life of wood without repair is several times shorter than that of tiles. Tiles usually cost a lot. And it’s annoying to lose a good coating because you need to change the substrate.
- The weight of ceramics and mortar (glue) is several times greater than the weight of wood. If you do not pay attention to this, the mass of the new finishing coating may exceed the strength capabilities of the boards or joists. As a result, the floor will collapse. Therefore, it is advisable to minimize the load - choose tiles of light weight, and also increase, if necessary, the load-bearing capacity of the wooden floor (install logs more often or take boards of greater thickness).
So if you have a choice, try to abandon this idea. If you still decide to lay tiles on a wooden floor, be prepared for the fact that the amount of work will be large.
[toc]
The first important rule: tiles should not be laid on a new wooden floor, in a new building or on a new floor. At least several years (one, or better yet two years) must pass, during which the main shrinkage occurs.
If the base is not strong enough, the boards will bend and the tiles will bounce off.
Before laying the tiles on the floor, it is necessary to carry out preparatory work. Their main task is to create conditions acceptable for both wood and ceramics. There will be several stages, and as a result the foundation must meet the following requirements:
- Air access to the wood is ensured.
- The load is distributed evenly and is not excessive.
- The base is motionless.
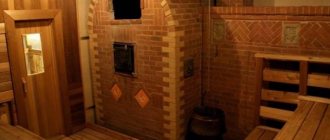
In bathhouses, the need to lay tiles most often arises in the washing room: constant humidity creates ideal conditions for the development of rot and fungi. That’s why they try to protect wood with ceramics. In other rooms, it is better to consider other flooring options.
Insufficiently well-done waterproofing will cause boards and slings to rot from water.
Assessing the condition
The first step in the room where you plan to lay tiles on a wooden floor is to disassemble the floor: remove the boards. Next, a careful and meticulous inspection of all components of the structure is required: beams, joists, boards, insulation, water and vapor insulation. All the components of the pie.
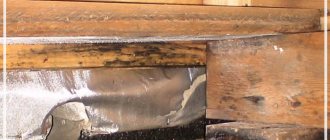
If there are any signs of destruction, they must be eliminated. When inspecting the wood you can see the following:
- Rot. There are many types of this lesion: dry, white, soft. This is the result of the activity of wood-destroying fungi. The type of destruction varies, but in any case the tree becomes soft. The condition is checked simply: if you see any changes in color or structure, drive the tip of an awl into this place. If it goes in and out easily, the wood is destroyed. The affected areas must be removed. If a small fragment is damaged, remove it, capturing some of the healthy tissue, then treat everything with antifungal compounds. If the damage is significant, the structural elements are completely removed, adjacent and new wood is also treated with antiseptics.
- Wood-boring beetles. It is mainly the larvae that destroy the tree. They gnaw through numerous passages, significantly reducing strength. The approach to the problem is similar; if the damage is significant, the floor fragment is replaced, thoroughly treated with special compounds. And all bug exit holes are treated especially carefully.
These are the “surprises” you can see when you remove the floorboards
Many types of fungi that destroy wood can only develop in conditions of sufficiently high humidity - at least 20%. In dry rooms this occurs due to unsuccessful waterproofing. Therefore, we check the condition of the waterproofing materials along the way. If there is damage somewhere, we eliminate it and, if necessary, lay/apply another layer of insulating materials. Only with effective waterproofing will a wooden floor last a long time: fungi simply do not develop if there is insufficient humidity, even if there are spores in the wood.
Read how to fight fungi in a bath here.
Difficulties in installing floor coverings
Neglecting the basic rules for preparing the base and laying floor ceramics can lead to:
- To deformation, cracking and damage to the cladding as a result of wood movement.
- To damage by rot and mold in rooms with high humidity.
In the process of installing tiles, novice craftsmen may encounter some difficulties:
- Insufficient rigidity of the base due to the mobility of wood for fixing floor ceramics.
- Insufficient oxygen access to the lower part of the floor structure.
- Uneven distribution of maximum loads over the entire surface area.
Installation of floor tiles in a wooden house after completion of construction, as well as installation of floors with wooden floors, is not carried out. Work is possible only after complete shrinkage of the structure after 3-4 years. If the house is built of brick, reinforced concrete or cinder block, then flooring can be done at any time.
Strengthening, leveling and processing
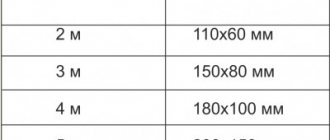
If the logs are laid in increments of more than 50 cm, additional ones must be installed, otherwise the structure will not support the weight of the new floor covering. When installing new elements, do not forget to treat them with antiseptics and fungicides.
Next, check the floor for horizontalness. This is done using a good building level. Usually there are deviations: shrinkage is usually uneven, in some places it will shrink more, in others less. All deviations are corrected: the lags are leveled. The excess is cut off with a plane, to increase the level, wedges are hammered under the joists or pieces of bricks and other materials are placed. In some cases, it is not possible to push anything down, then they stuff a board on top, removing the excess height with a plane.
The joists must be leveled
The next step is antibacterial and antifungal treatment. For a wooden floor under tiles, you need to find a composition with the longest period between two treatments. Then, according to all the rules, all wooden elements must be processed.
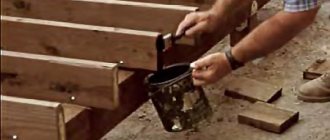
For baths, many people prefer to use only natural impregnations. The most reliable way is impregnation with hot drying oil. For normal protection it must be carried out several times. At least three, and preferably five. A new layer of hot drying oil is applied after the old one has dried. You can check this by touch: the surfaces should not stick.
Treatment with hot drying oil is an effective method of antifungal treatment
When processing, make sure that the drying oil does not cool down. When hot, it destroys spores, bacteria, larvae, and also becomes more fluid, penetrating deeper. So high temperature is the key to effective protection.
When heating drying oil, be careful: even vapors can flare up. Therefore, they heat the drying oil not on the tile, but above the tile, and keep a piece of tarpaulin or felt nearby to quickly cover the container that has caught fire. As soon as the smell of drying oil intensifies sharply, remove the heat source - a couple more moments and the vapor will flare up.
Preparing the boards
While the antibacterial treatment is drying/absorbing, it is necessary to treat the floor boards. If the previously used ones are in good condition, they can be installed again. But be sure to remove the varnish or paint with which they were covered before doing this.
If you have a sanding machine, removing paint is not a problem.
Removal of paintwork is possible using:
- Construction hair dryer. Set the temperature to about 200-250°C and direct the air flow to the surface. The paint swells with bubbles, you immediately pry it off with a spatula, a knife with a wide blade, or a scraper. Using a blowtorch is undesirable: the wood overheats, loses its properties and quickly collapses.
- Chemical removers. They are available in a wide variety at any hardware store or market. They are a gel-like mass. Apply to the surface with a spatula or brush. After a period of time, the paint softens and is removed with a spatula. Everything is fine, but if you need to treat a large area, a lot of washing is required, and this is not cheap.
- Clean off with a spatula or sandpaper. This is the cheapest, but also the most ineffective way. In the sense that it is ineffective because it requires a lot of time and physical effort. Paint can be removed faster if you have a sanding machine.
You should definitely not reuse boards that have been warped or damaged by pests. It's better to replace them. After cleaning off the paint, the boards are also subjected to antibacterial treatment. After drying, you can lay the subfloor under the tiles.
Sub flooring
The first step is to carry out insulation. The main requirement for insulation (except for low thermal conductivity): non-hygroscopic material. To prevent fungi and mold from developing, the floor must be dry. Secondly, it must be light: we need to make the load as small as possible. Extruded propylene foam has these qualities. Plus, bacteria and fungi do not multiply on it: there is no nutrient medium for them. The disadvantages of this material are its unnatural origin, the fact that it does not conduct air and is quite expensive.
The second material that can be used is expanded clay. It is, of course, heavier than polypropylene foam, and also more hygroscopic. But it is natural and conducts air.
The most common insulation material for bathhouse floors is expanded clay.
Having chosen the insulation, it is laid out on top of the waterproofing layer. The thickness is such that there is a distance of 5-7 mm to the boards laid on the joists. This is a ventilation gap that will provide the wood with normal conditions and allow excess moisture to be removed.
The floor will now be rough - the finishing coating will be laid on it. Treated old boards are a great option. They are laid across the joists, but not closely, as before, but leaving gaps of 3-4 mm. A ventilation gap is also left along the perimeter, along the walls: about a centimeter wide. These distances will allow the wood to expand as conditions change, and the gaps will then be closed with skirting boards.
Fasteners must be moisture-resistant: stainless or galvanized nails or self-tapping screws. At the points of attachment to the outer joists, they are driven in or screwed in two pieces; for all other points, one is enough.
The laid boards are puttyed if necessary, then smoothed using a sanding machine. Now all the cracks are sealed with polyurethane foam: it is hard enough to bear the weight of the tiles and adhesive and elastic enough so that the wood can expand and contract. After the foam has dried, it is cut off flush with the floor.
Preparatory work
Before starting work, you need to inspect the foundation components and assess their condition. To access the joists, you need to dismantle the rough boards. If rotting of the load-bearing bars is detected, they are removed and new ones are installed. The same is done when deflecting beams. If they sag, maintaining evenness, they can be strengthened with supports. All wood components are treated with an antiseptic. Before this, you need to remove the old paint coating (if any). Expanded clay loose insulation can be placed in the gaps between the joists. Between it and the top of the beams you need to leave 5 cm of free space for air circulation. After drying, the boards are mounted in place.
To compensate for wood movement, you can use waterproof plywood decking. Its thickness should be at least 2.5 cm. The sheets are mounted directly on the plane of the floor or wall or on the sheathing. The gaps between them are filled with polyurethane foam. Its damping properties would be appropriate for such a design. Instead of plywood, chipboard slabs can also be used to organize the shock-absorbing layer. Drywall is also used, connected to a wooden base using self-tapping screws. The flooring is covered with membrane polymer waterproofing material. Its fragments are overlapped and connected with adhesive tape. Lightweight ceramics can be mounted directly on plywood, without waterproofing and subsequent screed. But for this you need to select an adhesive composition suitable for such an operation.
After laying the waterproofing, a deeply penetrating primer is applied to the surface. After it dries, install the painting mesh and secure it with fasteners. Often they do without a mesh - in this case, the primer is applied only after the tightening mixture. Then the screed is poured. It is made from coarse sand fraction, liquid glass (40% each) and water (20%). You don’t have to prepare the composition yourself, but purchase a special product for wooden bases. Such mixtures remain elastic even after hardening. They do not become cracked when the wood moves. When the composition and subsequent primer have dried, you can begin to lay the cladding.
Waterproofing floors under tiles
The next step is to ensure tightness. The floor is impregnated several times with hot drying oil or covered with latex impregnation. This must be done carefully, sparing no materials: the waterproofing must be reliable. While the impregnation has not dried, roll out the painting mesh on top. The edges overlap each other by about 5-10 cm. This will be reinforcement that will reduce the effect of wood shifts on the tiles.
As an option, you can use rolled waterproofing materials. Often they put parchment paper, plastic film, or use bitumen or paraffin materials. They are also laid with an overlap, overlapping the edges by 10-15 cm and gluing them with tape.
Rough screed
Now we need to create a rigid base for the tiles - a rough screed. To do this, a metal reinforcing mesh with a pitch of 20 cm made of 3-5 mm wire is laid on top of the waterproofing layer on the prepared wooden floor. Fill with a thin layer of solution. What is the minimum layer of screed? At least 3 cm. A thinner base will crack.
Wet and semi-dry screed
You can use standard cement-sand mortar. You can add additives or add fiberglass to increase its elasticity and strength. For the washing room in the bathhouse, you can choose additives that at the same time make the concrete water-repellent.
Polymer screeds have good characteristics, but their attractive appearance is useless as a rough coating. And the high price calls into question the feasibility of their use.
When using a regular solution, you will have to wait 3-4 weeks for the screed to mature.
One of the compositions of the polymer screed - with liquid glass - can be made with your own hands. To do this take:
- two parts of liquid glass;
- two parts of washed and sifted coarse sand;
- one part water.
Everything is mixed and the floor is poured with this mixture. The result is a coating that is flexible enough to compensate for wood movement. Instead of liquid glass, you can use two-component polyurethane glue.
When laying the screed, try to make the surface as smooth as possible. According to modern building codes, tiles can only be laid on a perfectly level base. If you are making the floor in a washing room or shower room, then a slope towards the drain will be necessary. And it is formed precisely at this stage.
By adding plasticizers to the composition, the amount of water is greatly reduced. Because of this, the “setting” time of cement is reduced to several days.
Read more about how to make a concrete screed in the article “Do-it-yourself concrete floor screed”.
To make it easier to work with concrete, plasticizers are added to the solution. If the surface turns out to be not even enough, you will have to level it (remove unevenness and fill in depressions) and apply another layer of self-leveling mixture. To make the solution more homogeneous, it is advisable to treat it with a concrete vibrator.
After the screed has dried (takes several weeks), the preparation of the wooden floor for tiles is completed. You can start installation.
Dry screed for tiles
It is not necessary to use “wet” screeds in all rooms. For dry ones, you can prepare the floor for tiles using:
- moisture-resistant drywall (the most fragile of all the proposed materials, use only in extreme cases);
- GVL slabs (gypsum fiber sheets);
- CSP (cement particle boards);
- moisture resistant plywood.
But this option for preparing the floor for tiles is only suitable for dry rooms - a locker room or rest room in a bathhouse, a corridor or hallway in a wooden house. The tiles of a washing bath, in a bathroom or kitchen should be laid exclusively on a “wet” or “semi-dry” (with additives) screed.
Some people also lay gypsum fiber board, plywood, or fiber board under the tiles.
When using sheet materials, laying GVL, DSP, etc. has general rules. They need to be laid so that the joints of the sheets do not coincide with the joints of the boards or joists. This is only possible if they are placed at an angle of 30-45° to the boards. Moreover, the laying should be staggered - the sheets should be shifted one relative to the other.
The laid slab materials are secured around the perimeter and in the center with self-tapping screws. The distance between the fasteners is 25-30 cm. Then the seams are filled with compounds intended for moisture-resistant drywall. After drying, the seams are sanded. We can assume that the preparation is complete: we begin laying the tiles.
How to lay tiles on the floor in a bathhouse and sauna, read the article “Laying floor tiles in a bathhouse or sauna with your own hands.”
Cladding technology
The most difficult method for gluing porcelain tiles onto a tongue and groove, the simplest is screeding with a self-leveling floor over sheets of fiber board, which is easy to tile. It should be remembered that for the safety of rooms adjacent to the bathroom at the time of possible flooding, the height of the finishing coating in them should be higher, at least 2 cm.
The floor level in the bathroom should be 20 mm lower than in the corridor.
The conflict between wooden structures and ceramic cladding on top of them is caused by the following factors:
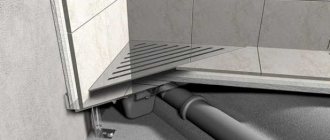
- on the one hand, wood easily absorbs moisture from the air, and vapor barrier films do not provide 100% guarantees of protection, so ventilated spaces are created inside structures;
Hole for ventilation of wooden floor.
- on the other hand, tiles solve the problem of wet cleaning in bathrooms, protect against leakage of communications and moisture from the air, but prevent the evaporation of water to the outside;
Therefore, the service life of load-bearing beams and wooden decking is sharply reduced.
Options for preparing floors for tiles
Schematic representation of the “pie” for preparing the floor for tiles.
As you can see, laying tiles correctly on a wooden floor is not easy. It's a lot of work and it takes a lot of time. Is there any way to speed up and make the process easier? It is highly undesirable to skip any steps. There is only one option: if after disassembling part of the floor, you find that there are no “sores” or troubles. The floor is insulated, it is level and there is no need to level it. Then you can immediately begin laying the subfloor from the boards, but be sure to remove the paint or varnish. You should also not skip impregnation with protective compounds and the creation of a waterproofing layer.
You can somewhat speed up the process of laying the subfloor if you use slab materials rather than old boards (we don’t use new ones - they can still crack). Not everyone trusts them: it is unknown how the same GVL or DSP will behave under tiles, and even in a damp room. Therefore, whether to use them or not is up to you.
If you will make a subfloor for tiles from cement bonded particle boards, plywood or gypsum fiber board, they are laid staggered so that the seams overlap. A gap of several millimeters is left between the plates to compensate for the movement of the wood. They are then sealed with compounds for working with drywall. They are fastened with galvanized self-tapping screws, the caps are recessed into the material. When impregnating, creating a reinforcing belt is unnecessary - the slabs themselves are sufficiently rigid, but more attention needs to be paid to waterproofing so as not to create conditions for destruction.
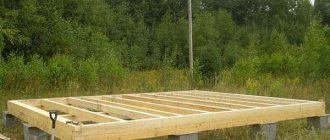
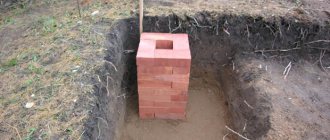
If the floor has rotted and only logs remain
In this case, all floorboards are dismantled and the joists are assessed. Some of them must also be rotten. Bad lags are replaced with new ones.
All beams are treated with an antiseptic and aligned using a level.
A new wooden flooring treated with an antiseptic is nailed on top.
Nailing new wood flooring
The further procedure is as described above.
There is another option. Install additional logs. Next, sheets of plywood are attached to them. The latter will be the basis for laying the tiles. This option will be discussed below.