Application
As already mentioned, the installation of wooden logs is possible in buildings of any type. However, in reinforced concrete buildings they are used relatively rarely, since it is easier to arrange a rough screed. This installation option is most convenient in:
- wooden houses (wild or rounded logs, beams, boards). In this case, the logs are laid on top of wooden (less often metal) floor beams, forming a strong support for the floor. When covering the ceiling in the lower room, it is appropriate to fill the gaps between the floor beams and joists with insulating and soundproofing material;
- frame buildings. It is permissible to install wooden logs on top of metal or wooden floor beams. Typically, wooden joists are used in houses with a timber frame;
- buildings of any design made of “heavy” building materials (brick, concrete, reinforced concrete, stone) for the purpose of leveling and insulating the floor. This option is optimal if it is undesirable to increase the load on the floors and load-bearing walls (columns) that the concrete screed provides.
If the building does not have basements and there is soil under the finished floor, laying wooden logs is the best option to ensure warmth and dryness in the room.
Each option for using floors on joists has its own installation and further use nuances.
Required working tools and materials
To work with a wooden floor on the ground, you will need some working tools and, of course, the necessary materials:
- plane;
- jigsaw;
- hammer drill or jackhammer;
- reciprocating saws;
- vibrating plate or rammer;
- screwdriver - preferably with a battery;
- electric drill;
- FSF plywood;
- consumables;
- fasteners;
- wooden beams;
- wooden boards;
- steam and waterproofing;
- insulation under the floor;
- impregnation for wood.
Related article: How to choose Provence style wallpaper for the kitchen: 8 tips
Advantages of flooring on joists
The main advantages of installing a floor in a wooden house on logs is the ability to obtain a practical and flat surface. In addition, this is achieved:
- uniform load distribution over the entire support area;
- good sound and heat insulation provided that modern materials are used for laying between the joists (as well as floor beams, if a beam system is used);
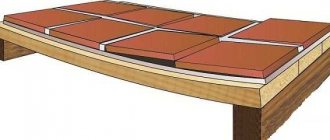
- leveling the surface for final coating. For this purpose, the beams are mounted using a level on supports to compensate for unevenness;
- ventilation of the underground space and the possibility of laying utilities in it;
- when installing not a solid, but a block (floorboard, parquet without gluing) flooring, it is possible to repair any elements of the flooring and their support;
- saving money and effort due to the relative cheapness of the material and ease of installation.
Disadvantages of floors laid on beams:
- significant rise in the height of the finished floor level (up to 10...20 cm);
- You cannot install heating using a “warm floor” system, and this applies to both water and electrical systems. In the first case, additional work will be required to install the screed and, accordingly, an additional rise in the level of the finished flooring. In the second, there is a high risk of short circuit and wood fire. In addition, wood does not conduct heat well; such heating will be irrational;
- Despite the apparent simplicity of installing floor joists, great attention is required to the technology of laying both the support beams themselves and the flooring on them. Failure to comply with the technological process may result in deformation, divergence of joints, creaking and other defects.
Taking into account the listed pros and cons, we can summarize: floors on joists have proven themselves best in private buildings, old houses with high ceilings and buildings built on a soil foundation.
What are lags?
Beams located longitudinally and transversely on a rough foundation in a room are called joists. Boards are attached to them to form a wooden floor. To make logs, dry, first-class wood is used, which must be tarred, treated with antiseptic and fire retardants, as well as compounds against damage to the material by rodents and insects.
The logs shown in the photo perform the following functions:
- a flat floor surface is created and the load on the foundation is correctly redistributed;
- an air gap is formed between the rough base and the back side of the floor board;
- the space between them can be filled with sound and heat insulating materials, which leads to a decrease in noise pollution and reduces heat loss;
- Thanks to their installation, it is possible to quickly replace a floor covering element that has become unusable.
If the floor joists are calculated and installed correctly, the wooden floor will last for many years.
What kind of joists should I use for the floor?
Due to the nature of use (under load, hidden), the choice of coniferous wood is optimal. Most often they use cheap pine, spruce, and fir. The use of larch is justified in case of high humidity in the room. Timber for logs is not necessarily purchased of the first grade; a second or third grade is sufficient, provided the geometry of the lumber is correct. The section of the beam is a rectangle with a side ratio of 1 to 1.5...2 (thickness of the logs to height). Only one side should be flat and smooth, although it is advisable to use planed timber with all smooth surfaces - this will facilitate the process of leveling the base.
The dimensions of the timber are selected depending on the planned load and the size of the room. The length of the span (that is, the distance between the walls) and the type of supporting surface for the logs are taken into account. If the beams are laid on a solid surface (concrete floor slab, compacted embankment on the ground, old floor with a solid base), it is permissible to reduce the requirements for the cross-section and strength of the material.
If the span size is between two table values, the larger integer value is adopted taking into account the strength. For example, for a room 3.5 m long we take a span of 4 m. Accordingly, the timber (joists for a wooden floor) should have a cross-section of 180x110 mm or more.
Important: when choosing the direction of laying the joists, you should take into account the direction of the incidence of sunlight (in rooms with windows) or the predominant movement (in narrow passage rooms such as a hallway). In both cases, the logs are placed across (light rays or movement). This ensures their uniform wear and loading, as well as deformation.
The distance between the beams depends on the thickness of the flooring (floorboard or slab materials). On average, without adjusting for the individual characteristics of the room, you can take the data from the table. For detailed calculations, you should study our article “Distance between floor joists.”
It should be noted that ALL wood for flooring on joists should have a moisture content of no higher than 12%; when purchasing, you should prefer chamber-dried wood. When drying naturally, the material must be kept for at least 5 years.
What should be taken into account when making calculations?
When performing the calculation, the following factors are taken into account:
- thickness of the flooring material (chipboard, boards, etc.);
- approximate step between floor joists;
- expected specific maximum load on the floor.
All these parameters will determine the cross-section of boards, timber and other lumber used to construct the floor.
When calculating what distance should be between the floor joists, it should be remembered that the outermost joists cannot be placed further than 30 millimeters from the walls; an allowance must be made for this in the calculations.
As a result of calculations, the result is usually not a whole number, but it should always be rounded up so that the actual number of lags does not turn out to be less than the calculated one. Otherwise, the strength of the floor structure may not be sufficient, especially considering that such savings will be completely insignificant compared to the likely risk.
The cheapest floor joists can be found at sawmills, followed by online construction stores.
When it comes to floor installation, it is not recommended to save too much. The logs must have not only a suitable cross-section, but also sufficient density. If you make the lag step for a floor made of boards too large, the boards will begin to sag and “play.” Likewise, if the distance between the joists for an OSB floor is made greater than acceptable, then the slabs will begin to crumble and crack.
Laying joists
Installation depends on the type of base. Conventionally, methods for installing wooden logs can be divided into three groups: on a solid and durable base (concrete, reinforced concrete, cement-sand screed, stone or brickwork), on the ground and on beams. Mandatory measures for all types of installation include pre-treatment of lumber (antiseptics, fungicidal preparations, fire protection, moisture protection) and checking the evenness of the base.
Floors with joists on concrete
If there is a solid foundation, it is necessary to carry out the following preparatory work:
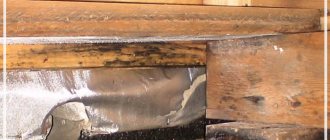
- waterproofing device. It is necessary to ensure that condensation and other moisture are not absorbed into the wood of the support beams, violating their geometry and integrity;
- creating a sound and/or heat insulating layer. This preparation stage is not necessary if you plan to lay insulating material between the joists, under the finishing flooring;
- organization of a cement-sand screed or a dense embankment (“dry” screed) on top of a slab or floor masonry.
Installation of the logs is carried out either on a base leveled with a screed, in which case the beams are laid directly on it, or on pads (stands). They are made of wood or other materials so that the different heights of the pads compensate for the unevenness of the base and guarantee a smooth surface of the finishing flooring.
If you plan to use wooden stands, it is better to use plywood or other thin board materials, pre-sawed in the form of square or rectangular fragments. A set of such tiles allows you to set the required height. The dimensions of the pads should exceed the width of the beam by 1.5...2 times.
Another popular installation option is on metal adjustable supports.
To use them, it is necessary to pre-drill holes in the beams with a diameter of 2...2.5 mm less than the diameter of the fastener. To prevent the head of the post from protruding onto the upper surface of the joist, part of the hole is drilled out to a diameter 3...4 times larger than the original one. The height of the support is adjusted by moving the nuts screwed onto them. Special (adjustable) supports for logs are also used. To cover the floor, it is better to fasten the joists without the possibility of displacement.
You can also attach the beams to galvanized corners. In this case, one side of the corner is fixed with self-tapping screws to the side of the beam, the second - with an anchor or dowel to the concrete or stone base.
In some cases, it is also convenient to use a “floating” floor. Its design and features are discussed in detail in the article “Floor Soundproofing”. This type of floor with a damping pad around the entire perimeter of the room is sometimes called a “screed on joists.”
Laying wooden logs on the ground
Before creating the frame, it is necessary to compact the soil manually or using machinery. For greater convenience of work and insulation, it is useful to arrange a backfill of expanded clay, a mixture of expanded clay with gravel, crushed stone or sand.
Depending on how it is planned to lay the logs - along a wooden frame or a grillage of piles, directly along the protrusion of the strip foundation, on the prepared soil - markings are made. If the distance between the elements of the grillage (piping, foundation) allows you to lay the logs without splicing, you should choose this option. If this installation method is not possible, install support posts as shown in the illustration.
This creates a relatively dry, ventilated underground. When choosing what kind of logs should be for such installation, you should give preference to larch. Despite its high price, the material justifies its use due to its increased durability and resistance to rot.
Waterproofing must be installed both on posts and on other supporting surfaces. If the level is not the same, leveling pads are also used.
If the logs rest on a frame or grillage, strip foundation, additional supports can be used to reduce the span length.
The timber is fastened to wooden elements with self-tapping screws, and to brick, concrete or reinforced concrete - with anchors or dowels.
Important: logs can be placed on the ground only in the case of temporary construction with a period of operation of no more than 2...5 years, and even in such situations the soil must be compacted and supplemented with waterproofing fill.
Fastening wooden logs to beams
Since the level of floor beams (metal or wood) does not always coincide, the side fastening method is used. In this case, the wooden beam is fixed with self-tapping screws on the side of the beam, as shown in the illustration.
If metal beams (channels) are used for the ceiling, the beams are also attached to the side surface so that the upper side of the beam is higher than the upper surface of the channel.
The use of metal beams in private housing construction is relatively rare, so they usually consider attaching floor joists in a frame house to wooden beams.
Important: for any installation option, the connection of wooden parts with self-tapping screws is carried out under the condition that the length of the self-tapping screw must exceed the thickness (height) of the attached element by 2…3 times. To avoid splitting and cracking of wood, holes with a diameter 2...2.5 mm smaller than the diameter of the fastener are pre-drilled in the parts.
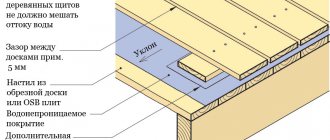
Installation of a wooden floor on the ground
To insulate a wooden floor with mineral wool, you must first waterproof both sides of the insulating material.
There are several differences between conventional flooring and ground flooring. First of all, this is a small layer between the soil and the floor - a ventilated underground. Its height usually ranges from 10 to 20 cm. As one can already understand from the name, such a layer is needed for ventilation, that is, for continuous air circulation. If this height is reduced, then heat losses associated with poor circulation will increase.
Related article: Black living room - 115 photos of the best ideas in the interior of a monochrome living room
Brief description of the main stages of floor installation:
- Prepare the soil base - this includes leveling the soil, adding crushed stone and compacting.
- Pour a layer of so-called lean concrete.
- Make markings - at this stage it is necessary to install beacons and determine the placement of brick “bedside tables”.
- Lay a concrete screed on the underlying concrete layer under the “bedside tables”. The bedside tables themselves must be made of solid brick.
- Lay a double layer of roofing material with an overlap.
- If necessary, install waterproofing of the floor (wet soil).
- It is imperative to install wooden gaskets impregnated with an antiseptic.
- In order to insulate the floor, you need to add slag along the outer walls of the underground during installation. Often the layer thickness can reach one meter.
- Lay wooden beams on brick bedside tables.
- Attach the floor boards to the joists using nails.
- Next, using a regular plane, you need to level the wooden floor to the ground.
- The next step is to putty the surface, especially in those places where the joints of the boards and nail heads are located.
Diagram of the installation of support columns for wooden floor joists.
You need to take a particularly responsible approach to the process of polishing the coating, since the smoothness of the floor will depend on this. Initially, as mentioned above, you need to go over the surface with a plane. Then, using sandpaper (sandpaper), thoroughly sand and polish the wooden floor. Wood has the ability to transform after varnishing (a pronounced structure and color emerges), so after sanding it is recommended to cover the floors with colorless varnish.
All of the above work can be done independently if you have clear step-by-step instructions and all the necessary tools and materials at hand.
Laying the floor on joists
Flooring on joists can be done:
- sheet materials (plywood, OSB or chipboard, others) in one or more layers;
- floorboard.
Parquet and other floor coverings are laid over solid flooring. The decking wood must meet the following requirements:
- high strength;
- resistance to shock and static loads;
- resistance to abrasion and mechanical damage (when using the flooring as a finishing coating);
- attractive appearance (if you plan to use the flooring as the final version of the decor and open it with transparent varnish).
Before you start laying the flooring, it is necessary to treat the floor joists in the house, if this has not been done before (antiseptic, fire protection, fungicidal and moisture-proof impregnations).
Typically, flooring on timber is considered a subfloor, but if the work is done well and the floorboard is significant, no further finishing is acceptable.
Installation procedure:
- checking and, if necessary, correcting the level of the upper plane of all joists;
- performing floor insulation along joists, as well as sound insulation. To prevent the insulating material from falling down, a hem is installed between the joists. The board or plasterboard covering of the floor of the lower floor can act as a backing;
- attaching the board to the joists (laying starts from the far corner of the room) according to the diagram. If the length of the boards is less than the width of the room, they are laid offset in two logs. This is necessary to improve the strength characteristics of the flooring;
- creating a finishing coating (if provided) or finishing the floorboard.
Technical features of the working stages
As people with experience in installation work know, each working stage has its own characteristics. Therefore, following the recommendations for performing these steps will help you complete the work more efficiently and quickly. As for work in your own home, then, first of all, attentiveness and patience should prevail in the work.
The structure of the floor consists of the following: sole, underlayment, waterproofing, thermal insulation, main load-bearing layer, facing material.
Scheme of insulation of wooden floors on the ground.
Sole - you should always start work with a high-quality and dense base. In this case, you need to remove the top layer of soil (about 0.5 m). Instead, you need to fill in coarse sand. After falling asleep, it is necessary to compact the layer well using a vibrating plate or tamper. To improve shrinkage, you need to water the sand. This will noticeably improve his sitting position.
Bedding layer - it is necessary in order to evenly distribute pressure over the entire surface of the soil layer. In turn, subsidence in one place can lead to deformation of the entire coating. The most commonly used is a 5-centimeter concrete screed. Another modern solution is to lay a profiled membrane. Due to this, the cost of work and the time it takes to complete it are significantly reduced.
Waterproofing is necessary in order to protect the structure from moisture getting inside. In addition, it protects against pathogenic bacteria such as mold, rot and mildew. Harmful bacteria not only destroy the coating, but also significantly reduce the level of comfort due to dampness and odor. The following materials are used for waterproofing: polyester, bitumen mastic, PVC membrane, fiberglass.
Wooden floor insulation scheme.
Thermal insulation - a large amount of heat always escapes through the floor. To prevent heat loss, a layer of thermal insulation is used, the material of which has low thermal conductivity. The following are suitable for this: expanded clay, expanded polystyrene, polyurethane, polystyrene foam, mineral wool, glass wool. You need to choose thermal insulation primarily based on financial resources and your own preferences. If you have enough money, you can install a warm electric or water floor. The presence of heat in the house will provide the maximum level of comfort and coziness for a long time.
Related article: Sewing a lambrequin for curtains is the fastest way!
The main load-bearing layer is the main part in the overall structure. It is a wooden covering made from a certain type of wood.
Facing coating - if you are not satisfied with the wooden covering, then you can put a facing material on top of it, although in practice the wooden covering is the best facing material.
DIY installation process: securing the material
As already described above, the construction of a wooden floor on the ground is a warm and primarily ventilated covering. The installation process itself is as follows.
It is imperative to check the soil for strength (soil preparation). If its strength is in doubt, you need to remove a small layer of soil and fill it with sand mixed with medium crushed stone instead. It is recommended to add bitumen to the solution and compact the entire backfill well.
Using a building level, it is necessary to install beacons and determine places for future “bedside tables”. It is recommended to pour a thin layer of concrete screed. After pouring, use a level to level the entire coating.
It is undesirable to make brick “bedside tables” from sand-lime brick and artificial stone. It should also be taken into account that the installation of “bedside tables” can only begin after the screed has completely dried. Next, it is necessary to lay a waterproofing and insulating layer.
You can begin installing timber (joists) on top of the brick cabinets and waterproofing layer. Self-tapping screws are required to secure them. The main thing is to take into account that there should be a free space of 2 - 3 cm between the walls and the joists. After this, they begin to lay the floor boards. The boards should fit as closely as possible to each other. Wooden blocks are used for this. Finish the work by sanding and polishing the coating. In this case, the true texture will immediately appear (especially if it is a tree of noble species).
Features of the materials used
Wood moisture content should not exceed 20%. Purely theoretically, logs can be made from almost any material:
- metal;
- plastic;
- tree;
- compound.
But the fairly high price of most of the above building materials makes them uncompetitive in comparison with wood. That is why, as a rule, a thick board or timber is used to assemble a wooden frame. But this material also has one significant drawback - hygroscopicity.
Dimensions of timber for installing logs
Therefore, when choosing beams for flooring, it is advisable to choose only the type of wood that is less susceptible to rotting and deformation. Which wood should you choose? Larch would be the best option, but it is quite expensive. A more affordable alternative would be pine or spruce. At the same time, resin pockets and minor defects on the timber do not in any way affect its technical performance.
But do not forget that the material must be durable and resistant to deformation. Based on this, it follows that you cannot save on the strength of the lags. The moisture content of the wood should not exceed 20%, otherwise, during the drying of the wooden frame, the logs will bend, which will affect the horizontalness of the laid finishing coating.
Basic requirements for floors
The size of the floor beams is determined by the intensity of the load per m2 of floor. The structure of logs for arranging a subfloor must have very high strength.
Only in this case does it not deform under the influence of static and dynamic loads created by the finishing coating (laminate, ceramic tiles, solid boards, parquet), furniture, equipment and people. The size of the floor beams is determined by the intensity of the load per m2 of floor, which is created during its operation. The calculation is performed in accordance with the following defining parameters:
- When arranging a wooden frame for attic floors, the floor must support a weight of 105 kg/m2;
- When finishing rough foundations on interfloor and basement floors, wooden floors should not deform even with a load of 210 kg/m2.
Based on the nuances described above, a calculation is made, according to which the main dimensions of the lags are accurately determined:
- section;
- length;
- thickness;
- width.
It is very important that the necessary parameters are observed, otherwise, due to the large static load, the wooden sheathing and floor board will begin to sag. This is fraught with complete destruction of both the rough and final coating.