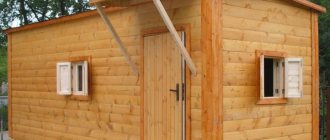
Having your own sauna seems like an impossible dream for many people. Fans of dry steam can use the empty space of the balcony to arrange the complex. To get a personal steam room, you need to purchase a ready-made mini-sauna or build it yourself. If you strictly follow the instructions and take into account all the nuances, you will get a full-fledged steam room with dry steam.
Important points
To build a mini-steam room in a small balcony space, you should calculate all the dimensions in advance, as well as change the insulation and install the electrical wiring. During construction, it is important to consider the positive and negative nuances of ventilation and waterproofing of the loggia.
Also, to equip a sauna on the balcony, you will most likely have to change the entire floor covering, ceiling and walls.
Brick, stone and other heavy materials that create excess load on the load-bearing slabs in the house are not suitable for interior decoration of the balcony. Wood is suitable for the steam room. To keep the room as warm as possible, it is important to choose the right insulation.
Before equipping a sauna on the loggia, it is necessary to carry out repair work (read more in the article “Do-it-yourself loggia repair”). The first thing you should do is remove all things from the balcony, and also remove the old finish, if any. For proper regulation of heat transfer for a steam room, the best place is the main wall of the house. To protect the steam room from possible emergency situations, it is better not to make it too large.
Optimal dimensions of the steam room:
- width 800 cm;
- up to 210 cm in height.
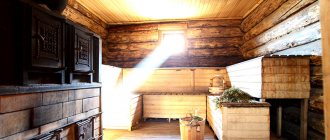
Finishing a balcony for a sauna
Next, you can begin preparing the balcony itself for equipping the sauna. First of all, you need to glaze the balcony (and only with high-quality double-glazed windows with a strong frame), or completely close the wall facing the street to reduce heat loss. Which option to choose depends only on the wishes of the apartment owner.
Tip: it is better to expand a narrow balcony for a sauna by additionally moving out the floor slab.
The list of necessary preparatory work includes waterproofing and insulation of the walls, ceiling and floor of the room. The finishing of the steam room and the rest of the area must be done separately. In this case, you must remember to leave a hole for ventilation.
Floor arrangement
The floor in the steam room should be made 10-20 cm higher than the floor of the rest of the balcony. This will allow you to properly arrange the drain.
Compact sauna on the balcony: main advantages
You can build a sauna on the balcony in your apartment with your own hands - it’s not difficult if you put in a little effort. The dry steam room is heated by an electric fireplace. To heat it, you do not need to use firewood or other types of fuel. After relaxing in the sauna, no ash will form on the floor or in the stove. Additional advantages:
- inexpensive arrangement in a short period of time;
- the effect of a real steam room;
- small dimensions;
- the room heats up in a matter of minutes;
- the ability to warm up at home, rather than in public saunas;
- the steam room does not disturb the neighbors at all;
- You can steam at different times of the day.
Selecting materials for a balcony sauna
It is better to take care of preparing the necessary materials in advance, so as not to fuss later.
The mini-sauna is an insulated wooden box, the dimensions of which are limited by the dimensions of the balcony
The following can be used as insulation:
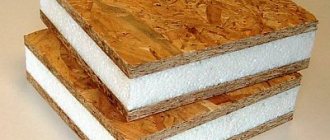
- Foam plastic, penoplex. It has proven itself well and performs a heat-saving function. In addition, it is inexpensive and effective.
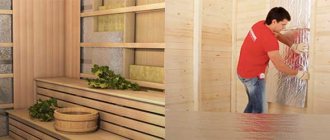
- Mineral wool. You can insulate floors, walls, and ceilings with cotton wool. It is universal. Cotton wool is distinguished by sound insulation, which your neighbors and you will love.
- Waterproofing film. It is used as an inversion roof. Waterproofing material has the property of thermal conductivity.
- Polyurethane foam and sealant. Foam is a popular material. With its help you can seal all seams and joints.
- Vapor barrier. It helps reduce the occurrence of condensation (cold air penetration) and has sound-absorbing properties.
Mineral wool for insulation
Izospan for vapor barrier
Remember, the main thing in this matter is not cost, but quality and safety.
Safety regulations
Opponents of installing saunas on balconies usually say that this design is unsafe. But if you follow all safety standards, you can protect yourself and your loved ones from unforeseen situations:
- Entrust the electrical installation and installation of lighting on the loggia to professional craftsmen. It is also important to monitor the entire process personally.
- The outer walls of the steam room should fit tightly to the insulating material. The booth should not border the street.
- It is recommended to make a separate outlet for the stove. It is not safe to run wires inside the mini-sauna.
- Measure a distance of about 3 centimeters between the floor and the door.
- It is better to use an electric oven with automatic settings. After working for 8 hours, the stove will turn off automatically.
- To avoid accidentally getting burned, it is advisable to cover the stove with a special screen.
- A stove-heater consumes a lot of energy, so it is better to connect them to the panel via its own cable.
- It is important to isolate the stove-stove from the wooden covering of the floor and walls. For insulation, choose high-quality heat-resistant materials.
- It is advisable to make the door inside from wood. If the handle is metal, you can get burned on it.
- The booth must have a lighting fixture with a heat-resistant coating and water protection level IP54.
- After visiting the sauna, it is necessary to thoroughly dry and ventilate.
- The total weight of the stones in the oven should be up to 15 kilograms.
- For doors you need to use special glass, which is sealed with rubber inserts when closed.
After the sauna on the balcony has been erected, it needs to be heated well. Open the door and turn on the heater for 60 minutes. The next day, dry for longer, up to 2 hours. Make the temperature no lower than 90 degrees. After this treatment, you can start steaming.
What type of oven is needed?
After all finishing work is completed, the stove is placed. Experts recommend installing electric heaters that are designed specifically for mini-saunas. They are affordable, safe and made with small spaces in mind. Buy it at a specialty store. Homemade heating items will cost a little less, but no one can guarantee their uninterrupted and safe operation.
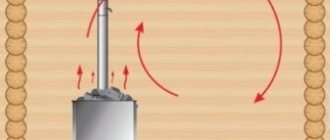
Where the electric furnace is installed, the walls and floor must be lined with heat-resistant material, for example, asbestos cardboard. Usually the heater is placed near the door to make it convenient to arrange the shelves. It is necessary to remember: you cannot use an electric oven without placing stones in it. This may cause a fire. The stones are laid so that convection occurs, that is, the heat exchange between the stove and the air in the sauna is accelerated (achieved using gaps between the stones and good traction).
An innovation is infrared heaters. The main difference between such a sauna and a classic steam room is the heating method. In an ordinary steam room, heat is transferred in the following sequence: fire (or heating element) – stones – air – object (person). In an infrared sauna, heat is transferred by the heater's radiation in the same way that the sun's rays increase the temperature of objects in their path. Therefore, an infrared oven is also called an “artificial” sun.
After all work is completed, a clock and thermometer are installed in the steam room.
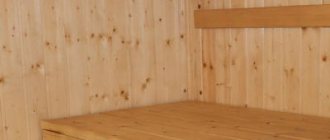
Construction of a shelf for a sauna
The structure must be firmly attached so that two people can sit on it comfortably. There is no need to glue seats to the walls. The best solution is to use special racks. To save space, you can install special pull-out shelves.
Step-by-step equipment process:
- Beams 8 centimeters thick are attached to the floor.
- Boards with rounded edges are installed on them using galvanized fasteners. The layer of wood must be at least 5 centimeters. Boards should be installed of high quality and well polished.
- It is important to maintain a distance of 1.5 centimeters between the boards so as not to impede air circulation.
- The shelves are coated with a special oil coating.
- High-quality tree species, such as linden and poplar, are suitable for the structure.
Ventilation arrangement
Ventilation is a very important aspect of a comfortable stay in the steam room. The conclusion should be made outside so that odors do not appear in the room, and in general, do not enter the apartment. The device consists of a hole with a special plug. When the plug is closed, then the wall is a solid structure that does not allow air to pass through.
Vent location
Such a hole should also be well insulated and insulated. To create a sealing plug, it is better to use dense foam that is well wrapped with film.
Legitimacy of the idea
After enterprising citizens began installing mini-saunas in their apartments, representatives of the housing office and the fire inspectorate unanimously banned this installation. But according to regulatory documents, such installation can be carried out.
In fact, when installing a sauna, the balcony is not structurally rebuilt. Even if a partition is made, it will not be considered a major repair. Theoretically, there are no violations. Before installing a steam room at home, it is recommended that you familiarize yourself with the types of documentation:
- “Architectural and planning solutions for multi-apartment residential buildings” (SP 31 - 107 - 2004);
- “Residential multi-apartment buildings” (SNiP 31 – 01 – 2003).
It is recommended to contact the Management Company for registration to obtain a list of services from which you can obtain permission to install a mini-steam room. But if the neighbors don’t mind and security measures are followed, you don’t have to collect documentation.
Fire safety
In a steam room installed in an apartment building, only an electric stove is allowed. Its power should be up to 4.5 kW. In this case, there must be a ventilation system. It is prohibited to discharge steam into the ventilation shaft inside the house, since this load was not provided for during construction. The fire inspector will also require the installation of a special dry pipe that automatically supplies water in the event of a fire. The dry pipe must be connected to the fire alarm system.
What do we need? List of materials
In order to make a sauna on your balcony, you will need different materials: insulation, thermal and waterproofing elements. To do everything wisely, we recommend purchasing the following materials:
- High-quality insulation;
- Vapor barrier films;
- Vapor barrier and polyethylene foam with aluminum foil;
- Fire-retardant drug;
- Impregnation;
- Antiseptic for wood products;
- Timber made of wood;
- Lining;
- Ceiling boards;
- Electric heater or other type of stove for a mini sauna on the balcony;
- Special thermometer for baths;
- Sealed spotlights.
When purchasing materials, pay attention not only to their quality, but also to the level of fire safety.
As a finishing material for the steam room, give preference to lining, preferably made of larch.
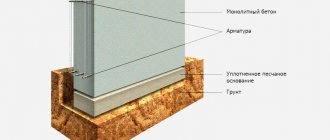
Floor insulation
To insulate the floor of a steam room on a balcony, polystyrene foam slabs are perfect - a material that does not conduct heat and is an example of waterproofing.
Floor insulation is carried out in the following sequence:
- Place logs made of 30-40 mm bars at the base of the surface. Secure them with dowels. The height of the logs should be no less than the insulation. If necessary, use liquid sealant in places where insulation is attached.
- Place thermal insulation boards between the joists. They do not need to be fastened, simply laid tightly or glued to a layer of waterproofing.
- The seams remaining between the joists and the insulation are carefully coated with sealant.
- Place a second layer of waterproofing on the polystyrene foam.
- Use clapboard as a finishing touch.
Observe safety precautions during work.
Video on the topic of insulating a balcony with polystyrene foam:
Insulation of walls and ceilings
When insulating walls, foam glass, penofol or the same polystyrene foam are suitable. The work proceeds in the following sequence:
- To secure the insulation to the surface of the walls, a frame is made from beams with gaps between the planks of no more than 50 cm.
- Insulation is placed in each cell. The pieces of material do not need to be secured, but it is better to nail the mats with nails. The insulation layer should consist of base material, vapor barrier, diffusion film and lining.
Another material is actively used as insulation. This is polyethylene - the rolled material has less thickness than mineral wool. One of the sides is foil, and this allows the surface to reflect heat, so it should be attached inside. Wooden slats are laid and nailed on top, and lining is mounted on top.
The ceiling is insulated according to the same principle as the walls, but the only difference is that the thickness of the insulation should be less. All other positions are similar:
- The frame is stuffed;
- Insulation is installed;
- Vapor barrier is attached;
- Finishing is in progress.
These works are done quickly and easily, the main thing is that they will help protect the steam room from heat loss.
Wiring and ventilation
Carrying out electrical communications is one of the most important and critical stages when constructing a bathhouse on the balcony. This is a source of increased danger. Therefore, strictly adhere to safety precautions.
Lighting in the sauna should be closed and not have contact with moisture. The ideal option is thermal spotlights with a high level of moisture resistance.
To prevent short circuits, the wiring is equipped with an RCD trip device. To do this you need:
- Install a panel with a 25 ampere circuit breaker;
- Route the wires to electrical points.
Important! All lights are inside, all switches are outside.
To protect the cable, a corrugated pipe with sealed ends is used.
Ventilation is the second most important stage. It is made in the outer wall to remove steam and odors. Ceiling installation and ventilation equipment are carried out in parallel. For the outlet hole you will need a thick plug to retain heat (a regular piece of foam plastic that fits the size of the hole.
Construction of the structure
The installation of the frame and cladding of the sauna has its own characteristics.
The work is carried out according to the following algorithm:
- Internal insulation is carried out by analogy with the installation of insulation on the balcony itself. An important nuance: be sure to use foil vapor barrier. Without this, moisture will accumulate between the layers, which will lead to loss of insulating properties and possible destruction of the material structure.
- Insulation for a sauna must also be selected based on increased insulation characteristics. It should be at least 10mm thicker.
- The walls are covered using natural wooden paneling. Exclusively deciduous trees are used. If you take conifers, when heated, drops of resin will appear on the surface, which will adversely affect the further operation of the sauna.
- The construction of a frame with a doorway is made of vertical beams with plywood sheets attached to them on both sides. Insulation is laid inside, also insulated with a foil layer. The outer part of the frame is covered with foil vapor barrier, all joints are reinforced with metallized tape.
- Wooden lining is fixed on top of the frame from the inside and outside.
- Lastly, install the door. It should be made of solid wood and open only outwards. It is also necessary to provide an external latch; it is not installed inside for reasons of convenience.
Sauna stove
After constructing all the main elements of the sauna structure, it is necessary to take care of the equipment. The main element of the sauna on the balcony is the stove - a heater, which can be purchased ready-made.
Important details:
- It is advisable to use a compact model with a power of 3 - 4.5 kW. It is enough to heat the relatively small space of the constructed sauna.
- Stones are poured onto the stove grate. They play an important role in arranging a sauna. It is the stones that will retain and release the heat received from the stove. The total weight of the stones should not exceed 12 - 15 kg.
- The stove is mounted near the entrance, close to the partition. The power supply is provided by a cord extending outside the sauna and connected to a separate socket of suitable power.
- The walls and floor in the immediate vicinity of the heating element are additionally equipped with fire-resistant materials. Typically, it is more advisable to use metal sheets for walls, and special fire-resistant ceramic tiles for floors.
- For safety, the oven is fenced with wooden railings. This is necessary to protect against injury from accidental contact or falling. Based on this, the railing must be strong enough to support the weight of an adult.
Where the electric heater is installed (usually near the door), the floor is covered with asbestos cardboard.
On a note! The stove can only be used if there are stones in it. Otherwise there is a risk of fire. Heat transfer is better if the stones are laid with gaps.
Instead of an electric heater, you can choose an infrared heater, or, as it is also called, “artificial sun”.
Shelves and other equipment
Since balconies are usually modest in size, the maximum number of shelves is no more than two. The lower tier is installed at a level of 70 cm from the floor, the upper - 150 cm. Gaps are made between the boards for air exchange. Additional attributes can also be placed in the steam room. You can build comfortable seats and hangers, put a table and a couple of chairs.
After completing the main amount of work, you can begin additional arrangement of the sauna. These can be chairs, tables, shelves, hangers for hats and clothes. Important items in the steam room are a thermometer and a hygrometer. By looking at them, you can control the level of heat and humidity during procedures. You can also hang a small clock. The decor can be anything, the main thing is that the objects and attributes are made of heat-resistant materials.
List of required materials
To build a steam room on a balcony, a wide variety of insulation materials, waterproofing materials and heat insulators are required. In order for the room to be airtight and retain heat well, the following materials are needed:
- Insulation materials.
- Vapor barrier film.
- Foil polyethylene foam.
- Foil vapor barrier.
- Fire-retardant composition.
- Pinotex impregnation.
- Antiseptic for impregnation of wood.
- Pine timber.
- Lining.
- Alder boards on the ceiling.
- Electrical system for a bath (for example: Ural-Mikmah-Term, Teplodar SteamSib).
- Specialized thermometer.
- Sealed, heat-protected bath lamp.
Types of heating elements (furnaces)
Sauna stoves are simple in design and maintenance. They consist of a 4 mm thick metal body, built-in electric heaters and thermal insulation. There is a small air space between the inner and outer layers of metal, so the furnaces are cooled better. By type they are divided into:
- closed type;
- open type.
Closed type
safer due to the fact that the heating element is located inside and is not subject to external influences.
Open type
distributes heat better, more evenly and faster. At the top of the unit there is a grate in which heating stones are placed. The larger, the better the heat spreads and the heat lasts longer.
Advantages of electric sauna stoves:
- ease of installation;
- do not form ash, do not require cleaning;
- do not emit carbon monoxide when heated;
- safer and more reliable than conventional heaters;
- due to its compact size, it is suitable for installation in an apartment;
- they are easy to manage;
- After installation, they are immediately ready for use.
The disadvantages of this type of stove are few: they waste a lot of electricity and the air from them is drier than from conventional ones.
Russian-made stoves have a more attractive price, but their appearance suffers as a result and their safety level will be lower than that of their foreign counterparts. To correctly select an electric heater, the volume of the room must be correctly determined. The standard calculation for such calculations looks like this:
1 kW heats 1 square meter, if there are insufficiently insulated areas - 1.2 kW per 1 square meter.
The most common models of stoves are Russian, Finnish, Swedish and German. The most popular models in combination of price and quality from Finnish manufacturers. After installation, the heater is protected with wooden railings, so strong that if it falls, it will prevent a person from falling and getting burned.
A few words about stones for a miniature sauna
Very often, inexperienced steam lovers purchase quartz to fill their heaters. Despite relatively satisfactory thermal properties, this stone is distinguished by one extremely unpleasant quality. Under the influence of different temperatures, it begins to defragment into tiny scales with razor-sharp edges. Quartz stone fines can easily cut skin. In conditions of extremely limited space, this quality can create not only a certain discomfort during procedures, but also carry the risk of cutting injury.
By the way! Ural quartz is characterized by fairly high resistance to sudden temperature changes and destruction.
If the issue of cheapness and accessibility is at the forefront, then you should look towards gabbro-diabase, and if you want to indulge yourself in nothing at least on the balcony, then you can swing at jade.