Covering a bathhouse with siding with your own hands - video + Photo.
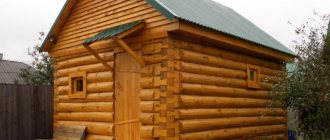
Why is it necessary to cover a bathhouse with siding? This question is ambiguous. If the bathhouse was built from peeled timber or rounded logs, then in this case no type of cladding would be appropriate, since natural wood is attractive in itself. People consider finishing a building if its appearance does not fit into the design of the site as a whole. Another reason to carry out external cladding is the material used in construction. For example, to make a brick bathhouse original, it can be lined with decorative stones, which will be quite expensive.
In this case, the possibility of covering with siding seems appropriate. This material is a simple and, most importantly, inexpensive option for finishing a bathhouse of an old building, since other options for creating an attractive appearance will be too expensive or simply unacceptable.
Is it possible to cover a bathhouse with siding?
In theory, the walls of a sauna or steam room can be lined with any material that is resistant to moisture and temperature changes. In practice, there are certain restrictions on the use of siding for lining the bathhouse frame:
- The material should not shift the dew point to the outer surface of the walls. That is, water vapor penetrating through cracks and gaps outside the box in the bathhouse must remain hot enough so as not to fall out as a layer of water;
- Siding panels must ensure reliable removal of water vapor and a gap between the wall and the cladding surface;
- The siding must have sufficient strength and at the same time be plastic so that the thermal expansion of the box in the bathhouse does not lead to breakage or deformation of the outer layer of the cladding.
In addition, improper lining of the bathhouse with siding often causes the accumulation of condensed water vapor on the internal waterproofing of the bathhouse walls. Due to the fact that the panels actually turn the bathhouse box into a case, ventilation and drying of the thermal insulation of the internal space can deteriorate and cause waterlogging and rotting of the walls.
In addition, siding for the exterior of a bathhouse should not delaminate, absorb moisture, or warp when exposed to water vapor. In this case, the material must be strong enough so as not to be torn off the fastening frame when it freezes, for example, when a timber frame shrinks.
Roof cladding
To finish the roof in a steam room, it is advisable to use corrugated sheets. This material is made from high quality galvanized sheet steel. At the production stage, each sheet is processed in roll forming machines. The corrugated sheet is protected from corrosion by a galvanized layer.
Stages of building a bathhouse roof from corrugated sheets:
- A sling system is installed.
- A sheathing is installed, which is coated with an antiseptic compound that protects the product from rotting under the influence of moist air and high temperature.
- Wooden surfaces are coated with paint that has fire retardant properties.
- Thermal insulation is being installed. This ensures protection of the corrugated sheet from sudden changes in temperature.
- A waterproofing material is placed on top of the thermal insulation, protecting the insulation from the accumulation of moisture as a result of the appearance of condensation on the inner surface of the profiled sheet. When choosing this element, you must carefully examine its structure.
Siding for a bathhouse: main characteristics and types
Essentially, these are simply panels made of plastic, wood or metal, mounted on the outer surface of the walls using profile sheathing or lath. Siding is used in finishing bathhouses built using a frame method; it is almost never used in log saunas. With the help of siding panels, it is sometimes possible to save the appearance of rather old buildings, built with crowns of timber, or cracked foam blocks. For stone and brick sauna frames, siding is used primarily for decorative purposes.
Recommendations
Recommendations for choosing and using metal siding:
- Do not remove the protective film before preparing the sheets for installation.
- You can work with metal siding regardless of the weather or time of year, but it is better not to do this in strong winds.
To keep the panels looking attractive, it is recommended to wash them with plain water.
Metal siding is a universal finishing material that is suitable for cladding buildings. You can find different panels on sale - sheets resembling a stone surface, wooden beams. Installation of metal siding is simple; you can do it yourself, without the help of specialists.
Vinyl
Of all the options, PVC siding is considered one of the best solutions when it comes to cladding the external walls of a bathhouse. Siding panels are made in two layers; the outer sublayer is saturated with additives that increase the resistance of the plastic to ultraviolet radiation. The inner layer has high density and strength, is not afraid of water, high temperature and deformation.
Vinyl is preferred when planning to cover the outside of a bathhouse with siding for several reasons:
- Affordable price, for a bath there is no point in overpaying for exclusive aluminum panels;
- Excellent decorative qualities of the cladding. Even the old bathhouse box looks like new after finishing;
- It is easy to repair and does not require heavy lathing for finishing with panels.
The disadvantages include the flammability of the material and the increased coefficient of thermal expansion.
Important! This means that finishing a bathhouse with vinyl siding cannot be planned if the stove chimney exits through the wall.
Also, you should not use vinyl for finishing if the surface is heated unevenly, for example, due to poor thermal insulation, part of the walls in the steam room area heats up to a high temperature, while the rest of the bathhouse remains moderately warm. In such a situation, vinyl panels are easily deformed and lose their original appearance.
Wood
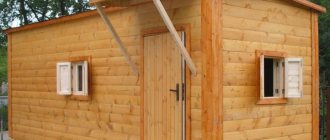
Natural wood panels are practically not used for additional finishing of baths. It turns out to be unprofitable in terms of price and operating conditions. Pure wood siding does not provide any additional advantages over vinyl or metal and is often used as a restoration finish for old frame or log baths.
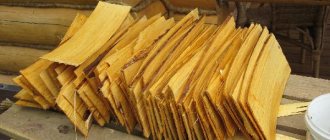
Aspen siding is often used for the restoration of original sauna buildings, when the sauna owner needs to restore and update the previous appearance of the building. Old log houses and boxes with carved crowns, platbands and shingled roofs are never sheathed with plastic. In this case, finishing with wooden siding will be the only correct solution.
An excellent alternative to wood are panels made from polymer-sawdust or decking boards. In appearance, such siding cannot be distinguished from natural wood by its pattern and texture, the price is affordable, and its resistance to sun and moisture corresponds to the characteristics of vinyl panels.
Cladding with wood-look metal panels
Metal siding panels
The most expensive and durable finishing option. It is widely used for decorative design of frame residential buildings. Siding metal can last at least 25 years without signs of corrosion on the front surface. Unlike vinyl, it perfectly withstands the strongest gusts of wind, which often happens if the sauna box is installed in an open area.
Not every bathhouse can be lined with metal siding on the outside. Metal panels have one significant drawback - the high thermal conductivity of the material. This means that if the walls of the bathhouse have high vapor permeability, and this is how good steam rooms should be, then in winter ice will definitely build up on the inside of the finish. As a result, the decorative finishing of the bathhouse may simply collapse under its own weight.
Advice! Metal siding is perfect for frame buildings of a bathhouse made of SIP panels.
The vapor permeability of a sandwich made of OSB board and polystyrene foam is practically zero, in addition, there is almost no shrinkage of the structure, so for this type of bathhouse box, finishing the walls with metal will be the ideal solution.
Tsokolny
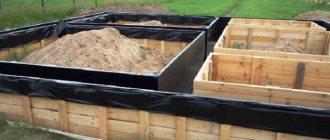
The lower part of the wall, adjacent to the foundation of the bathhouse, is considered the most vulnerable to moisture. The wooden crowns on the base are rotting, the brick walls of the bathhouse are overgrown with moss. Therefore, to combat negativity, several types of basement siding are used:
- Composite panels based on polypropylene and granite chips imprinted into the front part of the finish. One of the most durable materials, easy to cut and cut, withstands even impacts from icicles and snow falling from the roof of the bathhouse;
- Metal siding coated on both sides with polyester resin. Most often used to finish the base of bathhouses of any type and design, from projects on stilts to strip foundations. Durable, easy to repair;
- Asbestos-cement panels with the texture and pattern of brick or rubble masonry. It is heavy and difficult to install, but costs several times less than previous models.
Vinyl siding can be used to finish the base of the bathhouse. For example, if you need to cover the lower part of the walls of a timber or log steam room. It is clear that the problem of damaged crowns cannot be solved in this way, but vinyl material is quite suitable as a decorative finish.
Description and production technology of the material
Metal siding is a finishing material used for cladding different parts of the house (walls, slopes, anemones, gables). Metal siding - panels consisting of several layers:
- Metal sheet made of steel or aluminum.
- Primers. Connects metal sheet with paint coating.
- Polymer layer. Gives a certain color to metal panels and changes their texture. Apply on both sides to protect metal surfaces. If you need to get a thick coating, the polymer is applied in several layers.
- Additional protective coating or varnish. Increases the service life of the polymer layer, protects it from external factors.
- Protective film. Protects sheets from damage during transportation.
Before installation, the protective film must be removed.
Types of polymer coatings:
- Polyester. Matte finish with increased thickness. The thickness of the protective layer is 25 microns.
- Pural. Coating with increased durability. The average thickness is 50 microns. Has anti-corrosion properties.
- Plastisol. Thickness - 200 microns. Resistant to high temperatures.
- PVDF. Combination of polyvinyl difluoride and acrylic. After application, a glossy surface is obtained.
The service life of protective coatings is from 10 to 50 years.
Layers of metal-plastic panels (Photo: Instagram / ck_gravis)
How to properly sheathe a bathhouse with siding
There are two main ways to decorate a sauna box with decorative panels. The technology is selected depending on the condition of the walls and siding model:
- For frame and block buildings of a bathhouse, lathing is used, assembled on the walls from a thin galvanized profile;
- For panel boxes made of SIP panels, you can use a wooden lath treated with fire-fighting and antiseptic impregnations.
The method of fastening in both cases is the same; the slats or profile are mounted on the walls of the bathhouse only using metal corners with a sliding fit. During operation, the wooden box of the bathhouse becomes very hot and absorbs moisture. As a result of wood expansion, the siding panels remain in place, only moving a small amount and returning to place as the building cools.
If the walls are smooth, then the sheathing on the bathhouse is made of vertical wooden slats
The only exception is brick baths; in this case, the finishing can be mounted on the walls using ordinary strip hangers.
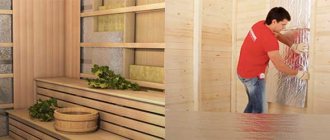
For your information! In any case, the finishing of the bath is carried out without laying insulation. Even if you use moisture-resistant mineral wool or polyurethane foam, the space under the siding will actively absorb moisture.
As a result, the walls of the bathhouse under the siding will freeze and block the escape of water vapor from the inside. A ventilation gap of at least 35-40 mm wide must be left between the plane of the panels and the wall surface.
Preparing the structure
First of all, the walls of the building must be treated with an antifungal agent. Siding panels cover the surface, so there will obviously be no natural sterilization by solar ultraviolet radiation. You cannot paint or varnish the walls of the bathhouse.
At the second stage of preparation, the surface geometry is measured. We determine the height and width, as well as the places of deviation from the vertical plane. Almost always the walls of the sauna have a curved outward in the central part. This is necessary in order to compensate for defects by installing the sheathing and calculate the required amount of material.
Therefore, first of all, horizontal slats or a profile are sewn onto the walls of the bathhouse; where necessary, bars or pieces of wooden slats are placed. The first layer of sheathing must be securely fastened along its entire length. The vertical slats of the second layer are mounted on sliding hangers.
It is clear that it will be necessary to lay a vapor barrier membrane under the sheathing.
How to determine the amount of siding for a bathhouse
Knowing the dimensions of the building, you can easily calculate the required volume of material. But first you will need to select a siding model and find out the total and front surface area of the panel. Each siding panel has small strips of locks around its perimeter for joining with adjacent panels. Therefore, the total area includes the value obtained by multiplying its actual dimensions. The front area is given by the manufacturer; this is the section of the bathhouse wall that will be occupied by the finishing after installing it on the frame.
The quantity is determined by dividing the total area of the bathhouse walls by the value of the front surface of one panel. We multiply the result obtained by 10% by the excess consumption of material. The number of profiles, starting and corner strips is calculated based on the total area of the finishing material.
The fastener must be screwed into the center of the mounting groove
Work order
Initially, a metal starting strip is mounted on the base of the walls. It should be 5-7 cm higher than the foundation blind area. The profile rail is carefully leveled horizontally and firmly attached to the wall of the bathhouse with anchors or self-tapping screws.
Installation of siding begins from the middle of the wall. The panels are laid on the left and right, connecting to each other with locks at the ends. The trim is attached to the slats with self-tapping screws. The next laid slab covers the fastening area, so there is no fear that the fastener heads will spoil the appearance of the finish.
At the corners, the siding is cut to the level of the cladding of the adjacent wall. We subsequently close the joint line with a decorative corner strip. During the installation of the finish, it is necessary to control the position of the slabs using a building level in the vertical and horizontal planes.
The quality of the finish is inspected and checked after the first full heating of the bathhouse.
How to cover a bathhouse with siding with your own hands: video
It is clear that it is better to see the process of finishing a building at least once than to read tips or instructions a hundred times. This video will help you figure out how to decorate the external walls of a brick bathhouse.
Video will help with installation work on a wooden bathhouse
It has many interesting nuances that will certainly be useful in the actual decoration of the sauna.
Work order
Stages of work
Finishing a bathhouse with siding requires care and precision.
All work is carried out in several stages:
| Vertical supports are installed. | You can use wood or metal profiles. The gaps between the posts are about 40-60 cm. |
| A frame is created. | Corner supports are being installed. To form the corners, you need to connect the supports at right angles. Then the other posts are attached to the walls. For this purpose, direct hangers are used. They are screwed using self-tapping screws or dowels. |
| Insulation is being installed. | Glass wool is usually used; polystyrene foam is also popular (see Insulation for facades under siding: how to choose). When choosing a shape, you need to take into account the size of the distance between the supports of the frame itself, since the insulation is placed there. It is advisable to cover it with a special waterproofing film after laying layers of insulation. |
| The line of the end of the base ebb is measured. | The starting bar is fixed on top. The panels themselves are installed from the middle to the edge of the wall. First, the starting bar is set. It is attached with self-tapping screws to the lower support points in a horizontal position. Paneling is done from bottom to top. Each panel has special grooves at the top and bottom. There is a hole on the side of the panels designed to allow the new panel to fit behind the previous one. |
Installation of panels
The photo shows the installation of the starting strip before starting to cover the bathhouse with siding on the outside. The first step is to attach the plinth strip. This will be the starting point on which the level and evenness of the installation will depend, so you should check everything 5 times before starting installation. Mark the installation line for the plinth, it should be 0.2 meters above the level of the ventilation ducts in the foundation. When the bar is secured, check its horizontalness again and if there are no deviations, you can begin the next one.
Install the remaining panels until you hear a characteristic click if you have chosen panels with a locking type of fastening. The planks should be installed in a tongue-and-groove manner or with an overlap, and then fixed using staplers or small nails in special places, which will then be covered with the next panel. This way you will raise the entire wall. At the level of installation of the doorway or windows, the panels should be cut to the required size, and the corner joints should be closed using additional strips.
The installation process is carried out under constant control of the level of horizontal installation of panels. Even with a slight distortion, there will no longer be evenness, and the entire appearance will be ruined. Fasten the panels with self-tapping screws, do not screw them in all the way, or rather leave 0.2 cm for a deformation gap. Then, neither in heat nor in cold, will it in any way affect the integrity of the finish and the overall appearance of the bathhouse, which is finished with siding.