Different materials can be used for surface finishing.
They are selected based on their characteristics, properties and, of course, cost. One of the common options for surface cladding is lining. However, to use it, you need to understand how to attach the lining to the wall.
In this article we will take a closer look at installation methods, the advantages and disadvantages of each option.
Types of lining fastening
First, you should familiarize yourself with the types of fastenings, consider each of them a little closer.
In total there are two types:
- Horizontal or wall mounted.
- Vertical, ceiling mounted.
Let's consider each of them separately.
Horizontal method of fastening the lining
How to attach the lining to the wall? When mounting the lining horizontally, installation is most often carried out from top to bottom. The first board is attached directly under the ceiling, leaving a gap of several centimeters (installation is carried out with the groove down). Next, each subsequent plank is installed with a comb into the groove one by one. This is how the complete installation process is carried out down to the last board. The latter is cut to width, usually in half, and carefully installed in its place using a pry bar or nail puller. The remaining gap, the size of which will be 2-3 centimeters, is closed using a plinth.
There is also a reverse fastening of the lining to the wall, i.e. top down. It is used extremely rarely. It can be noted that the fastening itself will be somewhat easier, since the visibility of the fastening zones is improved, but there are a significant number of disadvantages:
- The last board installed will ruin the appearance of the entire finish because it will be cut (which does not happen if installed from top to bottom, since this strip is located at the bottom and is not noticeable).
- There will be gaps between the panels, which is not very good both in operational terms and in decorative terms.
Vertical or ceiling mounting
Speaking about how to attach the lining to the ceiling, it is worth highlighting a number of rules that must be followed when carrying out work:
- First of all, you should pay attention to the installation of the frame; it should be made from 20*25 millimeter bars.
- Before starting installation, it is advisable to stretch several cords along the edges, which you can then use to guide you, which will somewhat simplify and speed up the whole process.
- These bars must only be fastened horizontally. Initially, fastening is carried out along the edges; after checking the building level, 3-4 additional fastenings are provided.
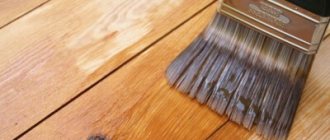
- In case of fixing the lining in rooms with high humidity, it is necessary to pre-treat it with an antiseptic or a hydrophobic compound.
- The fastening itself is most often carried out using nails that are driven in at an angle. In some cases, clamps are used. You can also use a construction stapler when attaching plastic lining.
- The first plank is attached directly next to the wall, leaving a small gap of 2-3 centimeters. It is recommended to install with the tenon towards you.
- The boards themselves are mounted one by one; if necessary, they are tapped with a rubber hammer for a tighter bond (a regular one can accidentally damage the surface, so it is better not to use it).
- It should be noted that electrical wiring is usually installed along the ceiling (at least for lighting), so hydro and vapor barrier should be provided.
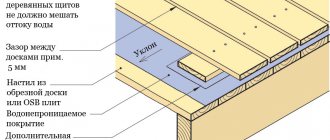
Lathing in the steam room
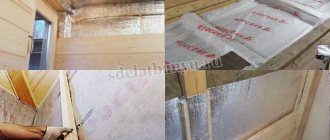
The installation of sheathing under the lining in a steam room is significantly different. The most important thing is the backing material. Construction foil is best suited for this. This substrate effectively retains steam, protecting the surface of the walls in the steam room from the influence of moisture.
Extreme conditions for frame wood force the use of more reliable fastenings for base slats. The classic option is to use a more solid block. Such material will serve as an excellent basis for boards of smaller sizes than the base - they will subsequently be mounted into prepared recesses.
Due to the constant influence of moisture, the sheathing under the lining may be subject to deformation. To avoid the appearance of defects, large beams to which the frame slats are attached are fastened with special corners, this significantly strengthens the structure, allowing it to withstand deviations and remain stable. In addition, these methods contribute to the formation of gaps in the space between the floor and the racks, which will significantly increase ventilation in the cavities of the structure.
It will be important that after the lathing under the lining is done with your own hands, it is necessary to impregnate it with a water-repellent emulsion.
A distinctive feature of the base for the lining in the steam room is the need to use more expensive material.
But the use of such raw materials will guarantee that your product will serve you for a long time, without deformation and maintaining an aesthetically pleasing appearance, without additional repairs.
Ways to fasten the lining
Regardless of the type of fastening, vertical or horizontal, the lining must be fastened to the sheathing, i.e. wooden frame. At the same time, each of its elements must be set strictly according to the level, since any irregularities or irregularities will ultimately lead to the appearance of bulges or depressions, which in turn will greatly spoil the appearance of the finish as a whole.
After installing the frame, you can begin directly attaching the lining. At the same time, in the case when interior finishing with clapboard is carried out in rooms where high air humidity is expected, it is necessary to treat all elements with special hydrophobic substances.
After installation is completed, a small piece of board is inserted into the gap left, with the help of which, by pressing or tapping, the entire structure is more tightly connected, which in turn allows you to completely get rid of the gaps.
It should be noted that when fastening it is necessary to leave small gaps of 2-3 centimeters at the beginning of the structure, i.e. at the ceiling, and at the end, at the floor. This solution will compensate for the temperature regime and provide additional ventilation to the room. In the absence of such indentations, there is a risk that after a while the boards will swell, and this will negatively affect both the appearance and the performance characteristics of the entire finish. Subsequently, such indentations are closed using a plinth.
In any case, without taking into account the chosen method of fastening the lining, the first plank is nailed to the frame with finishing nails; it is advisable to completely recess the head into the board using a hammer. In this case, regardless of the method of fastening, each board is initially nailed in the middle, then along the edges, depending on the length, to additional beams (strictly after checking the building level and confirming horizontality).
In total, there are four main methods of fastening the lining:
- screws or self-tapping screws;
- using nails;
- using clamps;
- and using a stapler.
Fastening the lining with self-tapping screws
How to fasten the lining with self-tapping screws? This method is usually often found when decorating premises where no additional processing or decoration is required. In particular, you can often find the use of this method when cladding baths. But it should be noted that this solution is not effective in conditions of frequent temperature changes, as well as high humidity, since in this case the fastenings may dry out, and this will significantly worsen the appearance. But this problem can be eliminated by pre-treatment with special compounds. At the same time, it is advisable to carry it out once every few months.
It should also be noted that such fastening is quite reliable, as a result of which it will be a good solution when planning the long-term operation of the finish.
The process of fastening the lining with self-tapping screws is as follows:
- Initially, each board is tried on the frame, and marks are made on the attachment points.
- Next, technological holes are prepared with a diameter 2 times smaller than the diameter of the self-tapping screw.
- Next comes the installation itself. In this case, the fasteners are screwed into pre-prepared holes with a screwdriver as deeply as possible.
- To mask the attachment points, the holes are subsequently closed with a wooden pin and sanded.
Fastening the lining with nails
Installation in this way is quite economical, simple, but at the same time somewhat unsafe, since there is a risk of the board splitting, and also short-lived. At the same time, in order to protect the lining from damage, you can use a hammer, or pre-prepare holes for fastening in the required places.
And yet, how to fasten the lining with nails? Let's begin, perhaps, to answer this question from afar, namely with a set of materials and tools:
- hammer, for complete hammering of nails without damaging the board;
- hammer;
- lining, per room area;
- nails, 5-7 pieces per standard plank (100x1500).
This is the basic installation kit; it should be noted that a large consumption of nails will have a somewhat detrimental effect on the appearance, but it cannot be reduced, since in this case the fastening will not be strong enough.
To fasten the lining, nails 50-60 millimeters long are usually used. In this case, each fastener is carefully arranged in a groove, and then hammered in with a hammer. To remove the caps from the surface, which is necessary since they will interfere with the installation of subsequent boards, the nails are hammered as much as possible with a hammer.
Fastening the lining with clamps
What is a lining clamp? These are peculiar metal plates, which include the presence of several holes for fastening, and a “tongue”, which will actually hold the material. This is a fairly reliable fastening element, with which you can reliably, and most importantly, securely fasten almost any material.
They become the most suitable for installing lining for several reasons:
- With the correct selection, you can fasten the lining as quickly, easily, and most importantly, without leaving a trace.
- Thanks to the manufacturing of high-carbon steel, such an element can reliably fasten the structure, and it will withstand high humidity, temperature changes, and any other influences.
And the next question arises, how to properly fasten the lining with clamps so that it lasts as long as possible? Everything here is quite simple and does not require special preparation.
First you need to select the necessary elements. Typically, for a block house, clamps with a tongue height of 6 millimeters are used, while for standard eurolining it is 4 mm. When purchasing, you should also take into account the consumption, usually it is 20-25 pcs. per square meter of lining.
Now let's look at the fastening process itself:
- The first board is secured with nails as standard.
- Next, the clamp is put on the tenon with a tongue, after which it is attached to the sheathing. Its fastening is carried out using nails, screws or a construction stapler. There are a total of three mounting holes, but only two are used.
- It is necessary to secure it on each frame beam with two nails (or other fasteners, depending on your choice). Typically, such products are already included in the set of clamps.
- In this way, each board is secured sequentially.
Fastening the lining with a stapler
The last type of fastening involves the use of a construction stapler. The method is simple and does not require much effort, but nevertheless requires some work experience, without which it would not be possible to attach the lining.
But you can go the other way and simply conduct a series of training sessions immediately before installation. Since the slightest inexperienced action can lead to significant surface defects or deviation of the boards, which in turn will not only spoil the material and its appearance, but also its performance capabilities.
The installation itself is quite simple. The board is applied to the frame, after which a bracket is inserted into the groove, this is done strictly at an angle of 45 degrees. It should be noted that any incorrect execution will entail defective insertion of the bracket, which in turn will interfere with the further installation of the next plank.
Description of work
In order for the lathing for the lining to be strong and durable, it is necessary to follow a certain work technology.
It consists of three stages:
- Calculation and purchase of materials.
- Preparing the bar for use.
- Installation of the structure.
Each stage is important, so carefully read the entire review to avoid errors during operation.
To get the perfect result, you need to secure the frame correctly
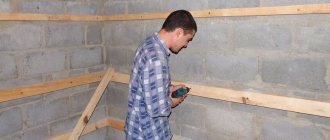
Stage 2 - frame construction
Before nailing the lining, it is necessary to build a solid foundation:
- First, you need to check the base with a level to find out how crooked your walls are. Next, the lines for the location of the bars are marked. Remember a simple rule - if the lining is mounted vertically, then the frame is positioned horizontally and vice versa ;
The easiest way is to sketch out a design diagram in advance to have a clear idea of what it should look like.
- A block is attached along the lines; if the walls are smooth, then you can fix it directly to the wall, and if there are unevenness, then it is better to fix the hangers every 50 cm. Then the hangers are bent, the block is placed, leveled and fixed in the desired position. See also the article finishing the kitchen with clapboard.
With the help of hangers, setting the frame level is not difficult
Selection of fasteners
Before you start working, carefully measure the distance and select the clamps according to size.
- It is very important to choose the right screws or nails. For example, it is better to use self-tapping screws where there is a large load, and nails where there is less load.
- The lining can be wider or narrower, its weight also varies. Therefore, it is advisable to fasten large sheets with larger and stronger clamps, and small ones with small ones.
- The staple has a tongue that comes in different heights, lengths and widths. But, if the height can be adjusted with pliers, then the other parameters cannot be changed. Therefore, it is worth taking this into account.
- Fixing parts is possible with a height of 1-2 mm for MDF and plastic.
- But chipboard can be fixed up to 3 mm.
- Eurolining up to 4 mm.
- If you need to trim a house with wooden clapboards, you will need stronger and larger 5 mm clamps.
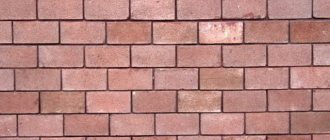
- The Block House is secured using the largest and strongest 6 mm clamps.
Decorating the house with a Block House made of wood from the outside
Clamps made of galvanized steel are the strongest and most reliable, although they cost a little more than metal ones, but using them you can be sure that the finish will not corrode or rust. In addition, they are suitable for outdoor and indoor use.
What are finishing nails?
This is the name for nails with a small cylindrical head, the diameter of which is only slightly larger than the diameter of the rod. They are designed specifically for fixing decorative trim, as they provide a hidden fastening. These nails are thin and, as a result, easily penetrate the wood without causing cracking. It’s easy to drown a small hat in the thickness of the material using a hammer.
Finishing nails
In the photo - the finishing nail next to the finisher
Characteristics
The rods of such hardware are smooth, with notches in the upper part, and range from 20 to 90 mm in length. The cap has an oval shape, and its height corresponds to the diameter of the rod. The diameter of the cap itself varies from 1.6 to 3.4 mm. The fasteners are made from low-carbon steel, and anti-corrosion compounds are used as a protective coating.
Unlike simple construction nails, finishing nails are not designed for high loads, since finishing materials are usually lightweight. They can only be used in structures that are not subject to shrinkage and mechanical bending or tearing loads. It is also undesirable to use them for temporary coverings: not a single tool makes it possible to pick up and pull out a nail due to the small head recessed into the wood. For the same reason, they cannot be reused.
NFL finishing nails
Galvanized finishing nails 1.8x40
Scope of application
Finishing nails are used not only for fastening lining; their scope of application is quite wide:
- furniture manufacturing;
- installation of small decor in interiors;
- decoration of window and door openings with platbands;
- fastening thin slats, glazing beads and skirting boards.
Some craftsmen use them when laying parquet and laminate flooring when they need to fix the planks, but since floor coverings are subject to constant mechanical stress, ordinary nails are more suitable here.
Driving the finishing nail. Using a finisher
Additional materials
To understand how to nail a lining with a stapler, you should consider each action. After installing the frame, it is necessary to insulate the walls or ceiling. This is especially important for a bathhouse. Heat will not quickly leave the room. For this purpose, mineral wool or other special materials are used. Foam plastic is not used for internal installation. Also, when installing the lining in a damp room, you will need to lay a layer of waterproofing. To prevent the structure from becoming loose over time, an OSB sheet is first attached to the frame. It can be as thin as 6mm. This is enough to stiffen the skin.
Next you need to prepare the glue. Without it, fastening with a stapler or other mounting elements will be fragile. Even when frozen, the glue is elastic. Therefore, under the influence of temperature and humidity, the lining will remain flat.
Making a choice
Compared to regular nails, it is better to give preference to special ones. Then you won’t have to bite off the caps before hammering. An excellent choice is a finishing nail. The small oval cap makes it almost invisible. Finishing nails are intended for fastening lining, thin slats or other similar parts. Installation is recommended when the room is heated or when it is warm outside.
Calculation of volume and area
In order to calculate the coverage area, you need to know the working width of the installed panel; if it is eurolining, then this parameter is standard and is generally 88 millimeters.
Calculating the ceiling is not a problem, the situation is more difficult with the walls, and in order to make the calculation easier, you simply need to divide the surface of the walls into separate geometric shapes.
Important! If in your calculations you use the actual width of the material, and not the working one, then the error in such calculations will be more than 5%.
A clear example of the difference between working and total width
Preparing for installation
Eurolining is a material made from solid wood. Therefore, the color and texture of each panel may vary.
Before starting installation, it is recommended to choose the most effective order, taking into account the chosen installation method.
Before proceeding with installation, it is necessary to prepare the material . To do this, you need to unpack it and leave it at room temperature for 2-3 days to allow it to get used to the microclimate of the room where it will be installed.
Installation must be carried out at a temperature of no lower than 5 degrees and a humidity of no more than 60 percent.
Tools
It is possible to fasten the eurolining yourself; there is nothing particularly complicated in this process.
List of tools needed when working with lining:
- closed type fasteners (these include clamps);
- nails and self-tapping screws, used for attaching hidden fasteners;
- perforator, drill, jigsaw, hammer;
- level used throughout the entire installation process.