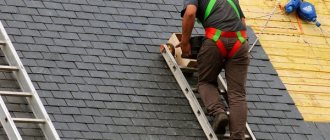
Flexible tiles, also known as soft bitumen roofing, take an honorable second place in popularity as a roofing material used on the roofs of private sector houses.
Its popularity is due to its excellent physical characteristics, variety of shapes and colors, which determines the price of the coating. Flexible tiles do not require a reinforced base, since they do not have a large mass, and it is not for nothing that they are called soft, allowing you to change the shape of the sheets using a regular knife and lie on any, even the most complex, surfaces. In addition, the relative simplicity of installation is an excellent opportunity to save money, which is also an absolute advantage of the material. It is worth saying that to make the task easier, it is better to carry out construction in the warm season, since after installation, individual sheets of bitumen shingles are so sintered together under the summer sun that they form an absolutely airtight coating that can last for several decades.
How to install flexible tiles correctly? What tools may be required in the process? In this article we will look at the main stages of self-installation of bitumen shingles on the roof.
Flexible tiles are bitumen sheets, rectangular in shape, made of fiberglass with bitumen impregnation, which is a binder. Bitumen is applied on both sides and can be oxidized or SBS - modified. The second option is preferable, since it is the additives of styrene and butadiene (SBS) that give the material elasticity, increase elongation and improve fatigue properties, which, in general, increases the service life of the tiles. Some builders argue that there is little point in overpaying for tiles with SBS - modified bitumen if installation is carried out in the summer. Material with oxidized bitumen loses only in that it becomes more brittle in the cold season, however, even at this time of year the problem can be solved by a construction hair dryer, which is used to heat the shingles before laying them on the roof.
On the inside, the sheet (shingle) has an adhesive composition and a protective film, which is removed during the installation process. Granules of quartz sand, basalt rocks, slag, etc. are applied to the outer side of the material, which form a continuous coating and are responsible not only for the color of the tiles and protection of the bitumen layer from ultraviolet radiation, but also complicate the avalanche-like melting of snow, since the rough surface of stone chips prevents sliding snowdrifts. The external topping, in turn, can be shale or basalt. It is better to choose a material with basalt chips, since this coating is applied hot and sintered to the surface of the fiberglass under the influence of high temperatures. This method will prevent the crumbs from crumbling over time and protect against color fading.
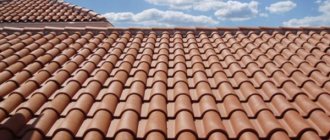
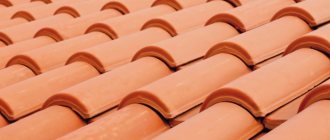
The appearance of the finished roof is determined, first of all, by the cut shape and color. Flexible tiles, as we have already noted, are distinguished by a variety of figured patterns and shades. The most common shapes are rectangles of various shapes, hexagons, rhombuses and semicircles, reminiscent of natural tiles.
It is worth noting that this roofing material is also classified by the number of layers. Flexible tiles can be single-layer, double-layer or three-layer.
Multilayer tiles have a number of advantages over single-layer tiles. Firstly, multilayer canvases, sintered by all layers, form a monolithic coating, which increases the strength characteristics of the roof, primarily waterproofing and wind protection.
Secondly, two-layer or three-layer tiles on an installed roof look very advantageous compared to single-layer ones, since the roof acquires color volume and a unique three-dimensional relief.
Important information about flexible tiles
This is a soft roofing material that is durable and quite strong . Its base is fiberglass, coated on both sides with a bitumen layer. The front side - the outer side - usually has a special coating of mineral chips. This coating is designed to protect against external negative influences such as wind and precipitation. In addition, with such a topping, flexible tiles look beautiful and unusual.
The advantages of flexible tiles include durability and strength
The bottom surface of the tiles has a sticky layer, thanks to which the material adheres securely to the previously prepared base. The sticky layer increases the tightness of the roof and its resistance to weather conditions.
Fixing flexible tiles with a pneumatic gun
Note! Flexible tiles first appeared on sale at the beginning of the last century in the USA. Its creator is Henry Reynolds, an employee of the Grand Rapids company. Half a century later, almost half of all private homes in America were covered with this material.
What to consider when laying flexible tiles
If bitumen shingles are laid correctly and operated in accordance with all the rules, then they will last at least 30 years. The material can be used to finish any roof, including those with complex geometric shapes. The tiles hardly load the foundation and rafters, but are very strong; in terms of its characteristics, it is no worse than metal tiles. Laying flexible tiles is not difficult at all, and the variety of shapes/shades allows you to choose them for a home in any style.
Laying flexible tiles is quite simple
Do-it-yourself bitumen shingle roofing
Video - How to determine the quality of flexible tiles
Video - Bituminous shingles: how to choose, installation of asphalt shingles, tools and requirements
Roof ridge location
Once you have completed installing soft shingles on slopes, move on to the ridge location. The ventilation channels in the frame body must remain open, so a gap of 0.5-2 cm remains between the tops of the skates. To ensure ventilation, the skate is equipped with a plastic aerator. It's not very attractive, so it's decorated with generic skate eaves tiles or chopped tiles for aesthetics.
Asphalt shingles with 4 nails. Each subsequent element must be closed with the clasp of the previous one. Lift the tile on the ridge from bottom to top. The ridge is positioned in the direction of the prevailing winds, so that the exposed areas go in the opposite direction.
No particular difficulties were found during the installation of the flexible roof. There are technological features. If they are strictly observed, then the masonry can be done by hand with remarkable results.
What should you know before installation?
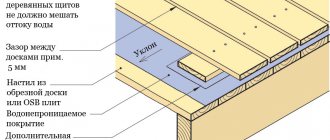
Flexible tiles are very demanding regarding the quality of the base. It is important that the base is well leveled and continuous. It can be made from different materials - OSB boards, wood, plywood, etc. It should also be remembered that when laying tiles between the elements there should be a slight gap necessary for compensatory expansion (with increasing temperature/humidity the material will increase in size). If you don’t leave gaps, the coating will simply go in waves. The sheets are attached to the sheathing with nails or self-tapping screws - in any case, the caps should be recessed into the material.
Prices for flexible tiles
flexible tiles
Installation of sheathing under flexible tiles
Roof angle depending on material
On a note! The larger the pitch of the sheathing for flexible tiles, the greater the thickness of the material should be.
Table. The pitch of the lathing and the corresponding thickness of the material.
| Laying step, cm | OSB boards, cm | Plywood, cm | Boards, cm |
| 60 | 1,2 | 1,2 | 2 |
| 90 | 1,8 | 1,8 | 2,3 |
| 120 | 2,1 | 2,1 | 3 |
| 150 | 2,7 | 2,7 | 3,7 |
Sheathing pitch for flexible tiles
Another important point is the arrangement of ventilation. It is necessary to have vents, holes for the exit and entry of air from/to the roof.
Calculator for calculating lumber for continuous sheathing
Go to calculations
Calculation of flexible tiles for a gable roof
Important features of the material
Given the extremely simple design that flexible tiles have, even a beginner can install a roof. The main thing is to follow technology.
This roofing material is made in the form of bitumen shingles:
- rectangular fiberglass fabric with bitumen impregnation;
- the lower part is treated with SBS or natural bitumen for gluing to a continuous frame;
- the self-adhesive layer is protected for storage and transportation by a polymer film;
- At the top, the fiberglass is covered with a material sprinkled with concrete chips, granite, basalt chips or quartz sand to improve wear resistance.
Shingles from different manufacturers sometimes do not have the same dimensions (average format 1×0.35 m), thickness 3 mm.
The tile pattern has several types:
- diamonds;
- brick;
- tiles;
- rectangles of different formats;
- honeycomb
Color shades can be multi-chrome or monochrome, different in each box. Therefore, before putting all the available material from different boxes, they are mixed in random order. Flexible bitumen cladding from Shinglas, Tegol or with a 3D effect from any manufacturer has the maximum artistic value. The self-adhesive layer does not ensure the reliability of the fastening parts of the tiles, so the roof is additionally attached to the frame with nails.
How to cut flexible tiles
There are a lot of cuts when laying this roofing material, as you will see for yourself by reading the instructions below. How to cut it? Some advise using metal scissors, others - a painting knife, others - ordinary scissors... What to use?
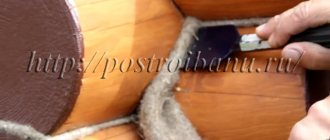
It is advisable to cut flexible tiles and other materials (underlayment carpet, for example) with a special roofing knife that has a hook blade - approximately the same as in the photo below.
Roofing knife
These knives come with trapezoidal blades (there can be from 3 to 5 pieces), and therefore hook blades must be purchased separately. The photo shows a double-sided blade, which is most suitable for flexible tiles.
Double sided hook blade
Note! When the hook blade no longer cuts well, it needs to be turned over or replaced with another one.
Give preference to a knife with a metal body (plastic, if dropped from a height, may break). Another selection criterion is the blade, which can be retractable or fixed, but decide for yourself here.
Roofing knife with fixed blade
Roofing knife with retractable blade
Rules for preparing for installation
To lay flexible tiles, prepare the following tools:
- construction hair dryer;
- scissors designed for cutting metal;
- small spatula;
- screwdriver;
- hammer.
Construction hairdryer
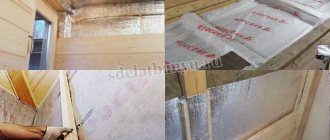
As for the materials, you will need the flexible tiles themselves, self-tapping screws, a special lining (you can use roofing felt), roofing nails (diameter 8-12 mm, length from 25 to 40 mm; approximate consumption of nails - 10 kg per 100 m sq. area), mastic for sealing joints, hydro-, steam- and heat-insulating material, as well as adhesive tape (double-sided is required).
Fragment of a roofing pie
Selecting underlay carpet
The carpet is made from two types of material.
In the valleys and on the cornices, a self-adhesive underlay carpet with a very durable polyester rot-resistant base and a fine-grained sand topping is used. Along the internal fractures of the roof (valleys), a valley carpet should be laid on top of the lining carpet; the back side of its edge needs to be coated with mastic to a width of about 10 cm.
For the rest of the area, you can use a lightweight lining material with a base made of rot-resistant polyester and a non-slip polypropylene coating, or a material with a fiberglass base and double-sided topping with mechanical fixation and an adhesive layer in places of horizontal overlaps.
TECHNONICOL
TECHNONICOL
TECHNONICOL
TECHNONICOL
Using a nailer to attach shingles
Instead of a hammer, you can use a tool such as a nailer for installation, in other words, a pneumatic hammer for driving nails. Such instruments can be drum and rack.
Nailer for fastening flexible tiles
Carbon steel is used to make nails for the pneumatic hammer; in addition, they are nickel-plated. In our case, obviously, they must have a large cap.
Nails for nailers
TOP 10 best manufacturers of flexible tiles
| Photo | Name | Rating | Price | |
| #1 | Katepal | ⭐ 100 / 1001 – voice | Find out more | |
| #2 | Siplast | ⭐ 98 / 100 | Find out more | |
| #3 | CertainTeed | ⭐ 98 / 100 | Find out more | |
| #4 | Kerabit | ⭐ 97 / 100 | Find out more | |
| #5 | Tegola | ⭐ 96 / 100 | Find out more | |
| #6 | Icopal | ⭐ 96 / 100 | Find out more | |
| #7 | Ruflex | ⭐ 94 / 100 | Find out more | |
| #8 | Shinglas TECHNONICOL | ⭐ 94 / 1001 – voice | Find out more | |
| #9 | Dock | ⭐ 92 / 1001 - voice | Find out more | |
| #10 | Onduline | ⭐ 91 / 100 | Find out more |
Which tile manufacturer would you choose or recommend?
Take the survey
Instructions for laying flexible tiles
The installation of this roofing material is well known to many craftsmen, since it has been used for a long time in low-rise construction. The installation process itself consists of several stages; let’s get acquainted with the features of each of them.
Stage No. 1. Installation of eaves overhang
To install the eaves overhang (or eaves trim as it is also called), follow the instructions below.
Step 1. Attach the strip to the edge of the roof with a small (10 cm) overhang beyond the border. Thanks to this, the part fits correctly with the gable strip. Both elements are necessary in order to protect the roof from the negative effects of environmental factors.
The cornice strip is applied to the installation site
Step 2. Secure the strip in place using roofing nails. Hammer them in a checkerboard pattern in increments of 15 cm. When connecting individual elements of the eaves overhang, be sure to do this with a slight overlap (from 10 to 15 cm).
The cornice strip is nailed
Roofing nails are used for fastening
The plank is nailed in a checkerboard pattern
Step 3. After this, trim the edge of the plank extending beyond the gable. Using tin snips, trim the piece to where it meets the edge (as in the photo).
The edge of the cornice strip is trimmed
Step 4. Take a hammer (preferably rubber) and bend the upper/lower edges of the overhang along the pediment. Additionally, secure the folded edges using a roofing nail.
It is better to use a rubber hammer to bend the edges of the strip.
Nail the folded edges
Stage No. 2. Laying underlay carpet
Thanks to the lining layer, better waterproofing of the material will be ensured.
Step 1. Lay the self-adhesive carpet parallel to the eaves strip, placing it on it and retreating from the edge of the strip approximately 2-3 cm. Glue the material so that each new section overlaps (at least 10 cm) with the previous one. Glue the strips from bottom to top to provide better protection against leaks. Carefully roll out the roll, simultaneously removing the protective film from it.
Rolling out the underlay carpet on the base
Step 2. Where the chimney pipe is located, cut the carpet according to its shape and glue it, moving it slightly over it.
Tile prices
tiles
How to cut underlayment in the chimney area
On a note! On the eaves overhang and in the valley, the lining carpet must be installed without fail! If the roof slope is 18 degrees or more, then the rest of the area need not be covered. If it is from 12 to 18 degrees, then the entire surface must be covered, otherwise the roof may leak.
Step 3. But above the self-adhesive lining, you can use a carpet that has mechanical fixation. Roll it out along the base with a 15cm overlap between the strips; a similar overlap is left between the material and the self-adhesive carpet laid earlier.
Individual strips are laid with an overlap of 15 cm
Step 4: Use a thermoset strip to overlap between the adhesive and mechanical fixing materials. This way the joints will be as tight as possible.
Longitudinal overlap of the carpet - 10 cm
Step 5. Fix the underlay carpet using a hammer and nails, driving them in at 20 cm intervals. It is recommended to use nails with a wide head.
Nails are used to secure the underlay carpet
Step 6. Coat all overlaps with a layer of bitumen-based mastic to improve the sealing of the joints. To do this, it is most convenient to use a metal spatula. The layer should be no more than 1 mm thick.
Application of bitumen mastic
The thickness of the mastic layer should be no more than 1 mm
Step 7: After installing the underlay rugs, cover the gable using a gable strip.
The gable strip is installed
Step 8. Trim the edge of the strip to match the shape of the roof.
This is how you need to trim the edge of the plank
Step 9. Secure the plank with nails, driving them in 15 cm increments in a checkerboard pattern.
Nails are also used to secure the gable strip.
Step 10. Lay the lining in the valley area so that it extends half a meter in each direction from the axial part. At the bottom, make a tongue on the carpet (as in the photo), through which rainwater will be drained.
An underlayment carpet is laid in the valley area
Stage No. 3. Laying directly flexible tiles
Now proceed to the most important stage - laying the bitumen shingles themselves. Apply markings in advance, thanks to which the coating will be laid evenly and neatly. Marking is especially important in the case of an unusual geometric roof shape.
Step 1. Start laying the first row of shingles 15 cm from the bend of the eaves strip. Trim the corner of the first sheet in advance - this will ensure the drainage of rainwater.
The first row of flexible tiles is being laid
The corner of the first sheet needs to be trimmed
Step 2. Apply a thin layer of mastic along the edge of the wrong side of the material. Also, apply it to the area that will be located on the gable trim.
Mastic is applied to the reverse side
The edge of the shingle is coated
Step 3. Glue coated shingles in the desired location. Be sure to leave 1.5 cm free on both slats to ensure efficient and proper drainage of precipitation.
The edge of the shingle does not fit flush with the end strip.
Step 4: Nail the material in place using wide-headed roofing nails. When driving a nail, step back 2 cm from the edge.
The distance from the edge of the shingle is 2 cm
Step 5. Use 5 nails to secure each shingle of material (2 at the edges, 3 more evenly in the middle of the sheet).
The material is secured with nails
Step 6. Where the shingles meet the gable portion, coat each shingle in the remaining courses with asphalt mastic.
The mastic is applied in areas adjacent to the gable part of the roof
Step 7. When laying the second row, maintain a slight offset (from 15 cm to 85 cm) of the elements relative to the first. Also, when laying the second row, make a slight overlap on the first.
Then the second row of tiles is laid
Step 8. For the valley, use a special valley carpet. Roll it out to cover the entire valley. Coat the inside edges of the carpet with mastic approximately 10 cm from the edge.
Special valley carpet
Fixing the valley carpet
Step 9. Also secure the carpet with nails - drive them around the perimeter, observing a step of 20 cm.
Nails are driven in increments of 20 cm
Step 10. Lay shingles in the valley area in the same way as you did on the slopes.
Then flexible tiles are laid in the valley area
Step 11. Cut the material along the axis of the valley to approximately 10 cm, using a sharp knife.
The material is cut along the axis of the valley
Step 12. Also cut the corners along the axis of the valley, which is required to remove precipitation. Apply mastic to each shingle.
Prices for metal tiles
metal tiles
The corners of the material are cut off
Step 13. Design the second part of the valley in the same way. The result will be a gutter, the width of which will be 10-15 cm. Through this gutter, water will easily flow into the drainage system.
The other part of the valley is designed in a similar way.
Leave a groove of 5-15 cm
Step 14. Finish the external break of the roof (the so-called rib) with ridge-eaves flexible tiles. Break several shingles into individual pieces.
Shingles need to be broken
Step 15. On the back of these elements there is a self-adhesive strip. Lay them along the edge of the roof with an overlap of several centimeters. Additionally, secure each of the elements with nails (a pair per side of the slope). Design the roof ridge in the same way.
Ridge-eaves flexible tiles
Laying elements overlapping
Video - How to lay shingles
Protection of gables and eaves
The perimeter of the roof is equipped with metal strips. They are necessary to protect weakened areas of the frame from moisture. The plank lies on the edge of the fastenings and protrudes as an edge. The edge line should coincide with the roof contour line. Roofing nails are attached to a zigzag section after 10-15 cm.
If it is necessary to connect both rails, they are laid with an overlap of 3-5 cm, at least 2 cm. The pediment strips overlap the cornice in the corners of the roof. In the places of the limb and the coupling of the fastenings, 2-3 cm are clogged.
Most flex roofing manufacturers recommend installing both types of metal protection on top of the barrier underlayment. However, the developers of the Shinglas brand recommend placing the rods under the barrier and the gables above it. Before installing gables and cornices on the board, it is recommended to first punch through the rod and then attach the metal protection to it.