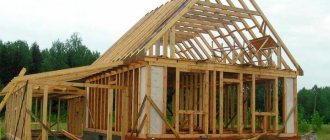
The construction of the main structural elements of the bathhouse (external walls and partitions) is often carried out simultaneously.
But sometimes finished premises require division into functional zones after installation of the roof, windows and doors. In this case, an additional partition can be installed in the bathhouse, which will allow more rational and efficient use of the interior.
How to properly make partitions in a bathhouse
There are several ways to build a sauna, depending on the size of the sauna, the method of heating the steam room and the location of the stove itself. Modern baths are built mainly in the same way as ordinary box houses. It’s simpler, the same design principles, layout and placement of partitions in the building. This is especially true for brick baths and saunas built into the living space of a house or attached to a building, but connected to a water heating system. In this case, the partition between the steam room and the washing room is built according to the same scheme as the external walls.
Always reinforce glass block construction.
Especially if the structure is supposed to be massive. For example, a wall. The best solution is special metal rods, which can be purchased at almost any construction supermarket. The rods must be selected with a cross-section of five millimeters. And they are installed both horizontally and vertically.
Phased construction
Any massive glass block structure should be built in stages. It is recommended to lay no more than three rows per day. Otherwise, if this rule is not followed, the wall may turn out to be uneven, and in some cases, the lower blocks may even crack under the weight of the upper rows.
The fact is that, unlike, for example, brick, glass blocks adhere less well to cement mortar. Therefore, the structure can “move” under its own weight.
Spacer crosses when laying glass blocks
Mounting crosses significantly speed up the laying of glass blocks
and ensure strictly the same distance between the blocks - a wall made of glass blocks will turn out perfectly smooth and neat. They are made of plastic, are inexpensive, and can be purchased at any hardware store.
Seams in glass block construction
Immediately after erecting a structure made of glass blocks (and most likely beforehand), you need to think about seams and joints. Ordinary gray joints made from ordinary cement-sand mortar do not look very attractive; it is best to purchase special grout for joints. The range of grouts for joints today is huge. There is a choice among manufacturers, colors and prices.
Grouts are sold in the form of dry mixtures. You just need to add a certain amount of water to the mixture (see instructions on the package) and mix the contents thoroughly.
But it’s even better to lay glass blocks on colored cement. It can be purchased at the same construction supermarkets. Such cement will cost a little more than ordinary cement, but the result is worth it. Or you can simply purchase special pigments that can be used to easily color a regular gray solution.
Wooden modules for glass blocks
Sometimes, in order not to bother with the solution and, in principle, the rather labor-intensive process of laying glass blocks, you can use special modules. They are something like a wooden lattice, each of the cells of which is designed for a glass block.
The process of “constructing” the structure is very simple. You need to insert glass blocks into the cells and secure everything with a gasket. The benefits are obvious - simplicity, convenience, perfect appearance. In addition, such a structure can be moved from place to place if the need arises.
We build and repair ourselves
Flexible stone What exactly is flexible stone? This is a layer of sandstone, one to three millimeters thick, applied to textiles. It can be made in the form of wallpaper and…
In baths and saunas, all structures and finishing materials are subjected to rather aggressive tests associated with high temperatures and high humidity, so the appearance of glass as a finishing material and structural zoning element is quite obvious.
At the same time, glass is not just a tribute to modern trends in design art, but also a completely reasonable solution both from the point of view of reliability and safety, and from the point of view of hygiene, because in conditions of high humidity the most favorable atmosphere is created for the development of all kinds of fungi.
What is the benefit of a properly assembled partition?
It’s another matter if the bathhouse building is built in a dacha or 20-30 m from the main residence. In this case, the problem of equipping partitions in the bathhouse is somewhat more complicated.
Therefore, in order to decide how to make partitions in a bathhouse with your own hands, you should count all the options and choose the right one, which will help you save firewood and, if possible, preserve the wooden building of the bathhouse:
- If the size of the sauna and bathhouse is small, then a removable partition is often placed inside the steam room, separating the steam room from tanks with a supply of water for washing and closets with clothes. After completing the bath procedures, the frame of the partition in the bath is removed with your own hands, and the small space of the steam room is used as a washing compartment. The heat of the stove is enough to wash in the warmth and thoroughly dry the bath;
- The second method is used for classic wooden log baths measuring 3x5 m or more. In this option, a frame or even brick partition with a minimal amount of thermal insulation is most often used;
- The third option involves solid thermal insulation of the partition; it is used in timber, log and brick bathhouses with two stoves and a boiler for hot water.
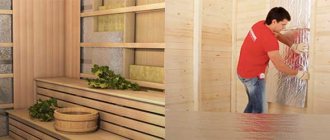
The first option is used quite rarely; most often these are small bathhouses converted from wooden cabins. To raise the temperature in the steam room and reduce heat loss, the partition in the steam room is made with your own hands in the form of a curtain made of foamed polyethylene foil or ordinary tarpaulin.
The last version of the wall with good insulating properties is considered the most reliable and simplest to install. Therefore, an insulated partition in a brick bathhouse is always built with your own hands if the design of the steam room turns out to be large, but it is not possible to install a full-fledged “hurricane” stove. In this case, the joint part of the wall between the sink and the sauna should be built of brick with mandatory insulation of the surface on the sauna side.
What does using a thin wall give?
Building a thin, heat-conducting partition between the steam room and the sink is not as simple as it might seem at first glance. The difficulty is that, before making a wooden partition in the bathhouse, you need to accurately calculate the thickness of the insulation. If you make it thin, you can cool down the steam room. If you use thick mineral fiber-reinforced insulation, the sink area may end up damp and cold. Partitions in a bathhouse made of boards without thermal insulation are used mainly in country versions of steam rooms.
In winter, the small thickness of the wall ensures high-quality and quick heating of the walls and floor of the washing compartment, especially in cases where the walls and floor of the shower are tiled. In summer, too much heat comes from the thin partition, so you have to make special vents through which excess heat is removed.
Advice! If you don’t have the necessary experience and knowledge on how to make partitions in a bathhouse with your own hands, choose the third option for wall cladding with enhanced thermal insulation.
The result is a very warm and economical steam room, and the walls of the washing compartment can be dried with a special ventilation system, when a hot stream of air flows from the sauna through the cracks in the deck floor into the shower room. It turns out a little more complicated, but the steam room and washing compartment will dry completely in any weather.
Device
The common thing in the construction of partitions in a bathhouse made of any material is that they are fastened only to the floor and walls , and the partition is not even brought up to the ceiling, so as not to take on the load from the roof.
ADVICE! Leave gaps of a few centimeters between the partition and the ceiling, even if you have non-shrinking wall material. In log houses, shrinkage is calculated as 4% of the height of the log house wall.
The gap between the wall and the ceiling is filled with jute, for example. Or a brick fight.
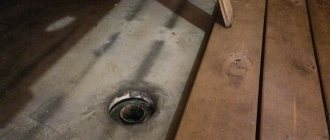
Fastening to the floor is either fastening to the joists or to the base, which will be built on the ground or on a concrete screed . Only the lightest wooden partition of small thickness can be placed and secured on the finished floor.
Read about how to properly attach partitions to the floor and walls in this article.
Thickness
Since we talked about different materials, there are different minimum values for them. Based on the fact that the thickness of the partitions in the bath should not be less than:
- quarters of a brick, if the partition is brick;
- 10 cm of timber or logs;
- frame without cladding - 5 cm.
The partitions inside the bathhouse can be thicker, it’s just a matter of preference. In general, they usually have a thickness somewhat less than the thickness of the external walls . For brick partitions, a thickness of a quarter brick is not as typical as a thickness of half a brick. The latter can be recommended as more stable.
How to insulate
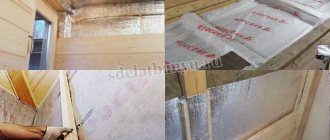
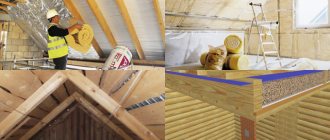
There are not many options for how to insulate a partition in a bathhouse. First of all, of course, mineral wool . This is the insulation that is used most often because it is widespread, relatively cheap, and despite all its shortcomings, it is still suitable for interior decoration of a bathhouse.
ATTENTION! Use mineral wool only “for baths and saunas,” plus don’t forget about steam and waterproofing - films that protect the insulation from moisture.
Foam glass
RusPar, for example, widely recommends foam glass in its videos, but does not say that this material is not cheap. In principle, everything is correct, for foam glass with closed cells (which is not permeable to vapor) it is possible to use it for insulating a bathhouse, and you will not have to worry about protecting the insulation from moisture, but this option is not suitable for everyone, but only for those who can afford increase in the cost of the project.
The third option, which seems suitable to us, is filling the frame with vermiculite. This method is not suitable for insulating brick walls, but the previous two are suitable.
BY THE WAY! A partition made of logs or timber does not require external insulation at all, only inter-crown insulation.
Partitions with convection
One of the ways to solve the issue of heating the room adjacent to the steam room is to create partitions with convection in the bathhouse. More precisely, they use the physical law of convection, and for this purpose holes are made in the partitions.
The easiest way to heat an adjacent room (sink or rest room) is to make two holes in the wall: one right near the floor, preferably located behind the stove, or run an air duct from it to the stove so that air from the adjacent room is drawn under the stove and it was heating up there.
Ventilation diagram, but it is better to place the fan in the hole behind the stove. See also many diagrams and the section on ventilation.
It is best to make the second hole low, somewhere around a meter above the floor. And here’s why: the warm air itself tends to the ceiling, and our task is to heat the entire room, that is, we make a hole in the middle, the air itself rises up, and due to the outflow below, it is actively mixed.
In the first hole (near the floor) it would be worth installing forced ventilation, which will pump cold air under the stove. But it’s possible to install a fan in the second hole, but understanding that it won’t live there for long. At least if its engine is inside. Engines do not tolerate high humidity and temperature . But if it is brushless, it will live.
In principle, one fan in the lower hole should be enough - increased pressure will be created in the steam room, which will descend through the exhaust hole. Or take the engine outside the channel.
There is also another interesting scheme that heats the adjacent room simply due to the pressure difference:
As you can see, here the already cooling air is drawn into the adjacent room, and there the exhaust hole is located under the ceiling , creating draft. We like the first convection option better; after all, heating is faster there.
Near the stove from the fire
The partition in the steam room of the bath from the stove is placed for reasons of fire safety, when the walls themselves are made of flammable material ( wood ). The partition can be a fire cut - this is a part of the wall that has been cut out of the wall material and replaced with brick. This cutting is done when the firebox is brought into the next room.
If the firebox is in a steam room, then you can move the stove away from the flammable wall, and put a brick partition between them, which will also serve as a heat accumulator .
IMPORTANT! If the partition is close to the hot metal of the furnace, then it is advisable to use clay furnace mortar rather than cement for the brickwork.
You can read more about the cutting wall for the bath here and here.
Options for partitions for baths
Before starting design work, you need to decide on two conditions. First, you need to decide what to make the partitions in the bathhouse from. Secondly, choose a scheme for arranging the dividing internal wall, select the dimensions and method of connecting the partition and external walls.
Traditionally, internal partitions in a bathhouse are built in several ways:
- Log or timber partitions are laid at the stage of laying the crowns of the building box;
- A frame partition in a bathhouse can be installed at any stage; it is most convenient to install the partition after laying the rough ceiling;
- Brick and aerated concrete walls are placed in the bathhouse before laying the floor and insulating the room.
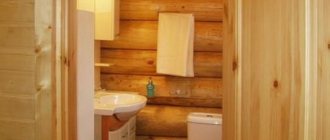
Wooden partitions in a bathhouse are considered to be more preferable for DIY construction; they are easier to construct and cheaper. It is always possible to add, rebuild or replace an assembled wall without any significant damage to the steam room and wash compartment.
How to make a frame partition in a bathhouse
The dividing wall between the steam room and the washing compartment can be made in two ways. The most affordable option is to build frame partitions in the bathhouse with your own hands with a compensating upper gap. A small gap is required to compensate for the loads that occur during heating and cooling of the bathhouse.
The second option is called a floating partition. Its essence lies in the fact that the structure is installed between two rooms on movable fasteners. As a result of increased humidity or temperature, the partition frame has the ability to move in the vertical direction without breaking the screws and fixing keys.
The choice of which partition to make in the bathhouse depends on the material from which the bathhouse box is built. The first method is used for buildings made of SIP panels, bricks, foam blocks, and profiled timber. The second option is used for wooden buildings. If the bathhouse is assembled from timber, then before you make a floating partition in the bathhouse yourself, it is better to check the amount of shrinkage of the room. If the process of setting up the crowns is completed, then you can choose a simpler stationary installation scheme for the wall.
Features of bath glass
Glass for fencing steam rooms has a number of features that increase the efficiency of the partition and also increase the safety of its use.
- The first feature is the use of only tempered material , because ordinary heated glass bursts when exposed to cold water and can damage the user with large and dangerous fragments.
- the technology of applying silver ions to the surface, which provide antibacterial properties regardless of the temperature and intensity of cleaning, has recently become widespread
- Careful processing of the edge is a condition for the tightness of the steam room, as well as the durability of the entire partition structure.
Decoration at the request of the customer can be done by tinting, matting, engraving, fusing, photo printing and even applying an entire plot. This approach will make the bathhouse or sauna truly individual, stylish and original.
Building a floating partition
The main idea of the unusual wall design is to install a partition without a rigid connection to the walls, ceiling and floor. The installation of the wall begins already at the final stage of construction of the bathhouse, when the concrete floor screed is poured.
First of all, two concrete sills are laid on the floor; they will also act as a barrier so that water does not leave the washing compartment.
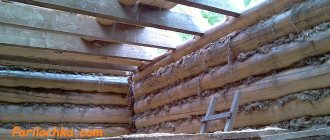
Next, parallel grooves are cut along the junction line on the log or beam walls of the bathhouse, in which the guides of the frame partition will be placed.
Along the contour of the grooves and the cut-out draft, side strips are sewn, which will hold the structure, seal the gaps between the walls and ceiling and at the same time serve as guides for the frame partition.
On the sides and at the bottom, the frame frame is attached to the wooden base of the threshold and guides using metal corners with a cut groove. Any expansion of the frame or its settlement will not lead to a break in the structure between the steam room and the washing compartment.
All that remains is to lay a vapor barrier, insulate the structure with mineral mats and cover the surface with linden clapboard.
Assembling a partition in a bathhouse made of timber
Making a wall separating the steam room and the washing compartment is considered the most difficult to do with your own hands. Most of the work has to be done at the stage of wall construction.
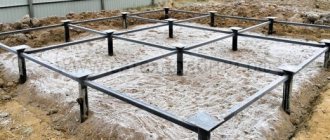
First of all, you will need to provide a support jumper on the foundation. If you use a shallow concrete strip, you will need to fill in the contour of the future steam room; for pile and columnar foundations, additional jumpers made of timber or channel are used.
A threshold made of treated timber is placed on the lintel, which will serve as the basis for the entire wall. The same threshold will serve as a supporting joist beam for future wooden floors.
If the wall between the steam compartment and the sink is long enough, then it is assembled by cutting, as is done when laying out crowns from logs or timber. This method is used in situations where the partitions in the bathhouse, photo, are made without doorways or brick inserts with a stove.
In this case, the partition in the bathhouse is built with a small gap between the upper crown and the ceiling, this is done for two reasons:
- Compensate for the expansion of timber or log crowns under the influence of heat and moisture;
- Ensure a flow of warm air from the steam room into the washing compartment.
A common wall assembled from timber is not insulated; it is covered with a vapor barrier film and covered with clapboard.
If there is a doorway, the timber wall, as in the case of frame partitions, is made according to a floating pattern. To do this, a cut is made on the adjacent walls to lay out the wall parts, and the door frame is secured in the opening to the ends of the logs or beams using self-tapping screws through the mounting grooves.
Brick wall between the steam room and the bathhouse
Using brick to build a dividing wall inside a log bathhouse looks rather strange, but in practice such a solution is considered competent and effective. Brick partition in a wooden bathhouse, as opposed to a frame structure:
- Does not rot or become damp from condensation;
- Can be used to move the back wall of the heater inside the sink;
- It perfectly transfers and distributes heat from the stove installed inside the steam room throughout the entire space of the shower room.
For your information! The latter quality turns out to be so valuable and convenient that the surface of the common wall on the side of the steam room is not covered with thermal insulation, but is lined with natural stone.
The only disadvantages of a brick partition in a bathhouse are its high heat capacity and the weight of the wall. This solution is ideal for a home bath and is not suitable for a steam room in a country house or suburban area. In winter, it will be quite difficult to quickly heat such a steam room.
The brickwork in the bathhouse is made of half a stone, that is, the cross-section of the wall does not exceed 12 cm. The construction of the future brick wall should be planned before laying the floors. If the base of the wall between the steam room and the sink cannot be installed on an independent foundation, then you will need to make a jumper between two powerful joists and reinforce them with crossbars and brick supports. Only in this case will the wooden structure withstand the weight of the masonry of several hundred kilograms.
To make the wall more stable, before starting work, a frame is assembled from a galvanized metal profile. This will help level, lay and keep the brick wall from tilting until the masonry mortar finally sets.
On the side of the steam room, the brick is covered with lathing, foil and thermal insulation are laid. If lining is sewn onto the surface of the common wall on the side of the washing compartment, then a vapor barrier can be omitted.
Construction of a brick partition
A brick partition is relevant for brick and stone baths. To obtain a lightweight structure, hollow bricks can be used for masonry.
The process of bricklaying the wall is carried out step by step:
- Marking is carried out to determine the boundary for the future partition.
- Preparation of materials and working tools. A masonry mortar based on cement (M 400 or 500), construction sand with the addition of water is mixed. First, bulk materials are mixed with the gradual introduction of water. The proportions of the components are 1: 3 (for 1 part cement 3 parts sand).
- A string is pulled along the drawn line to maintain an even plane of order. The laying starts from the wall, a small part of the cement mortar is applied to the base of the floor and the first row of bricks is laid. To increase the strength of the structure, metal strips and reinforcement are used in the process.
- The first row is treated with a connecting solution, on which the next row is laid.
- All rows of the structure are laid in a similar manner. A wide metal strip or reinforcing rod along the entire length is installed above the doorway, after which the brickwork continues to the ceiling.
Decorative finishing of a brick wall is done with plaster after the masonry mortar has completely dried.