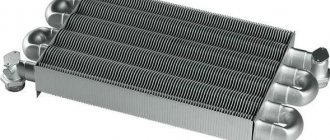
For the effective functioning of ventilation and chimney systems, stable natural draft is required. Only under this condition will normal air circulation and effective removal of combustion products occur. To prevent foreign objects and precipitation from entering ventilation and smoke ducts, as well as to protect the internal surface from soot and fat deposits, deflectors are widely used.
A modification of the TsAGI type deflector is one of the most common among such devices. This article will discuss the design features, operating principle, pros and cons of this device.
What is a TsAGI deflector and why is it needed?
The TsAGI deflector is a development of the Central Aerohydrodynamic Institute, designed to enhance natural draft, prevent reverse draft and protect against moisture and foreign objects getting into ventilation shafts and chimneys.
The use of these types of deflectors allows you to improve the microclimate in the room due to intensive air circulation and promotes more complete combustion of fuel.
Design and principle of operation
The TsAGI deflector has become widespread due to its efficiency and affordable cost. The deflector design includes the following elements:
- the lower shell, with the help of which the product is attached to the upper part of the air duct or chimney;
- diffuser, which is an expanded cone located between the pipe and the cap;
- a hollow metal cylinder, which is the outer part of the deflector;
- an upper conical hood designed to protect the air duct from clogging with foreign objects and adverse atmospheric influences;
- upper cone mounting brackets;
- mounting brackets.
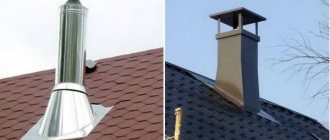
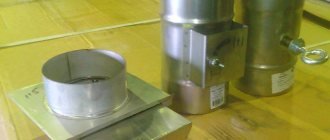
Typically, TsAGI deflectors are made of galvanized or stainless steel.
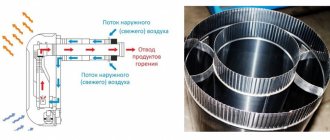
The principle of operation of the device is based on the cutting of the air flow by a deflector, as a result of which an area of low pressure (rarefaction) is formed above the head of the air duct. Thanks to this, the natural draft in the ventilation system increases by 15-20%.
By enhancing natural draft, the efficiency of ventilation and heating devices increases by 20-25%. Fuel combustion occurs with greater heat transfer, which reduces fuel consumption and reduces the emission of toxic compounds into the atmosphere. As for ventilation systems, when using a TsAGI deflector, the intensity of air circulation increases.
Types of nozzles
Now you can purchase ready-made or make your own the following types of caps - traction amplifiers:
- TsAGI deflector with expansion of the ventilation duct - diffuser;
- Volper's cylindrical “mushroom”;
- H-shaped pipe manifold;
- cap - weather vane (popularly - “sycophant”);
- spherical rotary nozzle - the so-called turbo deflector;
- static-dynamic open device of the “Astato” type.
It makes no sense to include and consider ordinary umbrellas on the list - such products do not improve traction, they only cover the pipe section from the rain.
Construction of TsAGI type hoods
This design was developed during the USSR by a specialized research institute (scientific institute). The deflector consists of the following parts (shown in the drawing):
- lower glass with a diffuser (extension) at the end;
- outer body – shell made of cylindrical roofing steel;
- cover in the form of an umbrella;
- cover fastening posts made of metal strips.
The operation of the product is simple: wind blowing the body from any side creates a vacuum zone above the diffuser open at the top. The exhaust gases coming from the mine are carried away by this rarefaction, come out and are picked up by the wind - the ejection principle works.
The table below shows the characteristics of typical TsAGI deflectors - dimensions, performance depending on the wind flow speed.
Comment. Capacity does not include the resistance of the duct system crossing the roof. The actual exhaust volume depends on the height of the pipe and the temperature difference between the indoor/outdoor air.
Of all the static traction amplifiers, the TsAGI cap is recognized as the most effective, despite the venerable age of development. Design advantages:
- ease of manufacture and installation;
- maximum protection against rain and snow, and traction overturning;
- reliability, no rotating parts;
- the direction of wind flows does not matter;
- lowest resistance coefficient (ξ = 0.6).
The disadvantage of the deflector is its dependence on wind speed. If the flows move slower than 2 m/s, the efficiency of the device tends to zero. However, calm weather has a negative impact on the operation of any attachment designed to enhance natural draft in the ventilation duct.
The hood works thanks to wind support - a vacuum appears above the cut of the air duct
Please note: in modern versions of TsAGI factory-made, insulation of the lower glass is provided if the cap is attached to the roof sandwich pipe. Under the “fungus” we see a skirt, although the flow area of the channel does not decrease.
Volper Static Umbrella
This deflector is more of a windproof device than an amplifier of natural draft. Although the nozzle successfully compensates for pressure losses at the flow outlet. The design includes the following elements:
- lower pipe (glass);
- upper cylindrical glass with concave walls;
- cone umbrella;
- connecting strips.
The hood is installed on a round air duct or a rectangular shaft through an adapter. How the Volper ventilation deflector works:
- Direct wind flows are reflected up and down by the concave surface of the upper shell.
- The jet passing between the umbrella and the cut of the glass creates an area of low pressure inside the body.
- The exhaust air changes direction and flows out through the gap under the “skirt”.
The nozzle is inferior to the TsAGI design in efficiency, but better protects the air duct from gusts of wind. Making a curved glass is more difficult, so home craftsmen simply make a cone. To increase productivity, a similar plate in mirror image is placed under the umbrella, as shown in the video:
H-shaped nozzle
This original design is a pipe assembly in the shape of the Russian letter “H”, the hood is connected to the middle of an imaginary crossbar. From whatever direction the wind blows into the open pipes - from above or from below - the faster flow will eject (carry along with it) an air stream from the ventilation riser.
The advantage of the H-shaped deflector is almost one hundred percent protection against wind blowing, reverse draft, moisture ingress and freezing. These advantages are crossed out by no less significant disadvantages:
- Problems with aerodynamics - to go outside, the air travels through 2 90° turns. The losses are compensated by the wind flow, but the traction force increases minimally. Hence the low performance of the exhaust nozzle.
- The device is quite bulky, making it difficult to attach to the pipe.
- The H-deflector doesn't look very nice. Imagine a situation where 2-3 ventilation ducts with similar caps are installed on the roof.
The cap provides maximum protection from the draft being blown out and overturning, but it itself creates considerable resistance to escaping gases
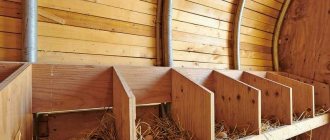
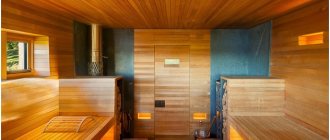
Addition. We missed one advantage of the nozzle - it is easy to assemble it with your own hands from ready-made tees. The product can be used for ventilation of ancillary buildings, for example, a bathhouse or a warm barn.
Turbo deflectors and weather vanes
We have combined these 2 types of attachments into one section due to the similarity of the operating principle:
- A spherical rotary deflector with multiple semicircular blades is rotated by the force of the wind. A vacuum is formed above the head of the pipe (inside the ball), and the efficiency of the hood increases.
- The weather vane with the wing always turns its “back” to the wind, preventing it from being blown into the trunk. A zone of low pressure (aerodynamic shadow) is formed behind the nozzle body; the air stream leaves the vertical channel more readily.
Advantages and disadvantages
Like any other product, the TsAGI deflector has its pros and cons. The feasibility of using the product is determined by their ratio. The advantages of the device include:
- reliable protection against foreign objects, birds and atmospheric influences getting inside ventilation ducts and chimneys;
- a significant increase in the service life of the head of ventilation ducts or chimneys. This is due to the fact that the presence of a deflector slows down the process of destruction of the upper part of the air duct caused by adverse atmospheric influences;
- prevention of reverse draft even with a large cross-section of ventilation lines and ventilation ducts;
- possibility of self-production. Thanks to its simple design and the use of available materials, a TsAGI type deflector can be made with your own hands. This does not require special tools or experience as a tinsmith.
A significant drawback is that in completely calm or weak wind conditions, such deflectors can create resistance to natural draft. In addition, if the ambient temperature drops significantly, the outer cylinder may freeze, which can lead to partial or complete blockage of the air ducts.
Calculation and drawings
Before purchasing a factory deflector or starting to manufacture the device yourself, you need to carry out an aerodynamic calculation and familiarize yourself with the drawings of existing devices.
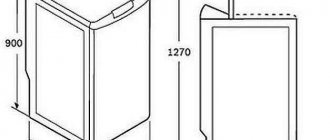
The main criterion when creating a deflector drawing is the internal diameter of the duct (D). The figure shows the dimensions of the structural elements.
TsAGI deflector dimensions
- diameter of the upper base of the diffuser – 1.18-1.26D;
- outer char diameter – 1.8-2D;
- outer ring height – 1-1.2D;
- distance from the ring to the base of the diffuser – 0.4-0.5D;
- height – 1.4-1.7D;
- diameter of the cap is 1.3-1.5D.
When making a deflector yourself, it is advisable to follow the SNiP recommendations given in the table.
| Deflector No. | Diameter of the lower base of the diffuser, mm | Diameter of the upper base of the diffuser, mm | Outer cylinder diameter, mm | Diameter of the lower base of the cone, mm | total height of the deflector, mm | Diffuser height, mm | Cone height, mm | Cylinder height, mm |
| 3 | 265 | 380 | 600 | 510 | 510 | 295 | 90 | 360 |
| 4 | 375 | 504 | 800 | 680 | 680 | 400 | 120 | 480 |
| 5 | 495 | 630 | 1000 | 850 | 850 | 500 | 150 | 600 |
| 6 | 595 | 736 | 1200 | 1020 | 1020 | 600 | 180 | 720 |
| 7 | 660 | 882 | 1400 | 1190 | 1190 | 700 | 210 | 840 |
| 8 | 775 | 1008 | 1600 | 1360 | 1360 | 800 | 240 | 960 |
| 9 | 885 | 1134 | 1800 | 1530 | 1530 | 900 | 270 | 1080 |
| 10 | 1025 | 1260 | 2000 | 1700 | 1700 | 1000 | 300 | 1200 |
How to make a TsAGI deflector for a chimney pipe with your own hands
The process of developing and assembling a deflector for a chimney consists of four stages: drawing, creation of blanks, assembly, installation of the structure and its fastening directly to the chimney.
Required Tools
You will definitely need:
- a sheet of thick paper for drawing and layout;
- marker for marking;
- riveter for connecting structural elements;
- metal scissors for cutting out parts;
- drill;
- hammer.
Don’t forget about the necessary tools before installing the deflector
Development of a drawing of a TsAGI deflector model
There is an algorithm for how to make a deflector for a chimney pipe with your own hands. It is recommended to perform the first stage on paper. First you need to calculate the dimensions of the diameter of the nozzle and the upper cap of the structure, and also calculate the height of the reflector.
For this, special formulas are used:
- diameter of the upper part of the deflector - 1.25d;
- outer ring diameter - 2d;
- height of the structure - 2d+d/2;
- ring height – 1.2d;
- diameter of the cap - 1.7d;
- the distance from the base to the edge of the outer casing is d/2.
Where d is the diameter of the chimney.
To make the task easier, a table containing ready-made calculations for standard sizes of metal pipes will help.
| Chimney pipe diameter, cm | Outer casing diameter, cm | Height of outer casing, cm | Diffuser outlet diameter, cm | Cap diameter, cm | Installation height of the outer casing, cm |
| 100 | 20.0 | 12.0 | 12.5 | 17.0…19.0 | 5.0 |
| 125 | 25.0 | 15.0 | 15.7 | 21.2…23.8 | 6.3 |
| 160 | 32.0 | 19.2 | 20.0 | 27.2…30.4 | 8.0 |
| 20.0 | 40.0 | 24.0 | 25.0 | 34.0…38.0 | 10.0 |
| 25.0 | 50.0 | 30.0 | 31.3 | 42.5…47.5 | 12.5 |
| 31.5 | 63.0 | 37.8 | 39.4 | 53.6–59.9 | 15.8 |
If the chimney has a non-standard width, then all calculations will have to be done independently. But, knowing the formulas, it is easy to measure the diameter of the pipe and determine all the necessary indicators to use them when drawing up drawings.
When the patterns are made, it is recommended to first assemble a paper prototype of the future reflector. Even if you are an experienced craftsman and are sure that you can design a deflector for a stove chimney with your own hands without any problems, you should not skip this stage, since it will help you identify possible errors and shortcomings, and correct the calculations or drawing. Only after creating the correct paper layout, which confirms that the deflector diagram is accurate, can you move on to the next stage.
Step-by-step instruction
There is an order of work that must be followed, otherwise you will not be able to connect the individual parts of the chimney deflector yourself with your own hands.
The procedure is as follows:
- Using paper blanks, transfer the template to the surface of the metal from which you plan to make the reflector. Carefully trace the outlines of the paper parts. You can use a permanent marker, special chalk, or even a simple pencil for this purpose.
- Using metal scissors, cut out the blanks of the necessary structural parts.
- Along the entire contour of the cuts, the metal must be bent by 5 mm and carefully passed with a hammer.
- Roll the workpiece into a cylinder shape, drill holes for fasteners so that you can connect the structure with rivets. Welding is permitted, but not arc welding. You need to be careful not to burn the metal. Choose the distance between the main fastening points from 2 to 6 cm, it varies depending on the size of the finished structure. The outer cylinder is rolled up and fastened in the same way.
- By bending and connecting the edges, make the remaining parts: an umbrella and a protective cap in the form of a cone.
- You need to cut fastening elements from a galvanized sheet - 3-4 strips: width 6 cm, length - up to 20 cm. Bend them along the entire perimeter on both sides and go over them with a hammer. From the inside of the umbrella, you need to drill mounting holes, stepping back from the edge by 5 cm. 3 points will be enough. After this, secure the metal strips to the cap with rivets. Then they must be bent at an angle of 90 degrees.
- Connect the diffuser and cone using rivets to the inlet pipe. Having made a deflector for a round pipe with your own hands, you can begin installing it.
A Volper chimney deflector can be created using a similar method. Its design is very similar to the TsAGI model, but there are some differences in the upper part. They are also made of stainless steel, galvanized or copper.
Making a TsAGI deflector with your own hands
Considering the relative simplicity of the product design and the availability of galvanized steel sheets, many owners of private houses have a desire to make a TsAGI deflector themselves. This task is quite within the capabilities of any home craftsman; it is enough to have a set of the most common tools and minimal practical skills in sheet metal processing.
What you need
To make a full-fledged deflector at home you will need:
- sheet metal 0.5-0.7 mm;
- Whatman paper or thick cardboard for making templates;
- marker;
- ruler;
- compass;
- scriber;
- pliers;
- two types of scissors: regular and for metal;
- electric drill or screwdriver;
- drills with a diameter of 2 to 2.5 mm;
- special tool for installing rivets.
Design work
First of all, you should measure the diameter of the air duct and obtain the value D necessary for further development of the design. Next, based on the above relationships, draw up drawings of the TsAGI deflector corresponding to the existing diameter of the air duct.
Since the dimensions of the main structural elements remain unchanged for a specific diameter of the chimney or ventilation pipe, for ease of calculation these values are given in the table.
| Diameter Air duct, mm | Diameter Outer ring, mm | Height of outer ring with cap, mm | Diffuser outlet diameter, mm | Umbrella diameter, mm | Mounting height of outer ring, mm |
| 110 | 210 | 130 | 135 | 170-190 | 50 |
| 125 | 250 | 150 | 157 | 215-240 | 65 |
| 160 | 320 | 195 | 200 | 270-305 | 80 |
| 200 | 400 | 240 | 250 | 345-385 | 100 |
| 260 | 510 | 310 | 315 | 425-475 | 125 |
| 315 | 630 | 380 | 395 | 535-600 | 160 |
The drawing up of drawings must be approached with all responsibility, since the efficiency of the deflector will depend on their accuracy.
Preparing templates
When making templates, you will have to remember a short course in geometry. The most difficult thing to make is a diffuser pattern, which is a development of a straight truncated cone. Below is the methodology for its construction.
The cap pattern is nothing more than a development of a cone with an upper base with a diameter of 1.18-1.26D and a lower base corresponding to the diameter of the air duct D.
The length of the generatrix can be determined using the Pythagorean theorem. Here the hypotenuse is the desired length of the generatrix, and the legs are the radius of the base, equal to 0.65-0.75D, and the height of the cap, which is equal to 0.24D.
Developments of cylindrical parts are rectangles, the length of which is equal to the circumference, and the width is determined from the above ratios.
Important! When constructing templates, it is necessary to take into account the amount of margin required for fastening the reamers. Usually it is 15-20 mm.
Assembly sequence
From ready-made cardboard templates, using paper clips or another method, a layout is assembled on a scale of 1:1 and the coincidence of its geometric parameters with the specified values is checked. Making a mock-up of the TsAGI deflector completely eliminates the occurrence of inconsistencies during the assembly process.
Product assembly consists of several successive stages.
- The patterns are placed on a metal sheet and traced along the contour with a marker or felt-tip pen.
- Using metal scissors, individual pieces are cut.
- Using pliers, the outer edges are bent to a width of 3-5 mm and tapped tightly with a hammer. This will provide the structural elements with additional rigidity.
- The cut blanks of the outer shell and the input cylinder are given the appropriate shape, so that the overlap is 20-25 mm. After this, holes with a diameter of 2-2.5 mm are drilled in the center of the lining, into which rivets are installed. The distance between the rivets depends on the overall dimensions of the product and can range from 20 to 50 mm. If the necessary tools are not available, the rivets can be replaced with screws of the appropriate diameter. The top hood and diffuser are made using the same technology.
- The next step is the manufacture of connecting brackets. The design provides for the presence of 3 fasteners, but to increase rigidity you can increase their number to four. The bracket blank is a strip, the width of which is 30-35 mm, and the length is 200-300 mm. A 5mm hem is made along the entire length of the workpiece on both sides and tapped tightly with a hammer.
- The brackets are attached to the cone using rivets or screws at a distance of 45-50 mm from its outer edge.
- After this, the strips are folded back and the conical cap is connected to the diffuser.
- Bracket blanks are attached to the conical cap and bent at the desired angle.
- The umbrella with attached brackets is connected to the diffuser using rivets or screws.
- The resulting structure is fixed in the outer shell taking into account the dimensions shown in the drawing. After this, the deflector assembly can be considered complete.
Making your own deflector
Considering the considerable prices for factory-made devices, you can try to make a ventilation deflector with your own hands, with some effort. It turns out that if you make a collet deflector with your own hands, you can save up to $40! You just need to purchase a sheet of galvanized steel, have the necessary tools, some materials and desire. Self-production of a chimney deflector device involves the use of: a ruler, tape measure, drawing set, marker, mallet, metal scissors, drill, drills, drill-tip screws or rivet gun, 15 mm press washers. You will also need a sheet of metal (galvanized, stainless steel, etc.) For fastening you will need to use available metal - aluminum, studs, etc.
Which is better, a TsAGI deflector or a turbo deflector?
Compared to TsAGI, rotary deflectors provide greater thrust even with the same dimensions. Another advantage of the turbo deflector is its high efficiency.
With the same dimensions of the outlet pipe, the dimensions of the TsAGI deflector are significantly larger than the dimensions of the rotating devices. With an air duct diameter of 100 to 150 mm, the operating efficiency of both devices is approximately the same, however, when the passage increases to 200 mm or more, the size ratio changes sharply in favor of turbo deflectors. They have less mass and are several times more compact.
The large weight and dimensions of the deflectors significantly complicate installation work with an air duct diameter starting from 600 mm. In comparison, a rotating device for a 600 mm diameter ventilation duct is between 12 and 15 kg and can easily be installed by one person. A deflector for the same duct will weigh about 40 kg, and two people will be required to install it.
Despite the above advantages of rotary devices, TsAGI deflectors have become more widespread. This is due to the affordable cost of the products and simplicity of design. In addition, such devices are often manufactured independently, which saves significant money.
TsAGI deflectors are widely used in both industrial and civil construction. The design developed at the Central Aerohydrodynamic Institute has proven itself over many years as an effective and easy-to-use device. In addition, many owners of private houses make such deflectors themselves. With correct calculations and careful execution of work, the quality of homemade ventilation devices is not inferior to factory-made analogues.