The steaming process itself is constructed as follows: the hot stones are occasionally poured with water, after which the hot air rushes upward. Slowly cooling, the steam sinks lower, giving the steam room the proper atmosphere.
Due to the increased humidity of the steam room, the movement of air masses slows down significantly, which is why in the process of arranging shelves in the bathhouse with your own hands, you should pay attention to the following nuances:
- There should be a fairly large distance between the boards of the shelves;
- It is not recommended to sew up the side parts of the walls, as this will complicate the process of cleaning the floors;
- The seats should be tilted so that the water drains freely;
- There should be a gap between the shelves and the wall.
Installing shelves in a bathhouse with your own hands is a rather important and responsible process, the correct execution of which determines the future convenience of using the steam room. To make a shelf in a bathhouse with your own hands, there are certain rules and requirements that must be followed for the sake of your own safety.
In addition, it is worth remembering that the shelves in a Russian bath must withstand the rather harsh atmosphere of the steam room. To do this, you need to very carefully select materials for them. You should not give preference to coniferous trees, as they emit a large amount of resins; it is best to choose one of the hardwoods.
Types and design in the steam room
A simple bathhouse shelf consists of two elements:
- seat;
- Support bars in the form of thick racks. They are made of two beams installed along the width of the shelves. They are connected with jumpers every 50 cm.
Important! Pay attention to the fasteners of all structural elements, since open use of screws and nails is not allowed due to the risk of burns.
Over the years, the shelves in the bathhouse and their designs have changed. Today, there are several options for designing shelves in a bathhouse:
- Letter "G". With this placement option, the shelves are placed on two adjacent partitions in the bathhouse;
- Coupe. The most suitable planning method for baths of a small area, since in this case the bath benches are placed one above the other;
- Steps. Thus, you can place shelves in a steam room with your own hands if the room itself is spacious enough;
- Complex design of a shelf in a bathhouse. With this arrangement of shelves in a sauna or bathhouse, it is possible to install a retractable mechanism for the lower bench or a folding mechanism for the upper one.
Bathhouse with floors: advantages and disadvantages
The main advantage of a bathhouse with floors is the space saving. If we compare a regular bathhouse with a bathhouse, taking into account the fact that they have the same dimensions, the second one will have a larger capacity.
An important advantage of the building is its efficiency. It is cheaper to build a bathhouse with floors than, for example, with an attic, and even more so with two floors; in addition, the work will take less time.
Originality can also be highlighted as a separate advantage. In our country, such a building can be seen rarely; it looks unusual and interesting. In addition, such a layout gives room for imagination; with it it is easy to create a cozy interior in the relaxation room.
An inexpensive bathhouse with beds is a good option for those who need to have a sleeping place in the bathhouse, while at their disposal a small area and a very limited budget.
If you want to get rid of the floors, then just finish the ceiling in the rest room, and you will have a bathhouse with a full-fledged attic.
Despite the abundance of advantages, a bathhouse with sheets also has disadvantages. In particular, you need to understand that the floor will be a small room with an uneven roof and most often its height will be less than a person’s height, i.e. it is not a full-fledged room. For this reason, in terms of convenience, a bathhouse with floors is inferior to a bathhouse with an attic or a two-story building.
We recommend reading:
Do-it-yourself sauna made of timber: where to start?
In addition, the room and the room above the floors do not have a wall, so there is no sound insulation. If, for example, in a bathhouse with several bedrooms, someone can calmly go to sleep in another room while the rest continue to relax in the rest room, then it will be difficult to sleep in the bathhouse.
The steam room and washing room are rooms characterized by high levels of humidity, so it is important to think carefully about ventilation. But even with good ventilation, the floors will always be warmer than below, because warm air accumulates under the roof.
How to do it right: layout and location
It is necessary to install shelves in the bath along those walls on which there are no windows, in two or three tiers.
Information. It is best to arrange ready-made shelves for a bathhouse in the form of steps, since the air temperature rises closer to the ceiling, and with this arrangement, each visitor to the bathhouse will be able to choose the optimal temperature regime for themselves.
As mentioned earlier, there are several ways to arrange bath shelves, let’s summarize:
- You can place them along one of the walls in several tiers;
- You can arrange two structures along two supporting walls, creating the appearance of a railway compartment;
- You can even design the shelves in the letter “G” in several tiers, combining two design methods;
- There is also an option for this arrangement: place the upper and lower shelves along one wall, and the middle one along the other, parallel to it. Looks great in medium-sized baths.
One of the main rules is to install shelves in a bathhouse on walls without windows. The fact is that the constant movement of steam can simply crack the glass.
That is why owners of a steam room with windows have little choice in layout.
Types of shelves and their purpose
At one time, we talked in detail about such an important accessory for a bath interior as a bath hanger. It also helps in organizing the bath space, but mostly takes on bulky items, such as outerwear, towels, and bathrobes. Sometimes hangers are equipped with a shelf for storing hats and bath caps. And this is already close to our topic today.
Wall shelves
Bath wall shelves are perhaps the most common and familiar item to many. They represent a horizontal platform, which is fixed to the wall by means of hanging elements, commonly called ears or support brackets.
Important! Let us immediately note that the load-bearing capacity of a system with brackets is higher, since it more evenly distributes and accepts both its own weight and the weight of the payload.
A wall shelf for a bathhouse can be single or multi-level, and it is quite obvious that the greater the number of elements in the system, the more reliable its fastening should be.
Floor systems can also be multi-level, that is, the main load distribution occurs not on the adjacent vertical wall, but on the underlying horizontal surface - the floor, but this is already a shelf, and it can be classified rather conditionally as a shelf.
Wall shelves can be very long and occupy almost the entire length of the wall. This solution, of course, has enormous capacity in terms of capacity, but is more the province of garages and sheds than bathhouses. Although, if your home sauna is equipped with a technical room, then why not use its full potential and place not only your own annual supply of brooms on large areas, but also take your neighbor’s for safekeeping.
Corner shelves
Many bathhouse practitioners have never learned to make good use of the space in the corners. Although, there are a lot of opportunities for this, starting from corner baths and ending with the mentioned shelves. What are the benefits of corner structures:
- The internal space of the bathhouse is used rationally, which is especially important for small room sizes;
- They have a higher load-bearing capacity, since they are fixed on both walls adjacent to each other;
- Such a system can be successfully played out in an interesting interior way; it leaves more opportunities for free creativity and flight of thought;
- Finally, the most important thing is that the corner design does not take up space on the main length of the wall, but it can be occupied by window and door openings, kitchen corners, bar counters and other things.
Combined designs
Some intermediate position, which may include the main features of a corner shelf and a wall shelf, have supports similar to a shelf, can be equipped with hooks and, as a result, be similar to a bath hanger. In general, this is the widest and most universal type, in our understanding; however, it is unlikely that you will be able to make such shelves in a bathhouse with your own hands in one evening - after all, the design is far from primitive.
Basic Rules
It is best to purchase ready-made shelves for a bathhouse in the store, but here you can encounter a serious problem, since it can be quite difficult to find a structure of a suitable size.
When arranging shelves in a bathhouse with your own hands, you should remember the following:
- You need to use only high-quality materials. There should be no roughness on the surface of the bath seats;
- The number of supports depends on the width of the board;
- The shelf in the bathhouse must be fastened in such a way that the metal fasteners are hidden in order to avoid possible burns;
- In order to make the support of the frame for the shelf in the bathhouse more stable, it should be tied with boards both above and below;
- Do not forget that the volume and shape of equipped benches should be suitable for people of any size;
- The most important thing is the reliability of the design, since without it there is a risk of injury;
- Rubber pads must be attached to the bottom surface of all steps and legs;
- A gap of 10–12 cm should be left between the shelves and the walls of the steam room. This will ensure unhindered air flow;
- The thickness of the board for constructing the frame should be four times less than its width in order to speed up the drying process of the wood.
Dimensions and diagrams
What shelves should be made in the bathhouse in terms of length and width? It is believed that the upper shelves, for lying on, should be slightly wider than the lower ones - on which they usually sit. And if in numbers, then for the first tier 30-40 cm is enough, and for the top - from 60 cm. It is more comfortable when the shelf is wide, 80-90 cm - especially if there are large, tall people in the family. The length should be at least 180 cm, and preferably 200 cm, so that a tall person can lie down with his arms stretched out in front of him.
Nagoa
Shelves - I have 75, I would like a little more, but it doesn’t work out, so 85 cm is excellent
But before you make shelves in the bathhouse, you should take the time to draw. You can use programs that are easy to download online and download for free, but often a piece of paper, a pencil and a ruler are enough. The steam room room is depicted, the dimensions (ceiling, floor, etc.), the location of the shelves and the sizes of the elements are indicated on the required scale - not forgetting the height of a person standing and sitting. A sketch usually helps to see how to make a corner shelf in a bathhouse, placing benches most conveniently, and whether the “compartment” location makes sense. It is important to think about where the stove will be located.
Avtomir
Then the passage will be narrow, the canopy is, for example, 90 cm, the bench is at least 30-40, if there is another 15-20 cm along the stove, there is only 50 cm left for the passage! not enough. If we are still talking about the bench to the right of the entrance, then it is there, I just didn’t draw it). There will be a supply of hot and cold water. Somehow I didn’t even think about the “danger” of the masonry; the only thing that bothered me about the entire stove was the sheet of metal, how not to touch it.
Step-by-step instructions and manufacturing stages
It is quite possible to make sauna shelves with your own hands if you follow a simple sequence of actions.
The most important thing is to pay due attention to the quality of materials, the reliability of fastenings, as well as the surface treatment of the benches.
Frame
The first stage involves installing the racks.
They ensure the reliability of the finished structure of the sun lounger.
For the top row, they usually use from four to six racks with a length of one meter and a cross-section of 1 cm (more precisely, you need to calculate based on the length of the beds).
You can fasten the racks to each other using wooden blocks, which are located along the entire perimeter of the bed. In order to securely fasten the racks to the wall, you should use the longest dowel screws.
Important! To arrange the racks of the upper shelf, you can use unpolished timber, the main thing is to make sure that there are no chips or cracks on it.
Bearing beam
After the racks are securely fastened, you can focus on arranging the directly supporting structure of the shelves in the bathhouse.
This is a very important step, since this design supports not only the weight of the people who will be on top, but also the weight of the shelf itself.
That is why the cross-section of the supporting beam must be at least 5x10 cm.
The top row of this design is installed across the length of the upper plane of the bed. The width of the step depends on the thickness of the boards used to arrange the shelf.
Attention! The thinner the top boards of the bath seat, the smaller the step between the supporting beams.
In order to ensure that all visitors to the bathhouse are comfortable enough, the width of the top shelf should be made at least 60 cm, optimally 90 cm.
Front surface
After the load-bearing structural elements are completely ready, you need to take care of the upper bed. The boards for it must be prepared in advance, that is, carefully sanded and processed.
The optimal thickness of boards for arranging the surface of a shelf is from three to six centimeters. They should be attached at a distance of 1-2 cm from each other. This is done to ensure unhindered circulation of steam and moisture.
Next, we’ll find out how to attach the shelves in the bathhouse to the frame. To ensure your own safety, it is recommended to use wooden wedges. They need to be inserted into holes previously prepared for them.
You can fasten the boards both along and across the sunbed. The second option is more economical, since in this case the installation of additional support bars is not required.
Important! Under no circumstances should you leave the caps of metal fasteners on the surface of the shelf, as this can cause burns.
In order to avoid danger, metal elements are driven 5-10 mm deep into the board.
Lower tier
The shelf located on the lower level must be installed at least 30 cm from the floor level.
This rule applies to those cases when the lower seat plays not only the role of a step for the bath attendant, but also the role of a sun lounger.
In order to install the lower shelf, you need to attach four wooden blocks to the posts of the upper deck. This quadrangle acts as a frame for a shelf in a bathhouse.
Next, the boards for the surface of the bench are attached using the technology described in the third stage.
Processing, impregnation
It's no secret that under constant exposure to high temperature and humidity, wooden elements in a bathhouse deteriorate very quickly. It is for this purpose that the final stage in finishing the shelves in the steam room is the treatment of all structural elements made of wood with special substances.
Information. To treat the shelves in a bathhouse with your own hands, you should use only environmentally friendly substances so as not to risk your life and health.
Regular flaxseed oil is considered an excellent protective agent against fungi and mold, which is why it has been used for many years to treat sauna shelves.
To treat the shelves in a Russian bathhouse with your own hands, use a solution of turpentine and beeswax.
Protective substances should be applied in at least two layers, but it is worth remembering that it takes about eight hours to dry one layer.
After complete drying, the bath shelves acquire a matte shine and a water-repellent surface.
To see this, look at the photo below. The wooden element on the left was treated with special protective substances, but not on the right. Therefore, it is always better to take care of protecting the shelf in the bathhouse with your own wooden hands.
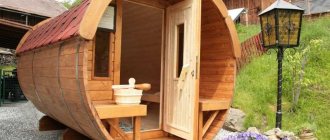
How we made shelves in the steam room
The construction of my bathhouse began with a sketch that set the layout of the premises and the steam room as well. The photo shows that the steam room is rectangular, the stove is located in the corner. Initially it was assumed that the shelves would be two rows, but as construction progressed, the question of what they would be like was decided to be postponed until the completion of the main finishing work. The only thing that was determined at this stage was that exclusively linden would be used for finishing.
1
After some time, the finishing of the walls was completed, the room became clear and it was time to install the shelves.
What goals do we pursue?
Of course, the first two main tasks are maximum area and convenient location during bath procedures, and of course the ability to quickly clean without unnecessary labor costs.
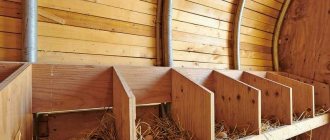
Taking into account the kind of room we ended up with (photo 1), there were three layout options:
1) Bench in front of the stove (left) and the second row along the wall (right).
2) A bench near the stove (at the end of the steam room) and two-level shelves in the shape of an G.
3) A simple design of two levels along the wall.
The third option was ultimately recognized as the most correct.
We simply checked: we lay down with my wife on the floor, between the stove and the wall, and made sure that the two levels would be comfortable in width. Then they lay down along the wall and made sure that there was enough space for two fairly tall people to lie comfortably at the same time on the upper level.
Determining the size and location
Having settled on this option, we began to estimate the width of the shelves. To do this, we drew lines on the floor with chalk, along which a 50x50 mm block was placed, to understand what could interfere with a comfortable “lying down.”
It turned out that with this configuration, the width of each shelf of 70 cm is more than enough (during installation, we managed to make the top shelf 78 cm).
Then we did the following.
Before we bought material for the shelves, we heated the bathhouse. They heated well, sparing no wood. The temperature was brought to 120 degrees. And with the stool we walked around the steam room, moving it to different places.
The thermometer gave readings in different areas of this room, and subjective sensations gave an understanding of where it was not comfortable. The most comfortable place was the middle of the steam room, approximately at a height of 1 meter 10 cm. The upper part was outlined there. The height of the top shelf above the bottom was 65 centimeters. From the bottom to the floor - 45 cm. Please note! Everyone convinced us that this was wrong. But practice has shown that we were right, which I will discuss below.
Having decided on the height and width, we had already ordered and purchased the materials, when the foreman who was finishing the steam room asked an innocent question: “And the children, will they steam?”
At this moment the shelves looked like this.
2
In general, they threw boards, they would have done it anyway (the picture shows that the transverse bars are on top, this is just the result of clarifying the height, since they made a little mistake). And then it turned out that if a child sat on the bottom shelf, he would inevitably get kicked in the head by the rising adult who was lying above.
Having considered these considerations, we made a small addition, and as a result the shelves began to look a little different.
3
By the way, the length of this short, children’s shelf is 120 cm. And it is located in the “coolest” zone of the steam room, even if it is well tossed and adults are waving brooms. Children, unfortunately, can’t stand it for long at the top; it’s better not to let them there.
Retractable
Arranging a retractable shelf can significantly increase the free space in the steam room. If necessary, it can be pulled out or pushed back in order to free up the passage.
The pull-out shelf can also accommodate water containers, bath accessories and accessories.
When installing a shelf in a bathhouse, the first step is to place the bars on the end walls of the room. Next, in order to secure the axle, you need to connect one end of it to a block on the wall, and the other to the end of the deck chair. After this, the levers are mounted. Their role is played by small wooden strips that are placed on the axle.
Important! In order for the retractable mechanism to operate more smoothly and freely, cuts should be made on the upper corners of these slats.
The thickness of the bars, as well as the end elements, must be the same.
To make the operation of this mechanism more clear, imagine a sliding sofa. So, this shelf operates on the same principle, so during the installation process you can rely on a long-familiar scheme.
With this arrangement of shelves in a log bathhouse, it can be extended to almost any distance, and the lounger itself rests on wooden legs.
You can also arrange backrests for a shelf in the bathhouse. To do this, you usually take three boards, which are placed on vertical posts made of polished timber.
Information. Thanks to the equipped backrest, sitting in the steam room is much more comfortable and safer, because the risk of burns from the walls of the room is eliminated. The material for the back is the same as for the shelves.
It is worth leaving gaps between the boards to ensure unobstructed ventilation.
Selection of materials for manufacturing
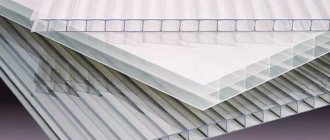
When choosing a material to make shelves in a bathhouse with your own hands, you should immediately forget about metal, plastic, glass and other modern options. Only wood is used, and the requirements for it are quite stringent:
- low thermal conductivity;
- high resistance to the destructive effects of moisture and heat;
- uniform and high density;
- no pungent odor or resin content.
As can be seen from the table below, coniferous wood (cedar, larch, fir, spruce) is quite small - but the high resin content makes them unsuitable for use in a steam room. If you want to enjoy the aroma of cedar or larch boards, they can be used to decorate a relaxation room; in a steam room it is better to use linden shelves for a bath.
The density of wood is usually determined at normal humidity; at elevated humidity it increases, thereby changing thermal conductivity. However, on average, when choosing a material, you can rely on the data in the table.
We invite you to familiarize yourself with: Roofing technology made of flexible tiles
According to aggregate data - the absence of resins, low thermal conductivity and relatively high density - three “budget” wood options are usually chosen: linden, aspen, alder. The fourth option, African oak (abashi or abash), with other higher parameters, is disappointing with its high price, twice as expensive as linden.
On sale are usually prepared boards for shelves in a bathhouse, already sanded, with rounded corners. Its width is convenient for installing a set-up bed of any width; the length is selected as a multiple of the full length of the bed or its half. When planning to cut boards yourself in order to make a bathhouse shelf with your own hands, you should remember the need for careful processing. To prevent warping and cracking, we take into account: the width of the board should not exceed four times its thickness.
Mandatory rounding of edges and corners, sanding until smooth will help avoid damage during operation and extend the life of the lumber.
Processing of boards (beams) to create a bathhouse environment is not limited to mechanical processing. It is more important to protect the wood from moisture with a special impregnation. The usual options - drying oil, primers, varnishes, paints - are excluded. The reason is that when heated, the substances begin to emit harmful fumes and unpleasant odors. The lack of constantly running ventilation in the bathhouse and high humidity, combined with high temperature, create a risk of intoxication of the body.
To avoid problems, bath shelves are treated with natural non-toxic impregnations:
- acrylic varnish on a natural basis, designed specifically for baths and saunas. Apply in two or three layers after sanding and washing (drying) the wood surface. Includes antiseptics, available colorless and tinted;
- special impregnations and antiseptics. Depending on the type and capabilities of the manufacturer, they provide a greater or lesser degree of preservation of the wood after processing. They are applied to the prepared surface in two or three layers, have no color, penetrate deeply into the fibers;
- linseed oil, pure or mixed with natural beeswax. Despite the high cost, this composition will protect the tree from rotting, cracking, delamination and swelling as safely as possible for health. Before application, the surface is sanded until smooth; the composition can be applied with a brush, roller or thick cloth (cotton, wool, linen). The proportions of linseed oil and wax are 5:1...2:1, depending on the desired degree of protection. The composition is applied heated to a temperature of 35...45 degrees, this promotes rapid absorption, after application the surface is polished with a thick cloth;
- beeswax, carnauba, special protective waxes with synthetic additives. The method of application and surface preparation are specified by the manufacturer; bee and carnauba are usually used heated to a liquid or semi-liquid state.
The choice of natural impregnations allows you to ensure the necessary durability of the sauna shelves and at the same time create a pleasant atmosphere of natural odors in the steam room.
How to attach
It is very important to prevent direct contact with the metal elements of the shelves in the bathhouse. Answering the question of how to attach shelves in a bathhouse to the frame, here are several possible methods:
- The easiest way is to hammer the caps as deep as possible into the tree;
- The safest and most environmentally friendly, but rather complicated method is fastening with oak wedges. They must be hammered into pre-prepared holes;
- Another simple option is to attach nails or screws to the back of the structure.
Advantages and disadvantages of different types of wood: summary
Let us explain why abasha has no competitors on the market in terms of thermal conductivity. The thing is that it has a rather low density - 390 kg per cubic meter with a humidity of 12%. The same linden weighs on average 490-530 kg per cubic meter, and aspen 450. That is, cheap aspen is closest to expensive abash