Pros and cons of this solution
Before you decide, you need to weigh how profitable it is. First, let's look at the advantages of this type of project.
- The main advantage is comfort for the owners. In this situation, you can easily go to the bathhouse to take a steam bath without getting dressed. It is also possible to simultaneously use the benefits that the bathhouse provides and those that the house provides. This is a relaxation room and an opportunity to sit by the fireplace, for example.
- Bathhouses are usually used for various reasons. This is both an opportunity to wash and a desire to take a steam bath. But there is also a reason of another kind. Staying in it is a powerful preventive and healing tool. The opportunity to go there without much additional time and effort is a powerful incentive to improve your health.
- An important factor is the cost of construction. By doing it inside the house, you can save a lot of money. In this case, it is convenient to use those communications that are already installed in the house. In addition, you can leave a washing room and steam room directly in such a bath; other rooms can be used inside the house itself.
- An important benefit can be saving space on the site. Not everyone has a large enough plot of land where all the buildings the owner needs can be placed. If you need to save money, then a bathhouse built in this way will free up part of the land compared to the option when it could stand alone.
- A free-standing bathhouse is more exposed to high temperatures and humidity than one that is part of a residential building. This means that it can last longer than in the first case.
- Before starting bath procedures, you need to warm up the room. A detached building will require more preparation time. Fuel costs will also be higher.
- The latter circumstance may be considered insufficiently significant, however, it can also bring some benefit. Since the bath room is not used very often, it can be used at other times for storing things or for drying clothes.
Since we know that there is always a downside, let’s see what you have to pay for the advantages listed here.
- The use of combination leads to the fact that now the requirements for compliance with fire safety will be significantly higher.
- During the construction process, it is necessary to obtain approval from permitting authorities, including fire services. Moreover, their requirements for such cases are quite high. If the extension is made unofficially and they find out about it, you can not only pay heavy fines, but also be subject to communications being cut off for violations.
- If the construction is not done correctly, you can get unpleasant consequences inside the house. For example, increased humidity may occur. Due to the increase in the size of the roof and the perimeter of the walls, much more resources will have to be spent on heating them than in the absence of such an extension.
- Some people may not like a bathhouse in the form of an extension from an aesthetic point of view. Firstly, such an extension changes the appearance of the entire house. Secondly, it does not correspond to the traditional, familiar appearance of the bathhouse itself.
After weighing everything carefully, the owner can decide whether or not he wants to undertake such a project.
What is a canopy
According to the online directory, this is a roof that is located on supports, has walls, or is completely open. It can be attached to a common facility, have one rafter system, or be an independent structure. The following materials can cover a wooden frame as a roof:
- Polycarbonate. There are two types - cellular and monolithic. For the roof, it is better to use the first option, since the sheet has stiffening ribs, which increases the strength to loads.
- Metal sheets – ondulin, corrugated sheets, metal tiles. Durable, easy to install, but susceptible to corrosion.
- Flexible materials - rubber or bitumen shingles. For such coverings, the canopy slope must have a significant angle of inclination, otherwise precipitation will linger on the roof and rot over time.
What to make a canopy from
The structure uses hard coniferous timber - pine, cedar. It is important that it is free from any defects - cracking, knots. This is especially important for load-bearing elements - racks, rafter system.
What projects are there?
There are several accommodation options. In some, the decision to combine can be made at the stage of building a house. In this case, it is possible to connect the house with the extension more organically. If an extension is made to an already built housing, then it will have its own characteristics. Usually the extension is placed near the wall where the sanitary facilities (bathroom and toilet) are located. Another possible option is to place the bathhouse in the basement or basement of the building.
Another question that requires attention: which project to use? Speaking in the broadest sense, there are two main options:
- buy a ready-made project;
- contact specialists who will develop a project specifically for this case.
Let's look at the pros and cons of each option. When developing a separate project, of course, it is expected that all the specific features of the planned building will be taken into account. In fact, a lot depends not only on the professionalism, but also on the integrity of the designers. Yes, this is a possible situation. When they take the finished project, they quickly modify it and pass it off as their own. Of course, the disadvantage of the development will be the rather high price.
If we talk about standard options, the price for them will be small. It may turn out that you can find them on the Internet for free. However, there are also pitfalls here. There is no and cannot be an ideal match in different cases. For example, the climate may be different, and this, in turn, dictates its requirements for heating and wall thickness. In addition, the connection to communications may vary. Therefore, such a standard project may be suitable in general, but it will have to be modified in detail. Therefore, there is no clear choice here.
It is important to note that ready-made projects do not provide interior design options. It is also important to note that in the modern construction market, some companies offer turnkey construction. They not only do the design, but also carry out all the construction.
How to lay polycarbonate sheets
With metal roofing materials everything is clear - waterproofing is placed on the sheathing, and the sheets are laid out overlapping. They are fastened with special galvanized bolts to avoid corrosion. With polycarbonate, the situation is more complicated, but not in terms of difficulty, but in the number of actions. So:
That's all. Polycarbonate does not require special care - it is simply washed. Do not use cleaning powders as this may leave scratches on the surface. All you need is a soap solution and water from a hose.
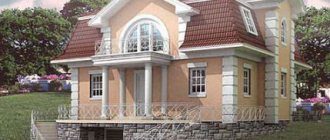
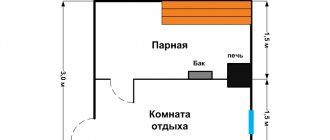
Bathhouse inside the house
The diagram shows what a bathhouse looks like inside a house. As you can see, its design and construction took place during the design and construction of a residential building. It is clear that this is not a separate extension, but an organic part of the house. It is made near the wall where the kitchen, bathroom and toilet are located. On the one hand, this layout makes it easier to connect water. On the other hand, the entry of water vapor into residential premises is minimized. In cold weather, bath rooms must be additionally heated. The proximity of the kitchen will help mitigate this problem. It also provides convenient movement between the bathhouse and the living area.
Preparatory work
Before the planned sheds attached to the house are created, photos of which can be viewed on the website, it is necessary to carry out preparatory work. For this purpose, a suitable area is marked out, and trees are uprooted from it. The clean area is leveled. At the same time, sand and gravel are added.
Some durable sheds require a foundation
Recesses are drilled under the canopy supports. And at this stage it is worth considering laying the cable under the lighting sources. A certain step for placing supports is selected. It depends on the weight of the roof and frame part.
The number and placement of racks must be calculated in advance
The stands are lowered into the prepared pits and filled with concrete mixture. The pillars are set according to level.
Important information! If groundwater is located nearby, then the ends of the pillars need to be additionally waterproofed. Metal supports are pre-treated with a primer.
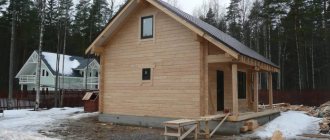
The bathhouse occupies the first floor
In this option, there is a bathhouse and a living room on the ground floor. The bedroom is on the second floor. The house has a swimming pool. Unlike the previous option, a terrace is not provided. There is no rest room; instead there is a large dining room. An important feature of this option is that the bedrooms are not located directly above the bathhouses. This means that the influence of high humidity and strong heating on these rooms is sharply reduced. This, in turn, reduces the requirements for interfloor insulation and vapor barrier.
Advantages of a ready-made canopy
Perhaps self-construction is not the home craftsman’s forte or there is simply no time for it. Then, for the sake of future comfort, you can purchase ready-made designs that are made to order by specialists who take into account all the wishes of the bathhouse owners. Their advantages are as follows:
- This is a constructor. Only the lazy would not be able to assemble the canopy according to the diagram supplied with the components.
- The entire structure is carefully verified - from the cuts under the logs, to the rafter system and strapping.
- The wood is of high quality - you don’t have to worry about load-bearing capacity, as well as load calculations.
- The beauty of factory-made elements is unrivaled - it is, of course, not handmade, but there are no errors either. All wood is processed and brought into presentable condition.
The cost of a finished wooden canopy pays off in comfort.
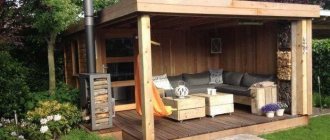
A bathhouse cannot be comfortable if there is no place to relax nearby. This is not always appropriate inside, especially in summer - the high constant temperature inside is not conducive to a pleasant pastime.
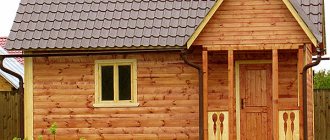
As an extension
This option applies to the situation when the house was built before the bathhouse. It was decided to build it as an extension. This solution can be called quite economical. The dimensions, as can be seen from the above drawing, are three by four meters. At the same time, there are all the necessary bath facilities. This option may be attractive for those owners whose plot is too small to develop well on it.
In this case, the water and electricity supply will need to be made additionally. After all, these communications in the bathhouse will not be part of the common ones. It should also be noted that there is no need to build all four walls for the extension. You can use the wall of the house as one of the walls. To communicate between rooms, you will need to cut out a doorway. The compactness of the structure allows it to be heated separately. At the same time, it will take incomparably less fuel to warm it up than with other layout options.
When building, it is important to pay attention to the depth of the foundation. It should be the same as at home. It is advisable to use the same material as for housing construction. It is best to make it wooden in the steam room. This floor will not slip. Larch boards are suitable for this. Under the floor of the stand you need to equip a hole into which the water will drain. It is located under the floor. You also need to pay attention to ensure that moisture does not get into the lighting fixtures. This is important due to constant high humidity.
Such an economical project is convenient for those who try to spend as little money as possible on building a house. At the same time, a bathhouse made in this way is fully functional.
Veranda to the bathhouse: photos, projects. How to build a veranda for a bathhouse with your own hands?
A sauna with a veranda is a great option for a summer holiday!
Obviously, it is more pleasant to relax between visits to the steam room in nature, enjoying clean air and beautiful scenery, rather than sitting indoors. Of course, the best option is to choose a bathhouse project with a terrace and build them at the same time, but this does not always happen. There are often cases when there is no money for the construction of a veranda at the time of construction of the bathhouse, so you have to install it later, having collected the necessary financial resources. Over time, some people like to expand the total area of the building by installing a veranda or terrace.
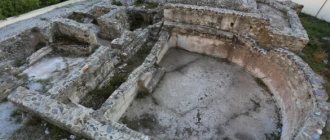
In the basement
Although this option may seem unusual, it has its undeniable advantages.
- It already has a common floor slab with the house.
- Note that in the cold winter it will be much warmer underground than outside.
- You can save a lot during construction. After all, there already actually is a ceiling, walls and floor. If you allocate the entire basement floor for this purpose, you will not have to save every meter of space. In addition, by making an underground building, you can actually save the space that this building would take up if it were built on the surface of the earth.
The difficulties will be that it will be necessary to ensure high-quality ventilation and warm up the underground room. You also need to pay attention to the issues of interfloor thermal insulation and vapor barrier.
It is possible to make a recreation room in the basement. The most common use of this project is to use the premises for your personal needs first and foremost.
Installation
Furnace equipment should be treated with special responsibility.
We will not consider in detail the construction of the entire house, but will only dwell on the most crucial moments.
Therefore, the instructions that follow are not a step-by-step guide, but only concern the nodes that you should pay special attention to:
- Project. We will not tire of repeating that design is one of the most important stages of any construction, especially when it comes to potentially dangerous objects. The combined steam room must be designed together with the house, and a professional civil engineer with qualifications sufficient for such tasks must work on the project;
Without a project - nowhere.
- Foundation. When creating a foundation, you should immediately lay that part of it that will serve as the basis for the furnace. This will greatly simplify the work in the future;
It is better to lay the stove foundation right away.
- Moisture protection. The waterproofing of all components in contact with the steam room and shower area must be increased and multi-level, and all surfaces should be protected: floor, walls and ceiling;
Waterproofing of all components is carried out especially carefully.
- Thermal insulation. If the house does not provide external thermal insulation of the walls, then it will have to be done at least on the walls of the steam room and shower room; in addition, it is better to insulate the steam room completely so that it does not transfer heat to adjacent rooms;
It is better to prevent heat leakage in all directions.
- Ventilation. In addition to natural ventilation of the house, you should equip a system of forced ventilation of the premises, which will completely eliminate the possibility of accumulation of carbon monoxide and other products of fuel combustion;
A forced ventilation system is the best remedy for carbon monoxide accumulation.
- If the walls of the steam room and shower consist of timber, then the lower crowns should be selected very carefully: it is better if they are made of larch or laminated timber, and their treatment with antiseptics, fire retardants and moisture-repellent compounds must be flawless and certified;
The lower crowns should be selected very carefully.
- Flue gas removal. The stove must be equipped with an effective system for removing combustion products of wood or gas. The places where the chimney comes into contact with building structures (walls, ceilings, roofing) must be decorated with special shaped parts that prevent these structures from heating from the bathhouse pipe;
The chimney is mounted using special adapters with thermal protection.
- Furnace equipment must comply with SNiP and GOST standards; it is better if it is built by a professional or purchased in a store.
Important! Despite the fact that the price of the project increases due to additional requirements and safety conditions, heat and waterproofing, ventilation and others, they cannot be neglected - this is extremely dangerous for the house and its residents.
Stage IV. Frame assembly
Now we are installing the pillars of the future canopy. To do this, use the same 50x150 boards. It is better to make jibs at the top and bottom so that they do not interfere with the operation of the building:
Here's how to properly build a shed from a profile pipe: here the ready-made element of the shed roof will be a truss. You will need to cook it from metal on the ground. As a result, you will have an equilateral triangle with a central element that will go from the top of the triangle to the middle of its crossbar. If you remember your school geometry course, this is the altitude of a triangle.
To make the rafters themselves, you will need a profile pipe with a cross-section of 20x20 millimeters, or an iron rod with a diameter of 10 millimeters. For light weights, the second option is more suitable, since it is easier to work with: you will not need to cut at an angle. But for a good canopy it is better to use, of course, a profile pipe.
So, we build a metal shed with a pitched roof step by step, with our own hands:
- Step 1. Making the foundation. For this purpose, we dig holes in the ground a little more than a meter deep, and narrower ones up to one and a half meters. We fill these holes with gravel to a depth of 20 centimeters.
- Step 2. Insert pipes with a cross section of 25x25 millimeters into these holes.
- Step 3. Install supports in the pits, fill them with medium gravel and concrete them.
- Step 4. Next, check the height of the racks - it should correspond to the angle of inclination of the future roof.
- Step 5: Now weld the pipes to the tops and post. Now check and clean all seams. Prime the surface and paint. It is better to use modern anti-corrosion paint for this purpose.
- Step 6. Lift and install the finished firms, and make movable jumpers between the trusses at a distance of 50 centimeters.
In addition, you can visually close such a canopy from the entire other area, but without blank walls, using a pergola:
Stage I. Design
A shed with a pitched roof is the simplest design that even a beginner can handle. Most often, sheds are installed on the north side of the house, which is usually not suitable for anything larger: it is useless to grow anything near it, and because of the falling shadow it will always be cool there.
So, place the corner points of the future canopy directly on the ground. For convenience, use two stakes that are connected to each other by a rail. In total you will need about 10 of these, and they will help you lay out the correct markings for the future canopy.
Now let's move on to choosing the roof slope. Let's clarify that any roof suffers most from these two factors: wind and load from precipitation, and the smaller the angle of inclination of a pitched roof, the less wind affects it, but the steeper the roof, the worse snow and water are retained on it.
In order for water to completely drain from the shed roof, the angle of inclination should be at least 15 degrees. And to do this, cut both edges of the boards at this angle. In general, select the angle of inclination of the shed roof in accordance with the conditions of your region. For such a building, a slope of 15-20 degrees is usually recommended.
Here, for example, is how to build the simplest shed with a pitched roof:
And the same standard roof with a standard slope for such a building.