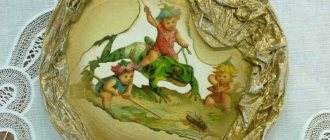
Decorating old furniture in decoupage style is a great way to return your favorite stool to a presentable appearance
Decorating in the decoupage style has become very popular. The technique is a process that allows you to decorate any surface in a relatively short time and for little money. Often, old pieces of furniture that have retained functionality but have lost their appearance are chosen as decoration items. Decoupage stools are a popular way to give old things new life.
Decoupage stools: master class for beginners
The decoupage technique was known back in the 17th century. Then, as now, paper or fabric were used as materials for decoration. Today, three-layer napkins are a popular material for decoupage.
Before you start decorating the furniture, you need to do some preparatory work and put its surface in order.
You can purchase special napkins or cards for decoupage in specialized stores, art stores and online stores.
Over time, stools in the kitchen become unusable. Many people do not like to part with old furniture - it can be convenient to use. Such furniture can be brought back to life. To do this, you need to decide on the materials and style in which the restoration will be carried out. Even a novice craftswoman can make decoupage. But first you need to familiarize yourself with the step-by-step actions.
Master class on decoupage of a wooden stool:
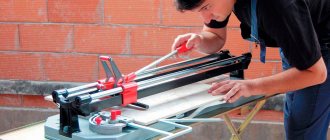
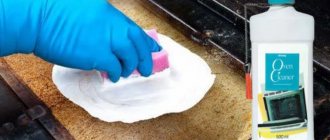
- Clean the surface of the stool from old varnish and paint.
- Sand the surface of the furniture with sandpaper.
- Seal cracks, if any. To do this, you should use putty, which can be bought at any hardware store.
- Cover the stool with acrylic paint - the color should not be too dark.
- Cut out selected images from napkins. Separate the top layer from the two bottom ones. Stick to the surface of the stool.
- Cover the stool with decoupage varnish.
The pasted image can be outlined. One of the options for additional decor could be coating the stool with craquelure varnish. The choice of decor style depends on the overall design of the room in which the furniture will be located.
Instructions for replacing upholstery on chairs
One of the simple and original ways to update a stool with your own hands is to replace the upholstery. There is a large selection of fabrics for this procedure. To carry out the work, you need to prepare all the tools:
- textile;
- scissors;
- hammer;
- knife;
- foam;
- sandpaper;
- screwdriver;
- special stapler.
To completely renew a stool, you need to clean it of the old coating.
Tools for repairing a stool: gloves, a set of rasps, a hacksaw, a ruler.
To do this, you need to unfasten all connecting elements. If the chair already has upholstery, then it must also be removed. All screws and bolts are separated. Craftsmen perform this procedure using a screwdriver and a hammer.
The next step is to free the surface from the old coating. This can be done using sandpaper. Thanks to this work, all gaps and cracks will be removed from the surface.
To replace the upholstery, you need to select a fabric. The material must be dense, wear-resistant and reliable. Therefore, experts recommend purchasing linen, tapestry, thick cotton, velor or artificial leather for these purposes. These materials must be cut according to the prepared pattern with a margin. And if you make a cover out of fabric, it will be convenient to remove and wash.
To the base of the stool you need to attach foam rubber, cut to the size of the seat. You can fix the material using a construction stapler. Then the fabric is stretched over the surface. Attach the product with nails or staples.
Thanks to the described method, craftsmen restore not only the seat, but also the back of the chairs. To do this, you can make a cover from the same fabric. If the stool does not have a back, then it is made from a sheet of plywood. When carrying out this procedure, it should be taken into account that the pattern on the material must match. Thus, the design will be holistic and complete.
You may be interested in: How to make chandeliers and lamps for the kitchen?
Quick do-it-yourself decoupage of stools
The decoupage technique is quite easy. Of course, it requires careful execution at all stages of decoration. But you can make decoupage in just a few hours. The main thing is to decide in advance on the style and appearance of the images.
One of the nice things about this technique is that you don’t have to spend too much - after all, decoupage can be made from available materials
Every housewife can decorate a stool on her own. To do this, it is not necessary to have a specialized decoupage kit.
You can make decoupage using available materials. For example, instead of three-layer napkins, you can use simple photo paper. Images for decoration can be found on the Internet and then printed on a printer. It is important to note that printing is best done on a laser printer - the image will be of higher quality.
Quick decoupage from paper:
- Clean the surface of the stool from old coating and dirt.
- Putty the surface, make it as smooth as possible.
- Prime the stool several times.
- Create a background using acrylic paint.
- Prepare printouts of the image.
- Layer the paper sheet.
- Paste the image on the stool. Smooth out using a brush or roller.
- Cover the stool with varnish.
The decor of the stool can be made in different styles: vintage, Viennese, Provence, maritime, etc. It's interesting to select pictures yourself. On the Internet you can find many images that will allow you to realize the most original ideas.
Make a soft pillow
To make sitting on a stool more pleasant, cover it with felt.
The chair cushion can be crocheted (we took the picture for inspiration from the master lacasadecoto on Etsy).
Or you can sew it, or simply cover the stool with fabric.
Photo source.
Vintage decoupage on a stool
Vintage style stools can be used to decorate a dining room, kitchen or veranda. Old stools or new furniture, for example, purchased from Ikea, are suitable for decoupage. Vintage style involves transferring images from a napkin to the surface of a wooden or plastic chair.
Cracks, scratches, chips - all these moments are characteristic of the now fashionable vintage style in the interior, so your decorated stool will look very impressive
If you are decorating a wooden stool, the first step is to clean it, putty and prime it.
It is better to select a picture for decoupage in advance. You should take into account the style of the room in which the furniture will be located. To make the decor look harmonious, decoupage the stools can be made with wallpaper, the same as on the walls.
How to make vintage decoupage:
- Prepare the surface of the stool.
- Preparation of pictures. Separate the top layer of the image from the two bottom ones.
- Paste the images in the chosen order. Smooth out and remove bubbles.
- Coat the stool with varnish.
You should take into account the quality of the material used to make decoupage. If the decoupage paper is too thick, it should be peeled off. You can skip this step, but then the thick paper will stand out, which sometimes gives the impression of a not very carefully done job. An image that is too protruding can be lightly sanded with sandpaper and then varnished.
Simple decoupage of an old stool
If the room is decorated in Provence style, the stool can be decoupaged in the appropriate style. To do this, you need to decide on the color of acrylic paint that will be used to create the background, and also find suitable images on napkins or print them on photo paper. The design can be simple natural motifs or patterns. If there is a staircase in the room, then you can choose a similar color for the stool - then the staircase will harmoniously combine with the stools.
The simplicity and comfort of the French Provence style can be created by decorating several interior items in decoupage at the same time
It is important to note that decoupage in the Provence style should not be done in too dark colors - it should be airy and light.
The set of decorating tools does not differ from the standard one. The materials you can use are fabric, three-layer napkins, paper, newspapers or decoupage cards. Based on the ease of work, it is better to work with napkins or newspapers.
Decorating a stool with napkins:
- Clean the surface of the stool and sand it with sandpaper.
- Level the surface of the product with putty.
- Apply the main background using a brush and acrylic paints.
- Cut out the selected images, separate the top layer and stick it on the stool.
- Cover the surface of the stool with decoupage varnish.
Provence style is simple and natural. You should not make bright decor. Stools look beautiful if you choose a light tone and minimalist images to decorate them.
Decorating an old stool
For many, it will not be difficult to find an old, tattered, but still strong stool. These things often sit somewhere in a dark corner of a closet, garage or attic. It’s high time to throw them away, but I can’t help but think they might come in handy during the next repair. This master class, demonstrating the decoupage of a stool, will allow you to move it from a dark closet to one of the central places in the interior of the kitchen, hallway, nursery or bedroom of any modern home.
The product has a simple, uncomplicated design and is convenient in many ways. It is easy to carry thanks to a special hole in the seat. It has a strong and practical surface, which, in addition to its main purpose, can be used as an original stand.
Preparatory stage
The result of the work will be a stool in the shabby chic style - beautiful, sophisticated, but with a noticeable antique charm. Prepare the necessary materials and tools:
- old wooden stool;
- decoupage napkins with floral patterns;
- paraffin candle;
- sponge;
- white and black acrylic paints;
- patination paint;
- acrylic lacquer;
- sandpaper with medium and fine grain;
- hard brush;
- PVA glue;
- brush.
If the stool needs repairs, you will additionally need: a hammer, nails, a jigsaw, putty, a wooden board.
Description of work
- Before aging and decoupage the stool, put the old piece of furniture in order. Repair and replace damaged parts. Then carefully sand the surface with sandpaper, remove everything unnecessary: remnants of old paint, varnish, dirt. Next, wipe the wood and degrease it. Fill the largest cracks and holes from fasteners with putty. Don't overdo it - after all, "shabby" means "shabby." After the filler has dried, go through the sandpaper again.
- To create a distressed effect on the wood, start painting the stool with black acrylic paint. This color will appear in areas where the base paint is damaged. You can cover not the entire surface with black pigment, but only the places that are subject to the greatest abrasion (where we plan to artificially create abrasions).
- After the paint has dried, take an ordinary paraffin candle and carefully mark three places of future scuffs on the stool. As a rule, these are the ends of the seat, the edges of the legs, and a little of the surface of the seat itself. Remove pieces and crumbs of paraffin from the stool. We recommend using a brush or a brush with hard bristles.
- Paint the chair with white acrylic paint in two stages. You can begin applying the second layer only after the previous one has completely dried. It is two layers of the substance that will provide an even, rich color.
- Start aging the surface of the chair. Black paint will show through the abrasions. A layer of paraffin will make it easier to remove the main top layers. Take medium-grit sandpaper and go over all the ends. With a little force, peel off the top layers of paint until it is black. Make the abrasions unevenly so that they have the most natural appearance.
- It's time for decoupage - let's decorate our stool with flowers. Carefully separate the layer with the image from the prepared napkin. Next, we cut out or tear out the floral motifs we need for decoration.
The torn edges of the motifs look more natural on the surface. Since the design does not have a smooth edge, it is easier to adapt it to the main background of the product.
- Since the napkin is thin, we lay it on the surface and, using a soft brush with a small amount of decoupage glue (or PVA), with light movements from the center of the motif to the periphery, attach the design to the stool.
Attention! If you are not using a napkin or rice paper, but a thicker material with a pattern, soak it in water for 2-3 seconds. Then apply glue to the surface to be decorated and glue.
- Take a thin brush and use white acrylic paint to tint the light elements of the design. This way it will blend in with the stool and look painted on.
- Glue and decorate the remaining decoupage elements in a similar way.
- Mix some water, white and black paint. Lightly wet the sponge. Wipe it off until almost no paint remains. Using light tapping movements, add aging to the surface of the stool.
Newspaper decoupage stool
Decoupage with newspapers is a simple and cheap way to give a product new life. Everyone has old newspapers in their house. They will give the product a special charm.
Decorating furniture with old newspapers is the most economical and at the same time extraordinary type of decoupage
It is important to pay attention to the fact that before gluing newspapers, they must be soaked in warm water for one minute.
The technology of decoupage with newspapers is almost no different from covering the surface with napkins. For ease of use, newspapers can be cut or torn into pieces. The tools for the job remain the same.
Tools:
- Sandpaper;
- Putty;
- Brush;
- Acrylic paints;
- Glue;
- Varnish.
Decoration must be done carefully. It is important to ensure that newspapers do not roll and lie flat. A regular construction roller will help smooth them out.