Home » Equipment » Warm floor
In addition to the fact that you can connect a heated floor to an electrical network or to a gas boiler, you must take into account that in some rooms it will be important to install a heated floor from a stove. Let's take a closer look at how exactly to do this.
Often such floors are carried out in wooden houses or bathhouses, while the temperature in the room becomes much higher and it is distributed evenly throughout the entire area.
Methods
With the first method, it is necessary to equip the stove with a water boiler. It should be big enough. The entire system will operate as with steam heating, when the room is heated by radiators located around the perimeter of the room, and heated floors are connected in the same way.
The choice of heating method and installation of heated floors will depend on other factors that also need to be taken into account. Before choosing one of the methods, you need to carefully calculate everything.
Of course, the main disadvantage is that the heat lasts as long as the stove itself is heated; as soon as it starts to cool, the floors immediately cool down. The only way to retain more heat is to turn on a heating element in the boiler, then after heating the hot water will remain in it longer.
The second method is easy and does not require large investments. For this option, a regular coal or wood stove is suitable, and the whole operating principle is as follows:
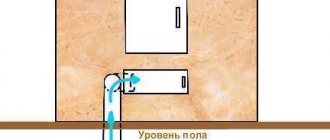
- air moves into the furnace firebox not from the room itself, but from under the floor;
- this air must be mixed with air from the room;
- air enters the room from the street, but it is no longer cold, but heated, since it has to pass through the oven.
We recommend: How to connect an electric boiler for underfloor heating?
Furnace and water heating
Warm floors from a stove are in great demand in private homes. It is best to install a special heat exchanger above the stove itself for installing water heating. A metal tank or welded pipes are used as it, and then a water heating system is laid.
Naturally, it will not be possible to take a heat exchanger with a large displacement, so experts recommend using an accumulative tank, which will be connected to the works.
In this case, it is important to pay attention that the floor should not release heat from the room, so foil is placed on it, which will display energy and heat.
For the system presented above, it is also necessary to purchase a pump that will return the cooled liquid back to the heating tank.
The auxiliary pump should be installed on a common return line, then the water will circulate in a large circle. It is recommended to maintain the temperature at the same level, preferably not exceeding 40°C.
To keep the temperature at the same level, you will need to additionally install a mixing unit.
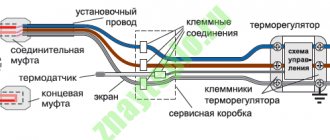
If several circuits are installed for different rooms, then a manifold is installed between the boiler, valves and thermal heads are connected to it, as well as taps that will help regulate the operation of the entire system.
Features of a heated floor system in a bathhouse from a sauna stove
System Specifics
The source of heat in the bathhouse is a brick or metal stove. Its task is to heat the room and heat a certain volume of water. In such a device, there is basically no heat exchanger. To connect a heated floor system to the stove, both structures are modified.
- A heat exchanger is equipped - a stainless steel tank or a register made of pipes. The heat exchanger is placed above the firebox. A pipeline is pulled from it down to the floor and into other heated rooms.
- The pipes serving the heat exchange tank need non-standard ones - 24 mm in diameter, not 16 mm.
- The system is equipped with a pump, since otherwise it is impossible to ensure the return of the cooled liquid to the heat exchanger.
- There is no way to regulate the degree of heating. The sauna stove gets very hot and supplies almost boiling water to the system. This is unacceptable. The device is equipped with a special unit for mixing water from the furnace and return water.
- Since the dimensions of the sauna stove are small, a small heat exchanger is installed here. To compensate for insufficient power, a battery tank is installed near the furnace and connected to a heat exchanger.
Installation diagram
Advantages and disadvantages
Warm floors from a stove under a screed have many advantages:
- First of all, we can talk about saving on fuel. Also, such a floor is easy to maintain and install;
- heat transfer is at a high level, while energy consumption is minimal. The room warms up, evenly covering the entire area;
- one stove can simultaneously heat several rooms at once;
- The service life of such a floor is quite long.
It has its drawbacks. For example, for a room with a huge square footage, you need to use a large volume of coolant, and it will take a lot of time to heat it up.
Warm floor in the bathhouse from the stove
Installation
Installation of a water floor heating system is carried out according to a scheme in which each stage is of fundamental importance. Failure to follow the sequence of work can result in an ineffective investment of effort and resources.
Installation begins with putting the work area in order: debris and stones should be removed. If there is soil underfoot, then first fill and compact a sand and gravel cushion with a layer of about 15 cm. In regions with a harsh climate, an additional insulating layer of expanded clay is added - 15-20 cm.
The purpose of this stage is to ensure a smooth surface without cracks, depressions, or cavities. If a rough leveling screed is made over a sand-gravel bed or expanded clay, then there should be a film under the backfill: it will hold the cement laitance, which ensures adhesion of the materials. Leveling screed on the ground can be done without film. The height of the rough leveling screed is up to 5 cm.
The concrete base is filled with hot bitumen, on which two perpendicularly directed layers of roofing material are laid. The seams between the strips are shed with bitumen or overlapped by 10 cm. This is enough for reliable waterproofing.
The easiest way to provide thermal insulation is penoplex. Lay the slabs about 5 cm thick close together - without gaps. If possible, use insulation with a foil layer. Otherwise, penofol will cope with the task: by laying it with a shiny layer facing up, we ensure that heat is reflected into the room.
Warm floor design
We suggest you read: You can pour concrete in cold weather
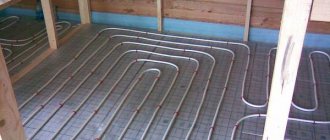
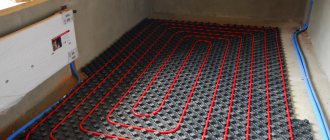
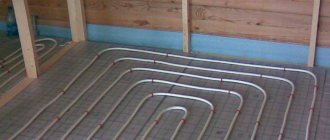
It is most convenient to lay underfloor heating pipes using mounting mats or meshes with a cell size of 100x100, 150x150. Perpendicular lines are excellent guidelines for laying out the contour evenly. The pipes are attached to the mesh bars with clamps. The use of mats provides both thermal insulation and fixation of pipes in special grooves between the bosses.
The most important thing at this stage is not to forget about the damper tape. No matter how strong and monolithic the concrete thickness of the floors may seem, under the influence of temperature the sand-cement screed can expand up to 0.5 mm per linear meter. The mass of concrete will rest against the walls, crack, and collapse.
Laying damper tape
Popular contour laying schemes are snake and snail (spiral). It is more difficult to make the contour of warm floors in a bathhouse with a snake - the pipes will have to be turned 180°. But there is an opinion that such a distribution of pipes is more effective for small rooms: warm floors with such a circuit layout warm up more evenly.
Having connected all the elements of the system, water is supplied to the circuit: it is important to check the tightness of the connections and correct all defects before the floor is poured with concrete.
Water heated floor circuit
Drainage
The arrangement of drainage, which ensures the removal of excess moisture from the steam room and washing room, involves two points:
- Installation of a water drainage system: through the drain hole, the liquid enters a pipe through which it goes into the general sewer or into a drain well.
- Preparing beacons for pouring screed, taking into account the slope of the entire floor surface towards the drain. All moisture will flow down the inclined floor to one point - into the drain hole.
Filling the screed
For finishing screed of heated floors, concrete M150 - M300 is required. When preparing the mixture yourself, it is recommended to add plasticizers, thanks to which the solution “spreads” evenly over the surface, fills all the cracks, and displaces air chambers.
Pouring heated floor screed
If finances allow, you can purchase a special mixture for screeding warm water floors. All the necessary components are already there in the required ratio; all that remains is to dilute the dry composition to the desired consistency according to the instructions. True, each meter of such a floor will cost about 500 rubles, if you calculate that one bag (25 kg) is enough for 0.5 m2, and such a volume of material costs about 250 rubles.
Finishing screed on heated floors performs the additional function of accumulating, preserving and releasing heat, so making a layer less than 5-7 cm is not recommended: the thinner the layer, the faster the floors will cool.
Some experts recommend filling water floors with screed when the circuit is filled with water so that the pipes are under pressure. But hot water can be supplied no earlier than a month after the floors are poured.
Final works
The final stage is laying the tiles. For the floors of the steam room and washroom, choose tiles with a matte surface.
Laying tiles on the floor
It is easy to slip on wet tiles with bare feet, so the texture of the cladding should ensure safety. But no matter how beautiful the tiled floor is, it still wouldn’t hurt to cover it with wooden bars, which provide safer movement, especially if there are children and elderly people in the family.
Operating conditions place increased demands on consumables (tiles, glue, grout):
- resistance to temperature changes, especially in winter;
- frost resistance;
- resistance under high-temperature operating conditions.
When laying tiles, you must observe the slope towards the drain hole, specified during the pouring of the concrete screed.
Slope of laying tiles towards the drain
Building “water” floors in a bathhouse from a wood-burning stove is a labor-intensive task and costly at the installation stage. But the costs are offset by increased comfort and savings during operation.
Heating the floor in the bathhouse using the heat of the stove is a profitable step
What material is used for installation?
Installation of a heated floor from a stove can be done using the following material:
- The most reliable way is to make a concrete screed. First of all, such a screed is moisture resistant, which means it will reduce the cost of waterproofing. The only negative is that the process will take a long time, because the concrete needs to dry well;
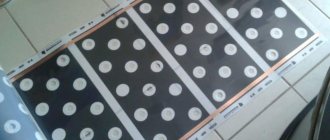
- Polystyrene plates are often used, which perfectly fix the pipes. Such plates are quickly installed and retain heat due to the foil coating. Whatever material is used, the height of the insulating layer should be 20 cm.
When making a concrete screed, you must also remember that if a pipeline rupture occurs, you will need to dismantle the entire coating to find the problem area.
Pros and cons of installation
The heated floor in the bathhouse will have a hot thermal fluid due to the properties of the combustion intensity of the stove
System Specifics
The first characteristic is that the furnace acts as a boiler, so it is necessary to install a heat exchanger above the combustion chamber. For this, an ordinary metal tank is used. From this tank all circuits will go to the necessary rooms.
In order for the cooled coolant to circulate through the system, it must be equipped with a pump. Without using a pump, the coolant will circulate through the pipes only if the furnace level is below the floor.
Also, for convective circulation it is necessary to use pipes with a large diameter (24 mm), and in most cases a smaller diameter (16 mm) is used. However, even these measures will not ensure effective circulation.
In addition, the bathhouse does not always have a temperature above zero if heat supply is not maintained in it. In such a case, you will have to use antifreeze as a coolant, and the system will have to be disconnected from the entire water heating system.
A wood stove will not be able to ensure the movement of water in a closed circuit, so they use a tank as a pipe coil. The thermal circulation diagram is shown in the picture
It will not be possible to install an oversized heat exchanger; therefore, it is necessary to use a storage tank. It is combined with a system of profile pipes, while on the base it is necessary to install a layer of insulation to eliminate heat loss.
Equipment in the bathhouse system of warm hydraulic floors provides the following advantages:
- No electromagnetic waves, as occurs when using electric heating systems.
- Cozy conditions. Often the floors in the bathhouse are cold, which brings serious discomfort and will cause colds.
Heated floors are especially beneficial in the waiting room to avoid getting sick
- Health safety. The product used as a coolant is environmentally friendly, therefore there is no harm to health.
- Saving on heating. Since circulating water acts as a heating device, good savings on solid fuel can be achieved to create a comfortable climate.
But this system has major disadvantages and difficulties in implementing good operation:
- In winter, you will have to drain the water so that the pipes do not crack when expanding due to freezing. To do this, you will have to take into account a complete drainage system, which is not very comfortable and economical in terms of water use. Perhaps the solution to the problem is to create positive conditions, but heating the stove regularly is also not very convenient. It would be more cunning to use antifreeze together with water.
- To warm up the coolant, a certain amount of heat will be needed, which will be taken from the heat to heat the steam room and washing area.
- Difficult installation process. We will have to implement a difficult scheme covering the entire room and passing under the floor.
It will be necessary to calculate a drain hole in the floor of the bathhouse so that the moisture does not destroy the thermal insulation material, but goes into the soil behind the wall of the bathhouse
- It will be necessary to provide leak-proof floors so that moisture cannot destroy the insulation material.
As you can see, the best aspects of using a heated hydraulic floor require solving problems of very high difficulty. There are a lot of points to consider, so it is necessary to dwell in detail on the process of improving the floor pie and heating systems.
You can use the following floor improvement options that can be connected to a heating system:
- Concrete screed. is considered an excellent option, as it allows you to save on material. Concrete has a high degree of water resistance. However, work is possible only after the screed has completely dried. To do this you need to wait 4-6 weeks. There is another negative characteristic: areas of leakage in the system will not be easy to determine.
- Polystyrene plate. Not a very typical type of base for a bath, but very effective when used with a heating system. Namely, with a foil surface, it can be perfectly protected from convective and radiated heat. But you will still need to use a concrete screed on top.
- Laying under wooden floors. You can go the very easy way and organize heating specifically for the floorboards. To do this, holes are made in the wood blocks for pipes. The advantage is that the possibility of repairing such a heating arrangement is several times greater.
Example of how a manufactured heated floor runs under the floorboards and in the cross beam system
Main! Foamed polystyrene, mineral wool or expanded clay sand can be used as a layer to protect against heat loss.
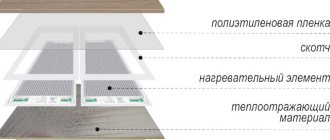
For example, let's look at one of the suitable methods for creating a heated hydraulic floor with a concrete screed and a heat-insulating layer. The entire system will consist of the following layers.
- Waterproofing layer. Designed to eliminate the collection of condensation on the floor during heating.
- Insulation layer. Needed to protect against heat loss.
- Reinforcing layer. Protects thermal insulation material from mechanical stress.
- Foil sheet. Allows you to expand the heating efficiency by reflecting heat radiation.
- Pipeline contour in a spiral shape.
- Concrete screed. Allows you to lay a floor covering on top. In this case, it is necessary to take into account the location of the drain hole.
- Finish floor covering. You can use ceramic tiles.
READ MORE: Gluing linoleum - How to glue linoleum? How to glue the covering to the floor, laying and gluing on plywood and chipboard, how to glue with tape
Before installing a heating circuit, you need to worry about the drainage system, since the floor must not leak. To do this you should prepare the following:
- Remove the soil by 30–40 cm. Make a tunnel under the base and a ditch in order to extend the pipe into the sewer pit. Bury the pipe with an equal distribution of sand. In this case, before laying the pipe, compact the ditch.
- Make a backfill of 15 cm with crushed stone and compact it.
- Make an insulating layer of expanded clay concrete 15–20 cm thick. In this case, you need to ensure that there is a slight slope towards the open end of the drain pipe.
Scheme of how to refine a screed with a heated floor and heated by direct combustion stoves
As soon as the preliminary part of the work is done, we proceed to the actual implementation of the heating system:
- Place two waterproofing barriers overlapping with rolled roofing material and seal the joints with mastic.
- Place thermal insulation material. In this case, it is necessary to store the formed slope.
- Reinforce the insulation layer with reinforcing mesh.
- Lay the pipes, forming a spiral circuit for uniform heating.
- Connect the pipes to a single system and check the functionality of the system.
- As soon as the test “start” is completed, it is allowed to pour the concrete screed. It is necessary to ensure free expansion. To do this, a damper tape is placed along the contour of the room.
- The screed is poured and leveled along the beacons, which are placed in advance in compliance with the slope to the drainage pipe.
- After the screed has completely dried, we begin the process of installing the final floor covering.
It turns out that you can really improve the water heating in the bathhouse. In this case, a direct combustion furnace can be used as a heating device, to which a collector is additionally connected to heat the coolant and a heat exchanger is installed above the stove.
How to install a heated floor?
The water floor from the stove should be constructed from the following layers:
- first of all, waterproofing is provided, which does not allow condensation to settle on the entire structure;
- Next comes a layer of thermal insulation that will prevent heat from escaping;
- the third layer is laid from reinforced mounting mesh to protect the insulation materials;
- a layer of thick foil is placed on top;
- pipes are installed, they are laid out in a snake or spiral with a certain pitch;
- a screed is made to level the surface;
- flooring is being installed.
In cases where the system will be laid directly on the ground, the layers may change, as additional thermal insulation is required.
Rules for laying the floor and connecting to heating
The installation of heated floors in a room from a stove is almost identical to the installation of such floors in an apartment, only the heat is obtained from different media. Let's look at how heated floors from a stove are installed:
- In order to install floors, it is necessary to carefully prepare the floor. No trash or debris is allowed. If there is an old coating, then it is completely removed and a small pit is made, which should be approximately 70 cm;
- the foundation of such a pit must be equipped with a waterproofing layer; you can use roofing material, which is applied in two levels;
- sand is poured on top and thoroughly compacted. The sand base should be 50 cm;
- roofing material is laid on top of such a layer and a septic tank is laid;
- after this, you can begin the rough screed, which should be at least 10 cm. As soon as the screed is ready, one more layer of waterproofing should be laid;
- then insulation and a mesh of reinforcement are laid;
- the next step will be the installation of the pipeline;
- a finishing screed is poured and a decorative coating is placed on top;
- The last step will be connecting the pipes to the tank.
As soon as the main work with the floor is completed, it is necessary to install a water supply system, for this you will need a metal tank where the water will be heated and a stove, due to which the water will be heated.
You definitely need to choose a special pump for the heated floor, which will drive hot water through the pipes and return the cooled water back to the tank to heat it. In practice, this process is constant while the stove is heating.
As soon as the fire stops, the water stops circulating, which means the floors will begin to gradually cool down. Therefore, for large country houses, it is advisable to provide an additional type of heating.
Such heated floors can become indispensable for a bathhouse or for small rooms where it is necessary to maintain a comfortable temperature not constantly, but periodically.
Do-it-yourself warm floor in a bathhouse
Heating the floor in a bathhouse using the heat of the stove is a profitable step. This design has the following advantages:
- electromagnetic radiation will not have its negative impact, which is inevitable when using electrical energy;
- this design is completely environmentally friendly;
- helps to heat the room more evenly;
- saving resources;
- fungus and mold do not receive a favorable environment for reproduction;
- There is no risk of a draft, since the entire steam room heats up evenly.
Let's move on to the disadvantages:
- the bathhouse is not constantly heated and there is a risk of pipes freezing, which can lead to failure of the entire system, so there is a need to drain the water from it every time;
- the heat exchanger consumes a lot of energy, which it takes from heating, therefore, if there is no adequate power reserve, the room may take longer to heat up;
- the volume and time of heating water will depend on how many adjacent rooms need to be heated;
Due to the heat exchanger installed above the firebox, hot water will enter the system, cool as it passes through it, and return cold to the heat exchanger again. There, the sauna stove with floor heating will heat it up again and the whole process will repeat.
A small circulation pump will help us return the cooled water back to the heat exchanger. Due to the circulating energy of the coolant, the room will be evenly heated.
You will have to lay a pipe with a diameter of at least 24 mm, which will reduce the resistance when the coolant moves. Standardly, for the system, a pipe with a diameter of 16 mm is used, but this will not suit us.
There is another pitfall here. We will need to install a mixer between the heat exchanger and the heating system, where cold water from the return circuit will be added.
The heating system provides for the use of coolant with a temperature not exceeding 400C. We will need to cool the water to the required temperature, since almost boiling water will come out of the heat exchanger, the temperature of which cannot be controlled.
Installation diagram
The principle of operation of a water system that heats the floors in a bathhouse is that a pipeline filled with liquid passes through a brick oven. The water begins to heat up after the furnace equipment is ignited. To circulate the liquid, the system is equipped with a special pump. When the bathhouse is ready to receive visitors, the floors will heat up to the optimal temperature.
The formation of the floor in the bathhouse should be taken with particular seriousness, because the room is constantly concentrated with enormous humidity and temperature. And, as you know, almost all building materials are afraid of conditions such as fire. Therefore, in order to complete all the work efficiently and choose the right coating, carefully read this article.
Why install a heated coating in a bathhouse?
The bathhouse is most often located a short distance from the home. In this independent building, the main element is the heater stove and heated exhaust elements that serve for steam generation. But it’s no secret that a bathhouse with just one stove, without additional heating elements, takes a very long time to heat up and staying in it until then is extremely unpleasant.
And, even after heating the entire room, the floors often remain cold. And, since a huge number of receptors are concentrated in the legs, when we step on a cold floor, we immediately risk getting sick. To eliminate this point, it is best to make a coating with heating from a stove.
If you are interested in the issue of installing heated floors in an apartment or private house, and you want to study it in more detail, we suggest you take a training course or get all the necessary information in our article.
Since the bathhouse is a room whose working environment is high temperature and humidity, the materials must easily withstand exposure to water and be resistant to rotting. This coating will be the right choice, especially if you are going to install a heated floor.
Often, various types of tiles, porcelain stoneware, and in some cases even natural stone are used for such purposes. All these materials perfectly transfer the received heat and are not at all affected by water. Laying is carried out strictly using tile adhesive with waterproofing properties, such as ceresite.
Many people want their floor to be made of natural wood, which is of course tactilely more pleasant than stone, but requires much more effort for installation and subsequent operation.
Therefore, professionals recommend using only coniferous trees, because their body contains a huge amount of oils that increase resistance to water and prevent the wood from rotting.
But, if you are looking for the best option, then I recommend choosing regular floor tiles. Despite the fact that the material is inexpensive, it is many times more efficient than wood. Wood cannot fully transfer thermal energy to the floor covering, because it itself is an insulating material.
https://www.youtube.com/watch?v=Waxg6VSKkXQ
Also, you can opt for natural stone. Looks great on the floor and conveys an atmosphere of warmth and naturalness. Well, in terms of thermal properties, it transfers heat from heating pipes in full size no worse than tiles. The only disadvantage of this coating is the difficulty of cleaning. But everything will depend on what stone you choose.
Manufacturing methods
There are two methods for making such a coating in a bathhouse. When implementing the first, we use a low-power gas boiler, which we install specifically for heated floors. Or we run a line, insulated with mineral wool and foil covering, from the main boiler in the house, if there is one.
A boiler-heated coating is not very effective, since its installation and further operation require significant costs. Therefore, today we will look at the operation of such a floor from a stove.
This method differs from installation with a boiler only by connecting the working manifold. When working with a boiler, we connect the manifold directly to the supply and return lines, and in the case of a stove, to the heat exchanger.
But, with this arrangement, overheating of the coolant occurs. The water in the system may not have time to transfer its heat to the concrete slab in which it is built, heat it up to 90 degrees, and then completely boil, which will result in the formation of steam, pressure and rupture of the circuit. You can avoid such unpleasant consequences by installing a buffer tank.
Many people decide to install a heated floor in the bathhouse from the stove. Although this is not an easy task, the combination of water heating with a stove will be cheap. In this case, the installation of expensive boilers is not required, because a conventional furnace is excellent as a source of heating the coolant.
Before making a heated floor in the bathhouse to keep it warm in winter, you need to decide on the future connection system. Often the furnace is connected to the installation indirectly - by a plate heat exchanger.
Then two coolant circulation systems are created: • through the stove and heat exchanger in an open system; • through heaters and a heat exchanger in a closed system.
To optimally solve the question of how to make a stove in a bathhouse so that the floor is warm, you should make a connection to the water floor piping system through a heat exchanger. The latter separates the circulation from the coolant to the rest of the installation.
As a heat exchanger, it is necessary to install a large coolant reservoir above the furnace. This design will be a buffer that stabilizes the water temperature in the system and ensures continuous heat supply.
If there is an excess of heat, that is, the heated water reaches too high a temperature in the room, the only solution is to slow down the combustion process by reducing the air supply.
READ MORE: Do-it-yourself heated floor - description, tips for choosing a system and step-by-step instructions on how to make a heated floor
Typically, heated floor systems in a bathhouse from a sauna stove operate stably only when their operating time is several hours a day and the rated power is not exceeded. To prevent the system from freezing in the cold season, you should make heated floors in the bathhouse from the stove using antifreeze as a coolant.
Particular attention should be paid to protecting the system from pressure increases due to heating of the coolant. The most effective, simple and cheap way is to install with an open expansion tank. It absorbs excess water, the volume of which increases after heating.
At the next stage of solving the question of how to make a heated floor in a bathhouse from a stove with your own hands, you should lay plastic pipes in a screed. To ensure uniform heating, an installation distance of no more than 20 cm is recommended. To compensate for the length of the piping system, insulating strips must be laid.
For surfaces with an edge length greater than 8 m, an expansion joint is required. Pipes used to be made from common plumbing materials such as copper, but such metal corrodes and leaks. Modern systems use flexible tubing called cross-linked polyethylene, or PEX.
Pipes for the circuit are selected 24 mm in diameter to reduce the risk of water freezing due to infrequent use of the room
In the bathhouse, it is better to lay the pipes in slats so that the wood dries well and does not rot, and also warms up faster
If the stove power is not enough, it is recommended to weld the battery tank