Types and classification
Based on their intended purpose, devices are divided into professional and household.
The first include:
- Burners for work related to metal processing: soldering, forging, welding.
- Devices for general construction, road work, roofing, wood burning, and removal of old paint.
- Technological equipment for various purposes. For example, drying chambers, food industry tools.
For household purposes, this includes a gas stove, nozzles for home stoves, heating boilers, and gas convectors.
Household devices include home workshop devices. This is where you most often find do-it-yourself burners, not only manufactured, but initially designed to perform specific tasks.
They are arranged according to two main schemes:
- injection or injection;
- with complete preliminary mixing of the working mixture, or ejection.
In the first type, air (or oxygen) is captured by the supplied gas stream. In the latter, the gas-air mixture is obtained in a preliminary chamber.
Scope of application after modification
Gas burners are used in households and agriculture, during construction and repair work, when repairing vehicles and equipment,
In addition to the listed areas, gas appliances are used for the following purposes:
- installation of heat shrink tubes;
- melting the solder before soldering;
- heating metal water pipes;
- heating bitumen for roof repair.
In addition to the above, the device is used for removing paintwork by firing the surface, for welding materials whose melting point is about 1000 C. With its help, you can cook or heat food or boil water for tea right on the construction site.
Homemade gas burners
The main components in the manufacture of powerful gas burners are industrial valves. They may be new, but for a homemade device it is enough to use used ones if there is no gas leak. They are designed to work in tandem with a 50-liter propane gas cylinder, which has an angle valve and a reducer.
Burner with valve VK-74
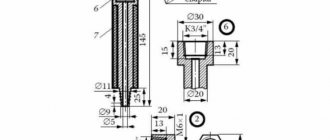
The structure of this burner is shown in Fig. 1. The oxygen cylinder valve VK-74 is used as a basis. A fitting-handle machined on a lathe is installed at the outlet end, to the corrugated part of which the hose from the cylinder is connected. A cap with a prepared hole with a thread for the nozzle is screwed onto the part of the valve with a conical thread K3/4˝, with which it was connected to the gas cylinder. You can use a ready-made blowtorch or gas stove.
The nozzle is made from a piece of 1/4˝ steel pipe 100 mm long and welded to the cap on two pieces of ∅5 mm wire. A distance of 15 mm should be left between the cap and the nozzle to allow air to enter the combustion zone. The position of the nozzle is adjusted by bending the wire holders to achieve a central flame position.
Sequence of actions to ignite the burner:
- Open the cylinder valve;
- Place a lit match near the nozzle and slowly open the burner valve;
- Control gas ignition;
- Adjust the flame using the burner valve
A homemade gas burner of this design has one drawback associated with the location of the valve. The gas flow is directed in the opposite direction to the normal position. Stuffing box seals experience constant gas pressure (including when the valve is closed), so it is necessary to constantly monitor the tightness of the seals.
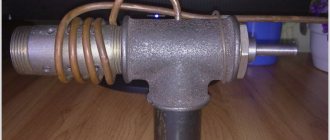
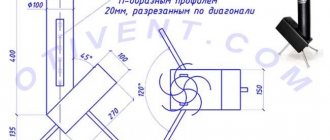
Burner converted from acetylene gas cutter
If you have an acetylene torch with a faulty oxygen supply valve, do not rush to throw it away. It is also suitable for making a burner (Fig. 2). The mixing chamber requires modifications, the contents of which must be removed to reduce weight. The oxygen barrel and valve will need to be removed. Solder the resulting hole with hard solder. Connect the hose coming from the gas cylinder reducer to a fitting with a left-hand thread M16 × 1.5.
Using a union nut, secure a homemade tip bent at 45° to the mixing chamber to make it more convenient to work with the burner. Screw a flange with a nozzle welded to it onto the thread of the tip.
One of the options for such a burner is to use a cap with an M22 × 1.5 thread. The design of the nozzle here is similar to the nozzle of the burner described above. The homemade gas burner is ready for use.
Gas mini burner
Mini gas burners are more suitable for working with small parts. The mini burner is based on a needle for inflating balls. It is necessary to make a cut in it, a little further than the middle of the needle. Some needles already have a similar hole, which significantly speeds up the work process. Next, you need to take the syringe needle and bend it about 45 degrees in the middle.
Mini gas burner design
It is best to sharpen the pointed end of a syringe needle so that it is straight. After this, it needs to be inserted into the ball needle so that one end comes out through the hole, and the other protrudes from the large needle by several mm. The resulting mini structure should be fixed using soldering. After this, droppers must be attached to the bases of the two needles. Clamps - dropper regulators need to be moved as close to the needles as possible. In the resulting burner they will act as gas and air supply regulators. They also need to be fastened together, and this is best done using a heat gun. All that remains is to connect a source of compressed gas to the finished device, the burner is ready for use. This homemade gas burner can heat objects up to 1000 degrees
You should work with it carefully, observing safety precautions
Fiery
Powerful gas heaters for large rooms with catalytic afterburning are expensive, but record-breakingly economical and efficient. It is impossible to reproduce them under amateur conditions: you need a micro-perforated ceramic plate with platinum coating in the pores and a special burner made of parts made with precision precision. At retail, one or the other will cost more than a new heater with a warranty.
Gas mini camping heaters
Tourists, hunters and fishermen have long come up with low-power afterburner heaters in the form of an attachment to a camp stove. These are also produced on an industrial scale, pos. 1 in Fig. Their efficiency is not so great, but it’s enough to heat the tent until lights out in sleeping bags. The design of the afterburner is quite complex (item 2), which is why factory tent heaters are not cheap. Fans also make a lot of these, from cans or, for example. from automobile oil filters. In this case, the heater can operate both from a gas flame and from a candle, see video:
Video: Portable oil filter heaters
With the advent of heat-resistant and heat-resistant steels in widespread use, lovers of being outdoors are increasingly giving preference to gas camping heaters with afterburning on a grid, pos. 3 and 4 - they are more economical and heat better. And again, amateur creativity combined both options into a combined type mini-heater, pos. 5., capable of working from both a gas burner and a candle.
Drawing of a mini-heater made from scrap materials for a summer residence
A drawing of a homemade mini-heater with afterburning is shown in Fig. on right. If it is used occasionally or temporarily, it can be made entirely from tin cans. For an enlarged version for the garden, cans of tomato paste, etc. will be used. Replacing the perforated mesh cover significantly reduces warm-up time and fuel consumption. A larger and very durable version can be assembled from car wheels, see next. video clip. This is already considered a stove, because... You can cook on it.
Homemade gas burners
The main components in the manufacture of powerful gas burners are industrial valves. They may be new, but for a homemade device it is enough to use used ones if there is no gas leak. They are designed to work in tandem with a 50-liter propane gas cylinder, which has an angle valve and a reducer.
Burner with valve VK-74
The structure of this burner is shown in Fig. 1. The oxygen cylinder valve VK-74 is used as a basis. A fitting-handle machined on a lathe is installed at the outlet end, to the corrugated part of which the hose from the cylinder is connected. A cap with a prepared hole with a thread for the nozzle is screwed onto the part of the valve with a conical thread K3/4˝, with which it was connected to the gas cylinder. You can use a ready-made blowtorch or gas stove.
The nozzle is made from a piece of 1/4˝ steel pipe 100 mm long and welded to the cap on two pieces of ∅5 mm wire. A distance of 15 mm should be left between the cap and the nozzle to allow air to enter the combustion zone. The position of the nozzle is adjusted by bending the wire holders to achieve a central flame position.
Sequence of actions to ignite the burner:
- Open the cylinder valve;
- Place a lit match near the nozzle and slowly open the burner valve;
- Control gas ignition;
- Adjust the flame using the burner valve
A homemade gas burner of this design has one drawback associated with the location of the valve. The gas flow is directed in the opposite direction to the normal position. Stuffing box seals experience constant gas pressure (including when the valve is closed), so it is necessary to constantly monitor the tightness of the seals.
Burner converted from acetylene gas cutter
If you have an acetylene torch with a faulty oxygen supply valve, do not rush to throw it away. It is also suitable for making a burner (Fig. 2). Gas mini burner
Mini gas burners are more suitable for working with small parts. The mini burner is based on a needle for inflating balls. It is necessary to make a cut in it, a little further than the middle of the needle. Some needles already have a similar hole, which significantly speeds up the work process. Next, you need to take the syringe needle and bend it about 45 degrees in the middle.
It is best to sharpen the pointed end of a syringe needle so that it is straight. After this, it needs to be inserted into the ball needle so that one end comes out through the hole, and the other protrudes from the large needle by several mm. The resulting mini structure should be fixed using soldering. After this, droppers must be attached to the bases of the two needles. Clamps - dropper regulators need to be moved as close to the needles as possible. In the resulting burner they will act as gas and air supply regulators. They also need to be fastened together, and this is best done using a heat gun. All that remains is to connect a source of compressed gas to the finished device, the burner is ready for use. This homemade gas burner can heat objects up to 1000 degrees
You should work with it carefully, observing safety precautions
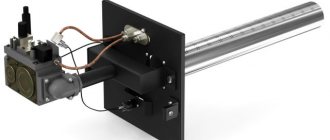
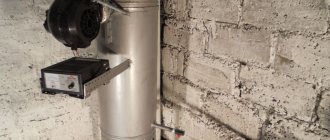
Pipe heater
Such heaters have different names, but in everyday life they are called thermal gas guns.
Such devices have high power and release a lot of energy. They usually come complete with chimneys. To make your own gas heat gun you will need the following materials:
- one pipe - diameter 180 mm and length 1 m;
- one pipe - diameter 80 mm and length 1 m;
- one pipe - length 30 cm and diameter 80 mm;
- mounting plates;
- Metal sheet;
- gas burner with piezo ignition;
- axial fan with round flange.
Tools:
- welding machine;
- roulette;
- spirit level
As with previous gas heater models, assembling the universal heat gun is quick and fairly easy. Let's start assembling according to the instructions.
- In a pipe with a diameter of 180 mm and a length of 1 m, drill two holes of different diameters opposite each other: 10 and 80 mm.
- We use the second pipe, 80 mm in diameter and 1 meter long, to make the combustion chamber. We take into account that it will require a piece of about 30 cm in length.
- We weld the mounting plates to the second pipe and make a hole on one side measuring 10 mm and insert it inside the first pipe.
- We cut out a plug from a metal sheet/plate to close the gap between the heat gun body and the combustion chamber.
- We weld the pipe intended for the combustion chamber to the inner casing.
- We proceed to welding the hot air outlet pipe to a hole with a diameter of 80 mm.
- We weld the plug.
- We check the rigidity of the installation of the gas burner in the chamber and pass a hose through 10 mm holes in two pipes.
- We install a fan heater in a heat gun, and in front we install a chimney on the chamber.
- For design mobility and ergonomics, legs are welded to the body.
Tip: instead of a pipe, innovators use used gas cylinders and fire extinguishers to make the main body.
We recommend reading:
What to do if there is an unpleasant smell from the ventilation in the toilet: solving the problem on your ownArrangement of ventilation in the toilet of a private house: just about the important
What to do if the boiler is leaking from below or from above: the correct methods for identifying and troubleshooting problems
Heating summer cottages, garages and greenhouses with self-produced gas heaters is effective and inexpensive, but how justified and safe? Such designs are recommended to be used as a temporary alternative to more modern and safer industrial production models. Factory models have several degrees of protection, are more functional and will provide residential and non-residential premises with constant and safe heating.
Nozzle for gas burner
Craftsmen solve this problem in the following way:
- A hole of as small a diameter as possible is drilled in the housing tube. Today, drills with a diameter of 0.2 - 0.3 mm and special chucks for them are available for sale. An example is Dremel brand products.
- Next, the burner is clamped in a vice with soft jaws and with careful blows of a chasing hammer, it is slightly deformed so that the hole narrows to the required size - 0.1 mm.
Gas regulator and nozzle/jet
All that remains is to treat the nozzle with fine-grained sandpaper, eliminating burrs and irregularities. This must be done to ensure that the gas flow, and therefore the torch, is smooth.
When you first start up the burner, you need to see if this was achieved, and if not, clean it more thoroughly.
Tips from the professionals
Experts advise not to use homemade gas heaters on an ongoing basis. These designs are good as a cheap alternative to the industrial analogues presented in stores, for periodic trips to nature or to the garage.
If you want to heat your cottage, garage or greenhouse with gas on an ongoing basis, you should take a closer look at industrial models of heaters. They are more effective and safe because they have several degrees of protection.
If you nevertheless decide to make a gas heater with your own hands, then for safety reasons be sure to carefully work out and think through the design of the device, provide a simple and intuitive method of activation/deactivation.
Important! All elements of the device responsible for supplying gas must be of industrial manufacture only and not be subject to modifications during operation.
Making a handle and nozzle
Torch Handles
Take a brass tube and attach a handle to it. If you have a handle from an old burner, you can use it - it will be much more convenient. If you don’t have one, you can take a wooden block. To make the handle fit comfortably in your hand, it can be processed. You need to drill a hole in it for the brass tube. Their diameters must match. After which the tube is inserted into the beam and secured there with silicone or epoxy resin.
If the nozzle is made correctly, then the flame is even
The next stage is the manufacture of the nozzle. This is a labor-intensive and long process. It needs to be approached with greater responsibility. The desired nozzle opening size is 0.1 mm. It is clear that it will be very difficult to achieve this size on your own without special equipment, so you need to drill the hole a little wider and adjust the edges to the desired size. Everything must be done carefully so that the hole is even and does not direct the flame in different directions. After making the hole, secure the workpiece in a vice. Then carefully strike the future nozzle with a hammer. This must be done vertically, with a “pull” towards the center of the workpiece. Gradually, the part must be scrolled, ensuring an ideal hole without slope.
After embossing the part, you need to sand the nozzle head with fine-grained sandpaper. Threads should be applied to the back of the part to connect it to the tube. A simpler connection method is to solder the nozzle to the pipe. But it should be noted that in this case it will be very difficult to repair any parts.
In principle, that’s all, now you can connect a gas cylinder to the tube, light it, and the unit is ready to work. But now certain difficulties arise that interfere with normal work and cause inconvenience. It turns out that you can regulate the gas flow only by opening and closing the tap on the gas cylinder. In this case, it will be very difficult to achieve the required flame strength. What to do?
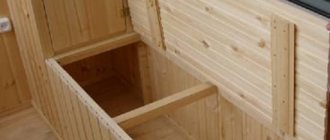
Wood stove
The good old solid fuel stove is a classic that will never lose its relevance. We offer detailed instructions for making such a homemade stove for the garage.
The first thing you need is a pipe. It will become the basis for the future oven.
In the fragment used, cut a hole for the grate - without it, heating the lower layers of firewood will be problematic.
Place the ash box exactly on the cut hole.
Turn the workpiece over and make holes for the chimney.
To increase heat transfer during kindling, it is recommended to use horizontal partitions in the chimney.
The heat exchanger can be made from thin pipes.
The stove will stand on legs - they can be easily made from any available material. In the photo, for example, a bumper amplifier is used.
We assemble the structure and install the chimney correctly.
We add refractory bricks inside - this will make the potbelly stove work much more productive!
To speed up the process, we offer you ready-made drawings - using them you can quickly and, most importantly, correctly assemble a wood-burning stove for your garage and be satisfied.
Characteristics and types of injection burners
The design of the forge burner determines the degree of waste of the metal when it is heated for forging, the intensity of scale formation on the surface, and the total gas consumption. In closed forges, short-flame burners are used.
Their design guarantees rapid mixing of the combustible mixture, which ensures high efficiency. Combustion products are removed from the furnace working space evenly and as efficiently as possible.
Operating principle of burners
In burners of this type, propane coming from a gas pipeline or cylinder is burned. Here, a mixture of gas and air is formed due to ejection, i.e. the latter being sucked into the burner under the influence of the energy of a gas jet under pressure.
In the area where air is taken in, a vacuum appears, due to which the air itself moves in a given direction. Mixing in the burner body, the working mixture escapes from it under pressure, creating the desired temperature.
The quality of operation of a gas burner depends on the constancy of the ratio of the volume of gas and air. Changes in gas density affect the burner's ability to suck in air.
The fuel combustion device or burner is the main component of the gas furnace. Its operation depends entirely on the correct manufacture of this key element
All changes in combustion temperature must be accompanied by similar changes in the air supply required for combustion.
If the indicators are unbalanced, the injection coefficient must be adjusted to achieve its stability. This is achieved by changing the gas pressure or adjusting the air damper.
Classification of burners according to main characteristics
They are classified according to different criteria. Based on the volume of primary air sucked in, a distinction is made between partial-mix and full-mix burners. The main characteristics of the former are the injection coefficient and the multiplicity.
The injection coefficient is determined by the ratio of the volumes of air injected and those required for 100 percent combustion of gas. The expression “injection ratio” refers to the relationship between the volume of primary air and the gas consumption of the burner.
Combustion of gas mixed with air in an injection burner occurs in a special nozzle - a tunnel made of refractory material
Injection burners used in home forges come in low (up to 5 kPa) gas pressure and medium - from 5 kPa to 0.3 MPa. When the gas in the burner is under a pressure of 20-90 kPa, the power of air suction remains practically unchanged, even when the gas pressure and vacuum in the furnace undergo changes.
When the pressure drops below this level, the injection coefficient increases, the pressure drops, and the vacuum in the forge increases. Depending on the presence of the distribution manifold, there are single- and multi-flame burners.
There is a division according to the number of nozzles: with one nozzle - single-nozzle, with several - multi-nozzle. These elements are placed in the center or scattered. According to this feature, there are burners with a central nozzle and a peripheral one.
How to make a gas burner
In the diagram below you can see exactly how a gas burner is made. Such a device will require the following components:
- The body, which is made in the form of a double truncated cone. Its manufacture requires high-strength steel.
- Confusion bell made of steel X18N9T, resistant to high temperatures and open flame.
- Heads for supplying natural or liquefied gas, as well as air at the required pressure to the work site.
- Mouths.
- Regulators that allow you to adjust the amount of gas and air in the mixture.
One and a half inch pipes and heat-resistant steel sheets will help complete the main elements of the device. For this purpose, welding is used in an argon environment, but you can also use flux, which will protect the seam from exposure to oxygen and rapid corrosion. We use ordinary high-pressure hoses as pipes for supplying gas and air. The main thing is to choose the right diameter. The connection to the body is made using metal clamps.
To prevent gas leakage and pressure loss, reliable sealing elements will be required. They can be made of rubber that can withstand aggressive chemical influences.
General recommendations for creating devices
In an effort to save on expenses, many owners, when choosing among heater options, are in no hurry to purchase ready-made factory models.
After all, if you have the desire and the appropriate skills, you can always construct a heating device on your own.
When choosing a DIY garage heater, many are guided by two parameters:
- The heating device should be easy to activate, quickly warming up the room.
- The device must have a simple design, devoid of complex parts and elements.
- Operation of the device must be carried out with minimal financial costs.
All these requirements are met by three options for the homemade heaters described below, which operate from different energy sources: gas, solid fuel and electricity.
The safety of the device is also important. Therefore, regardless of the heating method in the garage, it is necessary to equip a ventilation system. After all, a decrease in the amount of oxygen and the accumulation of combustion products poses a risk to human life.
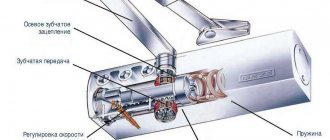
Principle of operation
The essence of the working principle of the device is simple: prepare a mixture of gas and oxygen for combustion, ensure a stable supply of the mixture and its combustion.
The gas burner is also equipped with additional capabilities aimed primarily at automation and maintaining the safe operation of the equipment. These functions are provided through the use of such nodes as:
- Automation. Through its use, gas supply to the burners is stopped in the event of an emergency. For example, such a shutdown may occur if the igniter temperature drops below a set level.
- Ignition. The device runs on electricity or a piezoelectric element. The ignition operation scheme looks like this: natural gas is supplied to the igniter, where it is ignited by a spark (mechanically or automatically), after which the ignition heats up to a certain level, opens the valve and allows the gas to flow into the burner.
The device can be powered by electricity or a piezoelectric element
The equipment used in boiler rooms is not much different in operating principle from household appliances. However, such devices tend to withstand high gas pressure. In addition, industrial equipment is equipped with filters to filter out all kinds of resins and small dust particles. Filtration allows you to increase the cost-effectiveness and technological efficiency of equipment operation.
Nuances and operating instructions
A propane burner is a dangerous device, and therefore, when working with it, you must follow the operating and fire safety rules
Roofing propane burner, instructions for use:
Carefully and tightly screw the nozzle onto the nozzle. Connect a hose to the cutter fitting, securing it with a special clamp. They are usually not included in the kit and will need to be purchased separately. Attach the second end of the hose to the gas vessel. Check the tightness and reliability of the connections with the flame regulator closed. Using soapy water, check the tightness of the connection and gas-air leaks, and with the gas valve on the cylinder open. Smoothly turn the gas regulator counterclockwise and light the burner. It is prohibited to point the torch at flammable materials. After completing the work, close your gas valve on the vessel. When the burner flame goes out, close the torch torch regulator and allow it to cool.
It is prohibited to point the torch at flammable materials. After completing the work, close your gas valve on the vessel. When the burner flame goes out, close the torch torch regulator and allow it to cool.
Dangerous and harmful production factors when working on the roof with a propane torch:
- The occurrence of a fire hazard;
- explosion of a gas container;
- burns from open fire;
- thermal burn from heated cutter surfaces.
Remaking a burner from an old stove
You can make a burner for a forge from a device used in gas stoves. To do this, you just need to correctly calculate the power using the following formulas:
- determine the power of the stove (W) from which the burner is removed (you can find it out from the instructions or data on the unit body);
- multiply W by the fuel efficiency (0.89-0.93) to obtain the required power for the forge (W1);
- find out the calorific value of gas (Q). If propane is used, it will be 3600 kJ/m3;
- calculate fuel consumption: T = 3.6 × W1 / Q.
Having manufactured the burner according to the drawings, it is necessary to check its functionality
Particular attention is paid to the tightness of the system. If you detect a gas odor, immediately close the regulators, ventilate the room and look for leaks to prevent an emergency during operation.
Choosing gas
You can only make a gas burner using propane, butane or a propane-butane mixture with your own hands, i.e. on gaseous saturated hydrocarbons and atmospheric air. When using 100% isobutane (see below), it is possible to achieve flame temperatures of up to 2000 degrees.
Acetylene allows you to achieve a flame temperature of up to 3000 degrees, but due to its danger, the high cost of calcium carbide and the need for pure oxygen as an oxidizing agent, it has practically fallen out of use in welding work. It is possible to obtain pure hydrogen at home; a hydrogen flame from a supercharged burner (see below) gives temperatures up to 2500 degrees. But the raw materials for producing hydrogen are expensive and unsafe (one of the components is a strong acid), but the main thing is that hydrogen cannot be smelled or tasted, there is no point in adding a mercaptan fragrance to it, because Hydrogen spreads an order of magnitude faster, and its admixture with air of only 4% already produces an explosive explosive gas, and its ignition can occur simply in the light.
Methane is not used in household gas burners for similar reasons; in addition, it is highly poisonous. As for flammable liquid vapors, pyrolysis gases and biogas, when burned in gas burners they produce a not very clean flame with a temperature below 1100 degrees. Flammable liquids of medium and below average volatility (from gasoline to fuel oil) are burned in special liquid burners, for example, in burners for diesel fuel; alcohols are used in low-power flame devices, and ethers do not burn at all - they have low energy, but are very dangerous.
Requirements for a garage heater
Requirements for a garage heater
As a rule, garages are heated using small portable devices that can quickly warm up the room and maintain the temperature at the desired level. Such heaters are used in garages, camping tents, greenhouses, etc.
Many craftsmen abandon the idea of creating a homemade heater, mistakenly believing that this will require buying expensive components and generally spending a lot of time. However, it is not. There are many simple and inexpensive models of heaters that can provide the most comfortable conditions for using the serviced premises.
Heater Elekon Power PG3B
Homemade units are in many ways similar to factory-made mechanisms. Therefore, to assemble the heater, you can take some factory model as a basis. In general, the operating principle of most existing home-made units is based on the same element - thermal film.
Daire heat gun
Thermal film creates heat and transfers it not to the air, but to objects located nearby, and they already heat the environment. That is, a homemade heater will not waste energy. A minimum amount of heat is transferred through the air, which makes heating as efficient as possible.
The device that you are asked to assemble will consume a minimum of energy and give off maximum heat.
Which gas to choose
A gas burner for do-it-yourself soldering is made exclusively using fuel such as:
- natural gas;
- propane;
- butane;
- propane-butane mixtures.
In other words, on hydrocarbon mixtures with atmospheric air. If you use fuel consisting of 100 percent isobutane, you can get a combustion temperature of 2000 degrees Celsius.
Acetylene is a substance that allows you to get temperatures up to 3000 degrees. But such a device is currently not popular for several reasons: the need for constant oxygen, a high level of danger, the need to use expensive calcium carbide for work and other reasons.
It is more than possible to obtain hydrogen at home, and such a device is capable of producing a temperature of 2500 degrees. But the starting materials for producing this substance are also very expensive (the main mixture for production is hydrocyanic acid). Besides, they are unsafe. Another disadvantage of hydrogen is that it can be smelled.
A substance such as methane is not used in household burners for obvious reasons. In addition, the gas is very poisonous. If we talk about methane fumes, they do not produce a large flame when burned, and the average temperature of the structure is 1100 degrees.
DIY indirect heating gas gun (heat exchanger)
While the construction of the CNC machine was suspended, I decided to start a topic and highlight my solution to the garage heating problem. It was heated by an ordinary 18 kW gas gun. This power is enough to raise the temperature to a comfortable 15-18 degrees in any frost (the garage is the last one in the row, the walls are made of reinforced concrete slab, nothing is insulated). There is a problem: with the arrival of cold weather, the hardware in the garage has a tendency to become rusty due to condensation. The gun already exists and the simplest solution I saw was to create a heat exchanger and remove combustion products to the outside. I wanted the heat exchanger to be simple (for quick creation) and effective. Therefore, at first the choice fell on a “pipe-in-pipe” type option: two coaxial pipes, the combustion products move along the inner one and are discharged outside, and the forced movement of the garage atmosphere in countercurrent (towards the combustion products) is organized along the outer one (in the cavity between the pipes). The efficiency will depend on the length of the pipes and, according to estimates, 5-7 meters should have been enough (for pipe diameters of 200 and 300 mm). The heat exchanger is too big.
The second option was to use car parts. In theory, the engine radiator should be capable of dissipating several tens of kilowatts of thermal energy. The estimated area of one radiator was equivalent to a 6-meter pipe, so at the disassembly site a pair of classic radiators, a fan from the 10th family and an additional pump from a gazelle were purchased at a low price. In the hardware store, parts of a plastic water pipe are found, and an old computer power supply was found in the bins.
This is what the test bench looks like for the applicability of parts.
The fan is powered by 5V, otherwise its power and noise are excessive. In the future, it would be ideal for him to make smooth adjustment and supply full 12V from the standard temperature sensor built into the radiator in case of overheating. The system is filled with the cheapest antifreeze (eight liters included). For the test, I placed the gun almost point-blank to the radiator, the distance between them was about 15 mm, at this distance almost the entire hot flow passed through the radiator. Hot is an understatement; at the exit from the gun the stream is red-hot and flammable. However, after passing through the radiator the air became warm to the touch, not even hot. and this despite the fact that less than a quarter of the radiator area was working! I let the system run for about 40 minutes to fully warm up. The antifreeze warmed up to 60 degrees and flowed from all the cracks (from under the caps, due to the lack of an expansion tank) and, in principle, the system demonstrated the stability of heat transfer from one radiator to another. Great.
The next check will be with deflectors: to expand the flow from the gun to the entire area of the radiator and a collector to remove combustion products into the pipe. At the same time, I’ll try to get a thermometer and measure the efficiency of the radiator by measuring the temperature at the inlet and outlet. Pairing a round gun with a rectangular radiator is quite a task. A model was drawn and the following development was obtained.
I transferred it from paper to galvanized steel and cut it out.
To be continued…
Nuances and operating instructions
A propane burner is a dangerous device, and therefore, when working with it, you must follow the operating and fire safety rules
Roofing propane burner, instructions for use:
Carefully and tightly screw the nozzle onto the nozzle. Connect a hose to the cutter fitting, securing it with a special clamp.
They are usually not included in the kit and will need to be purchased separately. Attach the second end of the hose to the gas vessel. Check the tightness and reliability of the connections with the flame regulator closed. Using soapy water, check the tightness of the connection and gas-air leaks, and with the gas valve on the cylinder open. Smoothly turn the gas regulator counterclockwise and light the burner.
It is prohibited to point the torch at flammable materials. After completing the work, close your gas valve on the vessel. When the burner flame goes out, close the torch torch regulator and allow it to cool.
Dangerous and harmful production factors when working on the roof with a propane torch:
- The occurrence of a fire hazard;
- explosion of a gas container;
- burns from open fire;
- thermal burn from heated cutter surfaces.
Conclusions and useful video on the topic
Gas heater from a tin can:
Homemade infrared gas heater:
Anyone can assemble a gas heater according to the schemes discussed at home. You just need to follow safety precautions and not neglect the instructions for putting the devices into operation. If you assemble the heater yourself, you can save money. In addition, the efficiency and performance of such devices is not inferior to store-bought ones.
If you plan to heat a small room or tent, and also take the device on trips and hikes, then it is better to make a heater from a gas burner or from a gas stove. They are more compact, take up less space and are easy to transport. Gas heaters are suitable for heating larger spaces, produce more heat and require an electrical connection to operate the fan.
Source
DIY burner: video
- 1 Materials and tools for work
- 2 Making a handle and nozzle
- 3 Work to improve flame control
- 4 Making a mini-burner
- 5 Videos
Many home craftsmen know what a gas burner is. Thanks to it, you can weld, surfacing and other types of processing of metal products, heat them and connect them. The principle of operation of such a device is to mix flammable gas and oxygen. As a result, you can get a stable flame with a huge temperature, which is difficult to extinguish. Such burners can be universal or designed for specific jobs. The fact that the flame is stable allows this unit to be used outdoors even in windy conditions. You can either buy it or make it at home. If you are not one of those who are looking for easy ways, we suggest you figure out how to properly make a gas torch for soldering with your own hands.
Making a tabletop fan heater
This type of device is a heater and fan rolled into one. If desired, a homemade fan heater can be used as an improvised air conditioner.
This type of heater is convenient because it allows you to regulate the heating temperature and the rotation speed of the cooler.
Selection of required materials
To create a fan heater you will need the following materials:
- rheostat;
- switch;
- power connector;
- electrical wire;
- LED Strip Light;
- 12 Volt computer cooler;
- three-amp 12-volt power supply;
To fix the heating element, you will also need two ten-centimeter rods of copper wiring with a cross-section of 1.5 sq. mm.
The tools you need to prepare are:
- jigsaw;
- hammer drill or drill;
- soldering iron;
- hole saw;
- glue for woodworking;
- “moment” or superglue;
Kinds
Burners can be of different types. Let's look at the main ones.
Atmospheric
Such devices are quite cheap. The reason is obvious - their production is not too difficult technologically. The operation of atmospheric burners is also simple. Air is sucked directly from the surrounding space. The formation of a gas-air mixture does not require additional effort.
Supercharged
This option uses a fan that actively pumps air. Stabilization of air pressure (pressure) allows you to compensate for almost all negative external factors
What is important is that “fire separation”, which often occurs with atmospheric burners with a significant increase in pressure, is also excluded
The following evidence supports such devices:
- stable operation under any conditions;
- efficiency of 95% or more;
- a fairly high level of safety (determined by the design);
- almost complete combustion of fuel;
- wide range of achieved powers;
- excellent level of automation;
- Possibility of use in furnaces and boilers of a wide variety of structural types.
It is worth noting that forced-air burners are much more expensive than their atmospheric counterparts. Even the most affordable models of this kind cost at least 4.5 times more. However, the main technical advantages fully justify such a fee. When the burner is operating with supercharging, noise of varying volumes may occur. Special protective covers will help to cope with this problem.
Such models are approximately twice as efficient as traditional flare designs. Some people even take tourist-type ceramic burners (for cylinders) and convert them into a boiler or stove. But you can do this only with complete confidence in your actions.