Communities › Kulibin Club › Blog › Airtronics project - an evil Babington burner in development.
Friends, we receive a large number of questions, both here and in PM. I didn’t expect such a stir and your attention to my remake of a rather popular design from the 60s of the last century. I am finishing the Topic. I have managed to (for now) systematize your questions received so far and I am adding to the FAQ topic.
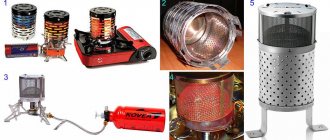
FAQ. 1. I don't understand the working principle of this burner. — Oil heated to 80 degrees Celsius is poured from a tube with a beveled end onto a polished steel ball, which has a 0.25 mm hole on its surface. Compressed air is supplied through this hole at a pressure of 3-5 Bar. The ball is regularly enveloped in an oil film, and in the place where the compressed air is released on its surface, the oil film collapses and is carried into the furnace in the form of a 50 micron aerosol. A new oil film is drawn to the hole along the surface of the ball. It was this effect that Babington discovered.
2. What settings does this burner need? -The burner is more sensitive to the temperature of the oil pouring over the ball, the mutual axial position of the ball relative to the smoke tube diffuser, and the mutual position of the tube pouring oil over the ball with the ball.
3. What tolerances are there during the manufacture of this burner? — The diameter of the ball is not less than 30 mm. The diameter of the hole in the ball for compressed air is no more than 0.25 mm. If the diameter of the hole in the ball is greater than 0.3 mm, you will get a large oil aerosol, noisy combustion, and difficult starting. More than 0.25 mm and up to 0.3 mm - this can be compensated by increasing the temperature of the oil pouring over the ball, increasing the air pressure in the ball hole to 5-6 Bar. If the hole in the ball is larger than 0.3 mm, then you will not be able to use the burner. Likewise, 0.3mm is a dangerous threshold.
4. How is the oil heated in this design? -Pre-start and standby heating. A tubular-type heating element in the oil tank heats the oil up to 80 degrees Celsius. When the burner is started, the oil pouring over the ball is heated by the recuperative roll. These are 4 turns of copper tube, rolled around the smoke pipe using an air gap of 10 mm, to avoid coking of the oil in the roll. After the burner enters operating mode, the tubular-type heating element turns off.
5. What are the ways to optimize the design and increase thermal performance? -Each new hole in the ball, made coaxially with the smoke pipe, is +50% power. If you have precision machines, you can make these holes switched by electromagnets. The second way is the successful development of a smoke pipe design. Take a look at the material on the development of smoke tubes for turbojet engines.
6.Oil consumption, heating capacity? -This particular design has a flow rate of about 2.5 liters per hour. Its power, calculated using two methods, is about 50 kW.
7. What is burning there and how is it burning? - Any oil burns, right up to black dirt. The main thing is that it flows warm and envelops the ball. Understand that even vegetable oil from deep fryers has a heating value of over 17,000 BTU. The adjusted burner does not stop working without any soot at all, the emission aroma is like that of an excellent diesel internal combustion engine.
8. I require a video, where is the video? -So here's the video:
Step by step guide
Step one is to drill a hole in the sphere. This cannot be done using conventional tools, because the hole diameter should be from 0.1 to 0.3 mm. You need a special drill and a special chuck. If you have a drill with a diameter of 0.1 mm, but the power of such a torch is not enough, you can make two or three holes. Such holes are drilled at high speeds.
When the sphere has a hole, it is attached to the air supply tube. Then the structure is installed inside the tee. A rubber plug is placed at the outlet of the tube from the housing, which is necessary to prevent air under pressure from escaping out. A hole is drilled in the plug through which the tube will pass.
How to make a working burner with your own hands?
The idea of using used machine oil as burner fuel is not new. There are many different schemes for making such a device on the World Wide Web. And the demand for this kind of product is only growing. It is clear, because this device will be very useful in everyday tasks and purposes, heating a summer house or utility room.
It is also worth saying that it has a large number of advantages:
- Most of the proposed schemes are simple , and every person with a minimum of necessary abilities and tools is able to assemble it.
- Fuel for such a burner is considered quite affordable. It can mostly be found in car repair shops, where there is simply an overabundance of it. Likewise, used oil can be obtained for free or for a small fee.
- The question of recycling used oil often arises , and such a burner can help recycle it without harming the external environment.
- This device is multifunctional and can be used as an ordinary burner or a heating system using liquid fuel.
- Such a device is mainly considered mobile , as it is light in weight and small in size.
- This burner is universal in the type of fuel used. Essentially, it will work on any combustible fuel, be it used motor oil, gasoline, kerosene or any other.
Among most schemes, one is considered the most interesting in terms of simplicity, practicality and uncomplicatedness. This miracle unit is called a Babington burner. It is named after its own creator and its design was impossible for a long time due to a patent. But the patent has expired and now anyone who wants can implement the scheme.
Its working principle is very simple and includes the following steps and parts:
- Preheated fuel penetrates the sphere, spreading uniformly over it, forming a thin film.
- An air blower is connected to the sphere itself , pumping air. A very small hole is made in the area, 0.1-0.3 mm in diameter. Air under pressure exits the sphere through this hole. Passing through the fuel, the air disperses it, forming something like an aerosol.
- Then this stream is ignited and a burning torch comes out.
- The rest of the unused waste flows into the settling tank and can be reused.
- In order for unused waste oil to automatically flow back to the sphere, you need to attach a pump to the system, which will supply fuel from the sump.
Preparatory heating of fuel solves 2 problems at once:
- Increased fluidity. The heated waste oil spreads better over the surface of the sphere and is atomized more easily by the supplied air.
- Makes the process of lighting the torch easier. At the same time, it is not only easier to start the device, so to speak, but the efficiency also increases.
The good qualities of such a scheme can be called:
- Multifunctionality in fuel use. Such a burner is almost independent of the degree of contamination of the liquid energy carrier.
- No need for filtering. Due to the fact that the system does not have narrow passages, apart from air holes, it does not require filtration, unlike factory substitutes.
Homemade waste oil stove
Any oil that remains after use does not have to be disposed of. It can serve as excellent fuel for a stove. The design is not complicated, so you can make a waste oil furnace yourself.
How does a waste oil furnace work?
The operating principle of a waste oil stove is quite simple. Under the influence of ignition, waste fuel ignites, thereby heating the stove. Heat is released which warms the room.
Most often, used automobile oil is used as kindling for the furnace. Suitable for both diesel and motor. But this is not the only fuel option available. Confectionery and vegetable oils are quite suitable for lighting the stove.
You can make several types of heating systems using waste oil with your own hands:
- potbelly stove;
- dropper;
- Babington burner.
The manufacture of each of them has several nuances.
Potbelly stoves are often made independently, as their design is very simple. But at the same time, they have the highest fuel consumption - about 2 liters per hour.
A drip stove can be made either from a pipe or from an old gas cylinder. At the bottom of the device there is a bowl with ignition. Oil is gradually added. The air entering the stove heats up. Such a stove can produce up to 15 kW of heat.
The Babington burner differs from other stoves in that the fuel is supplied by a pump. Unlike other furnaces that run on waste oil, the Babington burner will heat the room well even if there are a large number of impurities in the combustible substance.
Each of these furnaces can be designed independently.
Potbelly stove
A potbelly stove, or direct-acting stove, is one of the simplest designs. It consists of two combustion chambers, connecting tubes and a chimney.
Homemade potbelly stove
To create a potbelly stove you will need two metal containers. You can make them yourself by welding. A potbelly stove can be of any shape, but it is preferable to make oval containers, since their heat transfer will be higher.
Design of a potbelly stove running on waste oil
It is necessary to make stable legs from a thick sheet of steel. They should be welded to the bottom container. The lower tank will be used for used oil, so it is worth making it larger than the upper one. A small hole should be made on top of the container for pouring fuel and igniting the mixture. Be sure to design a damper, since during the use of waste oil and the combustion process, the lower tank must be completely sealed.
Next, a metal pipe is placed on the lid of the lower container, which will connect the two parts of the structure. Small holes must be made in the pipe for air supply. Thus, fuel vapors will mix with oxygen. The pipe must be positioned completely vertically.
Afterwards, a container for secondary combustion is installed on the structure. The temperature in the second tank is much higher, since the combustion of the gas-air mixture occurs in it. For convenience, it is advisable to make a removable lid in the second tank.
The last thing needed to create a potbelly stove is to attach the chimney to the top tank.
Assembly drawing of a potbelly stove
Combined potbelly stove
If you slightly modify the design of a classic potbelly stove, you can make a universal stove that will work not only on waste fuel, but also by igniting solid materials.
To do this, you need to make several additional elements. When igniting wood, the pipe must be sealed, so four plates must be made of steel that can close the pipe from air penetration. To do this, you should make several fastenings for bolts on the pipe so that additional elements can be easily screwed on.
A grate or steel grate is placed on the base of the lower tank. It is necessary to design an additional container that will be placed in the lower tank. It is necessary to ensure that the container can be easily installed through the removable top of the stove. It will serve as a reservoir for used oil.
The more removable elements there are in a potbelly stove, the easier it is to clean the stove after using used oil. You should also handle the stove with care. To ensure that the oil burns evenly, without bubbling or hissing, several important points must be taken into account. The tank must be filled no more than two-thirds with spent fuel. It is best to use machine oil and let it sit. Oil that was drained from a car several hours ago will not burn well.
Dropper from a pipe
Construction of a dropper stove made from a pipe with bottom fuel supply
A drip stove operating on waste oil uses oil more economically than a potbelly stove. This is due to the fact that fuel enters the furnace gradually. The operating principle of the dripper stove is quite simple. Due to the evaporation in the ignition bowl, warm air circulates through the pipe and heats the room. It is necessary to make a dropper stove step by step, observing the correct dimensions:
- For the pipe dripper body, a pipe with a diameter of 21 centimeters is required. The thickness of the pipe wall must be at least one centimeter. Height – 78 centimeters. The bottom is made of steel sheet. The thickness of the steel should be from 5 millimeters. It is necessary to cut the bottom, taking into account the thickness of the pipe, and weld it to the structure. At the bottom you need to place a bowl for ignition. The legs of the stove can be made of any material. For example, wide bolts will do.
- A hole must be made in the pipe. The distance from it to the bottom of the structure should be at least 7 centimeters. Through this hole it will be possible to observe the operation of the stove, as well as additionally light the bowl. The hole must be closed with a door. To do this, you need to make a small door from a sheet of steel or the remains of a pipe. In order for it to close hermetically, an asbestos cord should be attached around the perimeter.
- A pipe is welded on the opposite side of the hole. Its diameter is 10 centimeters. The thickness of the pipe must be at least 4 millimeters. This pipe will serve to remove smoke.
- The cover of the structure is also made of sheet metal. To do this, you need to cut a circle with a diameter of 22.8 centimeters. Walls 4 centimeters wide are welded along the edge. Two holes should be made. One on top of the lid with a diameter of 9 centimeters. The other should be placed on the side and be no more than 2 centimeters. You will need to make a door for the second hole, and you will also need to use an asbestos cord for tightness. The small hole will serve as a viewing window.
- The next step is to create a pipe for the air supply. To do this, you need a steel pipe 76 centimeters long and 9 centimeters in diameter. It will be necessary to make several holes in the pipe with a diameter of half a centimeter, retreating 0.5 centimeters from the edge of the pipe. There should be 9 holes placed around the circumference. After another half a centimeter there are 8 holes with a diameter of 4 millimeters. After the same interval, 9 holes of 3 millimeters each should be made. Using a grinder, 9 thin slits of 3 centimeters are cut. At the other end of the pipe, a hole with a diameter of 1 centimeter is made through which the fuel supply tube will be inserted.
- The fuel supply pipe should be small, only 1 centimeter in diameter. The length and bend should be made in such a way that fuel from the tank can gradually flow into the stove.
- The air and fuel supply pipes must be welded to the furnace lid.
- The chimney should be made taking into account the capabilities of the room. The height of the chimney pipe must be at least 4 meters. The chimney must be straight, without curved sections.
Do it yourself
The production process of the Babington burner is not quite simple and if all the materials and tools that will be needed are available, it only takes a couple of days, depending on the person’s abilities.
To produce this device you will need the following materials:
- steel tube DU10,
- iron tee with a diameter of 50 millimeters with internal thread;
- an iron sphere (or hemisphere) with a diameter of less than 50 millimeters;
- copper tube DN10 not less than 1 meter in length;
- metal elbow DN10 with external thread;
- a piece of pipe with a diameter of 50 millimeters with an external thread, a length of at least 10 centimeters;
You will also need a very small tool kit:
- an angle grinder (angle grinder) or a hacksaw for metal;
- perforator;
- specialized chuck for thin drills;
- drill;
- drill with a diameter of 0.1–0.3 millimeters;
- soldering machine;
Preliminary stage
at the beginning of assembly you need to make a hole in the area (hemisphere). This is one of the most difficult and serious stages, since the hole must be made exactly inside. In another case, the burner torch will be directed to the side, which in turn can have a bad effect on the quality of the product and its economy.
It is also worth saying that drilling holes of this diameter is considered a difficult task, since thin drills can break. Because of this, this process must be done carefully and slowly.
detailed instructions
Once the sphere or hemisphere is ready, assembly can begin. It is very simple and has a few simple steps:
- An iron piece of pipe will act as a nozzle. It is cut to the required length and screwed into a tee. After that, a very large hole is drilled in the pipe section on the side so that the jet can be ignited through it.
- On top of the tee, closer to the nozzle, there is a hole for a copper tube through which fuel will be supplied to the device.
- to the copper tube to connect the fuel line.
- The copper tube makes several turns (2-3 is enough) around the nozzle. They must be done at a certain distance from the pipe section. This will make it possible to heat the oil to the required temperature before it hits the sphere.
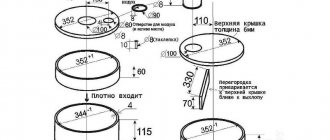
- In the area at the opposite end of the small hole, another hole is drilled along the outer diameter of the steel tube. The tube is placed hermetically into the sphere. This is necessary so that the air exits only through a small hole, and pressure is created in the middle. If a hemisphere is used instead of a sphere, then the tube is soldered at the location of the small hole and sealed.
- At the opposite end of the nozzle, an iron tube with a sphere is placed into the tee. She is attached to it.
- Likewise, the burner is ready for use. All that remains is to attach an air blower to the tube with the sphere, which will pump air into it and the fuel line to the copper tube.
- If desired , this system can be improved by connecting a pump for oil supply. You can also install a control unit with control sensors. This will make this system automatic and safest.
Manufacturing recommendations
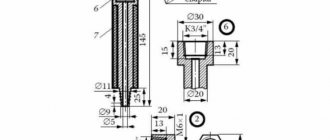
Due to its popularity and simplicity, the burner for the waste boiler is made by craftsmen in different variations, but we will undertake to describe the simplest design, which will be available for repetition at home. First you need to select the necessary materials, here is their list:
- Steel tee with internal threads with a diameter of 50 mm - for the body.
- Squeegee with external thread with a diameter of 50 mm - for the nozzle. Its length is optional, but not less than 100 mm for the nozzle.
- Metal elbow DN10 with external threads - for connecting the fuel line.
- Copper tube DU10 of the required length, but not less than 1 m - to the fuel line.
- A metal ball or hemisphere that fits freely into the tee is for the working part.
- A steel tube of at least DN10 is used to connect the air duct.
To make a burner for testing with your own hands, you need to perform one precise operation - make a hole in the center of the sphere. The hole diameter is from 0.1 to 0.4 mm, ideally 0.25 mm. It can be done in 2 ways: drill with a tool of the appropriate diameter or install a ready-made jet at 0.25 mm.
Important! The hole must be made strictly in the center, and its axis must be parallel to the walls of the housing (tee) in which the sphere will be installed. The deviation is allowed to be minimal, otherwise the torch will hit to the side, which will affect the stable operation and consumption of the burner.
It is not easy to accurately make such a small hole; thin drills easily break. Instructions on how to do this correctly are shown below:
Another way to make a calibrated hole in the spherical part of an autonomous burner is to insert a nozzle of the required diameter there. To do this, a hole is drilled, the diameter of which is slightly less than the outer diameter of the nozzle, and processed with a reamer. The jet is pressed inside and polished, as described in the video:
Note. If you need to make high-power burners, then the diameter of the nozzle can be increased to 0.4-0.5 mm or 2 small holes can be drilled, keeping a distance of at least 7 mm between them.
When this operation is completed, we assemble the burner based on the drawing:
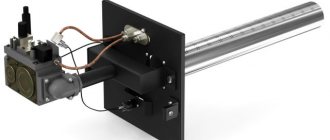
A hole must be made on the side of the nozzle wide enough to ignite the unit. A large fuel heating spiral is not needed, 2-3 turns are enough. The finished product can be mounted on a mounting plate and built into any boiler, including a homemade one. At the end of the work, you need to connect the air and fuel lines, and then organize the supply of oil and air. The simplest method of fuel supply is by gravity; for this purpose, the waste container is suspended from the wall above the burner device and a tube is laid from it.
If you use a pump to pump oil, you can subsequently use control sensors and a control unit, then you will have an automatic burner that will be safer to operate. Detailed instructions for selecting materials and assembling the device are shown in the video:
If everything is done correctly and the diameter of the air hole is 0.25 mm, then the fuel consumption of the burner should not exceed 1 liter per hour. There should be no black soot during combustion; you need to achieve even burning of the torch. The adjustment is carried out by moving the sphere back and forth or changing the air pressure. Any compressor can cope with its injection, even from a refrigerator, since the operating pressure does not exceed 4 Bar.
Operating rules
In order for the burner to be safe to operate, all parts associated with the supply of air and waste oil must be sealed. It is also worth saying that it is necessary to protect the mining storage from accidental penetration of fire into it. To do this you need to make an iron screen. It can also be made from other fire-resistant materials.
For safety, it is also very important that the torch burns strictly straight (this depends on the accuracy of placement in the very center of the drilled small hole). Correct adjustment of the oil supply to the burner is also considered very important. It can be implemented due to the longitudinal displacement of the tube with a sphere (hemisphere) in the middle of the tee.
Blitz tips
- If you set the fuel supply correctly , the Babington burner is the most economical and consumes only 0.5–1 liters of waste per hour. And air consumption will be only a couple of liters per hour.
- If you additionally add a chimney and a firebox with a water jacket to the circuit, then such a burner can be used as a real boiler for heating a private house.
- blower from an old refrigerator can be used as
- A system of this type does not stop working reliably even on a mixture of a wide variety of used oils containing gasoline , diesel fuel, various additives and even antifreeze, which, of course, gives it an advantage over factory-made similar ones.
- The heat from such a burner is extremely strong , and the power, depending on the combination, is more than 10 kW.
Complete photo and video instructions for making a burner using a blowtorch
Furnaces and boilers that operate during mining have long taken a good place among devices for heating premises. Mining is an inexpensive and sometimes free type of fuel; it is sometimes used for this purpose in car repair shops and garages. Many specialists, when choosing a design, ask themselves: is it possible to convert a gasoline lamp for soldering into a burner during testing?
Babington waste oil burner: drawings and principle of operation
This type of burner was developed in the 1960s and gained its popularity as a stove among owners of summer houses and utility rooms that needed to be heated.
Since the burner runs on liquid waste oil, its use is quite cheap when compared with gas boiler heating, electricity or solid fuel. This is a more economical option than a gas burner.
Used oil is a kind of cheaper alternative to all types of fuel. In addition to the fact that with the help of a burner using waste oil it was possible to heat rooms, it can help with the disposal of used and no longer needed oil. Suitable for both diesel and oil running.
- Principle of operation
- What is required for production
- General view of the finished structure
- Let's start making our own
- Manufacturing of the installation
- How is oil supplied to the burner?
- How is air regulation carried out?
Principle of operation
This device works in the same way as a whale breathes. The oil flows along a curve and, due to surface tension, creates a thin film.
When a jet of air under pressure from small holes pierces the fuel sheet, the combustible mixture is productively atomized, and a certain amount of air picks up the atomized fuel, which completes the entire combustion process. Therefore, efficient combustion does not require any additional air flow.
The main advantage of Babington burners is the absence of any nozzles, which often become clogged, because the fuel immediately comes from above the small air holes.
Please note: since the pump can operate on fuel with various impurities, metal shavings, dirt, a fuel sump will need to be mounted to the burner as a filter, and placed just below the nozzle.
Is it possible to make a soldering lamp work during testing?
The working principle of an ordinary blowtorch is to ignite gasoline vapors, which are pushed out under the influence of compressed air. This effect is achieved by forcing air into the burner fuel tank.
What happens if you pour used oil into a soldering lamp?
Oil itself, even under pressure, does not evaporate well - it must be heated. Due to poor atomization, the flame will be uneven and it will not be easy to light the burner. The oil burns with the formation of a significant amount of soot and soot, due to which the nozzle will quickly become coked, its cross-section will become smaller, and the lamp will break. Increasing the cross-section of the nozzle will also not give the expected effect - the oil will be sprayed in large drops, which will not make it possible to obtain the same flame of the torch.
Moreover, used oil often contains impurities: diesel fuel, gasoline, antifreeze and even water, which can lead to flashes in the middle of the lamp. To use the waste as fuel for a blowtorch, you will have to install a filtration system, this will further complicate the task.
Taking into account all the difficulties, using a gasoline lamp for soldering as a torch during testing is difficult and unsafe. Due to this, it is necessary to modify or completely change its design.
Babington burner - do it yourself
This type of burner was developed in the 1960s and gained its popularity as a stove among owners of summer houses and utility rooms that needed to be heated.
Since the burner runs on liquid waste oil, its use is quite cheap when compared with gas boiler heating, electricity or solid fuel. This is a more economical option than a gas burner.
If you have no desire to make anything with your own hands, then you can buy yourself a ready-made burner. High-quality diesel burners can be purchased from the official representative on fbr.ru at a good price.
Today, diesel burners for R boilers are considered one of the most reliable, functional and environmentally friendly.
Used oil is a kind of cheaper alternative to all types of fuel. In addition to the fact that with the help of a burner using waste oil it was possible to heat rooms, it can help with the disposal of used and no longer needed oil. Suitable for both diesel and oil running.
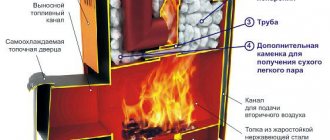
How to make a burner for mining yourself
For successful combustion of oil, it is necessary either to preheat it to the evaporation temperature - approximately 300 degrees Celsius, or to finely spray and enrich the oil vapors with air. It is possible to heat the oil to such temperatures using powerful tubular-type heating elements, but this will increase the cost of electrical energy. An oil aerosol can be created by applying a stream of compressed air through a layer of oil. This effect is implemented in a Babington burner - a device, an analogue of which you can assemble with your own hands from scrap parts.
Babington burner - replacement for a blowtorch
The Babington burner was originally patented to run on diesel. Later, having made small changes to the design, the craftsmen changed the design with their own hands and adapted the burner for burning waste machine and edible oils. The degree of oil contamination is not of great importance, since the fuel channels of the unit do not have narrow places prone to blockages.
Unlike a blowtorch, where the fuel-air mixture is sprayed under pressure through a spray device, in a Babington burner oil is pumped from a reservoir using a low-power pump and flows in a thin film along an inclined or spherical surface, and the oil-air mixture is formed as a result of blowing a thin stream compressed air through this film.
The spraying effect is shown firsthand in the video:
- The Babington burner has several practical blocks:
- Fuel - tank, pump and pipes for fuel supply.
- Air, it consists of an air blower and an air tube.
- A hemisphere with a small diameter hole where the air stream mixes with oil.
- A nozzle that directs the flame in the required direction.
- a large selection of fuel - used machine oils, lubricants of any viscosity, diesel fuel, fuel oil, any vegetable oils, also food production waste;
- the presence of impurities in the fuel;
- structural simplicity - you can create it with your own hands.
The usual design can be modified with your own hands, increasing its effectiveness. To do this, the fuel tank is equipped with a heater that heats the oil before the burner starts operating, which makes it possible to increase its fluidity. Moreover, a fuel channel made of an iron tube can be wound around the nozzle - in a similar way, the oil will be heated during the operating period of the burner.
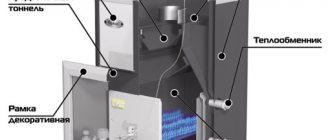
The burner nozzle is directed into the boiler, where the fuel chamber and water jacket are heated. You can also use the device for melting and heating metals.
Positive qualities of a self-made Babington burner:
Minuses:
- difficulty setting up the burner, which often manifests itself when changing the type of fuel;
- aroma and dirt - the burner cannot be installed in residential premises; a heat generating unit is required;
- The use of a burner involves an open flame, so fire-resistant measures must be observed.
The heat generating unit in the room must first of all be a powder or salt chemical fire extinguisher!
DIY Babington burner
You can assemble the burner with your own hands from ordinary parts; to do this you will need:
- A hollow ball or hemisphere with similar wall thickness so that you can make a hole with a diameter of no more than 0.3 mm. You can use any metal objects of a similar combination, for example, a brass handle for a spherical door, nuts with plugs. The main requirement is the possibility of good fastening of the air channel.
- Iron tube to supply compressed air from the air blower, diameter - 10-15 mm.
- An air blower, for example, from a refrigerator, with a working pressure of 2 atm, the highest - 4 atm.
- Fuel tank with a built-in 0.5-1 kW tubular heater made of non-corrosive metal.
- Fuel sump and drain pipe for excess oil back into the tank.
- Copper tube, diameter - 10 mm, wall thickness - 1-1.5 mm for the fuel channel.
- An oil pump from a car or bike with an electric motor to drive the pump. It is best to equip the pump with a filter with a large mesh at the inlet.
- Nozzle - a piece of pipe 200-400 mm long with an external thread of 2 inches.
- Crosspiece for two-inch metal pipe with internal thread.
- A piece of 1" threaded pipe and a 2/1" adapter to drain excess fuel into the sump.
- Adapters and fittings for connecting the fuel path, air channel and nozzle.
Preparing burner components for assembly
- The main and very important task is to make a hole of a given diameter in a spherical spray device. The power of the burner depends on its size. For example, a boiler with a heating capacity of 10-15 kW requires a burning torch, obtained during operation of a burner with one hole with a diameter of 0.2-0.25 mm. To obtain high power, there is no need to expand the hole - this can lead to very large droplets. It is better to make 2-4 holes with a diameter of 0.1-0.3 mm with a distance between them of 8-10 mm, otherwise the torches will be extinguished on each other. Fuel consumption can be calculated as follows: through one hole of 0.25 mm, 2 liters of waste are sprayed per hour.
Video about how you can create small diameter holes in an iron hemisphere:
- The tank is made of corrosion-resistant metal. A tubular-type heating element is built into it with an external water thermostat set to turn off the tubular heater at a temperature of 70 degrees Celsius.
- A fuel sump equipped with a pipe with an overflow should be made from a similar material. Through this pipe, oil from the sump will flow back into the tank. To drain dirt from the sump, you can install a plug in its bottom.
- The burner body is assembled: a nozzle from a piece of pipe is connected to the 2-inch cross in front, then adapters: from the top for oil supply, from the back for air. From below, a 2/1-inch adapter and a piece of pipe are connected to the crosspiece, through which excess oil will flow into the sump. The adapters are made of plugs with drilled holes into which the fuel and air duct pipes are inserted.
You can also make a housing from a tee, in which the air duct is inserted into the upper part, having previously drilled a hole of the required diameter.
- The fuel path is made of a copper tube, one end of which is wound around the nozzle three times, and then brought out into the housing from above through a plug adapter. The fuel pipe is connected to the pump, a reusable mesh filter is installed, and the second end of the pipe is inserted into the tank. The fuel path can be equipped with a valve. The pump is connected to an electric motor operating from a 220 V network.
- An air duct made of an iron tube is attached at one end to a hemisphere with a hole, having previously installed a plug adapter at the required distance. The hemisphere must be positioned in such a way that the oil from the fuel tube flows equally onto the rounded part of the spray device, and then into the lower part of the housing and into the sump. The rest of the air channel is connected to a compressor, which is also connected to a 220 V network.
- Since the installation will have as many as three consumers of electrical energy, which are not turned on simultaneously, it is best to equip the burner with a control panel: install a separate toggle switch or button to turn on the tubular heater and a separate toggle switch to turn on the air blower and pump. If you wish, you can equip the remote control with a light alarm made from diode lamps.
- You can equip the burner with a controller that automatically turns on the units according to the selected mode. Electric ignition is realized using spark plugs, and to extinguish the burner it is enough to close the oil supply.
Video - burner assembly diagram:
Preparing fuel for the burner
Virtually any waste oil can be used in a Babington burner. Automotive waste with a high amount of foreign inclusions is cleaned before being poured into the tank through a mesh and mixed with cleaner oil. Oils with a small amount of impurities can be poured without preparation.
When using edible vegetable oils, for example, deep-frying, it is recommended to let it sit for several hours and carefully drain the residue. These oils are sufficiently fluid at normal temperatures, so they can be heated in the tank only when the burner is started. When using fuel oil and other thick materials, they must be heated to a temperature of 70 to 90 degrees, otherwise the pump will work with overload.
Video on the topic
#1 professor
winner 2008: best Manta
- Our users
- Messages: 809
- Gender: Man
- Interests: Everything related to OPEL MANTA!
- Car: opel manta
- Real name: Ivan
- Place of residence: Yeysk city, Krasnodar Territory
So I actually decided to open a topic. In our cold times, I think it’s quite important to heat garages. boxes. Houses. The device and operating principles can be viewed on YouTube. https://www.forumhouse. /threads/84957/ true Babingtonians gather here https://lunohodov.net. t. asc&start=0 The photo here shows a very primitive burner design.
The burner itself was invented in the 60s in America. The patent was recently withdrawn. the drawings were made publicly available. I assembled this burner myself. 1. oil supply. very important! consists of a reservoir. oil pump (vaz.gaz.mot ural.etc.) in my case it’s a gas 402 engine.. lying around with a broken drive. electric gearbox. maybe with a vase. but it’s better with a foreign car. they are more powerful. power unit. In our case, 5 volts per gearbox is enough. A 450 watt unit was taken from a computer. We connect the green wire with the black wire in the center of the block (green is the only one there) and throw it on the yellow-black (12 volts) or red-black (5 volts) load. any. then we turn it on. without load the unit will fail after switching on. Depulsator is a device for smoothing the oil supply from the pump. It consists of a small cylindrical tank with a volume of 50 grams. With oil supplied from above. return in the middle and fuel supply to the burner. automatic tena... there are plenty of them on sale. any with a temperature controller.
Security measures
- A burner using oils and other GSPs can be dangerous if poorly installed and operated; in order to avoid a fire, a number of measures must be observed:
Do not leave a burner with an open nozzle unattended while it is running!
The Babington burner, unlike a blowtorch converted for working in mining, is a durable and reliable device that does not require complex maintenance. It will be enough to occasionally clean the fuel system, tank and sump, blow out the air duct in idle mode, and also monitor the serviceability of the air blower and oil pump. A working burner is a good and economical device with a long service life.