Here you will learn:
- Advantages of waste furnaces
- Select a drawing
- Assembly sequence
- Starting a potbelly stove
- Work on other types of fuel
Used engine oil is an inexpensive and popular type of fuel. It is used for heating residential and non-residential premises by burning it in factory-made or home-made stoves and boilers. In this review, we will talk about one of these homemade products - this is a small but effective potbelly stove for testing. Characterized by its small dimensions and simple design, it produces a large amount of heat. In conclusion, we will talk about a combined unit that can work on mining and firewood.
Advantages of waste furnaces
It’s very easy to make a potbelly stove with your own hands. To do this, you will need skills in working with metal and a welding machine. A good master will cope with it literally in one day. It is the simple design that is the main advantage of this heating unit. The operating principle of the model we are considering is the creation and subsequent ignition of a combustible mixture of air and waste oil vapor .
We can say that the potbelly stove works on the principle of pyrolysis. After all, heat generation occurs in several steps:
- The oil is heated and burned in the first chamber at a low temperature.
- The combustion products remaining in the exhaust burn out in the second combustion chamber, which is connected to the first via a tube.
- Combustion products are sent into the chimney, while the resulting heat is directed to the heated room.
An oil stove, after it reaches operating mode, burns waste so completely and efficiently that we will practically not see any smoke from the chimney. If you expect black soot, like from an old diesel locomotive, then there will be nothing of the kind here - in operating mode, only whitish smoke comes from here, and in some cases this is not visible.
The potbelly stove is highly efficient during mining. Used oil is burned here completely and without residue. Due to this, the internal surfaces and components remain clean for a long time, without the need for frequent cleaning. Such stoves are often used to heat small workshops, private craft shops, and garages. Those who change oil in cars get a good profit in the form of a large amount of waste.
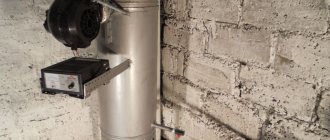
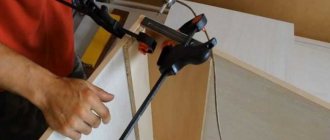
Installing and testing the device
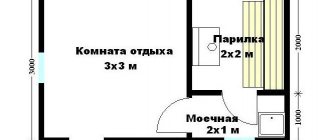
The stove is installed in a fire-safe place, not on a wooden (linoleum) floor. It is advisable to provide a container with sand in the garage in case of fire. Drafts and installation in cramped conditions (under hanging shelves, racks) are excluded. Pour oil into the lower tank. It is advisable to clean it before use and let it sit.
A chimney must be installed, otherwise the stove cannot be used in the garage. Water impurities are not allowed in the oil. First, pour in a small portion, a couple of liters. Then, using a paper wick, set fire to the oil in the tank. By opening or closing the damper, stable traction is achieved. After 2-3 minutes, the stove returns to operating mode and the oil begins to boil. The unit is ready for use.
Select a drawing
Drawing of the most efficient potbelly stove using waste oil.
Let's look at the details - before us is a stove consisting of three main parts. Part one, the lowest, is a container with a small hole for pouring fuel and ignition. This container plays two roles - it acts as a tank and works as the primary combustion chamber. The container lid also serves as a kind of combustion intensity regulator.
The next part is a tube with holes that is welded to the lower container. The holes are used to take in secondary air. It mixes with the evaporating waste, resulting in the formation of a combustible mixture that burns to form a high-temperature flame. When the potbelly stove warms up and reaches operating mode, the pipe will literally hum under the pressure of the fire. The final combustion occurs in the upper chamber.
The upper chamber of our potbelly stove is round. But nothing prevents you from making it rectangular (like the bottom one). By increasing the area of the upper surface, you can create a kind of hob so that you can boil a kettle and warm up with a cup of warm drink. In the upper part of the second chamber of the potbelly stove we see a small pipe - it serves to connect the chimney. That's the whole scheme - simple and unpretentious.
Assembly sequence
A potbelly stove using waste oil will delight you with its quick assembly. It can be welded from the remains of an old gas cylinder or any other metal container of suitable diameter. It is also possible to assemble from sheet iron with preliminary cutting, giving it the desired shape and welding. The first task is to build the primary combustion chamber. Its diameter is 344 mm, height – 115 mm. A sealed bottom is welded to the bottom.
A well-assembled potbelly stove will provide good heat transfer with fairly modest oil consumption.
The stove itself is installed on metal legs of any design. In our case, they are made from a metal corner and have a height of 100 mm. There are four legs in total - a potbelly stove using oil (working off) must stand on the working surface as stable as possible, since liquid fuel is blazing inside it.
Next, we need to make a lid that fits tightly onto the main part of the primary tank of our potbelly stove. It is not flat - it is a piece of pipe with a diameter of 352 mm with a round sheet of the same diameter welded to it. Two holes are cut in the upper part - one with a diameter of 100 mm, which is used for welding a tube with holes, and the second with a diameter of 60 mm, which is used for filling the unit with waste and adjusting the air supply.
The lid for filling the potbelly stove with waste and adjusting the air supply is made of metal and placed on a rivet.
The next part is a vertical tube with a height of 360 mm and a diameter of 100 mm. It is necessary to drill 48 holes in it - 6 rows of 8 holes each, in a kind of checkerboard pattern. The first row is 20 mm from the bottom of the pipe, the last row is 55 mm from the top. The diameter of the holes for supplying secondary air to the stove is 9 mm. The waste will burn here, so you need a lot of air.
The next stage of making a potbelly stove during mining is the creation of a secondary chamber. Its diameter is 352 mm, for its construction you will need two covers, upper and lower. We make holes in both covers with a diameter of 100 mm, but not in the center, but 110 mm from the center (closer to the side). We weld a steel partition 330 mm long and 70 mm high from the inside to the top one. We weld the potbelly stove to burn the waste into a single whole, making sure that the holes in the lids are not on top of each other, but on opposite sides. We weld a chimney pipe with a height of 130 mm and a diameter of 100 mm to the top cover.
Final assembly
We have in our hands three parts of our potbelly stove:
- Primary container with a removable lid and a hole for pouring waste.
- Tube with holes for secondary air intake.
- Secondary combustion chamber with a pipe for the chimney.
At the final stage of assembly, we weld together the cover of the primary combustion chamber (the cover must remain removable), a pipe with holes and the secondary chamber. Now everything is ready for testing.
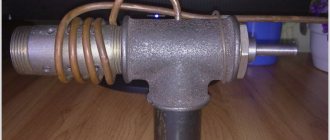
How to make a drip stove from a balloon
As a rule, an exhaust stove with a drip supply of oil into the bowl is made from a pipe with a diameter of 200 mm or an old propane gas cylinder. The latter is better to take the Soviet model, where the wall thickness is up to 5 mm.
When making a firebox from a pipe, you will have to make and weld a bottom and a lid to it. In this regard, a gas cylinder is more convenient: you need to unscrew the valve, fill it with water and cut off the upper part with a grinder. After this, follow the instructions:
- Make holes in the housing for the chimney and in the lid for mounting the afterburner. An inspection opening can be cut in the lower part of the cylinder, closed with a bolted lid, as shown in the drawing.
- Make an afterburner pipe by drilling holes according to the drawing. Use a cutting wheel to make 9 grooves at the bottom end.
- Make a steel bowl, possibly from a car brake disc, as shown in the photo. Place it on the bottom of the firebox, lifting it 3-5 cm.
- Replace the afterburner and put on the cylinder cap. Insert the oil line into the pipe so that its end is above the bowl.
- Make a fuel tank with a fitting (for example, from a heating expansion tank) and hang it on the wall near the stove. All that remains is to connect the chimney and you can start igniting.
If you want to make an exhaust furnace with a water circuit, then place a coil made of a thick-walled tube inside the firebox, preferably stainless steel. Place it in the upper zone, and lead the ends of the tubes out through the holes in the walls. Then they can be connected to the garage water heating batteries, as shown in the photo.
Details about the design of a drip furnace using waste oil, made with your own hands from a gas cylinder, are described in the following video:
Starting a potbelly stove
Now we will learn how to heat a potbelly stove by working off. The task is to bring the furnace to operating mode. Cold mining is a combustible material, but it is not capable of producing a high-temperature flame. Therefore, it needs to be warmed up. We install the potbelly stove on a good foundation, connect the chimney to it - its recommended height is 4-5 meters. Next, we pour the waste into it.
Do not try to use gasoline or other aggressively burning liquids here - their ignition can lead to serious burns and explosions.
At the next stage, we will need kerosene, which serves to speed up the ignition process. It is poured over the workings into the first chamber. Kerosene ignites softly, so it is suitable for our purposes. You can also use charcoal BBQ lighter fluids (slow burning).
We ignite our fuel mixture with a match (it’s better to throw a burning piece of paper into the tank), and adjust the supply of primary air. A burning flame will appear in the vertical perforated pipe. It will be slightly torn, since the potbelly stove is still cold. As it warms up, the flame will begin to brighten and hum – it should become almost white, with a slightly yellowish tint. Only in this case will the extraction release maximum thermal energy.
It is strictly forbidden to refuel the potbelly stove at full speed - wait until one portion burns out and only then fill in the next one. If you can’t stand it, increase the volume of the primary chamber. If this is not enough, weld a pipe to connect a metal fuel hose with an adjustment valve to the primary chamber of the potbelly stove. Connect this hose to a suitable large capacity fuel container. In this case, the potbelly stove will be able to burn indefinitely.
Basic safety measures:
- Clean the chimney regularly - the stability of combustion of waste in a potbelly stove depends on this.
- Do not use other types of fuel (for example, diesel fuel).
- Install the stove on a solid, non-combustible base. We strongly recommend making legs with holes for bolts - secure the primary chamber to prevent it from tipping over.
In addition, do not keep containers with flammable liquids near the stove. The distance to the nearest walls should not be less than 50 cm. To increase efficiency, we recommend covering the walls with galvanized iron to reflect the flow of thermal energy towards the room.
Work on other types of fuel
There is no need to bother with exact adherence to the millimeter - many craftsmen assemble potbelly stoves by working on them “by eye”, obtaining excellent results.
In our reviews, we have repeatedly published diagrams of conventional wood-burning stoves, including the pyrolysis type. They are made from sheet iron or old gas cylinders. Being equipped with large fireboxes, they allow you to burn almost any type of solid fuel. If you try, you can make a universal heating device - this is a wood-burning stove.
To do this, you will need an exhaust burner, shown in the figure below. Here we see the same primary combustion chamber with a perforated vertical tube connected to it. Only the final combustion will take place not in the secondary chamber, but in the chamber of the wood-burning stove. Your task is to arrange a removable door on it so that you can turn on the presented burner instead.
Converting a potbelly stove for mining is not particularly difficult - just use the diagrams and tips published in our review.
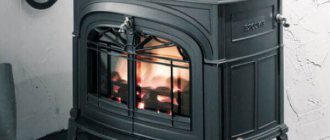
Homemade wood-burning and waste stove
A simple internal structure and at the same time high thermal efficiency - these are the qualities that distinguish a wood-burning and exhaust stove. The elementary design without complex components allows you to make your own stove from available materials.
Homemade stoves are used for heating warehouses, garages, auto repair shops, etc.
What is better to make a combination stove from?
There are several ways to make a wood-burning stove with your own hands:
- The simplest device made of steel and metal containers (cylinders).
- Models that use forced air injection - turbocharging.
- Drip feed device for mining.
As for furnace equipment with drip feed, it is quite difficult to make it completely safe, calculate productivity and meet other conditions on your own. For this reason, the choice should be made on a homemade universal stove using waste oil and wood with natural and forced air supply.
In the first case, the oven is made exclusively from steel sheets with a thickness of at least 5 mm. It is permissible to use gas cylinders, which are filled with water before cutting to prevent the remaining gas from exploding.
Two closed containers are made from the body of the cylinder, connected to each other by an adapter - a metal pipe, 2-3 mm thick. Holes are drilled in the connector at equal distances from each other.
As a result of assembly, a kind of attachment for mining is obtained, installed on the floor at one end, and the other is built into the firebox of a solid fuel furnace. Homemade universal stoves using waste oil, wood, sawdust and garbage, with built-in water heating, are equipped with an aluminum or copper coil.
A slightly more complicated device is one with a built-in fan that forces air currents to burn waste. Some users install a fan next to the stove, directing the air flow into the ash pan.
Combined type stove for firewood and mining
A universal metal furnace for working and wood burning has a device in which oil is supplied from above, and firewood is laid from below. In the process of burning solid fuels, the principle of top combustion is used.
The design of the furnace has the following features:
- Convective channels – wood-burning stove, hot air stove. The room is heated by radiation from the heated metal walls. To increase thermal efficiency, several pieces of pipe are welded onto the body. This is how the simplest air heating device appears, using the principle of convection heating.
- A water jacket is a self-made stove using wood and waste oil with a water circuit that allows you to heat not only the room with the installed heater, but also adjacent rooms. A simple coil is installed inside the housing. A piece of curved pipe of the appropriate diameter will do. For better heat transfer, a copper or aluminum coil is used. The heat sink is installed so as to avoid direct contact with fire. Heating is carried out through heated flue gases.
- Firebox - regardless of what you plan to use to heat the furnace, use an attachment for mining or firewood, the principle of pyrolysis combustion is applied. First, the fuel itself is burned, and then the exhaust gases are burned. For this purpose, the design includes two combustion chambers.
In furnaces with natural air supply and exhaust, special nozzles are used inside the housing to ensure the necessary oxygen flow.
How to convert a wood stove for mining
Converting a wood stove to use used engine oil does not require changing the internal structure or design of the heater. As a rule, a special attachment for testing is made for this purpose, consisting of the following components:
- The primary combustion chamber is actually a waste pan, with the simplest purpose of storing fuel and providing sufficient evaporating surface area necessary for burning the oil.
- The hole for the fuel supply is on the side of the made fuel receiver; a piece of small diameter pipe is welded. The mining will be poured through the hole and set on fire.
- Secondary combustion chamber - there is no full-fledged combustion chamber in the device for burning waste. The afterburner is a curved pipe of sufficient diameter connected to a pan. Injection holes are made along the entire length - nozzles for the supply of air necessary for secondary combustion during pyrolysis.
- Protective casing - when upgrading a wood-burning stove for used oil, it is taken into account that the main heating will be carried out by the steel walls of the stove, and not by the oil burner or attachment. For this reason, the pipe extending from the pan is bent so that it is approximately in the center of the open door of the solid fuel heater. A steel casing is welded along the edges to the size of the firebox of a wood-burning stove, preventing smoke from entering the room.
Modifying the furnace to use oil is not difficult and requires minimal financial investment.
How to use oil in a wood stove
An all-in-one stove that runs on both waste oil and wood requires proper operation and the ability to refuel and ignite liquid fuel. Precautionary measures are especially necessary when operating homemade stoves.
Refueling and ignition are performed as follows:
- You can add used oil to the oven through a special hole with a pipe located on the attachment, specially made with a small diameter. Refueling is allowed while the fuel is burning. The tray is filled ⅔ full.
- Ignition - sawdust mixed with waste oil is used to light the fuel. If the exhaust is cold, after refueling, add flammable liquid to the fuel receiver. Ignition is performed using paper rolled into a tube.
After the oil flares up, as evidenced by a uniform hum, the stove is switched to the long-burning mode, closing the slide valve.