Classification
You can find a huge number of different models of boilers for baths, which can be divided into separate groups according to different factors.
By fuel type
Kinds:
- Gas. Compact designs that consume little fuel. To connect the equipment, you need access to the central gas supply system.
- Solid fuel. Popular models of stove equipment that use different types of firewood. The surface of the boilers heats up quickly and releases heat for a long time.
- Boilers running on liquid fuel. To operate them, you can use waste oil, kerosene, and diesel fuel. When burning, liquid fuel emits an unpleasant odor. Therefore, boilers must be installed in separate rooms.
- Electrical. Equipment that does not pollute the environment. There is no need to assemble the chimney during installation. Electric boilers are connected to 220 or 380 V.
Pyrolysis boilers can be classified as a separate group. They have the highest efficiency rate. The design has an additional chamber in which the wood gas released after burning wood is burned.
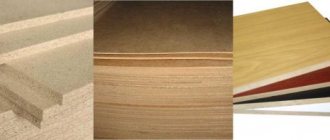
By material
Modern boilers are made of metal, since this material is reliable, durable, and wear-resistant. Some types of alloys are susceptible to rapid rust formation. Therefore, boilers need to be coated with special protective compounds.
By shape and volume
According to their shape, boilers are divided into two groups:
- Cylindrical - you can find seamless units on sale that are made from large diameter pipes. Suitable for installation in small steam rooms.
- Rectangular - such boilers are easier to find on sale. If you make equipment of this shape yourself, you need to learn how to work with a welding machine.
The volume of the boiler depends on the size of the room that needs to be heated.
Types of boilers
Depending on the type of fuel used, the entire variety of modern sauna boilers can be divided into several categories:
- Electric models. They are distinguished by the absence of harmful emissions of combustion products and the absence of the need to install a chimney. They do not require fuel reserves, but during any power outage they become useless.
- Gas boilers. The most economical of all the presented models, provided that the site is already gasified. There is also no need to prepare fuel reserves.
- Solid fuel. The most common type of boiler. During operation, they require periodic loading of new portions of fuel. They are rightly considered the most accessible for independent production.
- Diesel. Liquid fuel is used as a heat source. Due to the complexity of the design, they are not suitable for self-production.
- Pyrolysis (combustion of solid fuel and volatile substances occurs separately).
We recommend that you read: How to build a plasterboard box yourself to disguise pipes in a toilet?
Device
Design elements:
- Kamenka. A container that is filled with stones. To obtain steam, they need to be heated to maximum temperature and doused with water.
- Combustion chamber. Made from thick metal sheets.
- Grate. Separates the combustion chamber from the ash pan.
- Ash box.
- Container for water.
- Blower. Hole for supplying fresh air to the combustion chamber.
- Doors for firebox, ash pan.
Separately, you need to buy a chimney to remove gases remaining from the combustion of fuel from the firebox.
Features of the boiler design for the furnace
The boiler, like any other sauna stove, must necessarily consist of the following structural parts:
- The furnace in which fuel combustion occurs;
- A chimney through which smoke from burnt fuel is removed;
- Ash pan for ash extraction;
- A heater that allows you to redistribute and remove heat;
- Water tank.
You can make a boiler without a heater, in this case the bath will be heated only from the walls of the boiler and the tank, but the steam in such a bath will be heavy, because the heat from the firebox will only be used to heat the water, while it will quickly boil and fill the bath with thick steam .
The boiler firebox is made of thick-walled metal - it carries the greatest thermal load, and thin metal will quickly burn out. The bottom of the firebox must be equipped with a grate through which the ash from the firewood is poured into the ash pan. The thickness of the grate must be at least 5 mm.
An ash pan is a space under the firebox, the purpose of which is to collect ash and conveniently remove it. Through the ash pan door, air is drawn into the firebox, causing fuel to burn.
The chimney is part of the combustion system. It must be equipped with a valve or gate, the degree of opening of which can be adjusted to the draft. The chimney passes through the tank or heater, heats it and ends in a chimney.
A heater is a built-in or mounted container in a boiler in which special stones for a bath are placed. The volume of the heater depends on the size of the boiler and the sauna itself: a heater that is too small will not be able to warm up the room, and a heater that is too large will require prolonged heating of the stones, during which time the water in the tank will boil and the sauna will be filled with water vapor, making it hot and uncomfortable. Therefore, you should adhere to the rule: the volumes of the heater, water tank and firebox should not differ much.
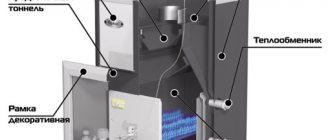
Heater sample
1 – lining with refractory bricks; 2 – steel barrel; 3 – metal pipe; 4 – water tank; 6 – partition between the heater and the firebox made of channel or reinforcement; 7 – combustion chamber.
Necessary tools, materials
To make a sauna boiler you will need the following tool:
- Welding machine;
- Grinder with cutting wheel.
In addition to sheet metal or barrels, you will also need:
- trimmings of reinforcement and channel for the manufacture of internal through partitions;
- sheet of thick-walled (minimum 5 mm) metal for the grate;
- pipe with a diameter of about 100 mm;
- metal hinges for the door;
- tank tap.
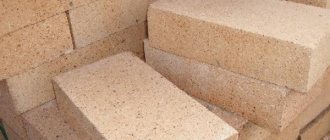
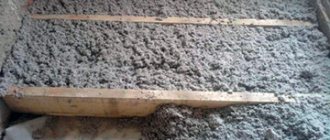
To create a screen that allows for better heat distribution throughout the steam room, fire-resistant bricks are used. It is laid out on the outer side of the walls closely or at some distance, or the inner walls of the firebox are lined with it.
Boiler for sauna from a barrel
The simplest design that allows you to make a boiler from scrap materials. Such a boiler is made from a metal barrel with a wall thickness of at least 3 mm - thinner walls will quickly burn out.
- The bottom of the barrel is cut out and instead, a bottom made of metal with a thickness of at least 5 mm is installed with legs welded to it from scraps of a channel or I-beam.
- At a distance of 3-5 cm from the bottom, use a grinder to cut out a window measuring 15x10 cm - this will be the door of the ash pan and ash pit. The door itself is made from a sawn piece of metal. Weld hinges and a latch handle to the door. Fasten the door in place.
- Above the ash pit, 5-7 cm, a grate is welded into the barrel - a sheet of metal cut to the shape of a barrel, with holes for air intake and ash discharge. The holes are usually made longitudinal, in the center, 1/2 the diameter of the grate. You can simply weld a row of thick reinforcement rods inside the grate.
- 5-10 cm above the grate, by analogy with the ash door, cut out the firebox door, measuring at least 25x40 cm, otherwise it will be inconvenient to put firewood into it. They also weld the latch handle and hinges, and put the door in place. The walls of the firebox are lined with refractory bricks.
- A heater is located above the firebox, and the height of the firebox is selected as 1/3 of the height of the barrel minus the ash pan. The partition between the firebox and the heater is not solid; it is made from channel scraps, and the holes between them should not exceed the size of the stones. The height of the heater is approximately equal to the height of the firebox. In the middle part of the heater it is necessary to make a window with a door - through it stones are placed inside the boiler, and water is added into it when steaming.
- The top of the barrel acts as a water tank. The partition between the heater and the tank must be solid, the seams are well welded, and in the center of the partition there is a hole with a diameter of about 100 mm, to which a piece of pipe is welded with a height twice as large as the height of the water tank. The water in such a tank is heated due to hot smoke passing through the pipe, as well as thermal radiation from the stones in the heater.
- The upper part of the tank is made in the form of a lid through which water is poured. You can just make a hole, but then the tank will be inconvenient to wash. A piece of half-inch pipe is welded into the lower part of the tank, and a tap is attached to it using a thread.
The resulting boiler is cleaned of scale and rust and, if desired, coated with heat-resistant polymer paint - it is sold in stores that sell sauna stoves.
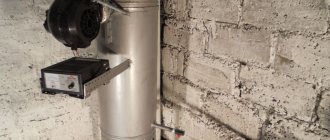
Sample of a finished boiler
DIY making
Anyone can assemble a boiler for a bath with their own hands. To do this, it is enough to prepare a place for its installation, make a drawing of the equipment, collect consumables, tools, and perform the work.
Scheduling and preparation
Before starting work, it is recommended to make a drawing of the future device. On it you need to indicate the dimensions, individual elements, and places of fastening of the boiler parts.
Materials and tools
Consumables:
- metal sheets or large diameter pipe for the body;
- tap for water tank;
- steel pipes for the manufacture of a heat exchanger;
- doors for the firebox, blower;
- fittings for the grate;
- channel, fireclay brick;
- clay mortar;
- pipes for chimney assembly.
Tools:
- drill with drills;
- hammer, pliers;
- welding equipment;
- grinder with metal discs;
- tape measure, building level.
Additionally, you need to prepare protective equipment.
Carrying out work
It is easier to assemble the boiler not from individual metal sheets, but from a large diameter pipe. It needs to be divided into parts:
- The bottom is an ash box. Height - 10 cm.
- The middle one is the combustion chamber. Height - 30–40 cm.
- The top one is a heater. Height - 40 cm.
The water tank must be mounted around the chimney.
Execution of work:
- Fix the fittings inside the pipe along the intended sections to create separate demarcation grids.
- Fix a thick sheet of metal between the combustion chamber and the heater.
- Make a hole on the back side of the combustion chamber on which to secure the initial elbow of the future chimney.
- On the front side, cut three rectangular holes for the ash pan, firebox, and heater.
Basalt slabs must be fixed to the walls surrounding the boiler. Screw stainless steel sheets on top of them. You can make a water tank yourself. To do this you will need several metal sheets. Make a hole in the bottom of the container to attach the tap. In the upper part - for filling with water.
Do-it-yourself gas boiler assembly
To manufacture the unit yourself, it is important to have basic skills in working with such equipment.
It should be remembered that the level of safety of devices created at home is lower than in the case of factory-made units. It is important to ensure high-quality tightness of connections and carefully select the materials used.
Finding the base material for the boiler
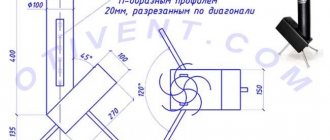
The boiler body will be a piece of thick-walled pipe made of hot-rolled steel; you should find a piece of structure that complies with GOST 8732-78. A piece 150 cm long will be enough, the diameter will be at least 42 cm, the optimal wall thickness will be within 9-10 mm. This is the maximum diameter of a pipe created using seamless technology; anything larger is assembled by welding; they are not suitable as a basis for gas equipment. The pipe must be made of grade 20 structural steel.
An improvised boiler with these parameters will be optimal for servicing a room of up to 10 square meters. m, the heated water is enough for use by 3-4 people.
Part of the pipe section will be adapted for a gas burner.
Chimney and body
A hole is cut out in the back of the body into which the chimney will be welded; an entrance with a diameter of 20 cm is also formed in the middle for pouring water into the tank; a lid with a seal is fitted to it. The steel container will cool quickly; it can subsequently be lined with bricks to improve the heat capacity of the unit.
After the housing is equipped with supports and a cover, it is installed on a foundation constructed of fire-resistant materials.
Features of assembling a homemade boiler
It is necessary to prepare the walls in the area where the boiler will be installed: either lay them out with red brick, or treat the wood with creosote. The floor here also needs to be strengthened: a concrete or paving stone foundation is built and lined with thick sheet steel. It is advisable to place the chimney in a galvanized box so that there is a gap of 3 cm; non-combustible material is placed in the gap; basalt wool is suitable.
To construct a storage tank, a 200-liter stainless steel barrel is used; it is introduced into the system using a thick-walled pipe with a diameter of up to 5 cm. Under these conditions, a cast-iron heat exchanger would be appropriate.
The area where the chimney crosses the ceiling or wall must be thermally insulated so that a distance of at least 15 cm is maintained from its surface to any flammable material. To insulate steel linings from wood, you can use asbestos.