Selection and purchase of building materials
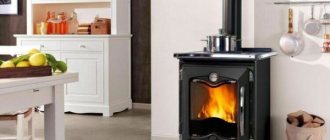
Regardless of what type of stove is to be built, the same materials are used - bricks, clay, sand.
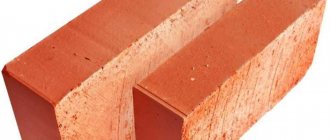
The main attention should be paid to the choice of brick. There are 4 types of bricks for sale for the construction of stove units:
There are 4 types of bricks for sale for the construction of furnace units:
- hand molding;
- ceramic;
- refractory;
- silicate.
Ceramic products are used to cover the unit. It is advisable to purchase M-250 or M-500 brick, which is more expensive, but more uniform than cheap products. It is able to withstand multiple heating-cooling cycles. Expensive brick has another advantage - excellent molding properties and decorative qualities.
Sand, when you build a brick stove with your own hands for a dacha or private household, you need to take it clean, without debris and various impurities, and therefore it needs to be sifted through a sieve.
Clay for kiln units can be normal, thin or oily. The proportions for preparing the mortar and the technology for laying bricks depend on which type is chosen. Stove makers prefer to use clay that has a normal fat content.
Furnace structure
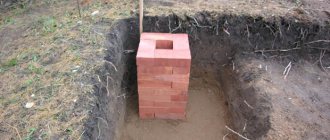
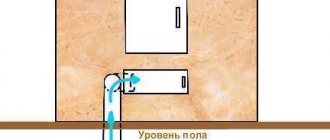
The foundation is installed below the floor level.
The foundation is placed below the finished floor level and is isolated from moisture.
The design of a brick stove with wood for a home includes the following elements:
- trenches are placed on the surface of the floor; these are legs that help warm up the bottom;
- the ashpit supplies flows to the combustion area, it has an ash pan;
- fuel combustion occurs in the combustion chamber with grates;
- the firebox ends with a vault, followed by the mouth of the furnace;
- Next comes a pass and canals;
- There are two valves for cleaning;
- At the top there is a vent into the room and a chimney.
In the chimney in front of the ceiling, an internal trim is made. At the top is the mouth of the smoke channel. A lining is provided inside to increase energy supply. The body and lining are not bandaged, since the elements receive different temperatures when heated.
Preparing the mortar for laying the stove
Most often, for laying a brick stove (or firebox), a clay mortar is used, which you can prepare with your own hands (for example, for a hob), it does not take much time. The following materials are needed for the firebox: clay, water, sand. Before preparing the mortar for laying the stove, the clay must be soaked for at least 24 hours. After this, clean water should be added to it, without mineral impurities. The resulting masonry mortar should be quite thick and resemble sour cream in consistency. The last ingredient is sand, it is added in small portions, constantly stirring the solution.
If a brick stove is laid according to all the rules, then the clay mortar will not be suitable for the first row (the junction of the brick and the foundation), as well as for the chimney. This is due to the accumulation of moisture during constant operation of the oven. Clay is prone to absorbing water and cracks due to sudden temperature changes. Therefore, it is better to use lime mortar for these places.
The procedure for preparing lime mortar for a brick kiln:
Materials: quicklime, water, sand. Prepare a mass consisting of water and lime, ratio 3:1. In this case, it is necessary to add water to the lime and constantly stir the solution until a dough forms.
It is very important to use a protective mask and gloves when working with quicklime. After preparing the dough for laying the oven, it should be crumbled and sifted thoroughly, getting rid of too large particles. Sand is added to the sifted solution, the amount of which should be 3 times more than lime. Adding water will allow you to obtain a thick mass for laying a stove or a separate firebox. Now you can start building a real Russian stove
Some craftsmen, for greater strength, add a small portion of cement to the solution.
A high-quality, but more expensive replacement for oven clay and lime mortar is cement mortar. Cement is characterized by increased strength and resistance to temperature changes; it is most suitable for laying a stove used for heating a room, as well as a chimney or oven.
To prepare such a solution you will need sifted sand and cement. The ratio should be 1 portion of cement to 3 portions of sand. Having prepared a dry solution (just mix cement and sand), you can gradually add water to it, but only in small portions. Having achieved the required consistency (the solution should become creamy), you can begin laying a brick stove for your home or cottage. The main disadvantage of cement mortar for creating a brick oven with your own hands is that it should be used within one hour after preparation.
And another useful video for beginner stove makers
Brick stove shapes for home
In addition to the specific functions, other parameters can be used to classify brick kilns.
The following types of stoves for brick houses are found in shape:
- Rectangular. It is easiest to build such structures.
- Square. They have the most compact sizes.
- Angular. An excellent option for small spaces and rooms with complex configurations.
- Round. A very exotic and beautiful option.
- T-shaped. The most traditional type of brick stoves for the home.
The shape of the stove is usually chosen based on the specific installation location and the preferences of the home owners.
There are also varieties of home stoves based on the firebox model, where the main parameter is the wall thickness:
- Thick-walled. They are characterized by the highest efficiency.
- Thin-walled. They are equipped only with cooking types of brick stoves.
- Combined. Typically used in heating and cooking stoves for home use.
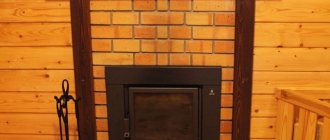
As a rule, the finished brick furnace structure is additionally finished in one way or another.
For these purposes the following can be used:
- Plaster.
- Decorative brick.
- Tiles or stove tiles.
- Special metal case.
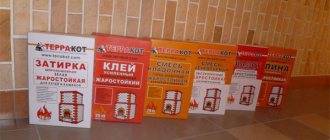
The choice of finishing option mainly depends on the overall interior of the home and the type of brick stove. The first three options will require the use of a special heat-resistant solution based on high-quality clay. In principle, for this you can use the same mixture on which the masonry was carried out. Factory-packed dry powders are especially good in this regard: to prepare the finished solution, they must be diluted in water in the proportions indicated on the packaging. In the case of plaster, an additional reinforcing mesh made of steel is usually used, which is fixed to the brick walls. Plastering work is permitted only after the masonry has completely dried.
As for cladding with decorative bricks or tiles, only special heat-resistant samples that can withstand significant temperature fluctuations can be used for these purposes. In some cases, brick walls are left without any finishing, but for this the masonry must be done to the highest possible quality. This is also allowed in cases where there are no special requirements for the external design of the furnace. This happens, for example, if the heating structure is built somewhere in a garage, barn or greenhouse.
Basic design elements of a heating furnace
Diagram of elements of a heating furnace
All existing heating stoves have approximately the same and fairly simple design. However, despite their simplicity, stove units are capable of fully solving the problems associated with heating residential premises.
The main components of a heating stove are the fuel compartment and the smoke exhaust structure. If a heating and cooking stove is being considered, the design must include a stove or oven. At the owner's request, his stove can be supplemented with a tank for heating hot water.
Heating stove. General scheme
Heating stove. General scheme
Firebox
Firebox
The most important part of any heating stove. Calculate the volume of the firebox in accordance with the area of the heated space, the characteristics of the fuel used, etc. To make a stove firebox, use high-quality fire-resistant bricks. The walls of the firebox should be half a brick thick.
Ash pan
Ash pan (ash pan) for the stove
This compartment is designed to collect waste from the furnace. Oxygen is also supplied to the combustible fuel through the ash chamber.
The ash pan is located below the grate and is equipped with an individual door.
The height of the firebox is usually 3 bricks.
Chimney
Rules for constructing a brick chimney
A very important component of any oven. Gases are removed through the chimney. At the same time, the design provides additional heating of the room.
Brick stove - arrangement of a chimney for it
If possible, the chimney should be designed so that it is as straight as possible. Any bends will negatively affect the efficiency of the heating stove.
Mortar for laying out a heating furnace
Clay mortar
In order for the operation of your heating stove to be as efficient, reliable and safe as possible, and for the structure itself to last as long as possible, you must properly prepare the masonry mortar.
The laying of heating stoves is carried out using a viscous solution prepared on the basis of clay and sifted sand.
To obtain such a solution, you need to fill the clay with normal humidity with water and soak it thoroughly. Pass the mixture through a sieve and stir until smooth. Then add sand to the mixture in the amount necessary to obtain a solution with the required plasticity and viscosity.
Furnace mortar
Pay due attention to preparing the mortar for masonry. The quality of the finished furnace unit, its main characteristics and service life depend on the correctness of its preparation.
The main stages of arranging a brick kiln in order with your own hands
When using an order for heating and cooking stoves, there are a number of key steps that must be followed. All of them have their own nuances and unique characteristics, knowing which you can ensure a high level of quality and minimize the costs of installing a furnace with your own hands.
Next, we will consider an example of a furnace design based on the “Swedish” order.
Work technology
In the design of such a heating installation. already in order, a blower is provided. This is especially important to remember when starting work on arranging the stove with your own hands.
At the same time, it is important to take into account the features of laying the 1st row of bricks. The fact is that here it is necessary to ensure compliance with the level and control of the angles, using a construction square for this purpose;
At the same time, it is necessary to pay attention to all the characteristics of the first row. The fact is that this significantly affects not only the service life and reliability of the heating installation, but also the efficiency of its operation; The technology of using the ordering provides for, upon completion of laying the first row of stoves, installing the door and ash pan, after which they begin laying the 2nd row;
The technology of using the ordering provides for, upon completion of laying the first row of stoves, installing the door and ash pan, after which they begin laying the 2nd row;
When constructing the 3rd row of the cooking furnace, you must adhere exactly to the order instructions. To create a blower, you should cut off a brick on each side
Moreover, here it is necessary to take into account that the row being arranged must have the same height as the door;
To lay the 4th row of the stove masonry, choose a place on the left side. This work begins with the installation of a door that allows ash removal. This will not allow the device to operate normally. As for the masonry itself, when performing it, they adhere to a similar order as in the scheme itself. Moreover, it is necessary to take care of closing the ash door. It is necessary to make a square-shaped hole above the ash pan. This idea is realized by laying bricks in a special way;
When starting to lay the 5th row, you need to keep an eye on it. so that the ash pan opening begins to narrow. This row is similar in appearance to the 4th. Therefore, the technology for laying it will be the same;
When starting to construct the 6th row, it is necessary to use a special brick with fire-resistant properties as a material. Most often, the diagram developed by qualified stove makers contains a note about this in the form of hatching. Such a hint allows you to simplify the masonry process and avoid possible difficulties when performing this work;
The brick that will be laid in front of the grate must be chipped. A detailed solution has a positive effect on the efficiency and quality of placing fuel on the grate while using the stove. At the same time, the grate support will be provided directly by the 5th row of the stove masonry;
The bricks of the 6th row and the grate must create between themselves a sufficient space of 10–15 cm wide, where it is necessary to place sand or ash, and the presence of such a gap is necessary to create the effect of expanding the metal of the grate when using a heating device;
After creating a U-shaped channel in the previous stages, it must be blocked. Moreover, this is done with the expectation that three new ones will arise as a result. This stage involves the installation of the furnace door, support for which will be provided directly by the 6th row of the furnace masonry;
The process of laying the 8th and 9th rows of the Swedish stove masonry is carried out according to the same scheme as in the case of the 7th. It must be remembered that it must have the same height as the combustion chamber door. Here, the processing of bricks is mandatory, with the help of which access to the partition of the combustion chamber and the left channel is blocked: they are trimmed on both sides, thereby ensuring efficiency and a smooth transition of combustion products from the firebox to the channel;
To create the 10th row of the furnace, refractory bricks are used. The laying technology requires ensuring vertical placement, which must be supplemented by regular checks carried out using a building level. The need for this is due to the fact that for such furnaces, when placing these bricks, a special cooking floor must be placed;
Next, you can start gluing the fire door. as a result, the final row will have two channels, distinguished by the presence of a perfectly square cross-section.
Calculation of the number of bricks
Regardless of the type of brick block, they all have the same standard dimensions.
This makes it possible to use several varieties at once in one masonry, without having to rack your brains trying to align the rows. Bricks have the following dimensions:
- single (standard) - 250x120x65 millimeters;
- one and a half - 250x120x88 millimeters;
- double - 250x120x138 millimeters.
There are also other options, but these are, as a rule, European standards that are not applied in our country.
For kiln construction, as a rule, single bricks are used, sometimes one-and-a-half bricks. Double is not suitable in this case. The fact is that it is usually hollow, that is, it has a large number of holes in the structure. This is done in order to reduce its weight.
We only need solid blocks. Hollow ones accumulate heat much worse and are destroyed more quickly under the influence of various aggressive factors.
Let's move on directly to the calculations. For them, we need only two indicators: the number of bricks from which the lowest continuous row is laid, that is, the base, and also the number of rows. All this is easy to calculate if you know the dimensions of the blocks you are going to use.
Having calculated the amount of material in the base, multiply it by the number of rows of which the oven will consist. In this case, only those departments that go up to the chimney are taken into account. Subtract a third from the resulting product, and you will have the required number of bricks.
We carry out calculations for the chimney separately. There you take the number of bricks in one row, multiply by the number of rows and do not subtract anything.
That's all. All that remains is to add up the results. Now you know how many bricks you will need to build a fireplace. Don't forget to add about 5% in case of replacing blocks broken during construction. Good luck and warmth in your home!
Laying a brick oven - important advice from professionals
It is important to strictly adhere to the ordering scheme you have chosen for a specific model of the stove structure, and also decide on the type of masonry. Common methods of installing bricks are masonry with empty seams and undercuts
In the latter case, there is no need to plaster the finished stove - the solution is present in all seams. But when performing work with empty seams, plastering the constructed stove is a mandatory operation.
Order diagram for the furnace structure
In order to avoid making fatal mistakes, beginners in the construction of home heating structures are recommended to pre-lay bricks without using a sand-clay mixture. It is done in order using 5 mm thick slats. They are placed between rows of bricks. In fact, the slats “replace” the mortar.
Once you have built the entire oven dry and are sure that everything was done correctly, begin to disassemble the structure. If possible, number all the bricks and stack them separately. Then the process of finishing masonry will go much faster for you.
Furnace finishing process
Other recommendations from experts that you should definitely follow when building a stove in a private home:
- vertical seams (all without exception) must be filled with mortar to avoid the possibility of delamination of the structure;
- each brick in the masonry must rest on at least two others;
- the smallest seam width is 2 mm;
- you need to bandage all rows vertically;
- the thickness of the mortar for masonry is taken to be about 5–7 mm; after pressing it with bricks, this value decreases by 2–3 mm (it is permissible to lightly tap the rows with a rubber hammer);
- when using ceramic bricks, they are dipped in ordinary water for a couple of seconds, due to which they stick to the mortar without any problems; there is no need to “bathe” fireclay products;
- Before laying, bricks should be cleaned from dust and crumbs with a hair brush (this operation is called mopping).
A few more important points. The bricks are placed in their designated place one at a time. If a stone falls “by”, it must be removed, the clay-sand mixture removed from it, and then placed again. The mortar that was removed from the bricks is not used in the future.
Brickwork structure
Using the drawings of brick stoves with your own hands, try to find the simplest method. As a rule, such stoves are small and can heat 1 room or a small house. Area about 0.4 m2. The brick consumption is low and the weight of the stove is small.
Check it out here too!
How to make an arch from plasterboard: we make an interior arch according to photo instructions. 120 photos of arches in the interiorHow to make a balcony with your own hands - tips on how to make a balcony in an apartment beautiful. Step-by-step guide to the use of modern building materials + 70 photos of the best design options
Installing a compartment door with your own hands - step-by-step instructions for installing sliding doors and tips on choosing fittings (110 photos + video)
In the second row it is necessary to install a blower, having previously wrapped it with asbestos cord. The door is secured using wire installed in the masonry.
The third row will be made of fireclay bricks. The fourth row is placed on the edge. In cases where the grate bars do not fit into the free space, the brick is cut with 3 mm gaps. On both sides.
Do not forget, when laying next to it, to leave the back brick without mortar. You will have to clean the ducts in the future.
The furnace door is placed in the 5th row and it must be laid out on the flat side for heat exchange. The seventh row is placed in the same way.
Check it out here too!
Do-it-yourself countertop installation: selection, installation and fastening of the countertop. 155 photos of the best ideas and tips for their use- Curtains for the kitchen: ideas for combination (design photo)
Do-it-yourself canopy - beautiful ideas, best projects and tips on how to build a canopy with your own hands (90 photos and videos)
On the ninth row a cooking surface is installed. An asbestos cord is also used here, without which smoke will leak into the room, destroying the clay mortar.
A chimney and a metal valve (with an asbestos cord) are placed on the top three rows.
It is recommended to install a plinth around the perimeter; it will ensure cleanliness near the stove itself.
Foundation? Foundation!
A Dutch oven, despite its light weight, needs a foundation. You can equip the foundation in two ways - from cement mortar or from bricks. Both options have their own characteristics.
In turn, a Dutch brick foundation will be noticeably more expensive, but at the same time it is much easier to make.
Formation of a cement foundation
Let's consider a method for forming a cement foundation for a Dutch oven.
You need to do the following:
- Prepare a pit, the depth of which is at least 50 cm. The area of the formed base must be larger than the size of the planned furnace.
- Make a cushion of gravel 10-1 cm thick and carefully compact it.
- Install the formwork and place a reinforcing frame made of metal rods, the thickness of which is 1 cm.
- Prepare the cement mixture and gradually pour the reinforcing structure.
- Cover the foundation with cement powder.
And now the solution.
High-quality masonry of a Dutch oven with a stove requires the preparation of a clay mortar. The strength and heat resistance of the Dutch oven and its tightness during operation depend on the quality of the solution.
The ratio of binding elements in the clay mortar depends on its purpose:
- for masonry work or
- for finishing a stove with a stove.
The frozen mixture must have a high level of rigidity. Masonry mortar of the correct consistency will be plastic and viscous, it will not crumble and will not be liquid.
Preparation of masonry mortar.
This process includes the following steps:
- The clay is placed in a trough where some water is added to it.
- After this, the clay soaks for 6-48 hours.
- While the clay is soaking, the material is thoroughly mixed and, if necessary, trampled in rubber boots.
- Sifted sand is added to the solution.
Now that the preparations are complete, you can begin laying the Dutch oven and stove.
So, a Dutch oven is the optimal solution for heating a country house or cottage.
When preparing for construction, you should pre-select the location of the Dutch oven, choose a stove layout, decide on the material for exterior decoration, calculate the required amount of brick, and prepare tools and materials.
It is necessary to equip the foundation and prepare the masonry mortar.
Do you have experience building a Dutch oven? Please share your comments below!
Rules for laying the furnace vaults of an outdoor stove
When laying furnace vaults, it is necessary to block the combustion openings, fireboxes, and chambers using simple and complex shaped lintels. The ceiling in a wall is called an arch or arched lintel, and the ceiling between the walls is called a vault.
To cover large spans, an arched ceiling is used.
Vaults can be steep, flat or gentle. The semicircular arch is equal to half a circle. A gentle vault is less steep. The three-center arch is even flatter, thanks to its design, heating occurs evenly over the entire surface
This is important when baking pies. The number of bricks in the arch and rows in the vault must be odd
The middle odd brick is called a castle brick. The bricks on which the lintel or arch rests are called heels. To give them the desired shape, such bricks have to be trimmed. The space covered by any jumper is called a span. The lifting height of a vault or arch is the lifting boom.
The construction of any lintel must begin with the laying of bricks on which it will rest. They should be hewn out according to a template. Since the height of the arch or vault can be different, the angle of the heel changes. You cannot use one heel shape for all arches and vaults.
The laying of the furnace firebox begins with the preparation of circles and foot templates; for this, on a sheet of paper, cardboard or plywood, it is necessary to draw a vault of the desired shape so that an odd number of rows of masonry can fit in it.
You can easily and quickly build a vault on two boards. An axis should be drawn in the middle of the narrow board so that it intersects the wide board. At a distance of 3-5 cm from the bottom edge of the wide board, you need to draw a straight line A-B, marking the width of the firebox on it. The axis should run in the middle of the firebox, between points B and D. On the axis from line A-B, the height of the arch lifting boom should be measured upward. The resulting point can be designated by the letter D. After this, you need to select the center O in such a way that the circle passing from it, forming the arch, runs through points B, D and the upper point of the arch lifting arrow.
The rules for laying a furnace recommend using formwork for the arch, which is laid on prepared circles.
After installing and securing the formwork, a nail should be driven into the central point O, from which the circle was drawn, and strong twine should be attached to it, which is necessary for checking the rows of the vault and marking the bricks to be laid. The brick for laying the vaults must be hewn, giving it a wedge-shaped shape.
In this case, the seams have the same thickness. When using regular brick, the seams will be thinner at the bottom and thicker at the top. They must be completely filled with solution.
The heels should be trimmed and laid very carefully, since filling large voids with mortar and crushed stone can lead to settlement of the vault or arch and their destruction.
The laying of the vault should begin from the edges, from both heels at the same time, moving towards the middle of the vault or towards the castle. The bricks need to be fitted tightly, so that they almost touch each other on the side of the firebox.
The last thing to be inserted into the row of masonry of a vault or arch is a castle brick, greased on both sides with clay mortar. It is advisable to strike only with a log or a mallet, since an ordinary hammer can split the brick.
Furnace construction plan
Before all design refinements, the proposed structure must meet fire and structural safety requirements
So it’s worth paying special attention to the preparatory stage
- We develop a detailed design diagram of the furnace;
- We decide on the location of the stove;
- Selecting materials for construction;
- We select a tool;
- We determine the need for assistants;
- We calculate the construction budget;
Particular attention is paid to the project diagram. The final success of the entire enterprise depends on competent engineering development
Currently, you can purchase a ready-made stove laying project. Even entire video courses have been developed for beginner furnace masters. When choosing a project, it is worth clarifying the accuracy and specificity of the data provided, especially the numbers, whether all aspects of construction are described step by step. The project must contain detailed comments. A serious project must be supplied with high-quality photographic material of the main stages of masonry. In a word, in a good project everything is explained literally “on the fingers”.
When choosing an installation location, much depends on the area of the room and the type of stove. There are so many subtleties and pitfalls here that masters recommend that novice stove makers create smaller models of their creations. Such “training” will allow you to understand the upcoming masonry and eliminate miscalculations and mistakes at the preparatory stage.
If the amount of work is significant and your own experience is not enough, then you will have to resort to help. At the final stage, we will calculate all costs.
Stocking up on tools
When laying a furnace, you will need measuring, construction and auxiliary tools.
Construction tools:
- Grinders for cutting bricks;
- Shovel;
- Metal sieve for sifting sand and solution. Sieve cell - no more than 2 millimeters;
- Jointing to compact the mortar;
- Combined trowel for laying mortar;
- Perforator with mixer attachment;
- Hammer-pick for chopping bricks;
Measuring tools:
- A tape measure at least 5 m long for taking measurements and markings;
- Plumb line to control the verticality of corners;
- A stove ruler is a wooden strip a little more than a meter long with smooth edges. The rule, as the ruler is called, serves to check the evenness of the masonry. There should be no gaps between the rule and the furnace wall
- opening template;
- building level to check the masonry horizon;
- flexible level;
Auxiliary “tools of labor” are buckets, tubs, mops with rags, etc.
We purchase building materials
.brick selection
- Hand-molded brick;
- Silicate;
- Refractory;
- Ceramic;
The furnace is lined with ceramic bricks. It is better to stop at the more expensive M-250 or M-500 brick, which is more uniform than its cheaper counterparts. In addition, such bricks can withstand multiple heating-cooling cycles. Another advantage of expensive brick is its excellent molding qualities for decorative finishing.
Sand. It must be as pure as a tear: without litter or impurities. To do this, it will have to be sifted through a construction sieve.
Clay. There are normal, skinny and fat. The technology and proportions for preparing the solution depend on the type of clay. Experts' preference for normal clay can range from 0.5:1 to 3:1. It is best to use clay of normal fat content;
When purchasing building materials, it is important to remember that “the miser pays twice,” so let’s forget about saving for a while. Otherwise the oven will not last long
Masonry stove mortars - what should they be?
Before you build the stove with your own hands, you should understand the compositions that will ensure reliable fixation of the bricks and the entire structure. Typically, masonry mortars based on sand and clay are used (white kaolin or fireclay marl for ordinary bricks, gray Cambrian or ground refractory clay for ceramic).
The components of the composition for laying the stove must be selected very carefully. For example, if you feel that there is any smell (unpleasant or pleasant) coming from fireclay clay, do not take it. The aroma indicates the presence of organic matter in the raw material. This clay is not suitable for laying a stove. You can take any sand, the main thing is that there are no foreign impurities in it.
Clay with sand
The proportions in a solution of clay and sand are determined experimentally by conducting special tests according to the following scheme:
- pour 1 kg of clay with plain water and leave for 24 hours until the composition sours;
- knead the clay until it becomes plasticine (adding water to the sour mixture);
- divide the batch into 3–5 parts and add sand to different portions (from 10 to 100% by volume);
- knead the solutions (as thoroughly as possible) and dry them for about 3.5 hours.
Then the samples must be carefully rolled out into 30–40 cm long “sausages” with a cross-section of about 1.5 cm and wrapped around a round piece of larger diameter. After this, wait for the compositions to dry (about half an hour). All that remains is to analyze the quality of the solutions.
Checking the quality of masonry mortar
If microscopic cracks have formed on the “sausage” or there are none at all, feel free to mix clay and sand in the proportions used for this test. With cracks no more than 2 mm deep, the solution can be used for laying those sections of the heating structure that do not warm up above 280–300 °C. If the “sausages” are covered with tears and deep cracks, this means that there is too much sand in the prepared mixture. It is prohibited to use it to construct a furnace.
An even simpler option is to purchase a ready-made mixture for furnace work at a hardware store. If you don’t want to bother with creating the “ideal” mortar yourself, just buy it and start building a brick oven.
Step-by-step instructions for laying a stove
Arrangement of the Kuznetsov furnace
During construction, the horizontality of the rows, the verticality of the walls and right angles are checked. Bricks are laid with the seams bandaged.
Construction order:
- preparing drawings for laying a stove with your own hands;
- marking, foundation installation;
- preparing the solution and laying out the ash pit and firebox;
- laying the stove body with channels, installing a water tank;
- device of a channel for smoke removal.
The seams of the internal surfaces are completely filled with clay mortar and the sagging is removed so that condensation and fumes do not accumulate in the uneven areas. First, the bricks are placed in a row dry, and after fitting, they lay the bricks using mortar.
Marking and foundation construction
For a brick stove, a foundation must be poured.
For brick fireplaces, a foundation must be built, since the structure is heavy, and the soil or floor in the house is not designed for such a mass.
Construction rules:
- the foundation is buried into the ground no less than half a meter so that the stove does not sag or tilt due to soil moisture when freezing;
- the size of the base is chosen so that the edges protrude beyond the stove by 10 cm on each side;
- the foundation of the stove is not connected to the base of the house; a gap of 5–6 cm is left between them, which is covered with sand.
The materials used are concrete, brick, rubble concrete. The surface is covered with three layers of roofing felt on bitumen mastic or molten resin.
Construction of the furnace body
To avoid the loss of coals, the grate is installed below the door.
The dimensions of the combustion chamber are selected according to the cubic capacity of the firewood loading. At the bottom, on the border with the ash pit, grates are placed; they are located below the door so that the coals do not fall out when opening. A gap of 5 mm is left between the iron and the masonry to compensate for expansion.
The rows are performed according to the ordering scheme in order to obtain channels passable for fuel combustion products. Bricks are beaten to size using a pick, the hammer is positioned away from you, and the elements are placed on the edge.
The water boiler is installed taking into account the manufacturer's instructions. The inner boiler is surrounded by two layers of tubs to increase the degree and rate of heating.
Construction of a chimney
A chimney is an engineering system in the form of a vertical pipe for removing smoke and creating draft. It is mounted so that the body does not come into contact with the roof structural elements.
There are types of channels:
- mounted, when the pipe is a continuation of the furnace and is placed above the body;
- indigenous, if the smoke collector is placed on its own base, sleeves go to it from the stove;
- wall, which are located in the main vertical fences of the house.
Chimneys are made of brick, concrete with heat-resistant additives, and steel sandwich pipes. Asbestos-cement elements are used at temperatures not exceeding +250°C. Other materials are enameled iron, vermiculite concrete, and composite compounds.
Popular order options
Having in your hands the order of a Russian stove with a hob, you can lay out the structure with your own hands
Of course, you will need the help of an experienced craftsman, since everything is important in masonry: from the proportions of components in the mortar to the choice of building and insulating materials
We offer two options that are most often demanded by owners of private houses.
Option #1 – with a stove and a stove bench
One of the most favorite solutions that combines all the advantages of a real Russian oven: a large furnace for baking bread, a convenient stove for cooking and a wide bed, which can be used as an additional sleeping place on cold winter nights.
One of the stove options with a stove bench and stove, which is located in front of the fuel-cooking chamber. The bed is located behind the chimney, in the back of the stove. There is also a baking area, a small ladder for climbing
Construction begins, as is customary, with the construction of the foundation. We remind you that it is not connected to the foundation of the house and is constructed separately. To do this, they usually dig a hole, make formwork and use reinforcement to fill it with cement mortar.
After it has matured, the base is insulated with basalt cardboard, steel or other material, leveled and the construction of the stove masonry begins.
It is better to learn the basics of masonry techniques in advance. Usually it is made in half a brick, with mortar, with adjustment and pinning. It is better to remove excess solution immediately
Tools: trowel, level, square, plumb line, rule - it is better to prepare in advance so that everything is at hand. You also need to buy all the necessary materials: a cast iron 2-burner stove, combustion and cleaning doors, a grate, valves, a view.
In addition to ordering for the construction of the furnace, drawings and diagrams are also used, showing the structure in cross-section from various angles, indicating the main parts and dimensions
Arranging a stove with a stove bench and stove
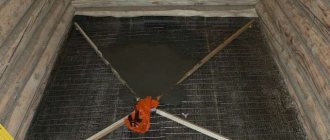
Rows 1 to 16. When constructing a hearth, brick mortar is not used. Instead, the cracks between the bricks are filled with sand or a dry mixture with broken glass.
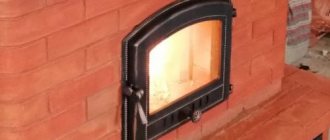
When installing a cast iron stove, you need to take into account the expansion of the metal when heated.
To do this, gaps of 2-3 mm are left on the sides, and the slab itself is not placed on the mortar, but left to lie loose so that it can be easily removed if necessary.
Rows 17 to 36. When making arched vaults, wooden blanks assembled from narrow planks are usually used. After the solution has dried and the arches have been checked for strength, the templates are removed
If it seems to you that the construction of the final element - the chimney - is the easiest, then you are mistaken.
Drawing of a brick stove pipe. Particular skill is required in the masonry cutting - insulation of 1.5-2 bricks, otter - transition through the roof and the head, responsible for traction
Experienced stove makers, when laying a chimney, carefully select the bricks: they take the smoothest ones and place them with the smoothest side inward. This is necessary to reduce the degree of contamination of the internal surface - less soot settles on smooth walls, so they have to be cleaned less often.
Option #2 – with a stove under the cauldron
The stove is large in size, it is easy to place not only pots on it, but also a large cauldron for preparing oriental dishes.
The author of the engineering miracle is Alexander Volodin. Most of the models he invented are called “with bottom flooding”, but not all are equipped with a cast iron stove
When using both fireboxes, you can heat a house with an area of up to 40-50 m², but if the structure is intended for a country house, then a small firebox stove with a stove will be more actively used.
Arrangement of the stove and stove
Changes can be made to the order, but on the condition that they do not contradict safety, logic and masonry rules.
In the 7th row, instead of a simple ceiling, you can build an arch, but only an experienced stove maker can do this, since building an arch requires additional time and knowledge of special techniques for processing and laying bricks.
At this stage, the masonry becomes quite high, so there is often a need for special scaffolding.
An ordinary stool is not enough, since in addition to the stove-maker, it is necessary to place a container with mortar and bricks at a certain height.
In the future, you can also use fireclay bricks, but solely for aesthetic purposes. The characteristics do not matter; if desired, you can make the masonry as before - with red solid brick.
Next, only the pipe is erected - to the distance remaining to the ceiling.
Rows 29-32 - construction of the pipe to the ceiling. The dimensions of the masonry are 2x1.5 bricks. We insulate the ceiling with non-combustible materials - asbestos, steel sheet
Photo of a DIY brick oven
Read here - Do-it-yourself installation of PVC panels - finishing walls with plastic panels, the best wall models and features of their fastening (125 photos + video)