Why cover with brick material?
Any work must be done thoughtfully, and before execution it is necessary to understand the reasons. The designs are easy to install, heat up quickly and are accessible to everyone due to their low price, but they have a lot of disadvantages.
In addition to the high heating rate, the surface is a source of infrared radiation, which is unpleasant for humans and burns the skin at a considerable distance.
Steel heaters dry out the air, which prevents the creation of the correct conditions in the bathhouse necessary for a comfortable procedure. When heating quickly, such a stove instantly gives off heat and has to be heated regularly, which increases the consumption of firewood and creates a lot of inconvenience.
Brickwork acts as a protective screen, allowing you to retain heat for a long time and rid you of infrared rays. Covering a sauna stove with bricks is inexpensive.
Oven protection for people and walls
It's time to talk about a protective screen, as well as a fence that will protect steamers from accidental burns.
Video
Watch another short video about how this is done in one bath:
https://youtu.be/OfH_e4ER6VE
Protective screen for the stove in the steam room
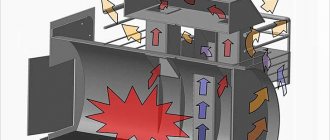
Only metal stoves create problems with overheating in the bathhouse . To combat this, several types of screens have been created, each of which is better or worse suited to solving the following problems:
- protection of the steam room from overheating, hard infrared radiation, converting it into softer radiation and heat accumulation;
- protection of a wall made of flammable material from overheating and fire;
- regulation of heat exchange in the steam room.
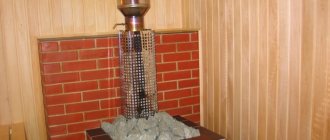
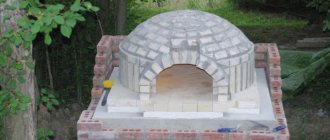
The first place in popularity will be the brick screen . This is a masonry of solid bricks on either 2, 3, or 4 sides around the stove. In this case, there must be a distance of 5-10 cm between the screen and the oven.
IMPORTANT! Masonry is most often done in half a brick - this is the middle position between masonry in a quarter of a brick and in a whole brick. The thinnest one does not prevent overheating, but it does not take so long to heat the bathhouse. The thickest masonry is closest to the parameters of a brick oven - the temperature will not be high, it will take a long time to heat, but the heat will be soft and long-lasting.
For heat exchange, holes are made at the bottom of the brick screen . They can be closed with doors, or you can simply insert bricks into them. When they are open, hot air from the stove enters the steam room and accelerates heating.
IMPORTANT! Holes are required at the bottom of the screen. In other places - at the request of the owner.
The height of the brick screen should not be lower than the height of the stove, but how much higher it will be is up to the owner to decide. With one caveat: you shouldn’t build it all the way to the ceiling, because otherwise you’ll have to invest in the foundation as well. Add the weight of bricks and mortar to the weight of the stove and chimney to calculate the total weight and stay within the weight limit for a stove without a foundation.
By the way, masonry mortar is a mixture of clay and sand, without cement .
Watch the video to see what the mortar should be like and how to lay bricks correctly:
Another type of screen is made of metal. Metal screens are available with convection and without convection.
Convection - two-layer, hollow inside. The voids between the ribs are filled with air, and it conducts heat poorly, so it acts as a heat insulator. Such a screen is enough to lower the temperature and prevent the wall from catching fire. The holes in the screen are designed to allow air to circulate.
There are other screens that are simply a polished sheet of metal. Polishing reflects some of the infrared radiation , reducing its absorption by the metal. This screen is designed to be mounted on a wall, but not directly on wood, but on a layer of refractory or on slats of thermal insulation. In the latter case, cooling occurs due to the air gap, so the rail should be several centimeters thick.
Refractories such as basalt or asbestos cardboard are attached directly to a wooden wall , and a sheet of metal is attached to them. It is good to use ceramic dowels for fastening.
Often, lining a stove with natural stone is accompanied by insulating the stove corner with the same material. This combination looks good.
A cheap version of a metal screen can be made yourself from two sheets of steel for the roof and 3/8-inch metal pipes. The tubes are attached to the wall, then the first layer of profile is placed on them. Then another layer of tubes and a second profile sheet. The structure should be 10 cm above the floor level and below the ceiling level by the same amount.
A plaster wall between the stove and a wooden wall can also be a type of screen
Stove fencing in the steam room
Fencing a sauna stove in a steam room: the “brick + tile + wood” option
For the safety of those in the steam room, a fence is usually placed around the stove to prevent them from accidentally touching the hot metal. It differs from a screen in that it is usually made of wood and is not intended to block thermal radiation.
Knowing who will visit the bathhouse in the future, it is worth making a thicker fence in advance that will prevent small children from sticking their hand to the stove. If the bathhouse is only for adults , then simple railings around the stove with supports in the corners are sufficient.
The type of wood matters: resinous ones are not suitable . Alder or linden is best .
***
Now all that remains is to apply the acquired knowledge in practice. Good luck!
Calculations for choosing a base
For the correct distribution of parameters, knowledge of the basic parameters is necessary:
- dimensions of the furnace and its weight;
- weight of stones in the heater;
- the mass of the container for heating the liquid and the volume of water (further calculations are based on the condition that a liter weighs 1 kilogram);
- the weight of the brick wall (depends on the type of stone, but standard fire brick = 4 kg).
When all the information is received, the specialist can easily carry out the necessary calculations. He will need to add up the weight of the stove, stones, brickwork, container and liquid. 20% is added to this amount to create an additional safety margin. It should be remembered that pressure is applied constantly, and if the boards do not meet the required characteristics, then sooner or later they will be pressed through.
If the resulting number does not exceed 600 kilograms, you can line a metal stove in a bathhouse with bricks without manipulating the foundation. For detailed calculations, you can use the information below.
Calculation of dangerous load on floors (kg/m2)
To assess how much load your floor can support, the technician needs to know what kind of joists are used. In the table below you can see the capabilities of different types of joists to support weight in kilograms per square meter.
| Section (cm) | Beam length between supports | ||||||
| 2 m | 2.5 m | 3m | 3.5 m | 4 m | 5 m | 6 m | |
| 10×5 | 734 | 585 | 490 | 420 | 367 | 325 | 293 |
| 15×5 | 1650 | 1321 | 1101 | 942 | 827 | 733 | 665 |
| 20×5 | 2930 | 2347 | 1955 | 1675 | 1464 | 1303 | 1172 |
| 20×10 | 4867 | 4690 | 3910 | 3353 | 2933 | 2733 | 2607 |
| 20×20 | 11730 | 3987 | 7821 | 6705 | 5866 | 6215 | 4691 |
| Cylindrical shape 20 | 6912 | 5528 | 4608 | 3950 | 3456 | 3070 | 2765 |
| Cylinder. f. 22 | 9200 | 7360 | 6132 | 5256 | 4600 | 4090 | 3682 |
Construction on foundation
If a metal sauna stove lined with brick is not suitable for installation according to the table, then in this case it is necessary to make a foundation. This task is simplified if you have just started building a building with your own hands and you do not need to dismantle the stove and floors.
To build a foundation, a hole about half a meter deep is dug around the perimeter of the masonry and filled 3/5 with crushed stone or a mixture of gravel and sand. It must be taken into account that contact with the bathhouse foundation is unacceptable.
After laying the cushion, a cement screed and a layer of waterproofing are made, after which formwork is made, which is filled with concrete mortar. For such a product to harden properly, it must be regularly moistened with water to avoid cracks.
The next stage is the construction of brick pillars that serve as support. It is recommended to do the masonry using clay mortar. All work must be carried out taking into account the level, avoiding distortions.
When everything is ready, the metal product is installed and covered with brick.
Protective screen manufacturing technology
Here you can see essentially two protective screens. The one closest to the wall is made of fire-resistant gypsum board gypsum boards mounted on metal profiles. An additional reflective layer is made of foil attached directly to the wall. The mineralite slabs were installed on top of the plasterboard using self-tapping screws through a 3-cm porcelain tile sleeve. Thermal insulation boards are finished with tiles that are laid with heat-resistant adhesive.
Now we will give examples of simpler, but well-proven ways to create a thermal barrier. First, let's figure out how to make a partition in the steam room, into which the furnace window opens.
This structure is made of glass-magnesium sheet (GMS) 10 mm thick, which is mounted on a metal frame with basalt insulation inside.
We invite you to familiarize yourself with Himalayan bath salt properties
Floor base
If the weight of your structure does not exceed the established standards, you can place the stand directly on the surface. If the bathhouse is many years old, the technician will still have to open the floor and inspect the joists and boards for damage. You also need to remember that the brick base also has its own weight and will put pressure on the floorboards.
If the wood is not suitable for the job or is not in perfect condition, it is not necessary to replace it. It is possible to reinforce them with a metal channel or additional wooden beam. It is worth considering the distance between the beams. If they are located more than a meter apart, the specialist will need to install additional ones so that the clearance between them is about 600 mm.
To lay the base, floorboards are placed ten centimeters larger than the size of the structure with the lining. On the firebox side, it is necessary to increase this distance to avoid burning elements from hitting the wood. Then a sheet of refractory material is placed on the marked area, on which brickwork is made about 200 mm high.
It is recommended to use refractory bricks without hollow sections for these purposes. You need to use a clay mortar, to which you can add a little cement mixture. All actions must be performed using a level. After preparing the base, you can think about how to properly brick a stove in a bathhouse.
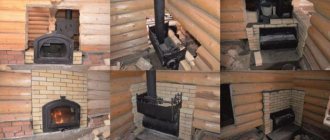
The process of lining a metal furnace with bricks
The entire process of lining an iron stove can be divided into several stages.
Stage 1 Foundation
The most important stage of any construction is the construction of the foundation . The durability and strength of the entire structure depends on the quality of its installation. If during the initial construction a foundation was made for the stove, then in order to cover the metal firebox you will not need to construct a new foundation. But if you are unsure of the strength of the old foundation, you need to take the time to build a new foundation, since the weight of the entire structure will increase significantly. If the total weight of the entire structure is less than 700 kg, the foundation need not be erected.
Foundation construction procedure:
- After the issue of where to install the stove has been decided, it is necessary to cut floorboards around the perimeter of the structure, taking into account that the size of the foundation should be 10–15 cm larger on each side.
- Next, you need to dig a pit up to 40 cm deep.
- Then it is necessary to build wooden formwork according to the size of the pit and the planned structure.
- The next step will be to waterproof the foundation.
- Then we pour a cushion of sand and crushed stone of the middle fraction to retain moisture.
- We fill the foundation with cement mortar and be sure to lay a layer of reinforcing mesh on top. We use a building level to check the evenness of the surface.
- Then you need to wait time for the concrete screed to completely harden.
Stage 2 Foundation construction
- After the foundation mortar has completely hardened, you need to lay out the base in one row of brickwork.
- We check again with a building level that the surface is horizontal.
- We lay a layer of roofing material to waterproof the base.
- It is necessary to lay a sheet of iron on top, which should exceed the size of the brickwork by 10 cm around the perimeter.
- Then we install a metal stove.
Stage 3 Preparation of the solution
A mixture of cement and clay will serve as an ideal mortar for lining a metal firebox with bricks. Experienced stove makers advise determining the proportion of these components by appearance. It is believed that it is necessary to take the same amount of cement and clay, while adding up to 30% river sand .
The main thing when preparing the solution is to achieve a homogeneous mass, without pebbles and lumps, reminiscent in appearance of thick sour cream. To check the quality of the prepared masonry mortar, you need to apply a little of the mixture to the brick. A high-quality mortar should not flow or slide off the brick. If the mixture is not very thick, you can add a small amount of sand.
Stage 4 Brick preparation
To complete this stage of work, it is necessary to soak a selected number of bricks for masonry in water for 12 hours . This action is required to ensure that the brick does not absorb moisture from the mortar during laying. When using old bricks, it must be cleaned of sand and old mortar.
Stage 5 How to line a metal stove
The average height of the structure will occupy 13–15 rows of masonry. Therefore, it is advisable to divide the entire work process into two stages. First you need to lay 7-8 rows and let them dry. The next day, after checking the shrinkage, we lay the remaining section of the structure.
Brick finishing process:
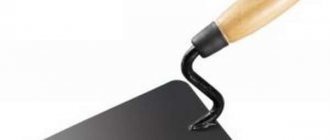
- You need to build a row starting from the corner of the structure, not forgetting to control the horizontal laying with a building level. Checking the correct angle should be carried out using a plumb line or a protractor.
- It is necessary to spread a reinforcing mesh on the second row to increase the strength of the structure.
- On the same row you need to start creating air gaps through which heated air will flow into the room. This operation must be repeated on rows 6 and 8. It is not advisable to make many holes. Two at the top and two at the bottom will be enough.
- The third row is laid out in the same way as the first.
- In the place where you plan to install the door for fuel and the blower, you need to lay a metal corner.
- The last row is laid out randomly.
Stage 6 Pre-firing of the furnace
An important stage is the preparation of the manufactured structure for its further operation. Do not immediately heat the oven to maximum temperature. It is necessary to perform 2-3 preliminary fires , which use a minimum amount of fuel. Such actions will allow the solution to dry thoroughly. Remember that there are a large number of schemes and methods for lining a metal stove with bricks, which you can learn about in detail on many construction Internet portals.
A stove in a bathhouse is not only a device for heating rooms, but also a stylish element of the interior. Therefore, special attention is paid to its external cladding. The construction market offers reliable and practical materials used for finishing the stove in the bathhouse.
The correct choice of suitable material depends on the design idea, interior style and financial capabilities of the customer.
Construction process
If you plan to cover it with bricks on all sides, then it will be a full covering, if only some sides are partial. When completely surrounded, it is possible to control the movement of warm air masses. To do this, doors are made at the top and bottom of the screen to stop the movement of air when closed.
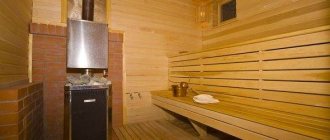
The model, completely covered with masonry, creates an ideal microclimate typical for a Russian bath. If at least one open wall remains, it will be more like a sauna, and the stone will protect you from burns and accumulate heat.
Screen construction options
To determine the answer to how to line a metal sauna stove correctly and with what kind of brick, it is necessary to consider all existing classifications.
By distance:
- solid - interferes with circulation, which reduces the heating rate;
- randomly - the brick is placed with holes, this type reduces the quality of shielding;
- a screen with doors at the top and bottom is an ideal option with the ability to adjust convection.
By arrangement of bricks:
- in size - increases the heating time of stones and consumes a lot of raw materials during construction;
- half a brick - the most suitable option with a durable wall and rapid warm-up;
- in a quarter of a stone - has good heating characteristics, but the strength of the masonry is reduced.
It is worth noting that an overly unstable option can be corrected using reinforcement with a special network, but still, a thin-walled lining should not be erected without good preparation.
Main functions of a sauna stove
The ideal option for a sauna stove is an economical option at an affordable price. At the same time, it must be able to warm up the required area, provide the required amount of hot water, provide steam and be as compact as possible, because no one will want to make adjustments to the design of the building where it will be located
It is also necessary to pay special attention to fire safety. When choosing an iron sauna stove, you need to clearly understand its purpose, and more specifically, the climate that will be created, like in a Russian bath or Finnish sauna
A sauna stove can be of several types:
- classic (stones exposed);
- with a mesh casing (the ability to load more than 200 kg of stone);
- option with closing stones (uniform heating, soft steam, low temperature);
- facing with decorative stone or brick.
Electric ovens did not appear that way. Their popularity is due to their efficiency and ease of use. A wide selection of models will allow you to choose the type and design of the stove, which will be the key to a great time.
What kind of brick to cover a stove in a bathhouse
Before the main procedure, you must first prepare all the materials. On the modern market you will find a huge variety of bricks, varying in size, aesthetic qualities and properties.
The choice of brick must be made based on the distance from the metal to the screen being built. If it is less than 250 mm, then this will lead to strong heating of the masonry and therefore it is better to use fireclay.
The optimal is 500 mm. For such buildings, an ordinary fire-resistant red stone is perfect. If you plan to install vents from below, then this material can be used closer.
Characteristics of building materials
You can calculate the main indicators that a brick has for lining a metal or iron stove in a bathhouse using the following table:
| Options | Facing | Textured | Raised | Ceramic |
| Strength | M-250 | M-250 | M-250 | M-200 |
| Size, cm | 25×12×6,5 | 25×12×6,5 | 25×12×6,5 | 25×12×6,5 |
| Frost resistance | F35 | F35 | F35 | F75 |
| Moisture absorption,% | 8,5 | 8,5 | 8,5 | 6 |
| Weight, kg | 4 | 4 | 3,8÷4 | 4,1 |
| Thermal conductivity, W/(m×°C) | 0,61 | 0,61 | 0,61 | 0,72 |
Fire resistant structures
A special heat-resistant cladding is used as protection for the walls. To do this, the fire-resistant cladding is covered with heat-resistant tiles. Non-flammable glue is used for its installation. The following facing materials have good fire-resistant qualities:
- terracotta tiles;
- tiles;
- porcelain stoneware;
- soapstone and so on.
In addition, fire-resistant plasterboard, mineralite, glass-magnesium sheet and other fire-resistant boards for a bathhouse can be used as fire-resistant protection for walls. It must be taken into account that for each type it is necessary to provide ventilation in the form of a gap at the bottom. Practice shows that the use of cladding as heat-resistant protection for walls in a bathhouse has almost the same thermal characteristics as reflective cladding. The only drawback is the cost, which is several times higher than standard options.
Choice of solution
The most common option for carrying out such work is clay. It is mixed with sand, adding a little cement. A cement mixture with the same clay ratio is also used. For the cementless option, make a clay mixture with twice the amount of sand, which is diluted with water to the desired consistency.
Fireclay powder is best used for refining seams, because it binds bricks less firmly.
A simpler option is to purchase a special mixture. It is inexpensive and easier to use. Thanks to a wide selection of similar products, you can easily select the optimal solution. It is worth noting that the diluted mixture must stand for some time before use so that the substances contained in it dissolve better and the solution takes on the necessary properties.
Fencing an iron stove in a bathhouse
Before starting construction, it is recommended to thoroughly wet the bricks with water for 12-13 hours. This will allow them to achieve the desired level of humidity. Otherwise, they will dehydrate the solution.
The quality of the mixture is checked as follows: it is applied to a new brick, and if it does not spill or crack, then the specialist has created the correct consistency.
Now you can begin the laying process itself. It is important to check each row for evenness using a level.
If you are interested in what to line a stove in a bathhouse with (except for brick), you can always find a replacement. There are special casings that are cut to suitable dimensions. They are made from different rocks, are easy to install, and you will definitely find the right option for yourself.
What is the best way to decorate the walls in the steam room behind the stove?
It is very bad when the smell of burnt wood appears, it is bad and extremely dangerous. You should move the oven and install appropriate protection. This is not so difficult to do; the minimum distance to the wall in the steam room should be 25 cm on all sides. Dismantle the stove, clean the wall and you can line the wall with soapstone, jadeite, crimson quartzite, gabbro-diabase, porphyrite. Any of these stones will provide reliable fire protection. After lining, install the stove again, observing the distances.
the system chose this answer as the best
If the stove is very close to a wooden wall and it is ready to ignite, then you need to think about a reflective screen. If this is not done, the wooden paneling will have to be dismantled. Fire-resistant plasterboard is suitable for finishing behind the stove - it is attached to metal structures. And you will also need a reflective screen.
It’s still better to use refractory bricks, which can be placed on edge due to lack of space. It is better to build a brick wall using the dry masonry method, fastening it to the main wall with special brackets. If you use traditional mortar masonry, it may crack and bricks will fall out.
add to favorites link thank
Monthly project statistics
New users: 65
Questions created: 145
Answers written: 932
Reputation points awarded: 11014
Connection to the server.
Speaking about fire safety in the bathhouse, first of all it is worth highlighting the protective screens that insulate the stove in the bathhouse from the walls.
On the construction market, the most common metal protective screens are made of steel or cast iron. Many manufacturers of iron furnaces provide thermal insulation for their products, providing them with special casings.
Choosing protective screens is quite simple, because depending on the side of the furnace to be insulated, you can purchase a front or side panel. Installing such screens will also not cause difficulties, because the manufacturer provides special legs that can be easily attached to the floor.
We invite you to familiarize yourself with the Turkish sauna (hamam) - contraindications, benefits and harm
Next we should talk about the installation rules. The panels themselves are installed at a distance of 1-5 cm from the stove, but a distance to the adjacent wall is also required. Protective screens reduce the radiated temperature to 80-100°C, which allows them to be installed 50 cm from a parallel wall.
The furnace fence in the steam room can also be made of brick. A brick screen can be installed on all sides of a metal furnace, forming a protective lining. Also, such a screen can only be installed between the flammable surface and the stove, representing a protective wall.
Having decided to lay such protection, use solid fireclay bricks, for the binding of which you can use clay or cement mortar. Typically, half-brick masonry (120 mm) is used, but due to lack of material, quarter-brick masonry (60 mm) is suitable. When using the latter installation method, remember that the thermal insulation properties of such a screen are reduced, so the distance to the wall should be increased.
This finishing of an iron stove in a bathhouse is also carried out in compliance with certain rules:
- In the lower part of the shield it is necessary to provide special openings that will ensure air convection between the furnace wall and the brick;
- The height of the brick wall should exceed the height of the stove by 20 cm, but it is often built right up to the ceiling;
- Maintain a distance of 5-15 cm between the stove and brick screens;
- There should also be a distance of 5-15 cm between the flammable surface, for example, a wall and a brick protection.
The second option for protecting walls from fire is special sheathing, which is made from non-combustible materials. The working element of this protection, which reflects IR rays that are dangerous for flammable surfaces, is a reflective material, for example, stainless steel.
You can assemble this version of protective casing yourself. To do this, you will need a non-flammable thermal insulation material, which will be discussed in more detail below, as well as a sheet of stainless steel.
Stainless steel can be replaced with a cheaper option - galvanization, however, when heated, it can release harmful substances, so we strongly do not recommend using it. When starting work, secure the insulation to the wall, and then cover it with a metal sheet.
To ensure that such thermal insulation for a sauna stove is as productive as possible, polish the metal surface. This will allow IR rays to be better reflected back into the steam room, and the reflected rays will be better perceived by humans.
You can use the following materials as thermal insulation:
- Basalt wool is absolutely safe for baths. It retains heat well, in addition, it is highly hygroscopic and does not burn at all;
- Basalt cardboard is a good option for a bathhouse. It consists of thin sheets of basalt fiber that retain heat well and do not burn;
- Asbestos cardboard is a strong and durable heat insulator, which is also suitable for a bathhouse;
- Minerite for baths is also an excellent material. Non-combustible plates are specially manufactured for shielding hot surfaces in baths and saunas;
Before covering the wall near the stove in the bathhouse, familiarize yourself with the correct technology for its construction. The most important thing is the installation order and compliance with the gaps.
The ideal design has the following structure:
- Wall;
- The ventilation gap is 2-3 cm;
- Insulation 1-2 cm;
- Stainless steel sheet.
Remember that the total distance from the wall to the stove must be more than 38 cm. For fastening, use ceramic bushings that will help form ventilation gaps. If the distance between the wall and the stove is minimal, then it is necessary to use two layers of mineralite slabs, between which a gap must also be left.
This option is practically no different from the previous one, however, if you don’t know how to decorate the wall behind the stove in the steam room in such a way as to preserve the beauty of the room while creating safe conditions, then this option is undoubtedly for you. Protect the walls using heat-resistant decorative materials laid on thermal insulation.
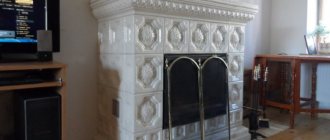
The finishing around the stove in the bathhouse can be done with the following materials:
- Clinker tiles are made from baked clay. It is characterized by high strength, heat resistance and durability. One of the advantages of this option is also the rich color palette, which includes not only black and white tones, but also blue or green colors;
- Terracotta tiles are also made from clay, but they are inferior to the previous option in terms of density and the number of possible colors;
- Soapstone is a good cladding option for a bathhouse, made from rocks of green and grayish shades. Has good heat resistance and strength;
- Tiles are ordinary ceramic tiles, characterized by good heat resistance and a pattern on their surface;
- Porcelain tiles are heat-resistant tiles that imitate natural stone or wood.
The tile will not dissipate heat, protecting the walls from fire, so it cannot be mounted directly on the wall. We recommend using the following design:
- Wall;
- Clearance for ventilation;
- Fireproof material;
- Tiles (the distance from the tile to the stove must be at least 15 cm).
Such a “pie” will create reliable protection for walls from heat, preserving the beauty of the room.
One of the following options can be used as a fireproof material:
- Fireproof drywall - made from the same materials as regular drywall, but using fiberglass;
- Minerite slabs for baths are absolutely not exposed to moisture and heat.
- Glass-magnesium sheet - plates made of fiberglass and magnesium binder. Excellent resistance to heat, moisture and noise.
This option will perfectly protect your bathhouse from the possibility of fire, and will also insulate the room, preserving its aesthetic component.
The most durable and reliable barrier that prevents excessive heating of the wall surface from the heat of the stove is the air space between them. If all distances established by standard regulatory documents are observed, you can be 100% sure that there is no reason to fear the walls heating up from the stove body.
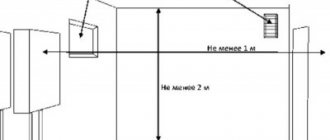
According to standards taken from SNiP 2.04.05-91, the distance from the stove to an unprotected wall with a fire resistance limit of REI 60 must be at least 500 mm (in diagram A), that is, half a meter. If you install a dense sheet of non-combustible material (minerite or glass-magnesite) on the wall and additionally attach a reflective layer of stainless steel to it, then this standard distance is reduced to 380 mm (in diagram B).
The dimensions of the parts of the protective screen structure that protrude beyond the dimensions of the furnace are also regulated (in diagram C). This distance should be taken into account when calculating the material to a value of at least 150 mm. As for the distance from the firebox door to the wall opposite it, it cannot be less than 1250 mm (in diagram F).
However, as practice shows, in order to comply with all these standards you need to have a fairly spacious steam room. And usually this room has very limited space and most of it is planned for shelves, which you want to make as spacious and comfortable as possible. Therefore, it is difficult to imagine a stove located with indentations of half a meter from the walls on each side.
Of course, this is not an excuse for violating fire safety standards established by special responsible authorities based on experimental scientific research. At the same time, manufacturers of Finnish stoves indicate other numbers in the technological documents for their products for the safe placement of their metal stoves in the walls of the steam room. For example, when installing a protective screen, the permissible distance to the wall is only 250 mm.
The basis for creating a thermal barrier is sheet non-combustible material. Glass-magnesite (SML) or mineralite slabs are used as such materials. Their installation is carried out through a sleeve, on a wooden frame or directly on the wall surface. The safest way to install this protective layer is to install it on self-tapping screws through a special metal or ceramic sleeve with a length of 3 cm. An example of the location of the thermal barrier with an illustration of the appearance of the sleeve is shown in the image below.
We invite you to familiarize yourself with DIY frame panel baths
Finishing
After setting, you need to make a lining so that the sauna stove, lined with brick, becomes a real decoration.
It is most convenient to remove excess solution using a drill with a special attachment. It is important to use personal protective equipment during the process. If after this procedure there are stains left on the brick, they can be removed with a brush dipped in a solution of laundry soap.
In order for the stone to retain its appearance for a long time, it is better to melt it slowly for the first time after lining, allowing the material to gradually warm up. Otherwise, the mortar may crack and the brick may lose its aesthetic qualities and properties.
Brickwork looks very beautiful regardless of the interior style. It does not require decorative finishing, and a huge selection of facing building materials will satisfy the most sophisticated tastes. All you need to do is keep it clean and protect it from damage.
Now you know how to cover an iron stove and boiler in a bathhouse with bricks. Regardless of the masonry method you choose and the materials used, you will immediately feel the pleasant comfort of the updated stove.