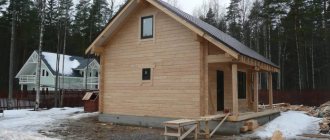
What could be better than a good steam bath or sauna? Here you can fully relax, relax and forget about your problems. The central place in any steam room is occupied by a stove, and not a simple one, but one that meets the following requirements:
- fire safety;
- quick heating of the bath;
- efficiency;
- adjustable temperature;
- long service life;
- ease of use;
- correspondence between the size of the room and the dimensions of the device;
- health safety;
- aesthetics.
Bath heating devices come in several types: heater stoves, steam generators made of brick or metal alloys, and equipment with a fireplace. The latter are considered the most modern models. They can be purchased in specialized stores or made with your own hands.
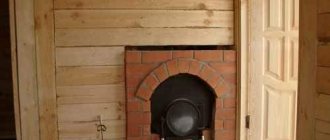
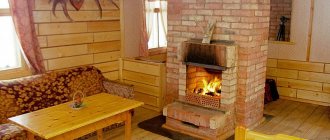
Such designs will be of interest to those who like to sit near the fireplace after bathing procedures. The glass ceramic door is an important part of this unit. It gives a conventional heating device all the properties of a fireplace. Thanks to the fireproof glass door (we wrote about the characteristics of heat-resistant material earlier), you can watch the fire burning in the fireplace. Such units are quite popular and are in great demand.
For a steam room, a fireplace stove is a combination of practicality, functionality and economy. It provides the desired temperature and a lot of pleasant warming steam in the bathhouse and serves as a fireplace in the dressing room.
Design and construction
The design of a sauna stove-fireplace is not relevant for purchased fireplaces, which mostly already have cladding; the portals are presented in the form of a cast iron or steel structure. If you assembled a brick sauna stove with your own hands, it can be lined and decorated with any materials that need to be renewed as they wear out.
Finishing can be done in one of the following ways:
- Traditional and ancient fireplace cladding using the peasant method involves applying a mortar containing whitewash, lime and clay to the brickwork and surface. After the solution has completely dried, such a surface can be painted, but this option requires artistic skills, which is why it is used quite rarely;
- Another option is to cover the fireplace with decorative bricks, which are affordable and allow you to imitate any surface;
- To finish the brick surface of the fireplace stove, you can use such heat-resistant ceramics as: porcelain stoneware, majolica or terracotta;
- Tiled fireplaces are very popular, on the surface of which such voluminous, massive and quite heavy tiles are fixed, having a unique color and style.
Kuznetsov furnaces have the following advantages:
- The oven heats up completely and gradually, starting from the bottom and slowly moving to the top;
- Due to their design features, the masonry of such stoves is not prone to destruction, deformation and cracks;
- Such units are capable of operating both the stove and fireplace separately, and together;
- Gases escaping from the firebox additionally heat the side walls of the fireplace stove;
- Soot and soot are formed in minimal quantities during equipment operation, which greatly facilitates cleaning and maintenance.
You can install a sauna stove with light weight and dimensions not only on the first, but also on the second floor of the house, however, during any construction with your own hands, you need to carry out a thorough and detailed design, draw up a project order, calculate and select the right materials, learn how to use a trowel , masonry mortar, level, grater, determine the most suitable place and method of placing the stove in the room.
Since brick sauna stoves have a lot of weight, more than 400 kilograms, before construction, it is necessary to pour a high-quality base or, in other words, a foundation under them. The depth of the pit will be about half a meter, after which crushed stone is laid on the bottom, which, if necessary, can be replaced with construction waste, filled with cement and supplemented with reinforcement - this will create a strong and solid foundation.
After the foundation has completely dried, two sheets of roofing material are laid on it and pressed with a layer of cement. Further, if you are going to install a purchased fireplace, you can decorate this area with stone or tiles, but if you are building a brick unit, you will not need decor and you can immediately begin installation.
For masonry, you need to choose a stove-fired refractory brick, and also observe the thickness of the seams between the bricks and rows, which ideally will be 3-4 millimeters. Each row is first laid out dry, and after laying on the mortar, the evenness is checked with a building level and plumb line, which will allow you to build a brick sauna stove with your own hands and in a short time.
Making a furnace firebox for a bathhouse from metal
The installation of the firebox must be carried out in accordance with all standards. The foundation for the firebox is a very important element. The reliability of the base determines the duration of its use, which can range from several months to decades. The firebox itself does not look quite aesthetically pleasing, so it is decorated with fireplace tiles. There are a lot of variations on how to make a firebox for a bath.
For the frame you will need a sheet of steel with a thickness of at least two millimeters; you can also use a chylous barrel, but with additional fastening. The sheet is divided into several sections for the firebox, tank and heater.
The remainder will be needed to make the ash pan and door. Corners or plates will be welded along the length where the grate will rest. It is best to purchase it in a store.
This type of stove is called a heater because it consists of individual stones. When fuel burns, the stones heat up, and the water that ends up on them forms steam. First of all, you need to choose the design and dimensions of the mechanism for heating the water. For the heater, the rods are attached by welding. Since it is heavy, the rods or square must be at least 10 millimeters.
A door is cut into the heater to transfer water to the stones. In this case, the heater door must face into the steam room, and the firebox must be placed opposite the entrance. The stones are distributed into the heater with some clearance, not closely. It is a good idea to use stones with small crystals of small size. It can be diabase or just chlorite.
Stones containing mica are prohibited; it promotes the release of carbon monoxide, and this is harmful to life. You need to attach a metal chimney cover above the heater, and then install a water tank.
The most practical method of heating water in a bathhouse is to use heat from the stove. There are several ways to install a tank for a sauna stove, the main thing is the location of the tank, it can be: internal, mounted or remote.
To design the tank, three versions of the material are used: cast iron, stainless steel containers or stainless steel. To make an iron barrel, you need to carry out a number of actions.
First you need to cut the desired piece of pipe. The cutting areas must be carefully processed. Then you need to start installing the bottom and top lid of the container. The next stage is soldering all the cut parts. Afterwards you need to install a tap and pipes, as well as a heat exchanger for the sauna stove. Then the installation of the module is carried out.
They prefer to build the stove supply for the bath separately. This is due to the fact that it is possible to create exactly the model of the stove that you wanted. Then, to make a metal sauna stove with your own hands, you will need blueprint reading skills, construction tools and materials. First you need to draw up a project and determine the dimensions of the device.
There are 2 design options for homemade stoves, these are the horizontal and vertical versions. To make a stove you will need:
- a rod ten millimeters thick;
- sheet steel, 8 mm thick;
- iron pipe;
- latches;
- water tap;
- two meters of pipe.
We take a large piece of pipe and cut out an opening in it for the blower. In the middle of the pipe, on the side of the opening, we weld fastenings for the grate. Then we equip the firebox, for this we weld fastenings for the heater rods. On the back side of the heater we cut a hole through which steam will flow. We fill it with stones suitable for this type of unit.
We cut a hole in the roof for the stove for the chimney pipe and install it. And don’t forget to cover the sauna stove with useful material to create a classic stove. It’s not difficult to build the device; just follow the instructions.
We suggest you read: Is it possible to build a bathhouse in winter from timber?
Installing a sauna stove is an important matter, the correct operation of which depends on the correct organization of the installation. Initially, you should choose a place to place it. It is also necessary to adhere to fire safety rules.
According to standards, the distance between the stove and a flammable wall must be at least 25 centimeters. First you need to determine what kind of stove you decide to install. The next stage is drawing up a plan and counting the necessary material.
To assemble a homemade stove, you will need tools: a grinder, metal scissors, a welding machine, a variety of measuring and marking kits. You will also need material. The step-by-step manufacturing process can be seen in the video presented in this article.
A do-it-yourself sauna stove made from a pipe is the easiest and most economical option for furnishing a room. A similar design will work well in every room. Thanks to the sealed housing, the stove made from 530 pipe will not emit carbon monoxide when active, so it is completely safe. A pipe bath can be made in two types: a horizontal and a vertical model.
This type of furnace significantly reduces the number of welding steps. In order to obtain an improved stove, only high-quality tubes are used, without corrosion. The workpiece should be cut into two parts, a longer section is needed for making a firebox and heater, and the remaining piece is suitable for constructing a tank. First you need to start making a pod.
A hole is cut at the bottom of the pipe, and a strong round-shaped plate is welded above it. Then we make a firebox and a door for it. We hang the door on a loop or hooks. A piece of pipe is welded above the firebox, which will be used as a heater.
Making stoves is an interesting and labor-intensive procedure. There are many types of metal stove models. The main task is to create a structure that is strong enough to prevent deformation and high thermal conductivity. For the manufacture of the mechanism, different materials are used: cast iron, steel and heat-resistant steel. The most common manufacture is steel.
This matter tolerates temperatures up to 400 degrees. The thickness of steel starts from 4 millimeters, but the disadvantage of the material is that it quickly burns out. The next material used is heat-resistant steel.
The minimum metal thickness is 3 millimeters. The stoves are made from the safest material, efficient and easy to install. Another material for forming metal sauna stoves is cast iron. It is not inferior in strength to steel, but at the same time its heat capacity and fragility are comparable to ceramics.
Precisely installing a stove in a bathhouse with your own hands is a responsible procedure, since the comfort and safety of its operation will depend on this.
In order for the steam room to warm up effectively, you need to select the location of the stove structure. By following all the rules and regulations for the placement of the heating medium, you will not have to worry about altering the bath unit for many years.
First of all, you need to calculate the dimensions of the device for the size of the high-temperature room, because the roof and interior decoration can burn, smolder, or melt; to prevent this, you need to choose the correct placement of the stove. You should also take care of installing a hood for a sauna stove, and do it yourself. It should be placed 50 centimeters from the wooden covering.
If it is protected by a metal screen, the distance can be reduced. The partitions opposite the firebox may not be insulated. The gap from the ceiling to the top cover should be 1.5 meters.
There must be unhindered access to the elements of the furnace structure in case of an emergency. You also need to plan in detail the ventilation system in the steam room, and think about the release of combustion products. When installing a brick kiln, you need to create a solid foundation, and place light metal structures on a non-combustible floor base.
Preparatory work
Selecting a water tank
One of the main components of a heating device is a tank or container for water. The volume of the tank should be selected before all construction work begins.
It depends on the number of people and the visit to the bathhouse: the more people who want to take a steam bath, the larger the volume of the tank needs to be used. One liter of water is usually consumed per person.
It is best to use an open tank as a tank. It will be more convenient to fill such a container with water. During operation, scale may appear on the tank. It is easier to eliminate it if the container is open.
If you do not use the sauna in winter, it is better to remove all liquid from the container. This way you prevent the water from freezing and damaging or deforming the tank itself.
Foundation of the future furnace
One of the most important components of any furnace is its foundation. A brick stove with a closed heater for a Russian bath made by yourself must be on a high-quality foundation.
The foundation depth should be below the soil freezing level by an average of half a meter. The area of the foundation should be larger than the furnace by a few centimeters around the perimeter.
Stages of building a foundation:
you need to dig a hole to install the formwork. Cover the bottom with sand (about 15 cm) and fill it with water to compact it. Small stones are placed on the surface, after which they are compacted. The formwork is made from boards. The internal size of the formwork must be identical to the size of the foundation
It is important to use a level to build. The formwork is fixed in the pit, and strong reinforcement is inserted inside. After this, all that remains is to concrete the area and leave it for several days. The wooden frame is removed, and the gaps between the ground and concrete are filled with sand or gravel
The structure is covered with film and left for about seven days.
What brick should I use?
It is appropriate to use ceramic refractory bricks in the bathhouse. It is red in color and is durable and resistant to high temperatures.
How to choose quality brick? Before purchasing a whole batch of bricks, check its quality. To do this, purchase several bricks and break them. If you have a few large pieces left over, this is a great material.
If it crumbles into small parts, it is a bad material. It is not the size of the brick itself that is important, but the identical parameters of each individual rectangle.
There is another type of brick that is used only in the fuel zone of the furnace. It is called fireclay. This material is resistant to heat. Fireclay has a larger size compared to others. But it can be easily filed and made to the desired size.
Preparation of the solution
A do-it-yourself sauna stove is made using two types of solution:
- for external masonry
- for the firebox and chimney.
The first one is easy enough
The main attention in this process should be paid to the components: sand and clay. Before preparation, the sand is sifted
It should be small and uniform. And it is best to choose clay that has overwintered in open areas. It should also be ground through a sieve, after wetting it with water.
The proportions of the components may vary. It depends on how high quality clay is used. But usually this ratio is 1 to 2 (1 part clay and 2 sand), water should be approximately 1/4 of the amount of clay.
To strengthen the fireclay brick (for laying the firebox), use a solution of heat-resistant clay (it is white). When exposed to high temperatures, it compresses tightly and forms reliable protection against heat. All solutions must be mixed gradually until the consistency of liquid sour cream.
Tools
No special tools are required to build a heater. All you need is a level, a trowel, and a container for mixing the solution. Every owner has them, so you don’t have to spend money on work equipment. If the masonry you choose requires cutting the brick, use a grinder and a hammer.
Main characteristics of structures
A fireplace in a bathhouse will not be able to heat the structure and provide an optimal atmosphere, but if it is combined with a stove, it will be possible to obtain a unique combined design. This oven has the following parameters :
- fire safety;
- ease of creation, allowing you to implement all stages with your own hands ;
- there is no possibility of getting burned on the surface of the product , and choking smoke will not penetrate into saunas and baths;
- you can make a design whose parameters will ideally suit the specific room in which it is intended to be installed;
- using a fireplace stove is very simple, so you don’t need to know any features or specifics of operation;
- the appearance is very beautiful and aesthetic, so the product can fit into even the most original and unusual saunas or baths;
- The efficiency of the equipment is considered high , which determines its efficiency;
- Due to the use of high-quality and reliable elements, a long service life of the structure .
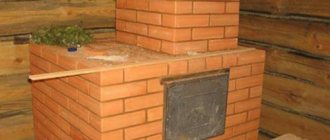
Masonry
The masonry process is very painstaking and complex. There are a large number of subtleties and nuances here, understanding some of which comes only with experience. Therefore, to make this work easier for you, this section contains several videos that tell you step by step and show how to lay row by row.
As an example, consider the manufacture of an open small stove-heater. The size of such a stove is 102x62 cm. It is capable of heating a steam room with a tank, while the tank itself is located separately. It uses an interesting water heating system - an open siphon. So, a pipe is welded into the tank at a slight angle, which is sealed at the end. It should be under an open fire in the firebox. As soon as the water in the pipe boils, it rises into the tank, and cold water comes in its place.
The diagram below shows an example of a stove with an open heater:
Diagram of an open heater
And also a diagram of the arrangement of the firebox of an open heater:
Firebox order
Below in the diagram is the order of laying bricks for the stove:
Brick laying order
If you want to make a closed stove, keep in mind that this is much more difficult to implement. There are many nuances that must be taken into account when laying it. It is quite difficult to describe the entire technological process, so we suggest you watch an introductory video. The peculiarity of such a furnace is that the reservoir for stones is lined with fireclay bricks:
Video about making a closed stove:
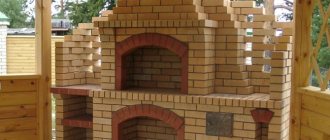
Do-it-yourself brick lining of the stove: materials and technologies
Particular attention should be paid to the choice of building materials. They must be able to withstand heat and temperature changes well.
What kind of brick to line an iron stove with? It must be fireproof, solid, without voids in the structure. This is not a case where you can skimp on quality, so choose the best materials. The costs will definitely pay off: you won’t have to repair the stove for a long time, it will last for many years. As for the outer surface, you can choose smooth or corrugated - to suit your taste.
How to calculate the amount of bricks for cladding
Opt for red fired solid brick. The amount of material is calculated based on the volume of the metal furnace plus the distance by which you plan to increase the structure. In your calculations, make a reserve for arranging the base for the stove - this is 1-2 rows of masonry, a chimney, if you plan to make it brick. To determine the amount of material in pieces, divide the area of the masonry by the side area of the brick. Add 5-10% to the result obtained. The reserve is needed in case additional material is needed, as well as to compensate for losses (waste) of material during transportation.
Red solid brick for oven cladding
Heat-resistant mortar for masonry
Cement-sand mortar is not suitable for laying bricks around a sauna stove, because... it does not tolerate high temperatures. Stove makers use clay-sand compositions. Clay can be found independently on river cliffs or in quarries, but it is much more convenient to use dry mixtures offered by industry. The dry mixture can be purchased at the store. It is mixed with water in accordance with the manufacturer's recommendations and is immediately ready for use. If you have experience and skills in determining the fat content of clay and preparing a high-quality solution, you can spend time and effort on this and prepare the clay mixture with your own hands.
Heat-resistant masonry mixture of industrial production
Additional materials and tools
A waterproofing material is placed under the base of the stove, which is resistant to high temperatures. As a rule, roofing felt is used as waterproofing; it is laid on the foundation in two layers. To ensure fire safety, the space near the stove is covered with a metal sheet or tile. If the stove is completely lined, then metal profiles will be needed to build a brick vault.
Tools you will need:
- Master OK;
- hammer;
- jointing;
- mooring cord;
- order;
- plumb line;
- building level;
- rule;
- shovel;
- solution container.
Finishing a sauna stove with bricks: work order
First you need to arrange the base, along the edges of which the masonry will be carried out. The base is a 1-2-row masonry. When it is built, you need to give the solution time to dry (usually indicated on the packaging of the dry mix). The stove is mounted on the finished base; you can immediately connect it to the chimney. In the corners, bars are installed to level the masonry, and a cord is pulled between them. Before laying, the brick is prepared by soaking it in cold water for half an hour.
The first row of bricks is decisive; the laying of the entire wall will be laid out along it, so you need to pay special attention to it. When the row is completed, remove excess solution
When laying the remaining rows, you need to be careful about the lining of the holes for the ash pan and firebox. During operation, you should check whether the doors open well.
Scheme of brick lining the furnace
Often, stove owners veneer only individual structural elements. This saves materials, time, labor and effort. Consider which option will be most convenient for you and arrange the stove so that it fully meets your needs.
Safety rules for the construction of a bathhouse
It has already been written above how important it is when planning and constructing a bathhouse to strictly adhere to all standards and recommendations to ensure fire safety.
Brick is the best material for fire protection, but despite this, it is necessary to maintain a minimum distance from the stove to the walls - no closer than 25 cm. A special base for the stove is laid on wooden floors to avoid fire. The ash compartment is located at a height of at least 14 cm from the floor.
Following the simple rules described in the article will help you install the stove in the bathhouse correctly and protect yourself from unforeseen situations.
Cleaning the oven manually
If you don't want to clean the stove, call a chimney sweep. A specialist will not only evaluate the draft and remove soot deposits, but also check the design. Of course, you can take care of the fireplace and chimney yourself. Pipe cleaning work should be performed as follows:
- Start with preparation. Close all stove openings leading into the room (including the firebox door) so that soot will not enter the room. If the firebox is open, hang a damp cloth over it.
- Chimneys can only be cleaned in dry and windless weather. Be sure to use elements of insurance when working on the roof of a house.
If the stove is not being used for a long time, you will need to ensure that birds have not built nests in the chimney. If you cannot remove accumulated debris, simply push it down. Use available means for this purpose.
The chimney must be cleaned if the soot layer is more than 2 mm. If it is smaller, then complete cleaning will not be required. You can get by with alternative methods. If the soot lies in a dense layer, it can be easily removed with a scraper. After this, you can additionally clean the chimney walls with a brush or run a brush over them.
While working on the chimney, you may find that the tool does not go any further. This means that you have encountered a blockage in the structure. Most often this is garbage, but across the pipe there may also be a brick that fell out of the collapsed masonry. If you haven't cleaned the pipe for a very long time, you may notice this phenomenon. It can be removed using a heavy core. The device is made of steel.
The cannonball is suspended on a rope and secured with a carabiner. The tool should cover about 70% of the pipe diameter. It must be carefully thrown into the chimney. Be careful not to touch the pipe walls with the tool.
Using the core you will quickly remove the blockage, after which the cleaned chimney can be brushed again. The devices you plan to use should be connected with carabiners. Remember that the core cannot be replaced with sports weights. Their center of gravity is shifted, and products can get stuck in the pipe. To remove such objects, the structure will have to be dismantled.
You can clean fireplaces that have a straight chimney not from the roof, but from the room. To do this, you need to buy a brush made of metal. The best product will be one that has a long handle.
After the work is completed, the firebox should be opened. Clean the holes thoroughly, sweep away soot and dirt with a brush. Don’t forget to treat the ash pit and remove the ash from it. Remove any remaining carbon deposits from the pipe walls. You can use a vacuum cleaner for this.
More about firebox rules
For your own safety, as well as for long-term, normal and problem-free operation of the heating unit and “gate”, adhere to the following recommendations:
- Splash water onto the stones carefully, without flooding them, in small portions - 50-100 ml, gradually reducing this volume.
- Use a fan to wet as much of the area as possible.
- Try to direct the liquid between the stones to obtain the hottest and dryest steam possible.
- Follow the sounds - when you hear the water hissing, you will understand that the temperature in the room is dropping.
- Pay attention to the color of the soaked stones - if they acquire a crimson glow, it means you are steaming correctly.
How to choose the right gas stove for a bath
The stove is the most important element of the steam room. It determines how comfortable and useful a visit to the bathhouse will be, and how much it will cost.
The design of a gas stove is not the last selection criterion. The volume of stones is also important; by splashing water on which you can adjust the steam hardness and other vaping characteristics.
As for technical parameters, the main ones are:
- area of the steam room;
- rated power;
- firebox type;
- material of manufacture;
- control method;
- installation features;
- design.
If the power of the stove is too large for the volume of the steam room, the air will heat up quickly, and the stones will not have time to warm up. This means that getting decent steam will be problematic.
At low power, the oven will operate at the limit of its capabilities, which will lead to rapid wear and deformation. As a result, you will have to spend money on expensive repairs or even buy a new unit.
Therefore, it is necessary to determine the volume of the steam room and add to it the volume of adjacent rooms if they are also planned to be heated using the same stove. You can add 20-25% to the obtained value and, based on this data, select a model based on other criteria.
Facing a gas stove with bricks or slabs of natural stone significantly increases the heat transfer of the unit and protects bathhouse lovers from direct exposure to high and ultra-high temperatures
It is important to pay attention to the firebox, which must be made of steel grades that can withstand high temperatures and their significant differences. It is desirable that the stove has thermal inertia, that is, it can retain heat after being turned off. This will not only save fuel while bathing, but also dry the bathhouse after completing all procedures
This will not only save fuel while bathing, but also dry the bathhouse after completing all procedures
It is desirable that the stove has thermal inertia, that is, it can retain heat after being turned off. This will not only save fuel during bathing, but also dry the bathhouse after completing all procedures.
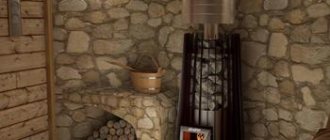
If the stove will also heat water for the shower room, which is located outside the steam room, you should choose a model with a remote tank. Those who like wet steam need to buy a stove with an open heater. For connoisseurs of dry heat, you will need a unit with a closed heater, in which the heating of the stones reaches 500°C.
Multi-mode models will help you not to limit yourself to one thing and, depending on your mood, steam in either a Russian steam room or a Finnish sauna. Some stoves are capable of providing the conditions of an oriental hammam and an infrared sauna.
Additional equipment will allow you to control the unit from a distance and prepare the bathhouse for your arrival, being hundreds of kilometers away. All that remains is to wish you a successful purchase and easy steaming!
How to choose the right place to install a stove in a bathhouse
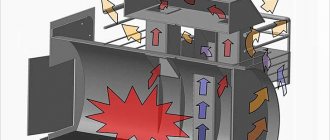
In order for the installation of a metal stove in a bathhouse to be successful, you need to know how the rooms are heated. When the stove heats up, heat moves along with the air throughout the room, uniformly heating the entire space of the room. In this regard, for normal heating, you should not put obstacles in the way of warm masses, be they walls, decorations or other piles.
How to place a stove in a bathhouse with a water tank? The stove is installed so that at least two rooms in the bathhouse are warm. This is the steam room itself and the dressing room. This is achieved by placing the stove in the wall between the steam room and the dressing room.
How to install a boiler in a bathhouse? In general, choosing the correct installation point for the boiler is the main step in planning a bathhouse. The selection of this point is influenced by the following criteria:
- oven power. This affects the size of the firebox and the number of stones laid. A simple rule for calculation is that for each square meter of steam room you need 1 kW/hour;
- firebox design and smoke pipe outlet. According to the rules, the horizontal part of the pipe for removing smoke and gas from the furnace should not be more than 1 meter long;
- walls, ceilings and floors. The minimum distance for installing the stove from surfaces subject to rapid heating and ignition will depend on the material from which the walls, floors and ceilings in the bathhouse are made;
We suggest you familiarize yourself with When birch brooms are harvested for a bath: timing, where it is better to collect, how to knit, rules for harvesting and storage
Expert advice
You can insulate the walls not only with brick, but also with some other materials: asbestos-cement slabs, mineralite (fiber cement slabs) and cover them on top with decorative metal sheets, stainless steel, and special ceramic tiles.
You can install ready-made purchased doors as doors. By placing a glass door on the firebox, you will get a beautiful visual effect of a live fire, like in a fireplace.
It is advisable to protect the iron body with a decorative grille to protect visitors from burns. Sometimes stones are placed behind these grates and used as an open heater.
Advantages and disadvantages of a brick stove
This design has many advantages:
- couples gathering in a sauna have a beneficial effect on health;
- a homemade brick sauna stove will fit perfectly into any interior of a given room;
- there is no need for additional brick finishing;
- long service life;
- the presence of harmful and dangerous substances in the materials is excluded;
- brick retains heat for a long time and warms the room;
- no condensation;
- publicly available raw materials are used as fuel;
- There is no need for regular chimney cleaning.
The disadvantages of such buildings include the following points:
Options for a homemade sauna stove
A homemade metal stove made of sheet metal has a lower firebox and a tank for heating water. Part of the oven is lined with bricks. The lower firebox and wall are also brick. The stove works in this way: water pours through the side door, from which steam is released.
A sheet iron stove works the same as in the previous version: water and steam enter through the side door. The internal walls are brick. For the construction of such a sauna stove, sheets of iron more than 5 mm thick may be suitable.
A brick stove for a bath is one of the most popular options. It looks like this: the firebox is lined with refractory bricks, below the firebox there is an ash pit, and a cast iron or steel grate, which is designed for laying stones. A brick oven has a chimney and doors. Hot water is supplied using a coil. The furnace is built on a foundation. For this design, a solution made of sand and clay is used. It is unacceptable to use a mortar for laying bricks that contains cement, which is not resistant to high temperatures. The brick oven is fireproof. Laying such a stove is a rather labor-intensive and complex process.