Types of curtains for sewing
First you need to decide on the type of curtains. Among the many, there are eight main types. Some are similar and differ only in nuances.
For beginners, the following popular styles are recommended for familiarization: English curtains, Roman curtains and classic ones with laces. The pattern for such curtains is perfect for beginners. Next, you should prepare the fabrics and tools.
Straight curtains have a weak effect, but are suitable for rooms with simple decoration and small windows. They are often complemented with laces made from the main fabric, sometimes with tassels. It is common to place a hook in the wall to maintain shape.
Room specification
The choice of fabric should be approached responsibly. It is necessary to weigh the material and decide in advance on the room for which the curtains are being prepared. Cotton or linen are used to make patterns for kitchen curtains. They are lightweight and do not require complicated care. You should not take synthetic fabrics.
Peaceful and soft colors are suitable for the sleeping area. To block the sun, they must be dense, which requires appropriate material.
It is better to hang bright curtains in the children's room. For the living room, you should choose based on the design of the room. Consulting a salesperson in a store will help.
Print placement
Usually the pattern is perpendicular, and you can easily adjust the size of the roll. Otherwise, the width is limited to three meters. You need a lot of prints to accurately combine the pattern. Don't forget about seam allowances.
Counting expenses
There are three criteria for calculating material, the main one being length. It is calculated as the distance from the cornice to the floor or window sill. The curtain may not reach the floor by ten centimeters or be only slightly longer than the window.
To calculate the width, you need to take into account three parameters: the length of the cornice, the coefficient of material gathering and seam allowances. The width of the cornice is usually greater than the width of the window. The measurement result is multiplied by a coefficient.
Fastening with grommets
If a rod-type curtain rod is mounted on the window, the curtain can be attached to it not only with hooks or eyelets, but also with metal rings called grommets. Such curtains look very impressive, especially when they are sewn from curtain fabric. Although, today this type of fastening is also used for tulle.
Metal rings are an interesting option for attaching curtains
Kitchen curtains with eyelets
Eyelet kit
Since the principle of attaching curtains is completely different here, the technology for processing the upper part of the fabric is different. In this case, it is not curtain tape that is sewn along the top edge of the curtain, but grommet tape. And sewing begins not from the bottom and sides, as is the case with curtain braid, but from the top (eyelet strip).
Grommet tape
Table 3. How to sew ribbon and attach eyelets
| Steps, photo | A comment |
Step 1 - removing the thread to straighten the cut | When buying fabric in a store, it may be cut unevenly. Therefore, before you start sewing the ribbon, the cut must be aligned. The easiest way to do this is to pull out the cross thread. It will leave a visible path along which it will be very convenient to cut. |
| Step 2 - first fold | Having aligned the fabric, place it face down on the table, fold it 1 cm to the wrong side, pin it and iron it. |
Step 3 – laying the grommet tape | Place the grommet tape inside the ironed hem with the adhesive side facing up. Its end should deviate from the side cut of the fabric by 2 cm. |
Step 4 – gluing the hem to the tape | Iron the folded edge of the fabric again, steaming thoroughly so that it sticks to the tape. Now the tape will hold perfectly in the specified position. For convenience when steaming, the opposite edge of the tape can be secured with pins. |
Step 5 - second fold | Next we need to make a large fold, as a result of which the grommet tape will be inside the “sandwich”. |
Step 6 - ironing | Carefully straighten the fabric so that there are no folds or creases, and steam the hem well with an iron. Then you need to turn the fabric right side up and iron the bar again. |
Step 7 - stitch | On a note! You can continue to work only when the fabric dries and cools down. Now the ironed strip needs to be secured with a stitch. Place the fabric under the sewing machine foot, wrong side up, and stitch at a distance of 1-2 mm. |
Step 8 - forming a side hem | At the next stage, you need to form side hems 1.5 * 1.5 cm and pin them. Do this on both sides along the entire length of the curtain. |
Step 9 - opening the eyelet | The grommet consists of two elements snapped into each other with a locking connection. To install it on the bar, it needs to be opened, for which a sharp object is inserted into the gap. If you pry it, the parts will separate. |
Step 10 - two parts of eyelet | The lower part is the one with grooves, the upper part is with spikes. |
Step 11 – marking the strip for the outer eyelet | We need to mark the installation locations for the eyelets in order to cut holes for them. You should start from the side cut (which is why it is tucked in advance), stepping back from the edge 3-4 cm (more will be unsightly). From this point you need to set aside a distance equal to half the diameter of the eyelet - that is, mark the center of the circle. |
Step 12 – drawing a circle | On a note! The most harmonious look will be the plank on which the eyelets are installed in the middle. Place the bottom of the grommet against the bar and trace its inner circumference with chalk or pencil. |
Step 13 - marking the installation locations of all eyelets | Similarly, you mark the place where the grommet will fit from the second edge, and only then can you begin to calculate their total number, which should always be even. Measure the distance between the two outer rings and divide it by their diameter, round to the nearest even number. It is optimal when the distance between the eyelets is within 17-20 cm. Mark the centers of the holes with pins so that if the calculation is inaccurate, they can be easily moved in one direction or another. |
Step 14 – Cutting the Holes | Having drawn all the circles, you can start cutting out the holes. First, cut the fabric in the center, then cut in a circle, not reaching 1-2 mm from the drawn line. |
Step 15 - installing the grommet | Now you can install the grommet. First, try on its lower element to the hole, and if the fabric overlaps it somewhere, trim it slightly. Then put the top on and press until it clicks. |
The curtain is ready
Please note that when you begin installing the eyelets on the bar, the side sections and bottom of the curtain must be hemmed and ironed. This is done in the same way that we wrote about in the first chapter.
Non-standard fastening of curtains on grommets through a cord
Video - Installing eyelets on curtains
Preparing for sewing
To prepare allowances for the final length, add up to ten centimeters for shrinkage after washing. The size of the additive depends on the material. For natural materials, allowances are made up to twelve percent of the original length.
It is necessary to prepare sketches for sewing curtains in advance - take templates or describe them yourself. It is necessary to specify all the parameters and solve difficulties that may arise during work.
Your own drawings often turn out to be of better quality than store-bought ones. It is also worth checking that the window measurements are correct. Mistakes will lead to curtains that are not aesthetically pleasing, so you need to double-check all the nuances. The style should match the decor of the room.
Drawing creation and initial work
Before you start sewing, you need to find or describe your own curtain patterns, select sketches, patterns, more suitable materials and solve other problems. All size parameters must be noted on the pattern. Templates you make yourself can turn out just as good as store-bought ones. It is important to take measurements from the window correctly.
How to measure a window
If you need to sew curtains in a studio, then the success of the product depends on the size that a person takes. If they are incorrect, then in the end the curtain will turn out ugly, and the fault will lie only with the client. You need to think through all the details, color, shape and number of folds.
You might be interested in this Basic rules for forming a chest dart
The style of the curtains should fit completely into the overall design of the room and not look bulky or pretentious. Below you can read step-by-step instructions for sewing curtains with your own hands.
Kitchen Roman blinds
First you need to accurately and accurately cut the canvas. Then fold it on both sides and trim the edges. According to the instructions above, apply the braid and smooth it out.
Next, prepare the slats and remove the nylon threads. Excess slats need to be removed, focusing on the planned number of folds.
Usually, with a standard length of 130 centimeters, five pieces are used. Fold the edge and hang the base from the cornice. The slats need to be attached evenly across the canvas. You need to make sure that they do not touch the rope mechanism. You can secure the fabric with PVA glue.
How to diversify your home interior: DIY decor and beautiful design ideas- How to hang curtains - step-by-step instructions with photo examples and recommendations. Exclusive curtain design solutions from experienced craftswomen
- Curtain tiebacks - 150 photos of new exclusive designs
Sewing curtains with your own hands: step-by-step instructions for connecting panels
The curtain making process consists of several steps:
- connection of two elements;
- ironing;
- stitching on a sewing machine;
- cutting the basting;
- smoothing the elements.
Curtain pattern
The process of sewing curtains with your own hands is described in detail below.
How to sew curtains: patterns
Like any work, sewing curtains begins with creating a pattern. You can find it on the Internet or draw it yourself. It is important to indicate all dimensions (length, width, etc.), choose the color of the fabric, the number of folds, and the density of the products. This is the most critical stage, since the type of product depends on it.
The second stage of work is cutting
Before working with the material, it is advisable to wash it so that it shrinks first. Next, dry the fabric and iron it on the inside. Prepare tools for work:
- textile roller;
- disappearing marker;
- tailor's pins;
- tape measure;
- ruler.
SVAG curtains pattern
When cutting elements, you need to be guided by the indication of the grain thread, so that the curtain does not change shape when used. Cutting is done from large canvases:
- lay the fabric on the surface with the inside facing up;
- place the pattern elements on the material;
- circle them with a marker, not forgetting to leave allowances (10 cm on top, 5 cm on the side).
Side edge finishing
Basically, the edges of the material are processed manually; this is even better suited for plain fabrics with a smooth structure - the stitches on the outside will remain invisible. The main thing is to grab only one thread of the main fabric with a needle. Thicker stitches will be visible later.
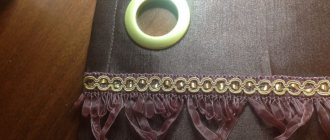
Curtain braid
Sew on curtain tape
Stages of sewing curtain tape:
- prepare the curtain, bend the top edge to the inside and iron it, the fold size is 2-3 cm;
- attach the curtain braid to the upper edge of the curtain (from the inside), making an indent of 1 cm from the edge;
- pull out the laces;
- bend the edges of the tape by 2-2.5 cm;
- stitch each edge using a machine.
Features of kitchen curtains
Weightless and thin materials (veil, organza, tulle) are suitable for the kitchen. For the kitchen, you can select fabrics with a variety of textures. Curtains with glass beads look very good.
Sometimes curtains are used in the kitchen to limit access to sunlight; dense and dark fabrics are chosen for them. Kitchen curtains should not be long, literally up to the windowsill. In this case, they will have to be washed less often.
You might be interested in Setting up a sewing machine: how to adjust it yourself
We sew Roman blinds for the kitchen
Blinds
This option is stylish and easy to manufacture. For blinds, a dense canvas without patterns is used. First you need to decide on the size and number of lamellas. The standard values are 127 and 89 millimeters.
Then the lamellas are cut out according to calculations. Allowances are also taken into account. The lamellas are placed with the front side inward, and the stitches are started. After turning them inside out, they are ironed and put on the guides.
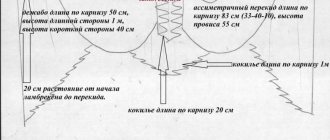
Making a lambrequin
Lambrequin can be soft, hard, combined and figured. Soft is made from thick or thin fabric. Decorated with sewn elements, folds and textile details.
The hard one is distinguished by a corresponding lining, which can be wooden or plastic. It gives shape and decorativeness to curtains. The figured lambrequin has a three-dimensional pattern and various holes.
When preparing, you need to make a pattern. Popular options are available on the websites. Then fabric of appropriate sizes is purchased. Initially, the canvas is attached above the window and sewn to the length of the floor. Then for a cornice half a meter wide you will need seventy centimeters of fabric.
Do-it-yourself tulle - step-by-step instructions on how to sew beautiful tulle. Photos of ready-made ideas and modern designCurtains for gray wallpaper - options for the ideal combination of curtains in a gray interior (TOP-150 photos of new designs)
- Quilt - 130 photos of the best new items of 2021. Step-by-step instructions on how to sew a beautiful patchwork quilt with your own hands
The lining should be trimmed. Having temporarily connected the layers with a pin, turn the curtains over and cover the holes. Then the cornice is attached, and the folds are tightened with laces.
A little about choosing fabric
Before purchasing material, you need to weigh everything carefully. Decide in which room the curtains will be placed. The choice of material very often depends on this.
Fabric for curtains
For the kitchen, choose light curtains made of cotton or linen. They are completely natural and easy to care for. The cascade or arch style is perfect.
Attention! Synthetic fabrics are not used for the kitchen.
If curtains are needed in the bedroom, then it is advisable to choose more delicate and calm colors. Curtains should be very thick (blackout) to protect the room from direct sunlight. Such fabrics are also used for summer verandas. It is advisable to buy thick material without patterns. Curtains for a children's room should be made of bright and light colors. Fabrics for curtains that need to be used to decorate the living room are selected depending on the style of the room. Everything is suitable here, from ordinary velvet to double-sided linen, if the hall is made in folk style. You can draw a template for the window. This will help you choose which shape and length of curtains will look best in your home. In the store, it is better to consult with the seller and look at all the samples of curtain fabrics.
You may be interested in Patterns and sewing of dresses in boho style with your own hands
Direction of print on roll
Nuances of measurements
To get a beautiful pattern for curtains, you need to make accurate and accurate calculations. A few tips to follow when taking measurements:
- The height should be measured in two or three places. If the ceiling or floor in the room is uneven, such a check will reveal this. If the heights are different, during the work you need to make a bevel in accordance with the measurements.
- You cannot subtract allowances from the result, since this is already done during the pattern.
Master class on sewing Roman blinds
Let's look at step-by-step instructions on how to make Roman blinds:
- Take accurate measurements of the window, as these curtains should tightly block the light from it.
- When purchasing material, add 10 cm to the width of the window opening, and 10-12 cm to the length.
- Use chalk or dry soap to mark the fold lines of the fabric, fold, iron and pin the fabric using safety pins.
- Secure the curtain to the beam with tape.
- We fold the bottom edge of the curtain and iron it.
- Next, we stitch the finishing edge of the future curtain.
- We secure the rings to the fabric with large stitches.
- We pass the twine through the holes and carefully tighten it. We cut off the excess ends with scissors. The stylish curtain is ready.
Making roses
There are two common options:
A decimeter wide fabric is taken, the length does not matter much. Only the splendor of the product depends on it. The strip is folded in half lengthwise. The stitching is then started and the edges are sewn together. The workpiece is turned out, twisted and fastened with threads. The method is simple, and even a child can make such a rose.
The flower is assembled from individual petals. Round petals of different sizes are cut out. You shouldn’t make them perfectly even - asymmetry is inherent in nature.
To avoid fraying of the edges, the petals are treated with fire. The result is interesting and more natural, but you need to put in more effort.
Other elements. There are many decorations for curtains. The most popular ones are listed here:
- jabot (specially shaped folds for additional decoration);
- tiebacks (patterning curtain tiebacks helps you make beautiful draperies with your own hands);
- decorative tassels (they add elegance to even ordinary simple curtains and can be used as tiebacks).
Making curtain ties
Pattern of tiebacks for curtains.
The tieback is a small but important element in the design of curtains. It not only holds the curtain panels open, but also shapes them with beautiful drapery. You don’t have to sew this part, but buy it ready-made. For example, curtains for a bedroom made in a classic style are ideally combined with tiebacks in the form of bronze or silver hooks mounted directly into the wall.
Pickups can be fancy. Details collected from beads, woven from braid or made from lace look very interesting. Rope tiebacks go perfectly with curtains made from rough fabric. They are a simple piece of thick cotton rope, decorated at the ends with an intricate knot or tassels. But if you decide to sew curtains with your own hands, then it is more logical to make tiebacks yourself.
Related article: What happens if you pour wallpaper glue into the toilet
Calculation of fabric for curtains.
To make the pickup you will need the following materials:
- a piece of main fabric;
- flaseline or other adhesive pad;
- satin bias tape;
- decorative button;
- a piece of ribbon for a loop.
First you need to determine the dimensions of the pickup. The easiest way is to measure ready-made curtains. Use a tailor's measuring tape to wrap around one curtain. Collect it the way it will lie in the grip and take it to the wall. Measure the result.
Next you need to build a pattern. Divide the resulting length in half. This will be the length of half the pickup. Draw half of the part's shape on paper. It can be of the most bizarre shape. But it is worth remembering that the more complex the element, the more difficult it is to process.
You need to cut out 2 pickup parts from flazeline. They need to duplicate both the front and back sides of the element. Otherwise, the pickup will not be tight enough. Flaseline parts are cut out with the same seam allowances as fabric parts (0.7-1.5 cm).
Photos of curtain patterns
Did you like the article? Share

+1