What are eyelets
Sewing masters do not need an explanation of the design. The same goes for the question of how to install the eyelets. Ordinary people should know that these are metal or plastic rings, reinforced along the edge of the fabric and serving as unhindered runners along a smooth round cornice at the moment of opening and closing. In the clothing industry, they are also called blocks, but they are much smaller in size. How to choose eyelets:
- According to the material. Steel ones made of yellow and white metal, suitable for strict fabrics of a single color. Otherwise, curtains with eyelets made of fabric with a pattern will look tacky. In addition, iron rings tend to corrode or peel off when exposed to washing.
Plastic options are pleasant due to their noiselessness and variety of colors. Inconspicuous gray or black eyelets for curtains will suit almost everything - print, stripe, mesh, tulle. Durable and easy to use.
- By inner diameter. Here it is important to take into account the cross-section of the cornice - it is 1-2 cm smaller than the ring. Curtains should move freely, without tension. Otherwise, the fabric risks falling out of the block and fluffing up when cut. Sometimes strings are used as a cornice, then a light fabric is purchased for them, for example, tulle with eyelets. Otherwise, sagging is inevitable.
- By style. It is almost impossible to spoil new design options with rings. On the contrary, they correspond to minimalism, hi-tech, madder, Scandinavian and national motifs. They will not suit country and classic styles, where the emphasis is on varied drapery, since the rings form the same laconic folds.
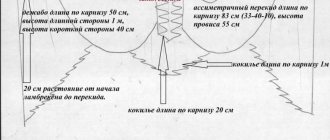
Dormer windows with a slope of any degree are ideal for ordering curtains with eyelets or making them yourself. There, a decorative cornice is made at a standard height and just below the window, behind which the edge of the curtain is tucked.
Curtains on blocks also exist in the form of Roman curtains. There they serve to attach a decorative cord that opens the window and drapes uniform folds.
- According to the shape of the opening. Everything is simple here - the wider and higher the window, the larger the rings. Otherwise, the eyelets will be lost against the background of the fabric, and the canvas will look empty in the interior. For narrow window openings, it makes sense to purchase several cornices located one above the other, of asymmetrical length. This will create the impression of a wide window.
- By the number of folds. It is not difficult to calculate eyelets for curtains using any fabric as an example - the rings are installed at the ends of the folds and the distances between them are strictly the same. Plus two extreme ones. The total number is even.
Related article: All the tricks: insulating the floor on the balcony
It is extremely important for the intended fastening to use fabric that does not fray when cut - the quality must be high. It is important to choose eyelets to match the cornice and purchased fabric, and not vice versa. Then neither style nor drapery will suffer.
Types of eyelets
The eyelet is a design of two rings with a latch. The fabric is placed between the rings and secured. Eyelets are made of metal, plastic and wood.
The most practical are plastic eyelets. High-quality plastic does not crumble or corrode, so the curtains can be washed directly along with the fastenings. Another plus is noiselessness. When sliding along the cornice, the plastic rings rustle slightly.
Wooden and metal eyelets without special coating are afraid of water and move much noisier.
On sale there are eyelets with imitation of various metals (gold, silver, platinum, chrome), sometimes they are complemented with rhinestones or a pattern. The most popular shapes are round eyelets, but there are also square and triangular ones.
Eyelets can also vary in internal diameter. It should be 5-10 mm larger than the diameter of the cornice pipe so that the curtains slide easily over it. The outer ring serves a decorative function, and its thickness only affects the appearance of the fastener.
Marking and preparing holes
Before installing fasteners, you should mark the product. The eyelets should be installed at intervals to prevent sagging of the material between them. Having placed the inserted grommet in the right place, circle it (the sleeve along the outer edge or the ring along the inner edge).
You may also be interested in: Methods and videos for installing vertical blinds
Then the holes are prepared. If their diameter is small, the holes can be pierced with an awl. Sometimes a hole punch is used for piercing. To prepare larger holes, punches are used. If there is no suitable tool, you can use a specially made homemade one. To do this, you need to select a tube of a suitable diameter and sharpen one of its edges. The hole should be such that the grommet bushing is inserted tightly, but does not cause tears or deformation of the material. It is convenient to punch holes on a piece of thin rubber or linoleum.
If the holes need to be large, make a cross-shaped cut with scissors and then cut out the excess material. The bushings should be inserted from the front side, and the rings should be put on from the back. The installation of plastic fasteners ends here.
Video of installing plastic eyelets with your own hands:
Preliminary calculations
Before making eyelets for curtains, you need to calculate the footage of the fabric. The length of the canvas should start from the edge of the cornice and end, not reaching 3-5 cm to the floor. If we are talking about kitchen curtains, the length reaches the window sill. For the hem, leave 5 cm at the bottom, leave a width at the top equal to the outer diameter of the eyelet + 5 cm.
The width of the canvas is calculated depending on the type of fabric. In order for eyelet curtains to look like the photos from fashion magazines, they must fold in beautiful wide folds. For tulle, the length of the cornice is multiplied by 1.5; for denser fabrics, the length of the cornice is multiplied by 2.
Curtain sewing technology
Making a curtain begins with processing the top and gluing the tape. A master class with step-by-step instructions given below will tell you how to sew curtains with eyelets:
- Fold it over to the wrong side and carefully iron 2 cm of the top edge of the future product. If the craftswoman does not have much experience, it is best to first draw a straight line along which the fold will go.
- Measure the height of the comb from the smoothed rib. Draw a straight line and iron it inside out again. The cut of the top will be inside, between the layers of fabric.
- Unfold the ironed edge and insert tape with an adhesive layer (grommet) inside. As mentioned above, its width should coincide with the height of the comb - the width of the pressed hem. On thin fabrics, it is advisable to shorten it in relation to the fabric by the amount of allowances for processing the side edges.
- Heat the iron high and iron the folded part of the panel so that the tape inside sticks well. Be sure to perform this step through gauze or a clean white cotton cloth. When ironing thin tulle, you can pre-moisten the gauze.
- On the wrong side, stitch the hem 2-3 mm from the edge, securing it. At the same time, you can sew on decorative braid if the design solution requires it.
- Fold and stitch the side seams.
You may also be interested in: Choosing the size of roller blinds
After the panel is ready, sewing curtains on eyelets involves installing rings. But how to make the eyelets neat, like in the pictures? To do this, you will need the results of calculating the distance between the centers of the rings, a ruler and chalk.
Installation of eyelets
Set aside 1.2-1.5 cm from the side edge. If the calculations were made correctly, the mark will have to be placed a little further than the line. From this mark, set aside ½ of the outer dimension of the ring and mark the center of the outer insert. Do the same on the other side of the tape.
Set aside from the center mark an amount equal to the distance between the eyelets. Place a dot to mark the center of the next ring. Set aside the same segment again, mark and continue until the end of the tape. If everything was calculated without errors, the last mark should match exactly the next time you measure the distance between the eyelets.
If the error and discrepancy are too large, an error in the calculations is likely. You need to measure the distance between the extreme center marks and recalculate the size of the fold, dividing the distance by the number of eyelets. After this, repeat the markings.
Place the outer ring on the comb so that the mark is in the center of the inner hole. Trace a circle inside. Do this for each mark.
Use nail scissors to carefully cut holes for the rings. The eyelets themselves are installed very simply: the lower half is placed under the fabric (from the inside out). The edges of the hole should fit around the bushing. The upper, decorative part is placed on top and pressed until it clicks.
How to hem the bottom of a product?
To make your new curtains look beautiful, you need to know how to properly sew and trim the bottom edge. The almost finished product needs to be hung on the cornice rod. Determine at what distance from the floor the bottom of the curtain should be. This value must be measured from its surface several times, along the entire fabric, placing marks on the fabric.
Remove the curtain and lay it flat. Connect the marks using a ruler. The straight line will be the bottom line. Fold the material inside out along it and iron the fold. From the fold, set aside the desired width of the hem, draw a line, bend the cut along it inward and iron. Stitch 2-3 mm from this last fold.
If you carefully carry out all the operations one by one, then neither inserting eyelets for curtains nor processing the edges of a large product will seem difficult. In this case, the accuracy of measurements for the uniform arrangement of the rings and the accuracy of processing the cuts are important.
Calculation of fastenings
All master classes on sewing curtains with eyelets say that for each linear meter of curtain there should be 6 eyelets.
The outer rings should be placed at a distance of 2-3 cm from the edge of the curtain so that the folds begin from the very beginning. Based on this, subtract 6 cm from the width of the canvas and divide the resulting figure by 6. You will get the number of eyelets you will need to buy.
Next you need to calculate the distance between the rings. To do this, divide the width by the number of eyelets and subtract the diameter of the outer ring of the eyelet from the resulting figure.
Curtain design and material calculation
The cut with eyelets is very simple: a completely straight rectangular fabric. Flounces, puffs or similar fluffy trim are not suitable for such models. At the same time, for use in a classic interior, these products can be unobtrusively supplemented with braid with balls, tassels or other thread decor. The color of the trim can be matched to the curtain or highlight the shade of the rings by choosing golden metal and the same braid, for example. This duo looks very good if the decorative strip is sewn just below the top hem.
For strict styles such as hi-tech or minimalism, unnecessary details are generally undesirable. The design of curtains with eyelets is something that seems to have been created specifically for them: uniform folds and large shiny or matte metal rings. This combination is both simple and elegant, which is what is required for the interior. For these styles, it is better to choose a plain fabric or a pattern of wide vertical stripes. If desired, you can combine fabrics: a plain cloth with a wide horizontal contrasting stripe of the corresponding texture (it is better to take fabric of the same name). The strip can be located below or above the panel. This combination looks very elegant if both shades are found in the interior.
For or in naive rustic styles, you can choose bright printed curtains and attach plastic rings to them. There are a lot of options for choosing the design of the eyelets themselves, but the cut of the curtains should remain as simple as possible. Thin curtains with eyelets can be sewn in the form of double panels united along the top line. By picking up the parts on opposite sides of the opening, you can get a very beautiful, flowing, light window frame.
How much fabric do you need?
The length of curtains, hand-sewn to decorate a room, varies depending on its purpose: in the living room and bedroom, curtains are usually made that do not reach the floor by several centimeters. The kitchen and children's room allow you to choose a length up to the window sill or almost to the floor, with all options in between. When taking length measurements, the choice remains with the hostess.
The width of the panel is determined by the length of the cornice. If you want to make curtains from 2 separate parts located on the sides of the opening, then the length of the cornice needs to be divided by 2, and for a solid curtain, take the value of its length from 1 limiter to the other. The resulting value must be multiplied by 2 or 2.5. This coefficient allows you to get not only beautiful folds on the curtains, but also a smooth wave when they are closed. For thin fabrics (organza, tulle, veil), you can use a factor of 1.5, since in this option large folds are not necessary.
Having calculated the width and length of the curtain, you need to add to these values allowances for processing the bottom (5-7 cm), side cuts (2-3 cm on each side) and for hemming the top (15 cm or more). Since quite large decorative details will be installed on the folded edge at the top, you need to take into account their outer diameter when choosing the size of the scallop: its minimum width should be 1-3 cm larger than the size of the grommet. The larger the ring, the more free spaces of fabric are needed above and below them. Having calculated the height of the scallop, you need to multiply the value by 2 and add another 2 cm to the value for the cut folded inward. It is best to buy eyelet tape the same width as the height of the comb, so it will turn out neat and rigid.
You may also be interested in: Do-it-yourself openwork lambrequin - patterns and videos
How many rings will it take?
The number of eyelets is calculated based on the desired size of the folds. This value can be chosen arbitrarily. It is recommended to create more pronounced waves on dense fabrics. Typically, the width of decorative folds ranges from 15 to 22 cm. But a fold with a width of about 18 cm is considered ideal.
In order to calculate the number of rings to install on each panel, you need to subtract the allowance for side hems from the value of its total width (across the fabric) (2-3 cm on each side, total 4-6 cm) and another 2.5- 3 cm for the indentation of the outer inserts from the edge. From the resulting figure, subtract the size of the ring along the outer rim. This value will indicate the distance between the extreme inserts.
The remaining width should be divided by the desired fold size (15-22 cm for thick curtains or less for thin fabrics). The result may turn out to be a fraction, then it must be rounded so as to obtain a whole and necessarily even number. After this, make adjustments to the calculations: divide the value obtained when calculating the width of the fabric between the outer inserts by the resulting even number. Having calculated the distance between the eyelets (centers of the rings), you can begin cutting and sewing the product.
Installation of eyelets
- Draw a straight line on the underside of the cuff with chalk or a piece of soap on which the fasteners will be located;
- Mark the locations for each of the eyelets;
- Trace the eyelets along the inner diameter;
- Using sharp scissors, cut each hole slightly beyond the drawn circle;
- Turn the curtain over so the front side is facing you;
- Place the wrong side of the eyelet under the bottom of the fabric;
- Place the front part on top;
- Press lightly until you hear a characteristic click;
- Repeat for each of the fasteners.