Roman blinds are simple, elegant and functional. They combine the advantages of curtains and horizontal blinds and are suitable for kitchens and rooms decorated in classical and Japanese styles, country, art deco, modern, etc., as well as for loggias and bathrooms as a means of protection from prying eyes and sunlight. Using step-by-step instructions, you can sew Roman blinds with your own hands, providing them with a convenient lifting mechanism.
How to sew Roman blinds with your own hands
When raised, the curtain gathers into beautiful folds. To understand the principle of sewing and operation of a lifting structure, it is better to start with a product for a small window. You need to depict your idea in a sketch (after measurements) and provide for fastening the curtain in such a way that it does not interfere with the opening of the window.
Cascading structures look voluminous, gathered into folds even in an unfolded position, so they are difficult to manufacture. For beginners, the classic model is more suitable.
It uses slats that are evenly distributed over the canvas at a distance of 25-30 cm. When lifted, identical strict horizontal folds are formed. Their number depends on the height of the window and the length of the product.
What are the types of Roman blinds?
The main basic principle that is common to all types of Roman curtains is the method of control. The canvas rises and falls, folding into even folds, using a chain or lace. At the same time, it can be fixed at any convenient height. All Roman blinds are conventionally divided into several types according to the type of fold formation.
Types of Roman blinds.
Classic
The most common type is, of course, the classic one. It is characterized by the following symptoms:
- when the canvas is lifted, smooth, beautiful folds are formed, which are stacked on top of each other along the lower edge;
- when closing the window, the canvas is leveled, completely covering the window space, while it looks absolutely even;
- In the drawstrings of classic curtains, flexible rods are attached that form fabric folds.
Classic Roman blinds in the interior of a living room, nursery or bedroom look elegant, simple and modern. Designers are happy to place them in the kitchen or bathroom, since even in the smallest room they take up minimal space.
Classic look in the interior of a country kitchen.
Frameless
The main difference between frameless products and classic ones is the absence of horizontal rods. It is thanks to the rods that smooth folds are formed in the classic model. In the frameless model, the folds sag, creating a feeling of simplicity and harmony. Such curtains are perfect for a relaxation area, as they promote relaxation and tranquility.
Frameless curtains in a cozy bay window.
Cascade
Such curtains, even when completely unraveled, have uniform horizontal folds that cascade. These Roman blinds are more festive and formal than classic ones, and are more suitable for the living room.
Cascading wine cherry draperies in a baroque bedroom.
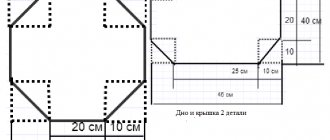
How to take measurements and pattern correctly
To make a pattern, you need to determine the height and width of the finished product.
Measurements are taken depending on the installation of the curtain:
- When installing windows in an opening, the width of the upper part of the opening and its height (to the window sill) are determined. To ensure that the curtain fits well into the opening, subtract 2 cm from the results obtained.
- For rooms with a standard ceiling height, install the product to the ceiling. The length of the curtain is equal to the distance from the ceiling to the floor, the window sill minus 2 cm, and the width is 10-20 cm greater than the width of the opening.
- When attaching to the wall above the window, add 10-20 cm to the width of the opening and its height. The side allowances will cover the slopes. The assembled curtain will not interfere with opening the window.
- When installing on plastic windows, measure the distance between the inner edges of the frames.
To prevent the finished curtain from shrinking after washing, the fabric must be soaked in warm water, dried and ironed before cutting.
When cutting the canvas, the following allowances are made:
- 5-6 cm – on the side cuts (2.5-3 cm on each side);
- 3 cm - for the hem of the bottom;
- 2-3 cm – for the top part.
Curtains are sewn double (or lined) and single (usually made of transparent fabric).
Soft (European) Roman blind
Roman curtains ─ are not necessarily strict geometry and asceticism. There are also more romantic variations of them, when there are no transverse slats in the canvas, the folds are not held in a strictly horizontal position and smoothly sag towards the center. Outwardly, they resemble Austrian or English counterparts, but they differ from “Austrian” ones in that they consist of only one section, and from “English” ones by the absence of vertical bow folds and side sags.
As a result, do-it-yourself soft Roman blinds according to the step-by-step instructions provided below look stricter and more modest than their closest analogues, but more romantic than models with hard inserts and fit perfectly into a cozy home environment.
The instructions for sewing European Roman blinds are extremely simple. Even a novice craftswoman can make them. It’s also nice that such a model does not require much fabric, and even if you choose an expensive option, such curtains will turn out to be quite budget-friendly.
The bathroom and the window for which our curtain is intended before and after cosmetic renovations
It is advisable to choose fabric for any curtains (and Roman curtains are no exception) based on the characteristics of their cut and design and the purpose of the room in which they are planned to be hung. Below we offer an option best suited for a bathroom or kitchen made of thick cotton fabric, if possible impregnated with a composition that repels water and kitchen odors. But this is just a recommendation, and the final choice depends only on your vision.
Necessary materials
In order to sew Roman blinds with soft folds according to our master class you will need:
- 2-3 meters of fabric for the front side (depending on the height of the window and the depth of the folds you choose);
- 2-3 meters of fabric for lining;
- sewing machine;
- scissors;
- threads, needles;
- safety pins;
- furniture stapler;
- plastic rings;
- 3 hook screws;
- nylon cord;
- wooden block for mounting curtains;
- wooden slats for the bottom.
Operating procedure
Step 1: Before you start sewing Roman blinds with your own hands, take measurements
In our case, we plan to hang the curtain on the plastic windows outside the opening. How to take measurements is described in P1 “General steps for all methods of sewing Roman blinds.” To the resulting dimensions on the front part we add 4 cm on the sides, 2 cm on the top, and 8 cm on the bottom for seams and hems, and on the lining, respectively, 2 cm, 2 cm and 8 cm.
Step 2: Cut out the front part of the curtain
There is no need to make a paper pattern. We smooth the fabric with an iron, fold it lengthwise to the required width, and cut off the excess along the entire length. If the fabric is more than two times wider than the window opening (in our case, the width of the window in the bathroom is 80 cm, and the fabric is 190 cm), it will need correspondingly half as much. Cut the fabric in half widthwise and join it into one long piece.
Before attaching the pieces on the machine, be sure to carefully and accurately align the pattern, as shown in the photo below.
Step 3: Cut out the lining and connect it to the front part
If the lining fabric is more than 2 times wider than the future curtain, first we perform the same procedure as above: we cut the fabric along the width, and then begin to sew the resulting pieces together into one long fabric. Don't forget to iron each seam thoroughly on both sides.
Then we sew the lining to the front of the curtain along the side and top seams. To do this, we combine the cuts of both canvases with their right sides facing each other, pin them together with safety pins and sew them on three sides, departing 2 cm from the edges. Then we remove the pins, turn the curtain right side out and smooth the seams with an iron.
Step 4: Making the bottom seam
We turn the bottom of the curtain 2 cm, iron it, sew, turn it another 6 cm and stitch and iron it again.
Step 5: Sew on the pleat rings
Using safety pins, on the sides, in accordance with the calculations of the folds, we mark the places where the rings will be located and sew them on manually.
After the rings are sewn, we thread nylon cords through them.
Step 6: Preparing a block for installing a Roman shade over the window opening
To make the block look aesthetically pleasing, we wrap it in lining fabric and secure it with a stapler. The curtain itself on a refined block can be secured in two ways:
- Staple using a stapler (as shown in the photo below);
- Using Velcro adhesive tape, stick one part of it onto the bar and the other onto the top of the curtain from the wrong side.
The second option is convenient because the curtain can be easily and without problems removed for washing and hung back in place.
Step 7: Insert ring-screws
We screw ring-screws into the block at the same distance from the edges as the plastic rings and thread nylon cords through them. The lifting mechanism is ready.
Step 8: Shaping the Bottom Edge
We insert a wooden strip into the drawstring we made at the bottom of the curtain. It will help the bottom of the curtain to maintain its strict “Roman” shape. The rail should not be visible, so its length must be made 2 cm shorter than the width of the curtain.
Step 9: Install the structure above the window opening
You can install a curtain over a window, just like a roller blind in the DIY Roller Blind master class, or you can use metal corners pre-fixed above the window opening.
Our DIY Roman blind for the kitchen or bathroom is completely ready.
Which fabric is better to choose
Roman curtains are made from different fabrics:
- light - tulle, silk, cambric, muslin;
- medium - linen, calico, satin, calico;
- heavy - velvet, velor, tapestry.
Artificial and mixed fabrics are considered the most practical: they are easier to wash and iron. It is better to choose materials intended for curtains, because... they are more resistant to fading.
A Roman blind requires a little fabric - 3-5 times less than classic curtains. Therefore, exquisite expensive material is often used to sew it. The flowability of the fabric does not matter, because... the sections are processed.
It is important that the pattern and color of the canvas match the overall design style of the room. For example, a checkered pattern and cheerful floral motifs would be appropriate for a kitchen in country and Provence style, while plain, simple ones without decor would be appropriate for an office. It is better to sew the first curtain from thick fabric: it is easier to work with.
Fabric selection
To make Romanesque curtains yourself, you should initially choose the right fabric. There are many options for color, print, density, composition, manufacturing principle and price. You can easily cope with the choice if you take into account several nuances:
- The degree of shading that should be chosen in accordance with the illumination of the windows. If the windows face the sunny side, then a fabric with a Black out effect would be an ideal option. Translucent fabrics are suitable for rooms with normal lighting. It is better to equip dark rooms with curtains made of the thinnest and most transparent fabric.
- Much depends on where the curtain will be placed in the future. In technical rooms, you can use sheets made of cheap textiles or covered with oilcloth. For bedrooms and hallways, textile bases made from expensive and natural fibers would be an ideal option.
- Synthetic fabrics for Romanesque curtains are a separate category of material that is used for certain categories of products.
You might be interested in this Features of paint in spray cans and its use for fabrics
Please note! When choosing a material for bathrooms, you should pay attention to options with special impregnations of the fabric base.
Fabric selection
Colors and prints should match the color scheme of the room's interior. The sizes of the canvases are also selected individually.
Synthetic fabrics for Roman blinds
Most often, synthetic fabrics for Roman blinds are used for arranging kitchen windows. Such material can be replaced if necessary, and it will not be too expensive. It is much easier to wash and clean various stains from a synthetic fabric than from a natural base.
What you need for sewing
For sewing you need:
- fabric, if necessary - material for lining and elements for decoration;
- a ready-made complete set of curtain rods for Roman blinds of the required length, closed or open (it includes a lifting block, strips, weighting material, chains, rings, threads, screws for fastening, etc.);
- Velcro tape along the width of the curtain;
- braid (preferably transparent);
- sewing machine.
You can put together a kit for the cornice yourself (it will cost much less).
Required accessories:
- nylon cord with a length equal to 6 times the length of the curtain and its triple width (it must be cut into 3 equal parts);
- drawstring tape;
- plastic rings with a diameter of 10-12 mm - for drawstrings (cords are threaded through them to lift the fabric);
- rods made of fiberglass, wood or wire;
- weighting material - a wooden or plastic strip 2.5 cm wide;
- bar for hanging curtains;
- small nails.
About the mechanism options and its choice
There are various mechanisms for Roman blinds, the most common are: cord, rotor-chain, motorized. The first one is the simplest and easiest to make yourself. The cornice looks like a system of cords through which Roman blinds are raised and lowered. The cord mechanism will not be difficult to repair or replace one or another part in it. However, he has a weak side. It is not suitable for heavy Roman blinds, since fabric weighing 4 kg or more and such a system for moving the fabric are not compatible. In this case, it is better to choose a rotary-chain mechanism. It is much more difficult to make. The system for raising and lowering curtains is based on chain control, when a chain is used to influence the block, which, in turn, sets in motion the strips that are fixed to the canvas.
Related article: Connecting a sink in the kitchen
The cord and rotary-chain mechanisms are very similar, however, the curtain rod, where the second one is used, is capable of performing actions with fabrics weighing up to 7 kg. The motorized curtain rod is the most modern mechanism for raising and lowering Roman shades. The remote control controls the entire process.
Scheme of a cornice with a closed control system.
This cornice is designed for canvas of any weight and size. It is not a problem for him if the window opening is at a high altitude or in a hard-to-reach place. A true craftsman can make a motorized cornice, especially since installing the mechanism will require significant effort.
To choose the right mechanism for the curtain rod of Roman blinds, you must take into account a few more points. The cost of manufacturing a rotary-chain mechanism will be higher than a cord mechanism. When choosing a curtain rod, you must take into account the weight of the curtain itself. For lightweight curtains, it is best to make a cornice with a cord system. It is perfect for installing curtains on a window sash or window frame. The latter mechanism is especially convenient in small rooms and small-sized urban apartments, because it does not require much space, and as a result of its use, the room will begin to look neat, well-groomed, and elegant.
Step by Step Actions
Master class on sewing single-layer Roman blinds with photographs:
- Fold the side allowances inside out twice and stitch at a distance of 1-1.3 cm from the edge.
- Fold the bottom seam allowance (if the factory edge of the fabric was not cut off, 1 fold is enough) and stitch. A weighting agent will be inserted into the resulting drawstring.
- Make a control measurement of the length of the curtain. Turn the top seam allowance to the wrong side. Not reaching 1-2 mm from the top edge and sides, pin the soft part of the adhesive tape and stitch it.
- On the wrong side of the fabric, mark the lines for the location of the strips or rods, taking into account their width. If there are 4 slats included with the cornice, there will be 5 folds.
- Divide the braid into segments according to the number of strips. The length of each should exceed the width of the curtain by 2 cm. Sew the braid along the marked horizontal lines. Tuck the cuts by 1 cm and do not attach them (the strips will be inserted into the holes).
- Sew rings on all pieces of braid and on the pocket for the weighting material at a distance of 12-20 cm from the sides. A cord will pass through them to raise and lower the curtains.
- Install cord guides on the cornice - above the rings.
- Attach the curtain to the curtain rod by connecting both parts of the adhesive tape (one of them is sewn to the curtain, the other is glued to the curtain rod).
- Thread the pieces of cord through the rings vertically to the top. Bring them to one side. Attach the cords to the lower rings with knots. Make sure they are tensioned equally. Tie the cords at the level of the eaves with a knot, and intertwine the hanging ends together.
- Insert weight material and strips.
- Install the fasteners on the cornice, mark their locations on the frame, wall or ceiling.
Where are Roman blinds attached?
The task is standard - protecting the room from ultraviolet radiation and privacy from ill-wishers. But if we are talking about Roman blinds, you can implement it by hanging them:
- On the window sash. In this case, when the window is opened, the entire window opening that this sash covered opens.
- On the window frame. This means that you won’t be able to open the shutter unless you fold the Roman blind.
- On the wall. In this case, the presence of a cornice is assumed. The entire opening is closed, including the slopes and the window sill.
- To the ceiling. Roman blinds become a decorative element that is attached to the ceiling and can extend all the way down to the floor.
Each type of fastening has a number of features. There is nothing complicated, but basic knowledge and construction skills are required.
Nuances in tailoring
When sewing you need to consider:
- Paper patterns for Roman blinds are not made.
- The fabric and braid should be smooth.
- To apply marks and lines, the fabric is laid out on a flat, smooth surface.
- Horizontal stitches should not tighten the sides, and vertical stitches should not tighten the edges of the product. To do this, you need to adjust the thread tension of the sewing machine.
- It is important to carefully combine the details.
- The soft part of the Velcro tape is attached to the curtain, the hard part is attached to the curtain rod.
- You need to attach the braid in one direction, otherwise the fabric will curl between the lines.
- For those who do not have sewing skills, it is better to choose a variegated or small-checked fabric: possible flaws are less noticeable on it.
- To secure the control mechanism rings, strong nylon threads are used that can withstand constant stress.
Depending on the width of the curtains, you can sew 2-5 rings in a row and the same number of cords to lift them. Each is tied to the bottom ring, threaded through all the rings in the vertical row, and then horizontally (through rings or pins), bringing the ends together.
Determining the required amount of fabric
Correct calculation of the length and width of the material for the future product is the key to a good result.
Window measurement and approximate calculation of fabric for Roman blinds
Before sewing a Roman blind with your own hands, you should determine the amount of fabric so that there is not a lot of excess left, but there is enough for a full-fledged product. It is recommended to use the following algorithm when taking measurements:
- determine the width and height of the window opening;
- add another five centimeters on all sides to the resulting measurements.
For example, if the window opening is 50 cm wide and 120 cm long, you will need to purchase fabric with a width of 60 cm and a length of 130 cm.
In addition, it is necessary to take into account the method of attaching the curtain itself (you can add another ten centimeters to the required length). Today, there are different options for fastening and decorating Roman blinds. Such curtains can be attached in the following ways:
- directly inside the window opening;
- standard installation option on the wall above the window opening;
- on the window frame.
If the choice falls on one of the first two options, then you can build a cornice at home, or purchase a ready-made factory one.
Fabric calculation table for Roman blinds
The decor of Roman curtains is based on the taste and imagination of the needlewoman.
On a note! Most often, decoration is done using ropes or ribbons.
DIY cornice construction
You can make a beautiful and durable cornice yourself from simple materials.
For this you will need:
- a board 4 cm wide, up to 2 cm thick, and a length equal to the width of the curtain (for fastening inside the opening, take a thinner board);
- a piece of fabric is 2.5-3 cm wider than the board and 7.5-8 cm longer (it needs to be ironed);
- Velcro tape - along the width of the curtain;
- stapler;
- pins (ears) according to the number of vertical rows of rings on the curtain;
- corners for attaching cornices.
A curtain heavier than 3.5-4 kg will not be held on with Velcro (Velcro tape). It is nailed to the cornice with small nails.
Cornice manufacturing technology with photo:
- Cover the board with fabric. First, wrap the long sections, secure them with staples at a distance of 15-20 cm, then the side ones.
- Attach the rigid part of the Velcro tape to the wide part of the cornice with a stapler.
- Attach the curtain to the curtain rod and mark on it the locations of the rings in the row. Remove the curtain and screw in the pins according to the markings.
- Screw the corners at least 2 cm from the edges.
Roman blinds for different interiors
Curtains of Roman design will look especially impressive in living rooms if you complement them with heavy curtain fabrics and lambrequins. This option is good in large, spacious rooms. But if your living room is small, choose light, translucent materials. For example, organza is a good choice. It will not perform the function of completely darkening the living room, but will bring comfort and harmony to it. If the living room is decorated in the spirit of minimalism or hi-tech, you should opt for plain fabrics. If the interior is bold and non-standard, you can choose canvases with geometric prints.
Roman blinds can be combined with other types of curtains
The combination of Roman blinds and tulle looks very nice
Translucent Roman blinds are used more for decorating windows
If you choose the right color and a simple lifting mechanism, Roman blinds will look very beautiful in a child’s room and the baby will probably like it. The color should match the main interior, but in the nursery you should avoid monochrome.
Roman blinds in the nursery can be chosen with a funny pattern
It is better to choose roman blinds in a nursery in positive and pleasant colors
It is advisable to choose Roman blinds in the nursery from natural materials
Remembering that the bedroom is a place of rest, relaxation, and sleep, you should focus on translucent canvases. They will transmit a little light and create the necessary twilight at the same time. If you want greater transparency, but at the same time, protection from prying eyes and light, combine curtains with heavy curtain fabric, which should ideally match the color of the curtains.
Roman blinds in the bedroom should fulfill their direct functions: protect from light and prying eyes
Roman blinds in the bedroom are best combined with curtains
Translucent Roman blinds in the bedroom for those who like twilight
If in other rooms curtains should be in harmony in color and design, in the kitchen you are free to experiment with them with all your might. Here, Roman blinds can freely stand out from the overall interior both in color and design. The boldest colors and prints will work, as will frameless, wave designs with rounded edges.
Using Roman blinds you can complement the interior of the kitchen
Roman blinds are an excellent option for decorating windows in the kitchen.
Roman curtains are most often purchased or ready-made. However, if you are a creative person and like to create your interior yourself, you can make Roman blinds with your own hands. The video and detailed photographs of the process posted here will significantly speed up and simplify the manufacturing process.
How to make Roman blinds from old blinds
Old blinds with a working lifting mechanism will do (the condition of the rotating device and slats does not matter). You will also need fabric and weighting material. A thin plastic or metal lamella will not work as it, because... its too light weight will not create enough tension for the cords when lifting.
You need to cut 1 thread on both sides: they will regulate the rotation of the plates; Untie the second pair of threads at the bottom and disassemble the blinds into individual elements. Of these, the top strip (as a cornice) and slats (instead of rods) will be used for the curtain.
The next steps are the same as for making a single layer curtain. If the fabric is transparent, the slats can be painted in a suitable color.
How to hang Roman blinds: curtain rods for Roman blinds
Fundamentally, cornices differ in location, in the design of the lifting mechanism, in material and color. Each of these parameters must be taken into account before purchasing the product.
Cornices are installed:
- On the wall;
- To the ceiling;
- Directly onto the window frame.
Wall curtain rods are more suitable for Roman blinds, but long curtains can also be used with ceiling curtains
Mounting to the ceiling visually makes the room taller and adds volume to the room.
If desired, the curtain fabric can be adjusted in length to any height at which the curtain rod is attached. Shortening Roman blinds is much easier than adding the missing length, so all calculations must be carried out in advance to avoid getting into an awkward situation. Very short Roman shades are fixed directly across the window frame. A mini-plank acts as a cornice.
They are distinguished by length:
- Mini curtain rods, only straight cut Roman blinds can be combined with them;
- Classic cornice, the length of the curtain fabric should be 1.8 m and the width should be 1.5 m;
- Cornice according to an individual project, this category includes cornices for round, oval, triangular windows, non-standard dimensions.
Roman blinds can frame a window opening of any size. You can combine Roman blinds mounted above the window opening and other types of curtains, for example, a thick curtain, on one window. When ordering a non-standard cornice, you can choose not only the desired size, but also the technical equipment of the product.
There are 2 types of lifting mechanism:
- Open;
- Closed.
The open mechanism has no camouflage and remains in plain sight. The cornice consists of a profile, chain and blocks that ensure the movement of the fabric. Roman blinds are attached to the profile using an adhesive strip of material. This is a fairly durable method, however, it is better not to use very heavy curtains that weigh more than 4 kg.
The instructions for each curtain rod model contain information about the maximum weight the product can support.
The closed mechanism is called "parma". Due to its presentable appearance, this is a more popular option. All parts of the lifting mechanism are placed in a narrow plastic box. Closed curtain rods for Roman shades are more durable than open ones, last longer and require repairs less often. Lifting is carried out using the same system of blocks; to lift the curtain, you need to pull the chain.
Decor for the top and bottom edges
The upper part of the curtains is decorated with lambrequins (ribbon, modular and lace), appliques, compositions of rhinestones and sequins.
To finish the lower edge, decorative elements such as:
- satin ribbons - along the contour, at a distance of 15-25 cm from the edges or in the form of bows;
- lace;
- figured fringe;
- lush ruffle;
- beaded scallops;
- bugles;
- braid and fringe;
- straight ruffles;
- butterflies;
- beads;
- rivets;
- buttons.
How to make a cornice
The first step is to cover the board with fabric. To do this, iron the cut piece of material and place it on a flat surface with the wrong side up. Place the board on the fabric. Wrap one long edge of the material over the board and secure with a stapler. The distance between the brackets should be 15-20 cm. Leave the fabric at both ends of the board free. Now wrap the board with the second long edge of the material, tucking the raw edge inside, and also secure it.
You may also be interested in: Types and shapes of curtain rods for the bathroom
Carefully wrap the loose ends of the fabric at the corners of the board and iron along the folds with your fingers. Fold in the raw edge and secure with a stapler.
On the top side of the board (wide if it will be attached perpendicular to the wall, narrow if parallel) place one part of the Velcro fastener and attach it with a stapler. Sew the second part onto the top edge of the curtain from the inside out.
Attach the curtain to the board and mark places for screwing in the pins above the vertical rows of rings. Remove the curtain. Screw in the pins.
If the cornice will be attached with corners, drill holes for them on the bottom plane of the board, placing the corners at a distance of no more than 100 cm from each other and at least 2 cm from the edges. Screw the corners. Attach the board to the wall at the desired height, level it horizontally, mark the locations for the holes, and drill them. Unscrew the corners from the board, screw them to the wall, and secure the cornice to the corners.
If you plan to attach the cornice directly to a wall or in a window opening, lay the board against the surface, level it, mark the locations for the screws, and drill holes through it. Drive the dowels into the wall, first widening the holes if necessary. Screw the cornice.