Due to the fact that this material combines several functions at once, the insulation and finishing of the building are combined into one process (“What are thermal panels”).
Do-it-yourself installation of thermal panels
Among the many advantages of using thermal panels (“Facade thermal panels, advantages and disadvantages of the material”), it is worth highlighting the ease of installation; if you follow certain rules, you can do the finishing work yourself. In fact, the installation process can be compared to a children's puzzle - one panel is fastened to another and fixed to the wall using a special adhesive or fasteners.
Note: In addition, manufacturers provide detailed installation instructions, which include not only a description, but diagrams and photographs.
Material calculation
First, you should calculate the number of thermal panels for the entire house that will be needed during the work process. In order to calculate the required number of thermal panels, you need:
- determine the area of the wall to be finished with thermal panels:
- find the area of one wall - multiply the length by the height;
- using a similar formula, determine the area of the door and window openings available on it;
- subtract the area of windows and doors from the area of the wall;
- divide the resulting value by the size of one panel - the result is the number of thermal panels required to finish one wall;
- Thus, carry out calculations for each wall and add up the results.
Additional elements
Important! It is necessary to add 10-15% to the result obtained, since during the installation work unforeseen circumstances may arise that will affect the amount of purchased material (incorrect calculation, defective products, damage to panels, etc.).
Required Tools
To carry out the work you will need:
- roulette;
- pencil;
- building level;
- Bulgarian;
- screwdriver and screwdrivers;
- perforator;
- hammer;
- putty knife.
Important! You will also need to additionally purchase corner elements of thermal panels (internal or external).
Do-it-yourself clinker panel installation technology
All experts in finishing work agree that such façade cladding is so easy to do that anyone can handle it without special training. Thermal panel elements weigh no more than 16 kg and have simple tongue-and-groove connections. The task is also helped by the fact that each manufacturer includes detailed assembly instructions with the material. Let us give the basic rules of installation, which are typical for all types of thermal plates.
Fastening thermal panels to the facade
Fastening technology without lathing
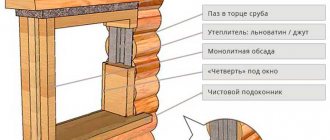
Here you need to remember that any façade cladding can only be installed on smooth walls. Prepare the wall by clearing it of unnecessary elements and protruding parts, for example, platbands, slopes, fasteners for antennas and spotlights, etc. Pay attention to the diagonals of the walls - they should be equal. A discrepancy in diagonals of 5 cm or more indicates the need to make lathing.
Important! Even the visual absence of potholes does not indicate perfectly smooth walls. If the error is more than 2 cm per linear meter, you will have to make lathing.
- Plastering the wall is not necessary. The first step is to install horizontal lines around the entire perimeter. After beating the horizontal line, install the profile along the mark you made or the starting rail.
- We start fastening with the corner elements, and then mount the first thermal plate, moving it to the corner. If there are no corners, it is necessary to cut and align the planar elements, moving them towards the corner as much as possible. The corner itself will have to be covered with a corner, which is painted in the color of the decorative finish. But we advise you to purchase all the necessary products, since flush-fitting slabs retain their technical characteristics much better, and such a facade looks finished. Move the second panel close to the first until it joins and secure.
- Do not forget to seal each slab with foam.
- For fastening we use ordinary screws or dowels. It all depends on the structure of the wall. Immediately after installation, the joints are grouted with a frost-resistant compound.
The simplicity of the work allows not only to create a new facade of the house, but also to repair old walls. If the wall has too many irregularities, then lathing technology is used.
Mounting the horizon to the vertical slats
Preparing the wall surface
Before installing thermal panels, you need to prepare the walls. To do this, you must first clean the surface of all kinds of contaminants, then plaster the uneven areas and sand the protrusions.
Wall primer
If the differences are too large, then you need to make a sheathing, and during installation, fill the resulting voids with polyurethane foam. After this, you need to prime the walls.
Thermal panels - installation
Wall marking
After the surface of the walls is prepared, you need to install a starting strip (base profile) - this is a starting strip and at the same time an ebb for rainwater. Then you need to mark and drill holes in the wall for the dowels (about 3 cm deep). After this, use a hammer to hammer the dowels into these holes.
Starting bar
Final stages
After installing thermal slabs made of polystyrene foam, grouting and jointing are done with a special jointing mixture.
Grouting work is carried out in the following order:
- First, dilute the jointing mixture with water, stirring it using a construction mixer.
- Then the gun is filled and applied to the seams using a mounting gun.
- Wait 40-60 minutes for the mixture to polymerize.
- After the grout has dried, you can open the seams using special spatulas. The forms of jointing are different and depend on the type of decorative finishing of the thermoslab.
PPU thermal plates do not require jointing.
The last task during installation is to install cornices to seal the gaps between the wall and the thermal panels.
How to attach thermal panels
Once the walls are prepared, you can begin installing thermal panels. The panels begin to be attached from the lower left corner, with thermal panels installed in rows. To install one panel you need 8-10 screws.
The second thermal panel must be attached to the first using special tongue-and-groove grooves, and then aligned and screwed with self-tapping screws. Also do the installation work of the first row. The panel may need to be trimmed at the end. This needs to be done using a grinder.
Installation of facade thermal panels
The second and subsequent rows of thermal panels are installed similarly from the left corner. Thus, finishing installation work should be carried out on all walls of the house.
How to attach panels to walls
Important! When installing the first (lowest) row, you should constantly check the level.
The appearance of the entire wall depends on the quality of installation of the starting row.
How to choose the right thermal panels
The decoration and design of the facade is done using clinker tiles for decades using high-quality materials. You can also take second-class materials, which are not resistant to various influences and are fragile, but how long will they last?
Watch the video, selection criteria:
On the Russian market, fortunately, there is a huge selection of thermal panels with clinker tiles, different in quality, colors, design solutions and composition. However, when choosing, you need to be guided by some rules in order to choose the best colors of facade thermal panels for a particular case:
- The colors of the facade should play harmoniously against the background with the surrounding buildings, sidewalk, fence and other elements.
- The facing material is selected to match the colors of the facade.
- The grout for thermal panels should match the color of the tiles and facade.
- We strongly advise against buying tiles with complex colors and textures. Such tiles are suitable only in the case of simultaneous, uniform design of the base and facade.
How to carry out installation correctly
To install façade insulation yourself, you will need the following tools:
- Putty knife;
- Screwdriver;
- Grinder or grinder;
- Level;
- Hammer.
Now we will describe the installation process itself step by step:
- The first step is to clean the walls and surface where thermal panels with clinker tiles will be temporarily installed before installation. The old decorative layer, if any, is also cleaned.
- Aluminum strips mark the horizon line. This action must be done to install the panels on the same level.
- The planks should be attached strictly parallel to the bottom and top.
- The distance between the aluminum strips must exactly correspond to the height of the panel layer.
- Installation of clinker panels starts strictly from the corner of the building.
- The panels are attached with dowels and self-tapping screws after checking the level.
- The style of assembling panels is very similar to assembling puzzles. The first tile is attached to the corner, and then the rest of the elements are laid out. When irregularities appear, mortgages are installed.
- The joints of the blocks are filled with foam or reinforcing sealant.
Cost of panels with clinker tiles
The price of domestic and foreign manufacturers has a significant difference. Although, if you choose the above manufacturers as the main suppliers of tiles, then the quality of the material will be close to European manufacturers. The main producing countries of the European market are Italy, Germany and Poland.
Let's watch the video, installation work, stages:
German clinker facade thermal panels, like a large number of other materials, are of the best quality and serve for more than fifty years. Prices fluctuate around 10,000 per square meter.
Italian tiles are usually used as original design solutions. About 7-10 thousand per square meter.
Polish building material is one of the cheapest from Europe. Its cost is 1000-5000 rubles per square.
Installation prices in big cities are 250-400 rubles per square meter.
Bottom line
If you have doubts about cladding with clinker facade thermal panels, we advise you not to refuse, if you have the means. Even a terrible and unkempt building can be brightly transformed after cladding. And insulation will only add to the incentive to purchase this particular material. Therefore, if you are at least partially interested in purchasing thermal panels for basements with clinker tiles or facades, do not hesitate.
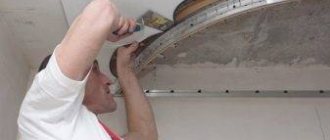
How do you unstitch seams?
This is an important point in the work; the integrity of the coating depends on its correct implementation. It is performed by filling the joints with cement mortar. High-quality jointing will not allow moisture to penetrate under the panels, otherwise this may result in destruction due to frost.
For jointing, you can use a thick plastic bag with a corner cut off, only its size should be slightly smaller than the seam between the panels.
Joining instructions
- Fill the bag completely with the solution, and, carefully squeezing it out, fill all the seams with it. Make sure that the solution does not remain on the panels.
- After setting, the seams must be compacted. This is done with a small wooden spatula. There is no need to try to compact it immediately after jointing; the liquid solution will only stain the thermal panels, and you will have to clean them later.
- To finally level the seams after compacting them, you need to cover them with a broom made of plant material or plastic.
- The final stage will be to treat the surface with a water-repellent composition, but this can only be done after the adhesive has completely dried.
Correct installation of façade thermal panels will create a perfect resemblance to brickwork or other type of finishing material and will give the building an individual look.
Features of installation of facade panels
Metal and facade finishing made of other materials are usually installed according to the same principle. Initially, specialists find the initial height of the row using a plumb line; when unevenness is detected on the walls, to install the panels and accurately connect them to each other, they use vertical beacons, which are attached using polyurethane foam.
Before installing the first row, a layer of polyurethane foam is laid on the base profile, after which each panel is attached to the corner of the building and rests on the profile, the panels are cut at the desired angle and secured with dowels. Next, adjacent panels are installed and all rows of the structure are installed according to this principle.
Advantages of using thermal panels
Here are some arguments in favor of thermal panels as a material for external wall cladding:
- high thermal insulation characteristics;
- possibility of use as decorative elements;
- excellent waterproofing;
- seamless technology for installing clinker thermal panels;
- long service life - up to several decades;
- ease of care;
- resistance to fungal infections and mold;
- light weight;
- ease of installation.
You can easily insulate the facades of even old, dilapidated buildings, because when working with thermal panels, you can forget about the large weight of the material, and therefore the increased load on the walls and foundation. In addition, you will save on internal thermal insulation.
Of course, insulating the walls of a house with clinker thermal panels is a significant expense item, but your investment will pay off many times over because you will get the “2 in 1” effect: insulation + decorative finishing.
What is a facade thermal panel
Many people know thermally insulated facade sandwich panels; they can be seen on the walls of hypermarkets, trade pavilions and industrial buildings built from metal structures. The panel, where the thermal insulation material is placed between metal sheets, is hung on a supporting steel frame. A sandwich panel, in essence, is a sufficiently thermally insulated outer wall that does not require finishing either inside or outside.
Unlike sandwich panels, facade thermal panels are not the main wall material. Neither their strength characteristics nor their thermal insulation properties are sufficient to independently serve as an external fence. Facade thermal panels serve exclusively for additional external insulation of walls of buildings under construction or existing ones.
Thermal panels for exterior decoration of the house are two-layer. A weather-resistant and durable finishing (protective and decorative) layer is applied to the slabs of rigid thermal insulation material. For each layer, various materials can be used, differing markedly in their characteristics and properties.
Cladding the facade with thermal panels is a quick and effective way to improve the thermal insulation of a building and give the house a solid appearance
Properties, advantages and disadvantages
Facade panels become more popular every year, thanks to the properties they have:
- increased resistance to flammable materials is manifested due to the action of polystyrene foam, a substance included in the product.
Another important component of a sandwich panel is polyurethane foam;
the aesthetics of this material lies in a wide selection of colors and different textures; safety of the material;
Manufacturers claim that the material's service life exceeds one hundred years.
the weight of the panels makes it possible not to strengthen the foundation; material resistance to fungi and mold; reliability in fastening. Fastening is done with special locks;
The tight fit of the material to the wall prevents the appearance of bridges from the cold.
Panels made using polyurethane foam poured into clinker tiles ensure the reliability and durability of the product, and have high thermal insulation.
Panels produced using polystyrene foam are made by heating particles of artificial material soldered onto the tile for finishing.
Thus, the connection of two substances - the cladding layer and the insulation - occurs without the use of glue, but at the same time high-quality adhesion of the materials to each other is ensured.
Possessing the above properties, the material, of course, has a huge advantage over other products for finishing facades.
The main advantages of facade thermal panels:
- This is the safest among heat-insulating materials from an environmental point of view.
- The ability to attach the product to any surface structure: brick, concrete, wood and other known materials for the production of houses.
Such panels can be installed even on outdated houses with half a century of history. If the façade geometry is noticeably disturbed, it is recommended to lath the façade for alignment.
This is a multifunctional material, because in addition to the heat-insulating functions, the panels have an aesthetic component.
The panels can be installed at any time of the year and in any weather conditions.
This is convenient when construction work lasts until cold weather, and construction needs to be completed quickly.
The choice of such panels is huge, which allows you to show your design imagination when finishing. The ability of the color of the panels not to change under the influence of rainwater or mechanical damage. Pigments and paint additives do not change their structure.
The technique of attaching the panels is not difficult and, we can say, even a novice master can do it. The speed of covering a building with such panels is high, which saves the builder’s time. There is no need to carefully select parts that match the color, as is the case with imported batches of bricks.
Like any product, facade thermal panels also have a number of disadvantages:
- The need for additional leveling of the wall surface if its shape is disturbed;
- The high cost of the material presented in stores, especially its corner parts;
- Sometimes we come across batches with low-quality products.
You can find out more details about facade thermal panels from the video below: