Topiary ball
Homemade topiary balls are preferable to purchased ones: they are simple, convenient, cheap, and most importantly, the required diameter is always at hand. The easiest way is to make a ball from newspapers and any scraps, compress it with wide tape. You can also use a combination of padding polyester and knitting threads. In general, whatever is at hand. Details about balls for the tree of happiness: .
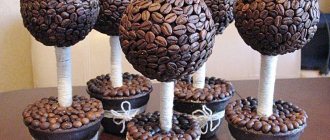
Advice! Always use a ready-made foam ball (you must first paint or wrap the base so that the foam does not melt) if you are planning a coffee topiary: it is convenient to glue the beans onto the foam. In addition, if the goal is to reduce the weight of the product as much as possible, also use a blank.
DIY topiary for beginners (video)
Topiary is an endless field for the embodiment of bold creative ideas and unlimited abilities. A tree of happiness, made with your own hands, will bring a lot of pleasure even from the creative process itself. But in the end, of course, it will please the eye and create a special atmosphere in the house. Moreover, today notes of Feng Shui can be actively traced.
Summer mood with a fruity and floral “tree of happiness”
Topiary originates from the ancient times of the Roman nobility. This word comes from the Latin "topia", which means "decorative place". The Romans were distinguished by their love of aesthetics, they were famous for their experienced masters of landscape design, “masters of topos,” as they were called then.
Topiary these days is an original composition that is an imitation of a neatly trimmed tree. An exquisite decorative item will fit perfectly into any home interior, be it a simple topiary made of paper or multi-textured compositions of feathers, flowers, coins, rhinestones.
The scope for creativity in creating topiaries is unlimited; they can be made to match any color scheme and room design
Topiary made of bright plastic decorative elements
topiary trunk
An elegant topiary in 90% of cases is obtained only with a curved trunk . And again, the easiest way is to prepare the trunk yourself: use a dry branch of corilus (they have characteristic curves), willow, apple tree, walnut or any other tree. First sand the branch with sandpaper.
Advice! Before use, check the strength of the branch to ensure that the trunk does not break. In addition, the branch must be extremely dry: upon contact with gypsum, the damp trunk gives up moisture, dries out and becomes loose!
It is no less convenient to use purchased trunks, called salex, sold in bundles of 10 pieces. These branches are already prepared and come in different colors. The standard length is 30 cm. The thickness of the trunk depends on the weight and size of the crown.
Topiary for beginners: main components
The main and important thing in making topiary is not the material, but its shape - it is a large decorated base on a leg, placed on a stable stand.
Topiary consists of three main parts:
- You can start work with any process, but it’s more rational to prepare the stand first. In most cases, the role of a stand is played by a flower pot or an ordinary mug. Silicone, foam or rubber material is placed inside such a base so that the barrel holds well. The base is decorated to your liking, in this case you can not be afraid to get creative and cover it with beads, grains, buttons or paper. The main thing is a harmonious combination with the overall composition.
- Barrel preparation. Anything can serve as a material for making a barrel. For example: use a real twig from a tree - cover it with varnish or stain; put together several skewers, tubes or sushi sticks - tie and wrap with ribbon or thread. You can also use wire. You should prepare several equal pieces of wire of the same length and wrap them with some material.
- Preparing the base. You need to choose a base for topiary based on your idea. If in the process you need to stick in the bases of the decor, then it is better to take a soft base, such as foam. To paste elements over the crown, it is better to give preference to solid materials, such as plastic or plastic.
The base of the topiary does not have to be a ball. You should start from the event or significant date in honor of which the topiary is made. Basics in the form of a star, letters and numbers look creative and original - for a birthday or other celebration, in the form of a heart or a Christmas tree - on Valentine's Day and the New Year. If necessary, the base should be coated with paint or covered with corrugated paper in accordance with the color of the decorative elements. In this way, the base is painted over to eliminate possible gaps.
The material for decorating topiary can be absolutely any element, from small beads and buttons to sweets and fruits.
The appearance of the tree should be oriented towards the event for which it is being prepared. If this is a gift for a child, then you can use candies in bright wrappers as decoration. If the occasion is some kind of holiday, then various bright ribbons, beads, fresh flowers and rhinestones can serve as decorations. When making topiary for yourself, you should take into account the overall interior of the home.
Attaching topiary to a pot
Filling with plaster or alabaster is the best choice for securing topiary in a pot. It is convenient to mix the solution directly in the pot, if the size of the container allows it. Pour in plaster (alabaster), add water, knead until it reaches the consistency of thick sour cream, and install the barrel. The fill (gypsum) sets in 2-3 hours and dries completely in 24 hours. Alabaster sets and dries much faster. The time depends on the volume of the pot, the temperature of the water (the warmer, the faster) and the quality of the mixture.
Don’t forget to add pieces of foam plastic, sponges or foil rolled into balls to the pot (especially a ceramic, glass or clay one) so that the plaster does not split the container as it expands. All the secrets for pouring plaster and other methods are in a detailed article:.
If you don’t have time to wait for the plaster to dry (the moisture will finally evaporate only after a day), use an alternative method: we attach the trunk to the bottom of the pot on plasticine, tightly lay pebbles around it (dry chestnuts, crushed stone, shell rock or any material that will not deteriorate upon contact with hot melt glue), sprinkle with small shells or pebbles in layers. We glue each layer generously! The fastening sets very firmly and you can immediately continue work.
Step-by-step master class: topiary for beginners
Every master class is attractive in its own way. But what do you need for topiary? How to make topiary with your own hands? Where to start?
To make a tree you will need:
- Ball – foam base;
- White and pink fabric flowers;
- Carnations with beads at the end;
- Satin ribbon;
- Pot;
- Decorative grass;
- Ready-made white-painted barrel (from a craft store);
- Small needles;
- Hot glue;
- Gypsum and water.
There are no clear types of topiary, as this is an individual and limitless imagination for creativity.
Step by step execution:
- First, we prepare the platform on which the base will rest. Mix the plaster with water until the plasticine becomes thick.
- Place the mixture in a pot and carefully immerse the finished trunk in it. The trunk should be set straight and held slightly with your hands so that it does not tilt and the plaster does not have time to fix it when it dries.
- We make a depression in the ball for stringing it onto the trunk.
- Using hot glue, drop by drop, we glue the flowers tightly to each other onto the foam ball to avoid the white base showing through. Next, we fix each flower with a carnation.
- Pour a little liquid glue into the recess and secure the crown to the leg.
- To decorate, tie a pink ribbon with a bow at the junction of the trunk and the crown. We mask the plaster in the pot with decorative grass.
The cute tree is ready!
Flowers on the ball can be attached in a chaotic manner, alternating pink with white. Or purposefully decorate half of the crown in pink and the other in white.
Gypsum can be replaced with earth or other natural soil.
Tips and tricks: how to make topiary
- The crown always be larger in diameter than the pot. But don’t make the ball too large, everything is good in moderation.
- The trunk must be of adequate length: the ball is not too high, but also does not lie in the pot.
- The top is connected to the bottom: according to the color scheme or the same materials. For example, for a New Year's topiary, the bottom is connected to the top through a composition at the base made of materials from the crown: a sisal ball, cinnamon sticks, smooth berries.
- There may be a compositional center on the crown - the accent of the topiary. For example, for a coffee tree this is a composition with a slice of lemon and cinnamon.
- Gypsum filling also serves as a weighting agent, but there is no point in making the tree too heavy; you can, for example, fill half the container, as for a heart-shaped topiary.
- Dried natural materials - chestnuts, nuts, acorns - are radically transformed if they are painted. The technique was used for autumn topiary.
- Seashells take on new shades when covered with nail polish, here's an example: .
- To protect topiary made from natural material from damage by insects, lightly treat the finished tree with any hairspray. Homemade flowers look no worse than store-bought ones: made from napkins, ceramic plasticine, orange peel, etc.
Satin ribbons
Let's try to make topiary from satin ribbons. If you know how to make flowers from satin ribbons, then it will be very easy for you, but even if this is your first time taking up topiary from ribbons, you will succeed. So, I’ll tell you about the experience of making topiary from satin ribbons with your own hands.
Required:
- about six meters of satin ribbon (no narrower than 5 cm, it’s better to take several colors);
- threads, beads, and ribbon for decoration;
- glue gun or regular superglue;
- a stick or a piece of plastic tube for the barrel;
- pot or bucket;
- material for the middle - a fabric bag, crumpled newspaper or a foil ball;
- earth, pebbles, crushed stone (I used colorful glass for an aquarium).
To make this topiary, a master class on making flowers will also come in handy - look at the video on how to make a simple rose from a satin ribbon.
We make 12-15 roses from satin ribbon. You can use several shades of ribbon (for example, three or four), or you can get by with just one shade - when I made a topiary for my younger sister to decorate the wedding photo booth, I used a beautiful ivory satin ribbon.
We make the middle - for example, we crumple up foil or old newspaper, wrap it with threads to make a dense shape. You can wrap it with ribbon, but there is no need - satin roses turn out quite lush.
The trunk can be made from a branch, a plastic pipe or any suitable stick. In extreme cases, dense wire, folded in several layers and wrapped with tape, is suitable. Wrap your trunk with tape, and then glue the trunk to the crown of the tree on one side and to the pot or bucket on the other.
We string a couple of beads onto a thread and “sew” the beads and a satin rose to the topiary. It should be sewn or glued firmly. When the entire ball is covered with roses, you need to prepare the trunk and pot.
You need to pour a weighting agent into the bucket, straighten all the flowers, and, if necessary, decorate with a decorative ribbon.