0
2356
17.05.2014
The function of the thermostat in heated floor systems is to turn heating circuits on and off and regulate the degree of heating. Using thermostats allows you to significantly save on your heating bills and avoid unnecessary expenses by turning on the system only when you need it.
Thermostat for heated floors
Operating principle and main advantages of the device
The temperature regulator is connected to a temperature sensor, which is located near the heating cable. Its operating principle is to determine deviations from specified values. If they are, then the thermostat transmits a signal to increase or decrease the temperature. After a certain temperature value has been set on the thermostat, the required amount of coolant is supplied to the cable.
| Do you dream of purchasing a good knife? Then you should definitely visit the bestblades.ru knife store. Kitchen, folding, travel, multi-item, exclusive knives from famous brands - you will find all this in this store. You can also purchase accessories for knives, everything for sharpening them and much more. The widest range and fast delivery, as well as many gifts with purchase, will certainly delight you. |
The main function of the device is to maintain a set temperature by turning the heating elements on or off. The device significantly saves on electricity costs, since the system starts working only when the temperature drops below the set temperature.
When operating a heated floor system, you should remember that it is inert: for the temperature in the coating to change, some time must pass.
Temperature regulators are considered an indispensable item for heated floors due to their many advantages. Among them:
- low price, depending on the type of thermostat;
- control is carried out using several keys;
- significant savings in electrical energy;
- the device is small in size;
- high degree of reliability of the device.
Types and possible functions of thermostats
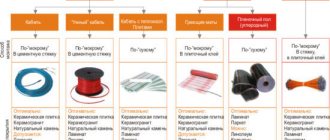
There are many types of such devices. It is customary to classify them according to several characteristics, but the most understandable is the classification according to the principle of action. According to it, the following types of devices can be distinguished:
Mechanical thermostats for heated floors
They are considered the easiest to manage and affordable. All settings are set and changed manually. The main disadvantage of this type of device is the inaccuracy of temperature indicators, which may differ from real ones by 3-5°C.
Electronic thermostats for heated floors
The cost of such devices is higher, but they have greater functionality. In such devices, you can set the floor temperature to decrease or increase at a certain time of the day. If the temperature outside the window has changed, then there is no need to adjust the indicators. Control can be carried out using a remote control.
Settings
Popular models of thermostats have software modules. Using the device makes it possible to set the floor temperature for any period of time. And the presence of a touch panel allows you to do this in a few clicks.
The electric floor controller is configured as follows:
- Press the power button “0”;
- Temperature heating is adjusted using the “up” and “down” buttons;
- When the temperature rises, “set” is displayed;
- The desired temperature level is reflected in the “run” indicator;
- The power is turned off with the on/off button.
Setting the date and time
The thermostat panel is equipped with a “book” icon; this button is intended for setting the date, time of heating on and off. To do this, hold it pressed together with the “up” key for 5 seconds.
A menu opens where you can set the hour and day of the week (days are represented by numbers from 1 to 7). The selected option is saved with the power button.
Setting heating by day and hour
The menu is also activated by pressing the “book” icon and holding it for 5 seconds.
On the menu, days come first. To select the required option, use the “book” keys, as well as the “up” and “down” keys. The sequence of settings is as follows: day, time, temperature indicator.
In these settings, the day is divided into six time periods - time:
- rise;
- leaving home;
- returning for lunch;
- leaving lunch;
- returning in the evening;
- night.
Setting up the service menu
This menu is activated when the device is turned off, using the “book” and “power” buttons. This option does:
- calibration, switching and simultaneous activation of sensors;
- setting temperature limit;
- setting the step for turning on and off the temperature;
- adjusting the heating level.
In addition, this menu allows you to reset all settings.
Kids mode
To protect the thermostat screen from accidental pressing, there is a function - setting a lock. To do this, press two “up” and “down” keys simultaneously for 5 seconds - this will reliably protect the device from accidental switching.
As you can see, connecting an electric or film heated floor to a thermostat is not difficult - the easiest step when installing underfloor heating. Therefore, anyone can do this type of work with their own hands.
How to connect a heated floor to a thermostat?
Installing a thermostat, with a clear understanding of each stage, is not a complicated process, but you need to be aware of some nuances. The device should be installed at a height of approximately 80-90 cm from the floor, but if the thermostat must diagnose the temperature of the air and the floor, then it is better to place it in another place.
The installation process consists of several stages:
Preparing for work
Before you start connecting, you need to familiarize yourself with the specifics of the device. All necessary requirements are contained in the instructions. Particular attention should be paid to the section that describes the installation of the thermostat, since the process of installing the device for different systems may have some differences. Before starting the installation, be sure to turn off the electricity supply to the distribution panel.
To perform the work, prepare the following equipment:
- indicator screwdriver;
- tester;
- screws for fastening;
- level.
Connecting wires
To connect the temperature controller to the floor, you first need to run the power wires. Using an indicator screwdriver, identify the phase wire, which may be black or brown. The wire with the working zero is painted blue, the ground wire is yellow-green.
Using a tester, measure the voltage between phase and zero. The device should indicate a voltage of 220 V. There is a connection diagram on the back of the device or in the instructions. The diagram is different for different thermostats, so be sure to check this point before connecting the wires.
Next, connect the temperature sensor, which is located in a corrugated tube, to the sensor terminals. If the sensor is not inserted into it, you will need to do it yourself.
Installing the thermostat front panel
Using the screws provided, secure the front panel. Using a level, make sure the thermostat is level. After this, close the lid of the device and restore the electrical power supply. If everything is done correctly, its screen should light up. The installation of the heated floor thermostat can be considered complete, after which you can begin setting it up.
Checking correct operation
After installing the thermostat, you need to check that it is working correctly. To do this, you need to perform the following steps: first you need to set the on and off time, the temperature parameters of the device. After this, you need to run a trial daily cycle of its operation.
Notes
Since the thermostat is a complex electronic device, its installation can only be performed if you have experience in electrical installation work. Errors during installation of the temperature controller can lead to damage to the heated floor.
If you decide to install the thermostat yourself, then before carrying out work, consult an electrician who has practical experience.
Connection diagram of the thermostat to the heated floor
Differences in connecting the thermostat depending on the type of cable
The diagrams for connecting the thermostat to heated floors with different cables are not significant, but they differ. Cables have different structures and numbers of cores; there are two-core and single-core.
Connecting a two-core cable to the thermostat
Two-core cable - three wires under a protective sheath. Two conductive (brown and blue), one grounding (yellow-green). This type is preferable when installing heated floors, since it is connected to the thermostat at only one end.
Connection diagram:
- a brown phase conductor is inserted into terminal 3;
- in 4 - blue zero;
- in 5 - grounding.
Diagram with two-core cable
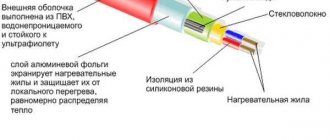
Single core cable
A single-core cable has only one current-carrying wire, and the second is grounding. The connection features are as follows:
- Both ends of the current-carrying cable are connected to contacts 3 - 4;
- Grounding is connected to 5.
Single-core cable diagram
Setting the floor heating thermostat
Depending on the settings, there are two types of thermostats: non-programmable and programmable.
The first type is simpler and cheaper, great for small spaces. After turning on the device, you only need to set the required floor temperature using the buttons. The main disadvantage of non-programmable temperature controllers is the long time it takes to heat the floor. Depending on its type, heating the floor can take from 10 minutes to an hour.
Programmable thermostats are much more convenient because you can set the time for the floor to heat up. Simply put, once configured, the floor will be heated in the morning when you wake up and in the evening when you come home from work. The rest of the time it will be disabled. The main advantage of programmable controls is energy savings: every time you leave, you won’t have to think about turning off the floor heating. The cost of such thermostats, in comparison with conventional ones, is significantly higher.
To correctly set the floor heating thermostat, you need to follow the sequence of actions. Only the general diagram is described below; for some device models the sequence may be different. To configure you need:
- set the current time and date;
- It is recommended to enable the floor sensor in the settings, as this will allow you to more accurately adjust the temperature;
- in the time period settings, set the time for turning on and off the floor heating, and then set the required temperature;
- If your device has this option, then set the parameters for weekends.
Watch the video on setting up the device:
Temperature determination error
Please note that the temperature directly at the remote sensor will always be higher than the temperature in the room, which the regulator shows on its display.
This is due to the depth of the sensor in the screed.
Usually this delta, between t on the floor surface and t inside the screed, does not exceed 5-7 degrees.
On the displays of electronic devices you can see both parameters, but in mechanical devices with a wheel, degrees are often not even written around the circumference, but only the numbers 1-2-3, etc. are indicated.
With five digits, one division corresponds to approximately 8 degrees.
Degrees are not indicated for a specific purpose, so as not to confuse the user. You set the thermostat housing to +25C, but the room thermometer in the apartment will only show +20C.
Most people will immediately ask the question: why does the regulator operate with such an error? Is it broken?
No, he's fine. In this case, the sensor in the floor warms up to +25C, not the air in the room. That is why manufacturers simply indicate numbers in mechanics, so that you, focusing only on your feelings, can choose the most comfortable mode for yourself.
If degrees are indicated on your mechanical thermostat, this means that it mainly works and is guided by its own air temperature sensor built into the housing.
The one that is connected to it from the outside and hidden in the tie only plays the role of protecting the cable from overheating.
Supply 220V power to terminals L and N through an RCD with a leakage current of no more than 30mA.
The diagram for connecting a heated floor directly through a thermostat from different manufacturers is the same and looks like this.
Is it possible to connect a heated floor without a temperature controller?
Theoretically, it is possible to use a heated floor without a thermostat. Moreover, every experienced craftsman who deals with such devices will say that using a thermostat is simply necessary. There are many reasons why you need to install this device. The most important are the following:
- A warm floor that was installed without a temperature controller simply will not provide comfort during operation. For example, if the temperature of the heated floor is too high, then with the help of a thermostat it will be possible to adjust the heating and set comfortable levels. If the temperature is too high for a long time, this will lead to failure of the heating element.
- With constant operation of the heated floor, electricity consumption increases significantly. Installing a temperature controller will save significant material resources, therefore, it will pay for itself in a short period of time. A programmable thermostat will help you save even more energy.
- The presence of a thermostat will significantly extend the life of the heated floor. This also applies to the floor covering, which, if constantly heated, will quickly become unusable.
Connection diagrams
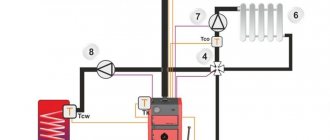
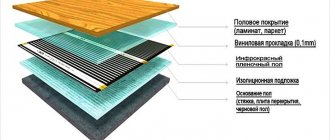
Water-heated floors often act as an additional source of heat. It is mainly combined with a general heating system or hot water supply. The specifics of adjusting heated floors depend on the connection method.
There are several schemes for connecting water heating devices.
Combined
A popular and technologically justified method is combined heating, which includes a radiator and a heated floor system. However, to arrange this structure we will need:
- boiler;
- pump;
- expansion tank;
- collectors for radiators and heated floors;
- radiators;
- pipes.
It is important to correctly combine different heating devices so that they function effectively. The main methods of connecting radiators with warm water floors into a single structure:
- Parallel connection of the collector unit to the heating system. The circuits cut into the highway up to the batteries. Liquid circulation is provided by a pump.
- Connection via rings, primary or secondary. When laid, the pipeline forms rings; they cut into the supply system in several places. The coolant temperature depends on the distance of the coil from the heat source.
- Connection to a coplanar manifold, to its extreme point. Water moves in the circuit due to the operation of a common house pump located in the generator room. In this case, the warm floor has priority when supplying hot coolant.
- Using a hydraulic distribution unit is an excellent option: if there are several heating devices, with differences in the length of the floor loops and the water flow in them. In this scheme, you also cannot do without a coplanar collector.
- Local connection of the circuit through a unibox in a parallel circuit. Suitable for rooms with a small area: bathroom, corridor.
Connection to radiator
A common way to recharge underfloor heating is from radiators. With this scheme, the temperature of the liquid in the water floor is directly related to the degree of its heating in the radiator.
Don't miss: What is stone wool and is it a good insulation?
To build this system, you need a main line that has a supply and return, as well as floor pipes and a unibox. Since the water in the radiators heats up to 80 degrees, it is recommended to connect the floor loops to the return line.
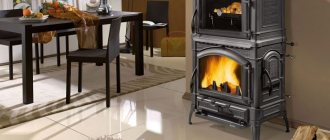
From the boiler
This is a simple option - the installed boiler is intended only for heating water for heated floors, so no regulators are needed.
If you have a modern gas boiler, it is able to regulate the temperature itself; just set the required indicator on the panel. Even with a two-contact system, when the boiler heats water for radiators and heated floors, the values for each device can be easily adjusted by the boiler’s automatic system.
When using a boiler that runs on solid fuel, a compensating barrel is required. The level of temperature and pressure is regulated by installing a safety unit on the barrel, which consists of a pressure gauge, an air release valve and a thermostat.
For your information! The functioning of a water heated floor is affected by the pipe laying pattern - find out what laying patterns there are, as well as how to connect heated floors. With a “snake”, the heating will be uneven, with cold and hot areas. When the circuit is placed according to the “snail” pattern, uniform heating is ensured.
How to choose a thermostat for a heated floor?
Today there are a large number of temperature controllers in different price categories on the market. The choice of this device must be taken with responsibility, since a correctly selected thermostat can significantly save money.
When choosing, special attention should be paid to the type of installation of the temperature sensor, which can be:
- Remote. Such a sensor is mounted in the floor of the room between the heating elements. It is placed in a tube embedded in the floor. The floor temperature can be adjusted more accurately because the sensor will be close to the floor surface. Such thermostats are worth buying in cases where the heated floor is not planned to be used as the main source of heat.
- Built-in. This sensor measures the air temperature in the room. If a warm floor will be the main source of heat, then it is worth purchasing devices with a built-in temperature sensor.
In order to avoid denial of warranty repairs in the event of a heated floor failure, it is recommended to purchase a thermostat from the same manufacturer as the heating elements.
On average, the warranty period for a temperature controller for a heated floor system is 2 years.
Connecting the thermostat
Warm floors Teplolux
Installing a thermostat with your own hands is a crucial moment that must be done in accordance with certain rules. Installation is carried out at a height of 150 cm from the floor, in a convenient place. The connection diagram requires laying several cables from the regulator to the heating elements. To do this, you need to make grooves in the wall. Let's take a closer look at how the thermostat is installed.
- In the selected location, using a drill bit, a hole is drilled into the concrete for the socket box. After its installation is completed, a power cable is inserted into it from the nearest outlet or directly from the electrical panel;
- The next step is to lay a groove to connect the temperature sensor and heating elements to the thermostat;
- The temperature sensor wire and cable for connecting to the heating elements are inserted into a plastic corrugated pipe. The corrugation is inserted into the groove and fixed with dowels or gypsum mortar;
- After this, all laid wires are connected to the thermostat terminals. The connection diagram is supplied by the manufacturer.
Note! To connect the wires to the thermostat, you need to disassemble it, that is, remove the decorative cover. To do this, carefully inspect the design: some models have screws, while in others the lid is held on by latches
TOP 5 best thermostats
If you are still in doubt about the model of thermostat for heated floors, then we have prepared a list of the 5 best devices:
Devireg 530
The device is the best option in cases where an additional heating system is planned. The device is highly reliable because it is equipped with control in case of a break in the wire that goes to the sensor.
Priotherm PR-119
To set the desired settings, you can choose one of 6 modes. The specified parameters are saved in the settings memory. The thermostat housing is made of high quality plastic.
Danfoss ECtemp Next Plus
Thanks to the possibility of programming, energy savings are ensured. Modern design will allow Danfoss ECtemp Next Plus to fit into any interior.
SET 09
The thermostat has a large graphic display. Thanks to the daily and weekly cycle, a comfortable temperature is constantly maintained.
Electrolux Thermotronic Touch
High-quality temperature sensors allow you to adjust the temperature with an accuracy of 0.5 degrees Celsius. You can set up to 6 time modes for each day.
The thermostat cannot be considered separately from the underfloor heating system, since it ensures an optimal level of comfort and reduces material costs for electricity. A variety of types of thermostats provide many options for implementing such control. It is recommended to install the thermostat only if you have experience in electrical installation work, since its incorrect connection can damage the entire underfloor heating system.