Wood selection
The modern range of linings is distinguished by its diversity. The choice of wood type for the interior decoration of a bathhouse depends on external features, technical characteristics of the material and personal preferences.
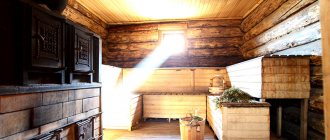
The material for installing the lining in the steam room is chosen from deciduous trees, which will release useful substances during the heating process. This material has a beautiful, even structure and is resistant to high humidity and high temperatures.
Due to the oils contained in the wood, softwood lining is recommended for use in the design of showers and dressing rooms.
External characteristics
Depending on the purpose, the outer surface and shape of the wooden material can be made in various variations.
For the external cladding of a bathhouse, it is rational to choose wood in the form of a beam or a wide board. This form allows for perfect joining of individual elements, which prevents moisture from entering the cracks. External cladding of the bathhouse with wood that imitates a log will somewhat complicate the process of caring for the surface of the material.
Particular attention should be paid to how to attach the lining to the wall in the bathhouse. It is more rational to nail the lining to the frame using nails, since the use of special fasteners will incur additional costs.
Classification
Creating an ideal wall surface in a bathhouse is possible through the use of high-quality materials. To know how to secure the lining in a bathhouse, it is necessary to distinguish by what characteristics it is divided.
Grade “Extra” and “A” are distinguished by high quality, an ideal smooth surface without various types of external damage, the same texture and color. Grades “B” and “C” do not meet the technical requirements, because there are visible external errors in the material on the surface (knots, deformations, various damages).
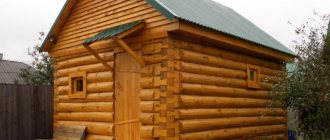
Features and advantages of a timber bath
Today, any building made of timber is an economical and environmentally friendly option. Wood is a durable and strong building material that has been proven over centuries of use. Moreover, they are also built in the shortest possible time. The timber is prepared and cut to the size specified in the project; you just need to assemble and secure everything. Thus, the advantages of a bathhouse made of timber:
- Speed and convenience. You can build a bathhouse in two weeks without the use of special equipment.
- Environmentally friendly. The material is natural and healthy.
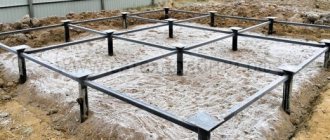
- Ease. The structure does not require a massive foundation.
- Slight shrinkage. It is possible to carry out finishing work almost immediately after installation.
- Availability. Low cost compared to other building materials.
- Low thermal conductivity. The material retains heat well inside and helps maintain comfortable conditions.
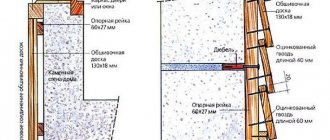
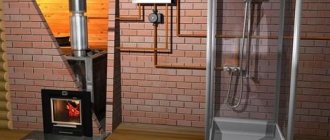
Preparing walls for cladding
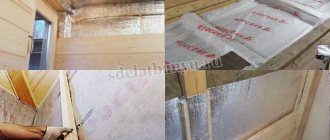
The first step is to prepare the walls. The surface of the wall is leveled and cleaned of dirt, mold and other imperfections. Then they are primed with antiseptic agents.
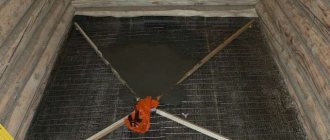
At the second stage, hydro- and thermal insulation is carried out. For waterproofing, multilayer polyethylene film is used. Various types of insulation materials are used to insulate walls.
At the last stage, a special frame is constructed onto which the lining will subsequently be attached.
Classic dowel
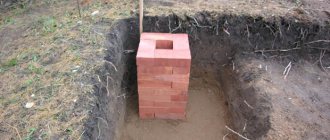
Wooden dowels have long been used in wooden house construction to securely fix crowns. This is a cylinder with a diameter of 30 mm (determined by the preferences of the carpenter) and a length of at least 2/3 of the combined thickness of the connected crowns (250-300 mm). A shorter length may not provide the required connection reliability.
The ideal material for making this fastener is oak. However, due to its high cost, dowels are most often made of birch. The assembly technology for dowels and nails is absolutely the same. A hole is drilled, the length of which exceeds the length of the fastener, and the diameter is slightly larger than the same size of the dowel (a tight entry into the hole is ensured).
Proponents of this option point out that dowels can be made independently (saving money on purchases); their use eliminates cracking of the timber and its hanging on the fasteners during shrinkage of the log house. In addition, they are not subject to corrosion.
Installation methods
Prolonged exposure to moisture and high temperatures on the lining leads to inevitable damage to the material. The duration of operation depends on the method of laying the lining. The methods of fixing eurolining in a bathhouse determine the nature of the installation work.
Vertical stripes look very attractive. With this installation option, the joints between the planks are almost invisible.
Horizontal laying of lining has a number of advantages:
- visible changes in the surface and structure of the material are hardly noticeable;
- detection and replacement of lining strips damaged by moisture is much easier and faster;
- visually increases the area of the room;
- The vertical arrangement of the frame slats promotes proper circulation of air masses, which increases the rate of removal of excess moisture.
Fastening the lining at an angle gives the room individuality and additional attractiveness. As a rule, diagonal trim decorates individual elements in the steam room. A combined finishing style is very common.
Options for fixing the lining
The differences in how to correctly nail the lining in a steam room onto one or another surface determine the technology for carrying out installation work. As a rule, the lining is attached to a wooden frame or sewn onto concrete (brick) walls. There are several methods of fastening.
Through fastening with nails or screws
The fastest and easiest way to attach. During the work process, holes are drilled on the bar, equal in diameter to the thickness of the nail head. After which the lining is nailed to the wall so that the nail is completely embedded in the plank, creating the integrity of the surface.
The disadvantage of this method of fastening is the heating of the metal rod and nail head under the influence of high temperatures. Prolonged exposure to moisture and heat on a nail leads to the formation of rust, which disrupts the aesthetic appeal of the steam room.
The sequence of actions on how to properly nail the lining in a bathhouse is shown in the photo.
Through fastening with nails or screws with masking
This method is chosen if the mounting is made on a concrete wall. A recess is drilled and the paneling is secured to the wall with a thin finishing pin. Then the protruding part is cut and sanded. The result is a neat, unnoticeable fastening.
Installation of lining in this way in a steam room was made possible thanks to the use of a stainless steel pin. Because a part made of wood was deformed and reduced in size under the influence of high temperatures.
Concealed fastening through a groove
Fastening using this technology involves the use of an additional hole (groove) in which the nail head will be hidden. To do this, it is necessary to drill a recess at an angle with a larger diameter than the width of the cap.
The final result depends on how to correctly nail the lining in a bathhouse using this method. Carefully driving the nail into the groove will ensure a smooth surface without visible unevenness or damage. This requires high professionalism and work skills.
Hidden fastening through the shelf
This method of fastening is only possible for eurolining and softline profiles that have a sufficient flange width. A specific configuration feature allows you to hide the head of a driven nail or the head of a screw with the next strip of lining.
Making this fastening does not require any special skills, and the resulting connection will meet all standards of beauty and quality.
Concealed fastening with clamps
It is the fastest and most reliable method of fastening. Before attaching the paneling in a bathhouse using this technology, you need to purchase special fasteners (clasps). Each lining is inserted into the groove of the previous plank. A clamp is placed on the free edge, which is subsequently attached to the frame using a nail or screw.
Regardless of how you install the lining in the steam room, you should take into account the individual characteristics and technical characteristics of the room. The correct choice of material, preparatory work and installation will undoubtedly become the basis for a high-quality and beautiful finish of any bathhouse.
How to install lining in a bathhouse - 4 correct installation methods
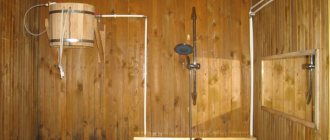
The installation of the lining is the same and does not depend on the chosen method of fastening: with a vertical arrangement of the boards, they start from one of the corners, moving to the right or left - as is convenient for you.
The first board is positioned so that the groove faces outward. The tenon of the next plank is inserted into it. It can be the other way around - there is not much difference here. When the paneling is horizontal, bathhouse construction experts say that the tenon should be directed upward: this way, moisture that condenses on the boards or drops of water that fall on it rolls onto the floor and does not remain in the groove. It is recommended to start from the ceiling.
When installing lining on the walls of a bathhouse or sauna, do not forget to leave a gap of 2-3 cm at the ceiling and at the floor. It is necessary for better ventilation and compensation for thermal expansion, and the gap will be closed with a plinth, which is still nailed at the top and bottom, and special corners are used in the corners. If you do not leave a gap, then most likely the lining will “swell.”
To achieve a tight connection of the lining strips with each other, after connecting them, a small piece of lining is inserted into the groove of the last board, which is tapped with a hammer, achieving an almost complete absence of gaps (do not forget to check the verticality of the plank after this procedure and, if necessary, correct its direction with several blows in the right place).
Clamps for wooden lining
The first and last boards, regardless of the choice of fastening method, are nailed with small-headed nails; if necessary, they are recessed completely using a hammer.
Now let’s talk about how to attach the planks. There are two main options:
- Using nails/screws
- Using clamps - clamps/holders that have a hole for nails or staples and a holder tongue that is fixed to the tongue of the lining, holding it.
You can fasten the lining with equal success using nails with a small head (usually finishing nails) and using clamps. Both methods have their supporters. In any case, the plank is fixed first in the middle (to the middle plank of the sheathing), then along the edges (top/bottom or right/left), after which the horizontal/verticality of the plank is checked again. If everything is fine, attach the lining to the intermediate strips of the sheathing.
When using nails, they are driven into the groove of the lining at an angle, completely recessing the head into the wood. To avoid damaging the bar, you can use a hammer. Screws are screwed in in the same way, also making sure that they do not protrude and interfere with “planting” the next board.
Installation of lining with finishing nails. Options
This method is good for everyone, but there is a high probability that the groove will split, which will significantly reduce the reliability of fastening the lining. In bathhouse conditions, this risks the fact that in high humidity or frost in an unheated bathhouse, the wood will swell and the plank may simply tear out. All the finishing will have to be redone. This problem is solved by pre-drilling holes in the right places, and then screwing/hammering nails or self-tapping screws into them.
Is it possible to fasten the lining in a bathhouse with finishing nails?
There is another option - simply hammer the nails into the lining, recessing the heads deeply (with or without drilling). Cover the resulting indentations with wood putty. It’s much easier to do this, but not everyone is happy with this option from an aesthetic point of view: making nail/screw marks completely invisible is quite problematic.
You can make your own wood putty that perfectly matches the color. To do this, mix the smallest shavings, or better yet, the dust that is formed when cutting the lining, with a small amount of PVA glue until it becomes a thick paste. Use this mixture to cover all the grooves.
Is it possible to fasten the lining in a bathhouse with finishing nails? After all, their hats are small. Will the lining “turn out” in winter? If you make the lathing in increments of 40-50 cm (as recommended), then the finishing nails securely fix the lining, and it remains in place even after significant frosts. If you like to play it safe, use either self-tapping screws or clamps.
Finishing nails for lining
It is better to take finishing nails for lining in a bathhouse with a copper, brass or chrome coating. They will withstand high humidity and will not collapse prematurely.
Clamps are metal plates that have holes for nails/staples and a tongue of a certain shape that holds the lining by the groove. Clamps are used not only for lining, but also for exterior finishing systems - ventilated facades, plastic panels or MDF and chipboard panels. These are fairly reliable devices that provide reliable and hidden fixation of finishing materials.
Clamps for lining
Climbers are good for installing lining in a bathhouse for two reasons:
- The clamps are made from high-carbon steel and then galvanized on top. So such products can withstand difficult bath conditions (high temperature and humidity) for a long time.
- The special design allows you to mount the trim covertly and at the same time reliably (if you choose the right clamp size).
When installing eurolining of a standard profile, you need to use clamps with a tongue height of 4 mm; when using staples and a construction stapler, the tongue should have a length of 5 mm. To install a block house (lining with a rounded front surface imitating a rounded log), the height of the tongue should be 6 mm.
On average, there are up to 20 clamps per square meter. Knowing the total area of the walls and ceiling, you can estimate the amount of fasteners needed.
Lining is a popular material for cladding many residential and non-residential premises, and to save money on installing the product, you can do it yourself. To do this, you need to familiarize yourself with the basic subtleties of the work, decide on the frame for the lining and installation tools.
What are the stages of installation of this facing material?
Lathing. It would be a wrong decision to nail the lining directly to the base of the room; for this, experts advise making a frame or sheathing. After all, the surface must be flat, contain an insulating layer, all its elements must be nailed down carefully, at the same level, so that the lining fits correctly and beautifully.
The frame creates an air space between the two layers, ventilation is formed as one of the foundations for high-quality operation of the product. The timber for the sheathing is thoroughly dried and nailed to the walls with dowel nails. You can use corners with vertical holes for a sliding type of structure in a wooden house.
Attention: the step between the fixed bars (50*50) should be 40 cm; if you plan to insulate the wall, then the distance will be equal to the insulation layer.
The frame slats must be installed perpendicular to the lining, they are attached to the wall using screws and sleeves, and can be fixed with dowels. To ensure perfect evenness of the structure, pieces of wood are placed under the slats. A rope is stretched between the outer beams and a level is established along which the remaining elements are located.
How to properly nail the lining to the base of the structure? What devices?
- You can use nails or a stapler; in this case, you will need a hammer, which will help to evenly sink the caps into the facing board.
- Special staples are also used - clamps, suitable for installing thin linings. The staples are secured on top with nails or self-tapping screws. The fasteners are closed with overlapping strips, and a dowel is used to hide the head of the self-tapping screw.
- The lining with a wide internal latch is fixed with clips, paper clips, as well as nails and screws. At the end of the process, all protruding parts are cut off and the surface is ground.
There are three ways to fasten the lining.
Vertical, the slats are mounted in the center of the working surface, and the frame is covered with clapboard from the corner of the structure. In this case, nails with a small head, as well as staples or screws, are better suited for fastening the board.
We suggest you read: Is it necessary to insulate a bathhouse made of foam blocks?
Where to begin?
- From the left edge of the working area, we place the ridge against the corner of the lining and nail it in a convenient way.
- Nails (or another element) are attached to the grooves, the second board is placed in the first, and so on until the very end.
- The final strip of lining is adjusted to a certain size and attached to the right edge of the base.
Important: the ridge on the first board is cut off so that the panel can hide the heads of the fasteners on the last strip of the first wall.
Horizontal installation, you need to fasten the lining with the ridge up in order to avoid moisture condensation inside the structure. It is better to install from top to bottom so that there are no visible gaps between the strips of the finishing board.
- First, the lining is mounted near the ceiling, the second is inserted from below into the first groove, secured with nails or self-tapping screws.
- The final board is sawn to the required size and attached to the step of the last strip.
The diagonal arrangement involves installing the first board from the corner, and the ends of the lining are cut according to a given sketch.
Wood lining is made from environmentally friendly and natural materials. Due to its high quality and excellent external characteristics, this material is widely used in the design of interior decoration of bathhouses. Lining from high-quality raw materials is made from various species of different textures with individual characteristics.
General information
The wood used for the interior decoration of the bathhouse must comply with the environmental and technical parameters of the room. To install lining to the walls and ceiling of a bathhouse, you need to know the properties and characteristics of the wooden material (read: “How to decorate a bathhouse with lining correctly - recommendations from a master”). Correctly selected material is the key to success in obtaining the desired result.