There is nothing fantastic or too unrealistic about the idea of building a bathhouse from a log. The traditions and technologies for constructing log steam rooms are well known and have been tested many times in practice. It only takes a little patience to choose the right material and assemble a log bathhouse. In fact, this is the most difficult and time-consuming part of the work.
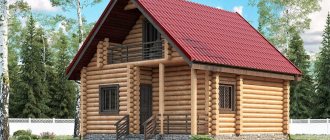
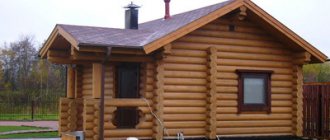
Classic project of a log bathhouse with an attic
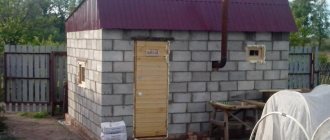
Foundation for a chopped bathhouse
Construction work begins with studying the site, carrying out all the necessary calculations and designing a bathhouse. In our case, given that this will be a log house, a simple preliminary design is sufficient, which will include the main parameters of the future building. As soon as the size and shape of the structure are indicated, the exact location for the bathhouse on the site is determined, you can begin to build the foundation.
Everyone knows the appearance of a strip foundation - these are concrete strips on which load-bearing walls rest. The base of the strip foundation should be 10 cm wider than the wall - this will be more reliable and stable.
First you need to mark the area:
Clear the area of debris, mark the place where the first corner of the building will be located, drive a peg and mark it with a triangle or any other way. On one side of the mark, measure the length that, according to our calculations, the longitudinal wall of the structure has. On the other side, measure a distance equal to the transverse wall in the center lines. Having determined the points where the walls will end, drive in the second and third pegs. Calculate the place opposite the first corner of the bathhouse, drive another peg there and move the triangle. Ideally, you should get a rectangle, the difference between the diagonals of which does not exceed 2 cm.
After marking, we begin digging a trench. If the soil on your site is sandy, then it is enough to dig a ditch 50-60 cm deep, if the soil is clay, you can deepen the ditch. After you have dug a trench, you need to surround it with an edged board, strengthening the edges - this will be formwork. As a rule, for such work, edged boards with a section of 150 by 25 mm are used. When installing, please note: the height of the formwork should exceed the height of the foundation by 10-15 cm. For wet or clayey soil, it is better to prepare a good sand cushion.
Edged boards are the best option for formwork: this material has a flat surface, which can significantly reduce the cost of subsequent front finishing of the finished foundation.
For more information on other types of foundations for a steam room (and the features of their purpose and construction), see our specialized article about foundations for baths.
Log baths - stages of construction
The construction of a log house begins with the planning of the site on which the bathhouse box will be built. If the log house is planned to be assembled from naturally drying material, then a columnar foundation can be used; in all other cases, it is best to pour a strip foundation made of reinforced concrete.
Tape is the best foundation for a bath
The assembly of the walls begins with laying the starting crown. The log is laid out on a concrete surface treated with waterproofing and sewn with staples and wire. The first crown must be laid as accurately as possible, since the walls of the bathhouse will be formed along it.
The log house will turn out warm if you cut the support groove correctly:
- The log that is planned to be laid is tried on the already laid crown;
- A marking line is applied to the surface of the workpiece, which is cut down with an ax along the entire length of the workpiece;
- Use a chainsaw to cut out a support groove and adjust it along the inner surface so that the next crown fits as tightly as possible.
Particular attention is paid to bandaging the corners; one of the possible options is shown in the diagram below.
Arrangement of a warm joint at the corners of the bathhouse
The ends at the corners will need to be covered with an overlay
After the walls and ceiling of the bathhouse are assembled, the roof rafter frame is assembled and the rough roofing is laid. The bathhouse frame must stand for at least one year until it shrinks completely. During this time, the roof, window and door openings are covered with film.
Cutting a groove with a special ax
Only upon completion of the shrinkage processes can floors be installed, partitions installed inside, and the ceiling insulated, usually with mineral wool and reflective roll insulation. All that remains is to install communications, install a stove and perform finishing work inside the bathhouse.
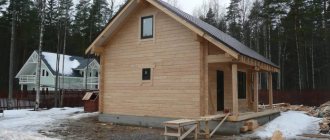
Log bathhouse for shrinkage
Wood selection
Properly selected wood is half the success. As a rule, log baths are built from deciduous and coniferous trees, the distinctive feature of which is strength and moisture resistance. It can be larch, pine, spruce or oak. For the construction of a bathhouse, it is recommended to choose well-dried logs with a diameter of 200x250 mm. Wood moisture content should be within 10%. Read more about choosing 100% timber for a bath in our special article.
Useful tips for building a log bathhouse with your own hands
- It is difficult for one person to lift logs; you need at least two or three people; it is better to do this with the help of equipment. Organizations engaged in cutting log houses most often use manipulators, lifts, and hoists. Of course, it’s difficult to get equipment at home, but if you have the opportunity to use a wheeled tractor, such as MTZ, YuMZ or T-40, then you can make lifting logs easier. To do this, insert a thin log into the hitch so that its end is under the rear axle of the tractor, and the hitch rail is under it; With this lever you can lift a load up to 2-3 meters.
- The dowels should not fit tightly into the drilled holes; it is better to make them 1-2 mm thinner - in this case, the log house will not hang on the dowels during the shrinkage process.
- You can place the first and removable crowns on wide logs, after first removing the layer of grass under them. If there is rocky, dense soil, it is enough to simply level them.
- From time to time it is worth checking with a hydraulic level whether the log house has sagged on the stumps.
- A difference in height angles of 5-7 cm is allowed; there is no point in adjusting each crown to the same size.
- In the wall, the butt of the next log is placed on the top of the previous one.
- You need to remember the safety rules, use safety glasses and gloves, and work in special clothing.
The basis of a chopped bath: we install the lower crown
The lower crown stands on the foundation, in close proximity to the ground and gets wet more than other crowns during precipitation. Before laying the first, lower crown, it is necessary to waterproof the foundation to prevent the walls in the lower part of the building from getting wet. To do this, it is enough to lay 2 or 3 layers of bitumen waterproofing material between the foundation and the logs.
The lower crown, which is called the frame, is made from thick logs. For greater reliability and durability of the structure, the frame is often made from a species that is highly resistant to rot and moisture - larch or oak.
The first crown can be laid in one of the two ways described below.
- First way. Two logs are placed on the foundation parallel to each other, having previously cut off 4-5 cm from each for a tight fit. Insulation is laid between the log and the waterproofing - it can be tow, jute or moss. Two more logs are also laid parallel to each other on the two free sides, strengthening them on the first hewn logs.
Advantage: the logs undergo minimal processing and remain intact, if you do not take into account the removal of 4-5 cm, which makes the flashing durable and strong.
Disadvantage: the appearance of too large gaps between the foundation and the logs, which must be sealed with bars, bricks or log particles. Alternatively, you can pour a foundation with different levels of perpendicular sides.
- Second way. Four logs are selected for the crown. Two of them are cut off by half, the remaining two - by 4-5 cm. With this installation, there are no gaps between the crown and the foundation. At the joints, the logs are joined using the corner joint method.
Advantage: no gaps and tight fit to the foundation.
Disadvantage: part of the log is removed, which violates its integrity and makes the wood less durable.
Important: To reduce the risk of rotting of the lower crown, it is advisable to treat that part of the hewn logs that come into contact with waterproofing materials with an antiseptic before laying.
Advantages of log baths
It would be wrong to say that building a log bathhouse is a simple and unpretentious matter. The situation is quite the opposite; building bathhouses from rounded logs requires not just good physical shape and the ability to handle carpentry tools. First of all, it requires experience and instinct, acquired precisely in practical work. Therefore, the demand for experienced carpenters who know how to build a bathhouse frame and correctly connect logs is incredibly high. The queue for such specialists is scheduled months in advance. Not to mention the fact that you need to stock up on building materials, and above all, choose a tool for constructing a bathhouse box.
Corners made of cylindrical logs
Is a log steam room worth the cost? Without any doubt, even if you do not take into account the prestige of such a bathhouse, the future owner will acquire at least a couple of additional bonuses:
- A log bathhouse made from properly processed logs has excellent resistance to frost, moisture, water vapor and temperature changes;
- The box turns out to be unusually rigid and durable, even if the foundation of the building is rather weak, the bathhouse will not fall apart, although packing the cracks and sealing the joints at the corners may add to the hassle.
A properly built log bathhouse turns out to be quite warm, but does not lose its ability to pass water vapor and air without giving off heat.
A log sauna fully preserves the aroma of wood
Most owners of a log sauna note the extraordinary atmosphere of the aroma of hot wood; each steam room smells differently, each has its own temperature and level of comfort. All this can be attributed to the subjective perception of a standard log bathhouse, but in relation to steam rooms made of foam blocks or profiled timber, especially SIP panels, such statements and assertions practically do not occur.
Walling
As soon as the lower crown is ready, you can start building the walls - you need to lay the logs horizontally, forming the crowns. At this stage, special attention should be paid to the corner connection of the walls, on which the solidity of the entire building depends.
Types of corner joints of logs
There are two ways to connect logs - a corner with a remainder and a corner without a remainder.
Angle with remainder - logs are connected in such a way that when connected they protrude beyond the walls of the structure by 20-30 cm.
Advantage: easy to manufacture, does not require additional insulation and is practically not blown through.
Disadvantage: material consumption is 10% more than with the “corner without residue” method.
Angle without rest: logs are connected to each other with wooden locks cut at the ends. In this case, the remains of the logs do not protrude beyond the walls of the building.
Advantage: aesthetics.
Disadvantage: high labor costs and the need to additionally insulate the walls from the outside. In addition, if the logs are not held together with dowels when joining “without remainder”, then the log house will be less stable.
There are many types of corner joints with a remainder, but the two most common methods are:
Angle angle: in our case, this type of notch was used when laying the lower crown. In the upper and lower logs, recesses of the same size are selected, into which the logs then go. This method is rarely used nowadays, because it is too difficult and time-consuming to adjust the size of the recesses and make the joints airtight. As a rule, logs are connected “in a circle” if it is necessary for all the tops of the crown to be located in the same plane.
“Bowl” angle: a simple and practical method used in the construction of walls, which even an amateur can master. The top log fits into a recess in the bottom log, cut into a bowl that replicates the seat of the incoming log.
The most suitable option for a bathhouse is considered to be cutting into a bowl “in the tail”: a protrusion is left at the base of the bowl along the lower log, and a recess is selected in the upper log that is suitable in size to the protrusion.
Formation of walls
Having chosen one of the corner connection methods, you can begin to form the walls of the bathhouse, horizontally laying the crowns in the desired sequence. The grooves formed during installation between the crowns are filled with insulation. Traditionally, tow or moss is used for these purposes.
During the assembly process, you need to mark out places in the walls for windows and doors. Crowns can be made from individual pieces of logs or simply sawed logs in the designated places. It is advisable to do this right away, because if you cut out the windows later, the logs may become stuck, the partitions will drop and large gaps will appear between the covering log and the upper level of the partitions. When the frame is installed, you need to cut openings for the door and windows in the designated places using a chainsaw.
Important: windows and doors must be floating so as not to interfere with the natural changes in the dimensions of the log house during shrinkage. To do this, spikes are formed in the lower and side parts of the opening, 6-8 cm wide and 4-5 cm high. Windows and doors are installed in door and window frames.
Construction of a bathhouse from rounded logs
The process of constructing a log house is considered the most complex and painstaking of all operations. In order to build a warm and durable bathhouse with minimal consumption of logs, you will need to at least carry out preliminary preparation of the material, taking into account the time of year and construction conditions.
Workpiece cylindrical
Preparation of materials for the construction of a bathhouse
First of all, you will need a high-quality, preferably proven, tool. The list should include:
- A chainsaw with a spare tire and a pair of quality chains. You can cut a log with your hands, but the maximum is to make some decorative cuts; for large ones, as a rule, there is not enough strength when building a bathhouse;
- Hand saw for pruning wood, best homemade, made from the classic two-handed model;
- A device with a cable for debarking logs from bark residues;
- Electric or manual plane, it doesn’t matter which one, the main thing is that it is convenient to work with the log in the most difficult places and areas of the bathhouse;
- Set of axes. You will need a heavy axe-chop with the blade sharpened at 25 degrees, a second tool for face cutting with the blade sharpened at 20 degrees;
- Metal staples, ties, clamps, any available tool for temporary fixation of the log at the time of processing.
Of course, in addition to the cutting tool, you will need a meter, surface planer, tape measure, and marking cords. Even after the log has been rounded or peeled on a machine, you will need to pay a lot of attention to the material before it is used for laying on the walls of the bathhouse.
Preparation of round timber
First of all, the purchased log is subject to the most thorough check and careful inspection of the surface. You will immediately need to reject those logs that have a lot of knots, cracks more than 50 cm and the difference in diameter at the ends is more than 1 cm. There will definitely be small cracks, this is not a problem for building a bathhouse, most often they are rubbed over with protective compounds.
To build a bathhouse, it is better not to use a log with a large number of knots and branches. This means that when the trunk was sawed, the least valuable part of the wood was cut and sold. This material can only be used for interior work.
If you plan to build a bathhouse from a log artificially dried in a chamber, then the surface of the material, before it is transported to the construction site, is treated with protective compounds for antifungal and fire retardant purposes. This material cuts well, but after assembling the frame, the walls of the bathhouse turn out to be weak, since there is no natural shrinkage.
Drying and storing material before starting construction of the bathhouse
It is best to roll the workpieces into a stack under a canopy, with boards laid out; each log is cut to a depth of 3-5 cm, this will protect the material from twisting and bending. After 7-8 months, the wood is almost ready for laying into the walls of the bathhouse.
Timber processing
The rest of the lumber - boards, slats, floorboards, joists and lining - are dried and treated with protective compounds. Some of them additionally have to be oiled so that the material does not rot due to the large amount of water vapor.
The lining must be brought inside the heated room, the timber is laid out in dense rows and loaded with OSB sheets, then with sandbags or ordinary oppression.
Roof for a bath
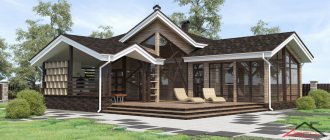
The optimal solution for a log bathhouse is a gable roof, which, although it will cost more than a single-pitch roof, will look neater. Under the roof you can arrange a room for storing bath accessories and drying brooms.
The figure shows that the greater the angle of inclination of the slope, the less load it is subjected to during snowfalls.
As a roofing material, you can choose roofing felt, slate, ondulin, corrugated sheets, and metal tiles. Any material within the financial capabilities of the bathhouse owner will do. The angle of inclination is selected depending on the selected roofing material.
Attention ! We have a detailed article on building a roof for a bathhouse here.
Advantages of sauna log houses
A log bathhouse is a reliable and practical structure, the main advantage of which is the speed of construction. Other advantages of wooden construction include the following:
- availability of construction work without the involvement of third-party specialists;
- possible shrinkage of the finished log house does not exceed 11 cm;
- saving money when building a wooden bathhouse yourself;
- a large selection of ready-made bathhouse projects or the opportunity to develop your own project;
- confidence in the quality of the building material;
- useful experience in private low-rise construction.
Floor in a chopped bath
A wide selection of modern materials allows you to make the floor not from wood, but from more durable and moisture-resistant materials. A wooden floor quickly gets wet and dries slowly, as a result of which the process of rotting begins, unpleasant odors and microbes are released, which is harmful to health.
The best option for a bathhouse is a concrete floor covered with tiles.
Please note that the floor is made only after the installation of the sewer system.
Materials for exterior finishing of baths
The external finishing of the bathhouse is carried out in conjunction with the thermal insulation of the facade. To save the usable area of the building, it is recommended to install insulating material on the outside of the structure. The best option is a ventilated facade, which will provide reliable protection against the penetration of moisture and cold.
The following decorative materials are used for the insulated facade:
- wooden or plastic lining;
- metal and vinyl siding;
- block house;
- panels for imitation timber;
- decorative plaster;
- corrugated sheeting
The traditional material for the exterior decoration of a bathhouse is wood, but metal and plastic are becoming more and more in demand. Such materials are characterized by increased strength, wear resistance, durability, inertness to negative factors and aesthetics.
Layout of a chopped bath
At the design stage, it is necessary to designate which rooms will be in the bathhouse and how to rationally distribute the total area between them.
As a rule, a bathhouse includes several rooms:
— vestibule, with an optimal area of 1 m2: the main function of the vestibule is to prevent humid or frosty street air from getting inside, otherwise condensation will freeze on the front door and it will be impossible to open it;
- locker room or rest room: according to the recommendations, the standard locker room area is determined at the rate of 2-4 m2 per person; if a small bathhouse for 4-6 people is being built, it is enough to allocate 8-10 m2 for this room;
— washing room: according to the standards, 2.7 m2 per person is allocated for this room, some owners combine a washing room and a steam room;
— steam room: according to the standards, 2-3 m2 are allocated per person to make it comfortable to steam, the area can be calculated with some margin.
We offer you several options for planning a bathhouse.
In the presented material, we outlined the basics of constructing a chopped bathhouse. If you have patience and, with a little work, understand the intricacies of the construction business, then soon you may have your own bathhouse - a source of health and good mood. Read more about the specific aspects of bathhouse planning here.
Disadvantages of chopping into a bowl
- Overuse of material. Due to the release around the corner, at least 20-25 cm from the log are lost, that is, the loss on one wall will be about half a meter. With a log standard of 6.1 meters, this must be taken into account; for example, inside a 6x6 log house, the useful distance will be only 5.2 meters.
- Due to the protruding corners, sheathing such a log house will be more difficult.
- It is necessary to promptly treat logs with antiseptics or paint to prevent them from darkening. Without lining, darkened areas of logs will be visible even under some types of paint, not to mention varnish inside the house.
Instructions for making bath panels using a burner
Very often, the natural texture of wood becomes the basis for applying a design using a burner. If you do not have special artistic abilities, we recommend doing the work in this order:
- We transfer the desired pattern onto the block using carbon paper and a simple pencil.
- We use a burner to repeat the outline of the design.
- We cover the surface with colorless varnish in several layers.
- We fix the galvanized fastening part at the back.
To draw a bright, contrasting line, you need to press the tool harder. Draw secondary lines with moderate pressure. Make essays with light movements.
Finishing the bathhouse with wooden clapboard
The traditional material for exterior finishing is wooden lining. This facade has an aesthetic and modern appearance and fits well with any architectural style.
Finishing the outside of a bathhouse with wooden clapboard has the following advantages:
- environmental safety;
- durability;
- high noise and heat insulation;
- low thermal conductivity;
- accessibility of installation.
Before decorative finishing, the outer walls of the bathhouse are treated with fire retardants and antiseptics, which do not contain hazardous components.
The sequence of cladding with wooden lining involves the preliminary preparation of a frame made of thin wooden slats. The lathing is fixed to the bath strictly according to the level to prevent possible deformation of the finishing material. The outer boards are installed first, then the central part is filled.
The lathing is mounted on screws or nails. Additionally, each slatted structure is treated with an antiseptic compound to protect against rotting. The gaps between the slats are filled with wooden inserts or wedges.
Wooden lining strips are mounted on the finished sheathing, with the first part being installed horizontally and strictly level. At the bottom, the lining is fixed with nails or screws, and in the center - with a hidden fastener.
Finally, a properly sheathed bathhouse frame can be treated with varnish or a coloring composition of the desired shade.
Features of making a mosaic panel for a bath
Recently, mosaics have become increasingly popular in decorating the walls of bathhouses.
Most often it is used for the internal lining of a Turkish bath, since with its help it can be used to emphasize the national oriental flavor. However, in traditional Russian baths this decorative element is also popular. Before creating a mosaic panel for a bathhouse, you need to decide on the size, shape, relief, image and shades of the design.
The mosaic panel is installed in this order:
- We fix individual parts on a special mesh. Please note that at this stage elements can easily be torn off from the overall canvas and replaced with others. This allows you to create an original drawing.
- We number the grids in order to simplify the installation of large canvases.
- We level the walls and prepare the surface for installing the panels.
- We glue the individual mosaic fragments using white adhesive.
- We rub the seams. We select the grout color in small pairs in accordance with the general background. For panels in large bath rooms, you can choose contrasting colors.
If you wish, you can mount a frame from a frieze or simply install the picture in the plane of the wall.
A mosaic panel can visually expand a small room. The market offers many production models of mosaics with 3D effect. You can decorate your bathhouse with a pattern of any geometric shape. Please note that a mosaic panel is not the main finishing coating, but a decorative element. Therefore, it should stand out on the wall, and not merge with the overall cladding.
Construction of the foundation
The next step will be laying the foundation. Since the wooden structure will have little weight, a powerful monolithic base can be abandoned. For a log bathhouse, a strip or column foundation is perfect.
Strip foundation
The construction of a strip foundation consists of the following stages:
- A trench is dug along the entire perimeter of the base, 40 cm wide and 50 cm deep.
- A cushion of gravel and sand is made at the bottom.
- Next, the reinforcement is laid.
- Formwork is constructed to a height of 50 cm.
- The concrete solution is poured.
- Sand and crushed stone are poured in strips inside the perimeter. In the future, they can also be filled with cement mortar or laid with a wooden floor.
Important: the height of the strip foundation must be at least 1 meter.
Columnar foundation
To lay a columnar base you will need:
- Make supports from brick or asbestos pipes. The supports are placed around the perimeter with a distance of 1.5 m.
- A concrete pad is made under each support.
- Reinforcement is fixed to the supports.
- A formwork 40 cm high is being constructed.
- Reinforcement is laid on the formwork and tied with rods.
- Concrete is poured.
After 4-5 weeks, when the concrete is completely dry, you can begin further construction.
Build a new one or restore an old one
It makes sense to carry out repairs in a bathhouse only in two cases:
- The building frame, walls, floors, foundation are in good or satisfactory condition, there are only isolated areas of damage, including crowns, foundation elements and roof;
- The wooden bathhouse, despite its shabby appearance, has an excellent steam room, providing wonderful steam and an indescribable atmosphere indoors. Often, such baths were built by real masters many decades ago, and it simply doesn’t make sense to get rid of them.
It is extremely difficult to build a first-class wooden bathhouse with well-chosen dimensions of the steam room, thermal insulation, a skillfully constructed stove and a ventilation system. It is much easier to restore a bathhouse by replacing old and rotten wooden parts.
In such a situation, masters answer the question of what can be made from an old bathhouse without hesitation. It is best to equip a new bathhouse with a cool steam room. It is clear that there are situations when repair is impossible. The building simply has to be burned, for example, if the wood is infected with fungus or blue rot after 20 years of sitting idle.