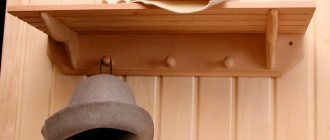
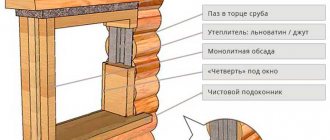
What does a person who enters the steam room see, besides the beautiful decoration, competently installed by the attentive and thrifty owner of the bathhouse? First of all, his attention is drawn to the stove, which is the “heart” of any steam room, as well as shelves on which you can sit comfortably (or not so comfortably, if something is done incorrectly) during the bath procedures. It is the last item of the above list that will be discussed further.
DIY bath shelf
For an ignorant person, the shelves in the bathhouse are an elementary structure consisting of 1-3 wooden benches. In practice, everything is much more serious and interesting. Did you know that different materials can be used to make shelves? At the same time, the configuration and dimensions of structures may also vary. You are invited to familiarize yourself with all the mentioned nuances, as well as instructions for making bath shelves yourself, while studying the information below.
Shelf 3 tiers made of logs
Single tier shelf
Three-tier shelf
Choosing a rack design
Collapsible rack
Most often, metal or wood is chosen as the material for garage shelving. Combinations of these materials are common. Plastic is rarely used.
The designs of shelving made of wood and metal can be as follows:
- Stationary, that is, designed and assembled for a specific room. Typically, a structure of this kind is assembled once, and to give it additional strength it is attached to the wall or floor (in some cases also to the ceiling)
- Mobile. It is possible to install the structure in different places, or the ability to constantly move it using rollers (wheels)
- Collapsible. The number of shelves, their height, and sometimes their length can be changed within arbitrary limits
- Hanging. Such structures are fastened to the ceiling or walls.
- A combination of different types or with exotic elements (for example, rotating, sliding). Usually, this is more of an aesthetic rather than a practical decision.
A separate group is represented by shelves for storing tools or shelf-containers for storing small parts - usually fasteners, as well as other “loose” items.
Tool storage panel
How such products are constructed is clear from their images. They are used quite often because they are very convenient to use and easy to manufacture. In addition, any available materials can be used as material for them.
Shelves made of many containers
Naturally, the layout of any rack, which includes calculating its dimensions and determining the number of shelves, should be based on the size of the garage, the parking space for the car, and the location of the doors and gates. In some cases, it will be optimal to use corner shelving.
Building a chicken coop: description, tips, arrangement of premises for 5, 10 and 20 chickens (105 Photo Ideas) + Reviews
Corner shelves
Position of the shelf above the door
Most often, this design is miniature and can be used both for practical purposes and as a decorative element. For the bathroom, it can become a place for household chemicals, clean towels or other personal hygiene items and products.
Idea! In the bedroom, you can make a portal around the door, where you can place various little things that are so necessary in every home.
Original hanging shelf made of wood and rope
Do-it-yourself - How to make it yourself Beautiful and unusual do-it-yourself shelves How to make a beautiful and unusual shelf for books, etc.
An original hanging shelf made of wood and rope
You can make the interior of the room bright and unusual with the help of a hanging structure, in which the shelves are made of natural wood, and the racks are made of thick hemp rope. This shelf will fit perfectly into a room in a country style or decorate a room in a nautical style.
Original hanging shelf made of wood and rope
Materials
- 4 solid wood shelves. Dimensions 60 cm by 30 cm. Wood thickness - 27 mm.
- Hemp rope, diameter - 25-30 mm. The length depends on the desired size of the structure.
- Special brackets with hooks.
- Anchors for attaching brackets to the ceiling.
- Sandpaper.
- Tools.
- Drill.
- Pencil.
- Corner.
- Level.
- Roulette.
- Screwdriver.
Manufacturing
First, you should thoroughly clean the surface of the wooden shelves.
It is important that the edges of the wood are smooth and free of chips.
Then on all shelves you should mark the position of the through holes through which the rope will be pulled. To do this, you need to step back from one edge by 5 cm and draw a straight line, from the other edge by the same distance and mark it in the same way. Each hole is placed at the intersection of lines. Using a drill and a large drill, at least 15 mm, drill 4 holes on each board.
Then the boards need to be coated with varnish, stain or acrylic paint. The elements are painted in colors that will harmoniously fit into the interior of the room. After the coating has dried, you can begin assembling the structure.
You need to take a rope and cut it into 2 equal parts. The resulting ropes are folded in half
It is important that its segments are equal. Then the first shelf is strung on ropes and secured with knots
The nodes must be positioned strictly parallel, otherwise the part will warp. Then the second shelf is strung; it can be positioned 40 cm lower. It is also fixed with knots. To prevent the board from dangling, you can tie knots not only under the shelf, but also above the shelf.
The nodes must be located strictly parallel
The rest of the wooden elements are attached in the same way.
It is important to check the location of the shelves during the process of attaching them. They should not be skewed or located at different distances from each other
The lower knots should be strong; the rest of the rope can be divided into strands for beauty.
The resulting shelf can be hung either on the ceiling using brackets with hooks, or on the walls. Despite the fact that the structure is not too heavy, it needs to be secured with anchors.
It will be a wonderful interior decoration. It is not recommended to place fragile, heavy or glass items on the structure, especially if there are small children or pets in the house.
In addition to the hanging ones, you can make floor shelves that will fit perfectly into the interior. Wooden shelf for flowers. Handmade
Wooden shelf for flowers. Handmade
Wooden shelf for flowers. Handmade
Wooden shelf for flowers. Handmade
In addition to the hanging ones, you can make floor shelves that will fit perfectly into the interior. Wooden shelf for flowers. Handmade
Where should the storage system be located?
In every home you can find space for ceiling shelves. They can be created in the following places in the apartment:
- Kitchen. Here you can make shelves above the door, along the wall, or fill the space above the refrigerator or kitchen unit.
- Hallway. In this room, the storage system is installed at the end or along one wall.
Small kitchen with shelves on the ceiling
Baskets for storing things in the hallway interior
Advice! If the room is narrow, do not create shelves along long walls, this will visually narrow the space even more, and it will be inconvenient to use such a system.
What to make from and how to mount shelves under the ceiling in the garage
How to make a shelf in a bathhouse, selection of materials and recommendations from professionals
Home / Features of various rooms / Garage / Shelves under the ceiling in the garage - what to make of and how to attach?
For many, the garage is not just a place where the car is parked, but also a kind of warehouse for everything that needs to be stored somewhere, but there was no place in the apartment or house for these things. However, even in this room, sooner or later the space runs out and the search begins for free space to accommodate all the existing belongings. In such a situation, shelves under the ceiling, which can be placed in any garage, will help out.
Features of the room
Since the garage still belongs to technical premises, the shelves here may look completely different than in the living space
There is no longer a need for a stylish and beautiful appearance, but all attention is paid to the functionality of the installed structure. Therefore, almost any board or piece of plywood can serve as material for making a shelf.
There are many ready-made solutions that may not be suitable for residential premises, but fit perfectly into the garage space. These are systems made of metal profiles, iron gratings and various metal baskets, which can also act as a place to store all sorts of things.
The fastening of such structures will also differ from what can be found in an apartment or residential part of the house. Here, a more serious load on the shelf is assumed and therefore, the fasteners most often take the form of powerful anchors, brackets or metal corners attached to the surfaces with thick bolts.
What to make from
Since the premises are technical, the materials for making mezzanines can be very simple. Most often, it is just a board attached to the wall or ceiling. You can replace wood with plywood, but you should choose a thicker and preferably waterproof variety. It is not recommended to use chipboard, since the humidity in the garage is often high, and chipboard is more suitable for dry rooms.
If you have the appropriate experience and opportunity, you can assemble the base of the shelves from metal pipes or rods. When welding, you must immediately provide a place for fixing the fasteners with which the product will be fixed to the wall or ceiling.
Regular metal or plastic baskets can also be used as storage space. This is no longer quite a shelf, but the ease of use of such solutions has made them no less popular. All that is needed to make such a structure is several baskets of a suitable size and special profiles for attaching them. The profiles are a U-shaped bar into the groove of which the edge of the basket will be inserted. They need to be placed at such a distance that the opposite edges of the baskets fit into them freely, but do not fall out when it is pulled out.
Where and how to attach
It is recommended to attach such structures to two planes at once - the wall and the ceiling. This solution will create a very strong and durable structure. However, there are many other options - from long studs fixed on the floor plane and a board attached to them, to a simple steel bracket driven into the wall with a metal sheet or lattice fixed on it.
Most often, shelves under the ceiling in the garage are mounted on hangers. This can be either a long pin or a bracket specially designed for such structures. An excellent option would be a ready-made system for hanging shelves, which is sold in almost every hardware store. It consists of a special profile attached to the wall and corner holders fixed to such a profile.
The advantage of such a system is that when organizing storage space, you can choose the height at which the shelves will be located, and also use the entire height of the wall to place them. In addition, you don’t need to make anything yourself - the components are purchased separately and are not too expensive. At the same time, you can buy exactly as many items and parts as you need - at least one shelf, at least ten.
How to treat wood
Wood processing can be done by various means, which can be created on a chemical or organic basis. Any wood impregnation agent helps repel moisture. Most often, universal compounds are used that protect against moisture and high temperature.
Attention! It is also worth using mixtures designed to increase resistance to damage by fungi and insects.
The composition of the described solutions can be oil-soluble or water-soluble . When using antiseptic impregnations, you must strictly follow the instructions, since such compositions are aggressive chemicals.
Prices for wood antiseptics
How to do
Bed under the ceiling installation description
The size, style and design, as well as the location of such a pantry will be individual in each home. Therefore, below we present only the general procedure for installing such a structure.
Having decided on the place where the pantry will be located, we take all the dimensions - height, width of the room or opening.
Taking into account the size of the opening, we come up with an approximate diagram of the future structure.
We mark the area where the cabinet is attached using a building level. It must be used, since the ceilings and walls may not be too smooth.
We make fasteners for the entire structure based on the dimensions and based on the invented diagram. A metal corner is excellent as fastening elements, in which you can pre-drill holes to fix the lower part.
We fasten the base using a hammer drill and dowels. We place the fastening points at a distance of about 20 centimeters from each other.
- The lower base of the shelf can be made from any durable sheet material. One of the most suitable options is laminated chipboard or plywood sheet.
- If all the dimensions are accurate and the workpiece fits well into place, it is fixed with self-tapping screws through the holes drilled in the corner.
You can glue an edging tape to the end of the base that matches the color using liquid nails or another method.
- An internal partition is installed.
- Next, a box of bars is mounted, which will serve as the basis for attaching the doors. The outside of the box is also finished with edging tape.
Next, the pre-prepared doors are attached. They can be cut from the same sheet of chipboard or plywood, adjusting the size so that there is a gap of no more than five millimeters between the closed doors.
The installation of the mezzanine can be considered complete. If all the parts are made of laminated chipboard, all that remains is to cover the protruding fasteners with the same edge tape that was used to finish the end parts of the structure. If everything is assembled from plywood, additional finishing of the entire cabinet will be required in accordance with the rest of the room's design.
Placing shelves in the kitchen
This room in the house is most often small in size, so the use of shelves under the ceiling is due to practicality and convenience. Such systems can be placed and used in different ways:
Advice! A good place that is often not used is the area above the upper cabinets of the kitchen unit. Shelves can be equipped from the same material as the rest of the furniture. Baskets look stylish on an open shelf.
Kitchen work surface located by the window
Kitchen design for a private house in white
- There is also a lot of unused space above the refrigerator, which can be easily filled by adding shelves on which you can place dishes or decorative items.
- If you are the owner of a room with high ceilings, you can place shelves in several rows, and this will be a convenient, practical solution.
Fastening the finished structure
Diagram of shelf fastening elements.
After drying, the hanging shelves can be attached to the ceiling. Carefully pass the cable through the holes and secure it in the fastening rings using a special screw. The upper ends of the cable are hooked onto self-tapping hooks, which are screwed into the ceiling beam, and secured with rope clamps. Then the lower ends are attached to the screws in the floor in the same way. Very often, the lower ends of the cable are simply tied in knots under the bottom shelf, then fasteners in the floor are not needed. But the first installation option is much more reliable, because the tensioned ropes prevent the structure from swaying.
When the shelf racks are suspended, adjust the cable tension using screws in the fastening rings, and level the shelves vertically and horizontally. If the rack is placed on the wall, first make level marks, and then drill holes for the dowels. The further fastening process is no different from that described above. When making such a rack, you should take into account the weight of the items that will be placed on it. The greater the load, the thicker the shelves and the tighter the cable. If hanging shelves are intended for small items, they are held in place by 2 cords, one on each side. For heavier items, additional support is needed, and then four cords are pulled through each shelf.
It’s not difficult to make a hanging shelf more original: for example, you can take boards of different lengths, fasten the longest one on ropes from below, then a little shorter one, and so on up to the top, where the shortest board will be located.
You will get an interesting pyramid shelf, and if you paint it in bright colors, it will be an excellent solution for a child’s room. The holes for the cords in this case should be on the same line vertically, that is, if they are drilled in the upper shelf at a distance of 2 cm from the edge, then in the lower shelf the indentation will be already 15 cm.
Despite the ease of manufacture, each rack requires care and precision. All elements should look the same, have a smooth surface and symmetry. It is advisable to use a new cord or rope, without scuffs or tears, to avoid a sudden fall of the entire structure. You shouldn’t clutter the shelves to the top; it’s better to hang a few more cute shelves and sort items by size - then the appearance of the room will be much more attractive.
What to choose: linden or aspen?
Many people, at a certain point in bathhouse construction, reduce the question “what to make bathhouse shelves from” to linden or aspen. And this happens because of the hardwoods, which are probably the most affordable , only these are on sale.
BY THE WAY! Has anyone ever looked at the characteristics of ash? But it is a very worthy breed for a bathhouse - excellent indicators of resistance to rotting.
So, the entire variety of deciduous species in Russia is reduced to linden and aspen, well, someone will remember alder At the same time, this cannot be considered accidental - look at the forums, the topic of what our ancestors built their baths from is constantly discussed there. And it is always said that the linden and aspen inside the steam room are our everything.
Shelves in a Russian bath
Okay, let's assume that there is no choice and no way out. And if you choose between these two, you need to weigh the following pros and cons:
- according to technical characteristics, aspen is slightly better than linden;
- linden has a pleasant subtle aroma;
- Aspen darkens from water faster than others.
And here something must weigh - either you want to whiten the shelves more often than usual, or not. You can, of course, coat the aspen with oil or oil wax - this will eliminate the disadvantage. Or you can simply prefer linden - for the aroma, for example.
If you want to learn more about what our judgment is based on, we recommend reading the article - it’s about lining, but the essence is the same - linden or aspen.
nuances of fastening, fastening methods, instructions, photos, videos
A shelf on the wall is a decoration for any interior. Every person wants to mount a shelf on the wall so that it fits perfectly into the overall design of the room. This problem is not at all difficult to solve. Absolutely anyone who has free time and a set of necessary tools can nail a shelf to the wall.
The nuances of fastening shelves
As the main support for the shelf, you can choose an anchor bolt, thanks to which you can securely fasten the piece of furniture.
Its dimensions are as follows:
- diameter up to 12 mm,
length – 180 mm.
In order to attach the shelf to the wall correctly, it is important to follow the recommendations of experts
As a base for the shelf, you can take a piece of board from a window sill with artificial turf.
The dimensions are as follows:
- thickness – 25 mm,
width – up to 200 mm.
There are only two options for mounting:
- classic,
hidden.
A hidden option for fastening shelves is needed in cases where decorative elements are absolutely incompatible with protruding fasteners. Attaching shelves in this version is just as easy as in the traditional one.
Depending on the type of fastening of the shelf, the options for its installation and types of fasteners vary
When working with anchor bolts, a clear sequence of actions should be followed
A shelf with hidden fasteners looks neater
Sequence of work
Before you attach the shelf to the wall, you need to know that the thicker the shelf, the thicker the support should be. A hole is drilled in the end part an average of 5 mm below the surface. All holes for shelves in the wall must match, otherwise attaching them will be quite problematic.
Metal corner - the most reliable fastening for a wooden shelf
When using anchor bolts, you can use special brackets
Invisible fastening of shelves is carried out in a hidden way
Using your imagination, you can create a unique shelf fastener
Attaching the shelf to the wall:
- A strip of the required length is considered a template. It is applied to the end of the shelf and a hole of the required diameter is made, after which it is applied to the wall.
The next step will be drilling, which must be done with maximum precision.
To attach the shelf you will need:
- electric drill,
threaded coupling,
brackets,
lath - template,
carpentry glue,
screws.
Installation of a corner shelf (video)
Store shelf mounts
A shelf that you bought at a hardware store can be very difficult to attach to the wall. Be sure to read the instructions that came with it. Most likely, it will contain all the necessary recommendations on how to screw the product to the wall.
Next you need to understand what type of fastening the shelf has. Usually, complete with a shelf and instructions, it also includes elements that are used to fasten the product. It is also necessary to select brackets, thanks to which the shelf will be secured.
Pelican mount is most often used for glass shelves
Bracket options may vary:
- fastenings that do not extend beyond the shelves;
flat brackets with pear-shaped holes at the end.
Steps to attach the shelf to the wall:
- Based on the possible dimensions of the shelf, you will need to decide on the place where the fastening will be made. Choose the right place so that other furniture in the room does not interfere.
Using a building level, you need to control the position of the product.
Nests are first created in the walls so that after this procedure the shelves can be safely attached. These nests are made with a puncher or drill, and then dowels are driven into the resulting holes.
After this, the shelf is mounted on the wall.
The final stage is screwing the fastening elements into the holes.
How to hang shelves on the wall (video)
Thus, it was clearly shown how to attach any shelves to the wall. The fastening is carefully planned and only after the plan has been developed, work begins.
Attention, TODAY only!
Important nuances
When hanging shelves, check that all parts of the product fastening match the fasteners on the wall. It is better to use special brackets - unlike ordinary dowels, they are more reliable.
Kitchen set with gray facade
Important! Be careful about what you are storing, as it is important to take into account the force of the load. To accommodate heavy items, it is best to choose a shelf material that can withstand heavy loads, such as board or thick plywood. For storing small and light items, structures made of chipboard or plasterboard are suitable. This decision must be made during renovation.
Ceiling shelf for garage
Making hanging shelves
Hanging wall shelves
There are two types of hanging shelves - wall and ceiling. Wall shelves can be made in open or closed design, sometimes they have a back wall. They are attached to the garage wall using corners or anchors. These shelves can also be either stationary or collapsible.
Ceiling shelves are placed at the highest level and are attached directly to the ceiling. They can be hung on hooks welded to metal ceiling beams. In addition, eye bolts or special long studs are used as fastenings.
Suspended ceiling shelves
The advantages of such shelves include the relative simplicity and speed of assembly. However, they are quite flimsy and cannot support too much weight. On the other hand, no one will place items that are too heavy to be stored at this level for safety reasons.
The manufacture of the frame for such structures, as well as the shelves themselves, repeats the procedures described earlier in the production of wooden shelves with a metal frame. In this case, fastenings are made in the upper part of the frame for connection with hooks or studs installed in the ceiling.
Various niches for the attic ceiling
If you have an individual house with an attic, then you have ceiling slopes where you can arrange original and spacious storage spaces. It is advisable to design niches during the construction of the building, but it is possible to create them in the finished building. In this case, the structures are strong and can withstand heavy loads, so you can place various heavy objects on them and not be afraid that they will break the shelves.
Dressing room on the attic floor
Design variations of suspended shelves
Wall shelves
Wall shelves
Can be open or closed. With or without back wall. Most often, a metal corner and a wooden base are used to make such structures. Suspended on the walls with anchors. The type of fastening can be permanent or dismantled.
Ceiling hanging shelves
Ceiling hanging shelves
These structures are made of a metal corner, a wooden base, and a special cable or a metal round profile attached to special anchors is used as the side walls.
These shelves are hung on special hooks driven or welded into the ceiling beams. The advantages of ceiling shelves are quick dismantling if necessary. Disadvantages - rather shaky design, which can sway when touched.
It is not recommended to store expensive tools or fragile items on such shelves.
Shelf in the form of a shield for tools
Shield shelf
This design is equipped with small shelves for storing small items and special hanging fittings. The shield consists of a strong back wall, fixed to the wall with anchors. Shelves, special hooks or tool holders are mounted on the wall.
This shelf is very convenient for carpentry and plumbing work. Most often, such a shield is hung in front of the workbench so that all the necessary tools are at hand. Sometimes the shield is equipped with additional lighting in the form of a lamp on a movable leg.
What materials and tools will be needed?
- Pine beams. For the construction of the frame, beams of 40x40 millimeters are suitable, and for doors you need to select beams of a smaller thickness.
- Metal corner. It will be needed to fix the wooden parts.
- Chipboard sheets. The thickness of the sheets directly depends on the future load on the shelf.
- Furniture fittings. Little attention is paid to it, which is in vain, because the service life and appearance of the structure depend on the quality of the fittings. Hinges, latches, locks and handles for the cabinet must be made of metal that is resistant to corrosion.
- Nails. They will need to be used to connect wood elements.
- Several strips of lining (its number and thickness will depend on the choice of shape and design of the structure).
- Construction tape, pencil, level, screwdriver, hammer, hacksaw and hammer drill.
Creating such furniture yourself is a simple but labor-intensive process.
Decide on a design.
Wall shelf made of MDF and glass
Wall shelf with glass doors
Making an ordinary hanging shelf with glass doors is not difficult, the main thing is to choose the right material and fasteners to securely fix the structure. The shelf length is 110 cm, height - 30 cm, depth - 27 cm.
Tools for work
- Drill
- Screwdriver.
- Jigsaw for cutting MDF sheets yourself.
- Iron for fixing edges.
- Stationery knife,
- Level.
- Metal long ruler and pencil.
- Materials
- MDF board. It is advisable to purchase material with double-sided lamination, 16 mm thick.
- Edge for finishing the ends of MDF boards. You can purchase a plastic version that is attached to the ends by tension.
- Two glass sheets measuring 55 cm by 26.7 cm. The glass on the edges must be treated so that the shelf can be used safely.
- Plastic tracks for glass along which the panels will move.
- Sandpaper.
- Self-tapping screws for mounting the shelf structure.
- Small nails for attaching glass tracks.
- Dowels for fixing the shelf to the wall.
- Hanging brackets.
Shelf with glass doors
Slab cutting
To ensure that the edges remain intact and without chips, it is advisable to cut them in a workshop on special machines. If such processing is not possible, then a jigsaw is used for cutting.
The MDF board is cut into the following parts:
- lid;
- bottom (110 cm by 27 cm);
- side panels, 2 pieces (26.7 cm by 27 cm);
- back wall (110 cm by 30 cm).
To make the shelf construction lighter, you can use a thinner laminated fiberboard sheet for the back wall. But, as often happens, it is quite difficult to choose a single color for materials. Therefore, it is best to make the back wall from the same materials from which the rest of the structural parts are made.
Laminated fiberboard sheet
After the shelf parts are cut, the ends need to be processed. To do this, use an iron to glue an adhesive edge or simply attach plastic analogues tightly.
Assembly of the structure
Side panels are attached to the lid and bottom. If the fasteners are made using self-tapping screws, then there is no need to drill holes in the ends. If parts are assembled using screws, then the diameter of the drill should be less than the diameter of the fastener.
Before driving the screws, you can pour a drop of white glue into the holes. This will improve the strength of the structure. It is advisable to recess the caps of fastening fittings into the material by several mm. This will allow you to hide the holes with special plugs or fill them with putty.
Then the back wall is attached to self-tapping screws or self-tapping screws. Brackets for hanging the shelf are attached to the rear side ends.
The last stage of work is attaching plastic tracks for glass and installing the glass itself. The tracks are nailed to the bottom and lid of the shelf with small nails, step -10 cm. The glass should slide freely along the tracks.
The shelf is hung on dowels, which are pre-drilled into the wall
It is important that the distance between the fasteners on the wall matches the distance between the brackets on the shelf
Shelf bracket
A shelf without glass is hung, the panels are inserted into the structure already on the wall. It is also recommended to check the suspended structure for strength and safety: you can forcefully pull the top cover of the shelf towards you or place several heavy objects on it.
A well-fixed and correctly assembled structure should withstand preliminary inspection.
Smell
Use hardwood. Having made a choice in favor of coniferous species, buy timber harvested in winter and brought from the northern regions of the country. This is a material with higher density. Fir wood has a beautiful texture, color and no resin pockets, which cannot be said about all types of pine trees. A tree with a strong aroma, such as some types of fir have, will negate efforts to improve the steam room. Resinous types will create a wonderful “woody” smell in the sauna, which will promote relaxation. Please note that if the pine wood has not undergone special treatment (resin removal), under the influence of hot air the resin will come out. When work on the steam room is completed, heat the steam room harder for an hour, scrape off the resin released from the resin pockets from the shelves. Repeat the action several times.
After completing the construction of the bath beds, they need to be impregnated with a protective solution.
DIY tool shelf
Homemade tool shield
In order to have all the small tools at hand during plumbing or carpentry work, you can think over and make a special shield. Shield shelves are not distinguished by their high load-carrying capacity and strength; heavy tools cannot be stored on them, but for small and necessary things that always get lost, this design will be ideal.
It is important to know!
- It is advisable to hang a shelf with a tool on a plastered wall, otherwise condensation will accumulate between the brick or block surface and the wall of the shelf. Constant high humidity will negatively affect the shield material and can cause it to deform or rot.
- The average load per square meter of the shield surface should not exceed 14 kg. Weighting the structure will lead to rapid destruction.
- The height of the shield is determined by the height of the garage owner. The top edge of the shelf should not be higher than human height. Otherwise, it will be inconvenient to take tools from the shield.
- If shelves are designed on the shield, it is not advisable to make them closed. This will also make the job more difficult. All small tools and parts must be in the public domain.
How to make a shield with your own hands
Shield with tool
Materials and tools
- Plywood board or chipboard, the thickness of the material should be more than 2 cm.
- Anchors for fixing the structure.
- Material for shelves.
- Brackets for fixing the shelf on the wall.
- Hooks for storing tools.
- Self-tapping screws for assembling open shelves.
- A hammer drill with a drill for drilling holes in the wall.
- Screwdriver.
- Level.
- Roulette.
- Drill.
- Jigsaw.
Step 1. First you need to select the dimensions of the shield. Most often, such a shelf is fixed in front of a workbench, behind which a person is engaged in repair work. It is desirable that the width of the shield is not much larger than the dimensions of the workbench.
Step 2. Then a shield is cut out of plywood or other material. Places for small shelves are immediately marked on it.
Step 3. Then, using a jigsaw, the shelves with side walls are cut out. The side walls of the shelves can be made the same size as the length of the shield. Next, using long self-tapping screws, the shelf structure is assembled and attached to the surface of the shield. A place for storing jars and boxes with nails and other small things is ready.
Tool shield
Step 4. Attaching hooks. To do this, holes are drilled in the shield and dowels are driven into them and special threaded hooks are screwed in. It is advisable to think in advance where and what kind of tool will be located. Based on this, the hooks are drilled.
Lugs or brackets are then attached to the back wall to secure the shelf to the wall. The last stage is mounting the shelf on the wall. Holes are drilled using a hammer drill and anchors are driven into them. If the shelf is fastened “tightly”, then you can strengthen the fixation of the structure using a special washer, which will prevent the eyes from sliding off the anchor.
A simple and convenient shield for tools and parts is ready. If you have all the tools and materials, you can make it in a few hours.
What you need to know about linden wood?
Let's start with the fact that linden is a hardwood tree, and they are used in the steam room of a bathhouse solely because they do not contain resin. At the same time, as is known, resin makes wood more resistant to water and rot.
Some hardwoods are more resistant to decay (that is, damage by fungi that process wood), others less so.
ATTENTION! Linden occupies the lowest position on the durability scale; its durability is equal to one, that is, there are simply no less resistant species.
This instability is also associated with the hardness of the rock. The harder it is, the denser its fibers, the more stable it is. Linden is a soft wood; it is often used for ornamental work precisely because of its ease of processing.
And no matter what they tell you that there are harder types of linden, the difference will not be great. By the way, it’s true, there are two types of linden , one of which is a little better in characteristics, but linden remains a linden and does not turn into oak (in terms of quality). Therefore, it is not so important whether Caucasian or from another region.
Now comes the fun part. Some time ago, we, like the majority, firmly believed that linden has a unique property - when moistened, it does not change its size . This is very important for doors and windows. And then it’s time to look at the tables, which provide data on the coefficients of swelling and shrinkage.
And what happened? That the same cedar changes its dimensions significantly less, and even aspen’s performance is a little better. So it turns out that this is a myth? But here we again think about what made it so tenacious? If the doors no longer fit into the openings, then such an experience should eventually reduce to zero the number of people who want to see this for themselves.
And fake doors are in constant demand. Therefore, if it swells within acceptable limits, it can be used. But then other breeds are also suitable.
If we talk about shelves for a bathhouse made of linden, then there is no reason to doubt - they can be made. And they will behave well, especially if you show a little care. Linden can indeed rot easily, but if the bath is not dried, then larch will not last long.
Notice how the shelves are protected from rotting from the floor
So, firstly, drying, and secondly, impregnation (a separate article is devoted to material with industrial impregnation) , but more on that a little later.
In the meantime, we recommend that those interested in a more in-depth study of the subject read the article, where we consider the various properties of wood specifically for shelves.
We also have an article about the types of lumber used to create shelves. Also a useful and informative text.
If you have not yet decided what design your shelves should be, you can read about it here.
The size of the shelves is also an important issue, which is discussed in detail in this article.
Yes, and in most of the articles mentioned here there are fragments dedicated specifically to linden. You might get a better picture by reading them all.
Floor to ceiling shelf parts list
| Design on the diagram | ||||
| Designation | Detail | Material | Quantity | Size, inch |
| A | Upper and lower | strapping bars 2×4 ??? | 6 | 59 ½ |
| IN | Support posts | timber 2×4 | 6 | 91 ½ |
| WITH | Side panel | oak plywood ½ inch | 1 | 95 ¾ x 13 |
| D | Top, bottom panels | oak plywood ½ inch | 4 | 27 ¼ x 13 |
| E | Int. panels for fastening shelves | oak plywood ½ inch | 8 | 44 7/8 x 13 |
| F | Stationary shelves | ¾ inch oak plywood | 2 | 27 ¼ x 13 |
| G | Height-adjustable shelves | oak plywood ¼ inch | 8 | 26 1/8 x 11 1/8 |
| N | Vertical elements of the front frame | oak, 1x4 | 28 linear feet | |
| 1 | Upper trim and center frame of the front frame | oak, 1x3 | 10 linear feet | |
| J | Shelf cover | oak, 1x2 | 18 linear feet |
Shelf sizes and shapes
In the process of designing shelves for a bath, it is necessary to adhere to established standards and correctly observe key linear parameters. The values recommended below will allow you to get the most comfortable shelves to use, organically fitting into the space of even a small steam room.
In terms of shelf width, the most popular variations are:
- 40 cm is a fairly narrow seat, the use of which would be appropriate in a small steam room. If there is sufficient space, it is recommended to give preference to more impressive values;
- 60 cm – medium-sized shelf;
- 90 cm is a standard and very convenient option. You can sit comfortably on such a shelf with your legs bent;
- 150 cm is a wide shelf that allows you not only to sit, but also to lie with your legs bent.
If there is sufficient space in the steam room, the size of the shelves can be increased at your discretion.
The width of the top row of shelves is 70 cm, allowing one person to lie comfortably on the shelf
The width of the bottom row of shelves in the sauna is 50 cm
The side shelves serve as a stand for bowls, basins or for placement in the steam room in a sitting position. Width of side shelves – 40 cm
More detailed information regarding the dimensions of the components of the bath shelves is discussed in the following image.
Recommended dimensions of bath shelves
Regarding the installation height of the elements, the recommendations are as follows:
- 1.1-1.2 m - professionals advise trying to maintain this distance between the bottom step and the second shelf;
- 40-60 cm is the optimal gap between the 1st and 2nd shelves;
- 20 cm - this distance between the floor surface and the bottom step is the minimum acceptable;
- 1.5-1.8 m is the minimum recommended shelf length.
The height of the lower level of the shelves from the floor is 45 cm
The height of the second (upper) level of the shelves is 88 cm from the floor, or 43 cm from the lower level of the steam room shelves, or 120 cm from the ceiling of the sauna or bathhouse steam room
The dimensions of the back of the shelves are adjusted to the height of people from 160 to 185 cm
The height of the sauna from the ceiling is 208 cm
The following image schematically shows the recommended shelf sizes and distances between different surfaces and elements.
Recommended shelf sizes and distances between different surfaces and elements
Additionally, bath shelves are classified according to their design features. There are 3 main options, each of which you can find in the following table.
Table. Bathroom shelf configuration options
| Variety of shelves for baths | Description |
Stepped shelves | It occurs more often than others. With this design, the shelves are mounted on one wall and arranged in steps. In this case, it will be the “coldest” on the bottom shelf, and the hottest on the top - heated air masses, as is known, are displaced by cold air and rush upward. |
Corner shelves | The best option to save money and make the most efficient use of available space. The shelves are arranged in such a way that the upper and lower ones are adjacent to one wall, and the intermediate part of the structure is arranged on an adjacent wall. |
| Shelves-"compartment" | Arranging shelves in this configuration allows you to save some space in the steam room. The principle is simple: when not needed, the upper tier rises to the wall, like a shelf in a train compartment, and if it becomes necessary to use it, it can just as easily be lowered back. |
An example of a folding shelf in a bathhouse
Step-by-step instruction
Step 1 – creating the frame.
You need to use pine beams. First you need to make the rear frame. Horizontal bars are attached to vertical bars in increments of 60 centimeters. You can use regular nails to join wood. The frame must be attached to the balcony wall with anchors. After this, you can attach the strips to the rear frame (the length is equal to the future depth of the cabinet).
It cannot be compared with the monotonous furniture that is presented in stores and hypermarkets.
In addition, the lining is fragile, so you need to work with it carefully.
Step 2 – covering the inner wall of the frame.
For the back of the cabinet frame, it is better to use a sheet of chipboard. He will be a reliable wall. It is attached to the back wall using ordinary self-tapping screws. If you have a construction stapler at home, you can use that too.
However, by taking a little time, you can build a spacious, functional and original cabinet from lining for household items.
The material does not tolerate temperature changes.
Step 3 – installation of shelves on the frame.
You just need to cut out suitable size chipboard sheets and install them on horizontal wooden guides.
Before you begin the actual production and installation of lining furniture, you need to prepare.
However, there is one condition - such a cabinet can only be used in a glassed room.
Step 4 – making the door.
The design of the furniture and its functionality will largely depend on the quality of the door made. To assemble the door, you first need to prepare the frame. To do this, we take thin beams and fasten the frame to the required height and width. To make the frame strong, we use a diagonal jumper. After this, the frame can be sheathed with clapboard. We fasten it using ordinary nails. Next, we complete the canvas with locks, hinges and handles, and then attach it to the cabinet itself.
Choose a location. Everything is simple here, because the balconies have special niches for installing built-in wardrobes.
It is better to make it from cheap lining.
Correct height of bath ceilings
When determining it, experts take into account several important points:
- dimensions of the shelves - the longer and wider they are, the greater the distance between them should be;
- warm-up time and fuel consumption - the smaller the room, the smaller it is;
- sunbeds installed in 2-3 levels make it possible to choose your own relaxation conditions: heat lovers can sit on the last tier, beginners can sit on the first;
- the minimum distance from the upper shelves to the ceilings must be 110 cm (according to SNiP), otherwise it will simply be uncomfortable and even unsafe to sit on them.
Most of the above rules were derived experimentally, but absolutely each of them was tested in practice. Therefore, when today we talk about the correct height of the ceiling in a bathhouse from the floor, the standard of 2.2-2.4 meters takes into account all the recommendations - you can safely rely on it.
Basic standards and principles for calculation
Calculations are carried out by professionals using a simple formula: take the standard height of a person with his arms raised up and add 50 cm to it. The result will be a figure of 2.1-2.6 m, which in practice was reduced to 2.2-2.4 m .
Three reasons why you should not reduce the standard value to 2.1 m:
- mixing air in such a volume risks being too harsh and causing you discomfort during bathing procedures;
- due to the nature of the distribution of heated masses in a low room, your head will be warm and your feet will be comparatively cool, which will also not add to the comfort of sensations;
- It is problematic to achieve proper lighting, ventilation and humidity conditions.
Raising it higher than 2.6 m is irrational from an economic point of view. In this case, heating costs will increase, but part of the heat will simply be spent uselessly - it will go nowhere.