Advantages and weaknesses
Slow-burning wood-burning stoves significantly outperformed outdated designs, which had the following indicators:
- low efficiency, not exceeding 85% under good conditions;
- constant presence of a person to control combustion and lining the material every 3-4 hours;
- impossibility of automating various processes, etc.
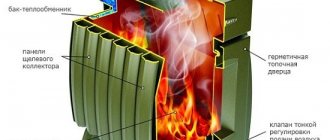
The main advantage of the structures will be that the combustion process will change. Since the access of oxygen is limited, the firewood only smolders. During the process, pyrolysis gas is released, which subsequently burns in a remote chamber, increasing efficiency by 15-20%. As a result, instead of 4 hours, the lining of firewood occurs after 8-9 hours. Also, one should not forget about the automation of the combustion process.
Materials
Do-it-yourself building materials for the construction of a long-burning rocket stove are selected depending on the calorific value of the fuel. For laying the main part of the building, simple red stove bricks are usually used. The firebox and combustion bunker are lined with fireclay bricks.
If you plan to use high-calorie fuel (for example, coal), then refractory bricks are used for the construction of almost all parts of the structure. The masonry elements are fastened with an aqueous solution of a mixture of sand and clay.
Regardless of the type of design for a long-burning rocket stove, you will need to buy stove accessories:
- blower;
- grates;
- firebox doors;
- intermediate cap;
- chimney pipe.
The mechanism of operation of the stove, taking into account the design
Projects have been developed that allow you to build a long-burning stove even at home. Despite the abundance of design solutions, the principle of operation will be the same for all. For more economical and high-quality fuel consumption, it is necessary to understand the features of the pyrolysis reaction. Most of the heat is generated due to the combustion of gases that are released through smoldering logs. First, the fuel gets very hot, then the oxygen supply is automatically limited.
Attempts to convert a conventional oven into a pyrolysis oven will not be successful.
Efficient designs are completely sealed, while traditional devices release all combustible gases through the chimney without any effect. In addition, the pyrolysis furnace can be equipped with water cooling circuits, which makes it a full-fledged boiler with an integral heating system.
Installing a heating device - important rules
For the installation to operate safely, certain rules must be followed:
- It is prohibited to place combustible and flammable objects within the warming-up distance;
- we make the chimney dismountable for cleaning;
- Before use, we carry out a test to select the optimal mode.
The diameter of the chimney exhaust pipe is about 15 cm.
For the chimney exhaust we use a pipe with a diameter of 150 mm and a length of 5 m. With a smaller cross-section, smoke will not be removed well; with a larger cross-section, excess draft will appear. We install an adjustable damper on the chimney. Accumulated condensate must be removed periodically. If the chimney is not dismountable, doors are made in it for cleaning. Excessive formation of condensation can be prevented by constructing a chimney using the sandwich principle. Between two pipes of different diameters we place a layer of glass wool for insulation. We cover the top of the chimney pipe with a deflector to prevent rain, snow, and wind from blowing in.
In a house where there are children, we line the stove with bricks. The masonry around plays the role of a protective screen, so as not to get burned if you accidentally touch it, and protects objects and walls from overheating. It also serves as a good heat accumulator. The brick will accumulate heat and release it much more slowly than the iron body. We arrange the foundation if the floor under the stove is made of flammable materials. It is not necessary to deepen it too much; the weight of the heating device is light.
Features of the construction of a long-burning furnace
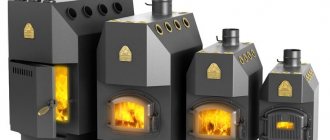
To build an upper combustion furnace with your own hands, you do not need special knowledge. There are two options for constructing the structure, taking into account the material used - metal or brick. To make a metal stove yourself, you must have:
- The basis. A barrel with a volume of up to 200 liters is best. A sheet of steel, an unnecessary gas cylinder or an ordinary piece of pipe will do.
- Materials for stability, including reinforcement, channels, etc.
- 2 circles of the same diameter as the barrel (or other base). Metal thinner than 5 mm is not allowed.
- The door. Make it yourself or purchase a factory one.
- Pipe 100 mm and 150 mm for the base and chimney.
Review of brick kilns
The most popular and time-tested basic designs are widely used by stove makers: they make small adjustments to them, adjusting the size and functionality to the customer’s wishes. However, the principle of their operation remains the same, so all brick stoves can be divided into several groups.
Video: DIY masonry master class
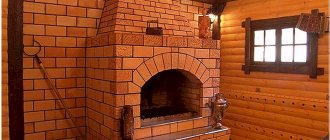
Russian stove
Russian stove
It is distinguished by its massiveness, large dimensions and wide functionality . It consists of an open firebox, which in some cases is closed with a damper, as well as long smoke channels running along all the walls of the stove and heating them well. Sometimes a Russian stove is equipped with another firebox with a hob.
The Russian stove, in addition to heating, allows you to:
- prepare a variety of foods - boil, fry, stew, bake;
- dry clothes and shoes;
- warm a bed or bed used for sleeping and resting.
The efficiency of the Russian stove is not too high - up to 60%, in addition, its firebox requires certain skills. Moreover, it is necessary to heat a Russian stove regularly in winter, avoiding interruptions and cooling the body of the stove. With periodic heating, condensation forms in a cooled stove, the brick absorbs it and cracks the next time it cools and freezes.
In the summer, the Russian stove is heated regularly or periodically for cooking, while using the “summer” mode, directing the smoke using a damper directly into the chimney. The body of the stove does not heat up.
Advantages of the Russian stove:
- multifunctional, solves a whole range of problems;
- with regular heating in the cold season, it creates an even microclimate in the house without temperature fluctuations;
- decorates the house and gives it a unique national flavor.
Flaws:
- large weight and dimensions - requires the construction of a massive foundation;
- large volume of materials for masonry, high cost of construction;
- complex maintenance, the need to regularly clean the ducts and chimney with your own hands;
- not very high efficiency.
It is advisable to build a Russian stove in a house for permanent residence, if there is free space and financial capabilities.
Dutch
Dutch oven
The Dutch oven is a fairly popular design of heating stoves; sometimes they are equipped with a hob. This is a channel-type stove - to effectively heat the walls, it is equipped with smoke channels with a vertical arrangement. Passing through them, the smoke completely burns out and transfers heat to the brick.
The design feature of the Dutch oven is its small footprint, which makes it popular among summer residents and owners of small houses. Moreover, the stove can be made to any height, so it can successfully heat two floors. The shape of the stove also varies from square and rectangular to round, but in any case its height is much greater than its width, so the Dutch stove is often compared to a column.
Advantages of the “Dutch”:
- savings on space and materials - it requires two to three times less bricks than a Russian stove, and the cost of its construction is significantly lower, it can be easily folded with your own hands;
- The Dutch oven has rather thin walls and warms up quickly;
- it can be heated after long breaks, immediately bringing it to full power;
- with modest dimensions, the “Dutch” can heat a house with an area of up to 70 square meters.
However, it also has disadvantages:
- Its efficiency is low - about 40%;
- the optimal operating mode is smoldering, which is why the “Dutch stove” is sometimes called a long-burning brick stove;
- to ensure good draft, cleaning the stove from ash and soot should be done regularly;
- If you don’t close the view after firing, the stove instantly cools down, so it requires close attention and skill in heating.
A Dutch oven is perfect for heating a cottage or small house, including those with a second or attic floor, and it can be equipped with a stove, oven or water tank.
Swedish
Swedish oven
The Swedish stove has a more versatile design compared to the Dutch stove, and its efficiency is much higher despite its compact size. A standard Swedish stove is multifunctional; it has a hob, an oven, and two niches for drying shoes and clothes, and some craftsmen complement the Swedish stove with a fireplace or a bed.
This is a duct-type stove, which also implements the principle of a bell-type stove - combustion of flue gases under the roof of the firebox. The stove effectively heats two adjacent rooms, usually a kitchen and a room; a Swede cannot cope with heating a large house.
Advantages of the “Swedish”:
- fast warm-up;
- efficient fuel combustion;
- the special design of the channels allows the lower part of the stove to be heated, making the floors warm;
- the ability to prepare various dishes;
- in the niches located on top it is convenient to dry vegetables, fruits and berries, as well as reheat food;
- You can also dry clothes and shoes in them;
- If desired, you can build a heat exchanger into the stove and heat water for household needs.
Disadvantages of the "Swedish":
- for laying highly heated elements, it is necessary to use fireclay bricks, which increases the cost of its construction;
- to avoid heat loss through the lower part of the stove, you need to make good thermal insulation;
- It is not recommended to completely cool the stove in the cold season, since igniting a cold, damp stove leads to gradual destruction of the masonry.
The Swede is suitable for small houses with permanent residence or as an additional source of heat in houses with water heating.
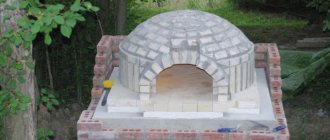
Bell-shaped
Photo: bell furnace
One of the most modern developments is bell-type furnaces. Their difference is the ability to heat up evenly from all sides and retain heat for a long time. Unlike ducted stoves, bell-type or dome stoves do not have winding, narrow channels, so they are no less susceptible to the deposition of solid particles and narrowing of the chimney.
The principle of their operation is as follows: smoke from the firebox rises up, under the hood, where it lingers until it cools, after which it descends down the walls, heating them. The stove can have a whole cascade of hoods in which the smoke gradually cools, so the efficiency of such stoves is very high.
Advantages of bell-type furnaces:
- simple design and small amount of material required for masonry, low price;
- the stove can be heated from a cold state, while it quickly heats all adjacent rooms;
- if you forget to close the damper, the stove will not cool down like a Dutch oven, thanks to the so-called gas view, which prevents reverse draft;
- if desired, it can be equipped with a hob and heat exchanger;
- Even a novice stove maker can build such a stove with his own hands.
This stove has virtually no disadvantages, which is why it is very popular among summer residents and owners of country houses.
Bell-type stoves are an excellent choice for a summer house, country house, or cottage. Thanks to any possible number of cascades, it can heat several rooms at once, including on two floors.
Stages of building a metal furnace
- The base should be without a top, so it needs to be sawed off with a grinder. If you use a gas cylinder, for safety reasons it is necessary to fill it with water before finishing work. The seam should be as even as possible, since both parts will still be needed.
- Steel of at least 5 mm thickness is welded to the bottom of the metal base. The square will be more stable, which can also be achieved by attaching legs from channels or reinforcement.
- The clamping mechanism is cut from a piece of steel and pipe. The diameter of the circle must be made smaller than the barrel itself. A hole about 10 mm in diameter is left in the middle. A pipe is attached to it so that it protrudes from the top of the barrel by approximately 15 cm.
- On the other side of the circle, reinforcement in the form of a cross is placed. This will serve to compress the fuel being used.
- In the cut off lid you need to make a place for the pipe. It should fit in there freely, but not have large holes.
- A small hole is made at the bottom of the base where the door is attached. It will be used to remove ash.
- A chimney is attached at the top. Its length should be slightly larger than the cross section of the base.
A long-burning heating stove is economical and requires attention, so it is advisable to start the operation process with a test fire. It is important not to install the device near walls or other objects. During operation, the stove becomes very hot, so it is not recommended to store flammable substances near it. You also need to think through the process of cleaning the chimney in advance, or better yet, make it collapsible.
Self-production
In order to make a heating device, use any of the available materials:
- refractory brick;
- cast iron;
- steel.
Long-burning stoves made of brick are rare, since this material will not provide the longest possible smoldering process. Depending on the design of the stove, the craftsmen try to achieve the longest fuel combustion possible, up to 12 hours. This factor depends on the amount of oxygen in the combustion chamber - the less it is, the longer the smoldering process.
Homemade long-burning stoves are suitable for heating small country houses and village houses.
Requirements for the work site
To create a long-burning stove, you will need to make your own boiler. Think over and arrange your workplace. The master will need:
- access to the electrical network;
- dry storage room for storing tools and materials;
- free space for work.
In warm sunny weather, work is carried out in the fresh air. It is based on a schematic image (drawing) for the future boiler.
Schemes, necessary tools and materials
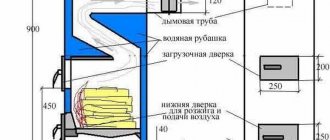
To create a high-performance, long-burning solid fuel boiler with your own hands, you need to have some knowledge of how the heating system works. It consists of three parts:
- the area into which fuel is loaded;
- the area where burning and smoldering occurs;
- smoke exhaust area.
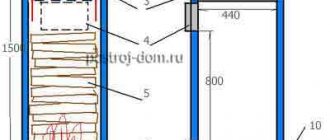
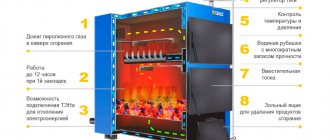
The design of a long-burning furnace is simple, the diagram is presented below. Please note that there is an air supply regulator at the top. The better this element is made, the longer the smoldering process takes place.
The design of the furnace may look different:
According to the presented diagrams, we will draw up a drawing of a long-burning furnace on paper and get to work. Tools you will need:
- hammer;
- axe;
- electric welding machine;
- grinder (autogen);
- roulette;
- level;
- black marker.
The materials we use are:
- as a base - a barrel made of steel or cast iron with a volume of 200 liters without visible damage;
- channels or metal scraps for the legs of a solid fuel stove;
- steel sheet, 5 mm thick - at least 1 m2;
- door for the combustion chamber;
- metal pipe, 100 mm in diameter, 15 cm higher than the barrel.
The chimney is made from a pipe with a diameter of 150 mm. If there is no barrel, it is replaced with a gas cylinder. The base of a stove for a long-burning wood-burning cottage is also made of sheet steel. The thicker the base wall, the longer the service life of the equipment.
The fuel used for such a furnace is:
- firewood;
- coal;
- sawdust and other solid fuels.
The wood stove needs to be cleaned twice a week, leaving a small amount of ash at the bottom. This will protect the bottom from burning out.
Step-by-step instruction
Step 1. A long-burning wood stove is made from a readily available metal cylinder that has a bottom but no lid. If a gas cylinder is used, first remove the upper part with a grinder or autogen. The cut level is drawn in advance so that the top is even.
Be careful when cutting the gas cylinder. Before doing this, you need to unscrew the valve and fill the container with water.
If a long-burning wood-burning stove is made of a sheet of steel, then it is not necessary to weld the structure in the form of a cylinder. The cube shape in this case looks more advantageous and will be more stable. If you like a cylindrical long-burning wood stove, limit its height to 1 meter.
Step 2. A pressure circle is made from a sheet of steel. The diameter of the circle should be slightly smaller than the diameter of the cylinder (by 2 centimeters). A circle is cut out in the middle according to the diameter of the pipe (100 mm). It is inserted into the hole and welded. The pressure circle must have free movement, and on the inside it is necessary to weld an impeller or channel in the form of a cross.
Step 3. In the lower part of the base of the structure from which the wood-burning stove for the home is made, a small hole is cut out through which it will be convenient to remove the remaining ash. Having cut the door to size and fastened the hinges, we make the door.
Step 4. Using this principle, a hatch is cut for loading fuel.
Step 5. A long-burning solid fuel stove has a chimney, which is made of a pipe with a diameter of 10 cm. Achieve a strictly horizontal position.
Step 6. The boiler lid is cut from a sheet of steel. A 10 cm hole is made in it for the air distributor. It is important that all parts have a tight fit - this will ensure maximum performance, since oxygen flow will be minimal.
Homemade long-burning stove from a gas cylinder
A homemade long-burning wood-burning stove has a simple design, and can be easily improved if desired. A solid fuel stove runs on coal, wood and other fuels. It is important to pack it as tightly as possible into the combustion chamber.
The principle of operation of the boiler is simple: by opening the top cover and removing the air regulator, the owner fills the container with firewood, coal, peat or other combustion products. Lighter fluid is often used to speed up the process. The cover is put in place, the fuel is ignited. At this moment the air damper opens. When the fuel is smoldering, you need to close the damper and enjoy the warmth. Before burning a full tank of fuel, the process is repeated.
Sometimes you can hear the name “top combustion furnace” in relation to this design. The air regulator pipe will gradually decrease into the boiler during operation of the heating system. This indicator will allow you to estimate the amount of fuel in the boiler.
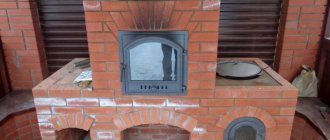
Homemade brick ovens
Long-burning brick stoves are not difficult to build yourself. If you take the issue seriously, you can also cook lunch in such a stove. Brick quickly releases heat, making the room warm. Cooking stoves are still common in the suburbs where people live permanently. This type of long-burning design is rarely used for summer cottages.
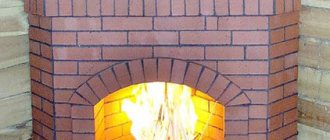
An important disadvantage of brick is its rapid cooling. Externally, a long-burning brick stove is no different from a classic Russian stove, but the internal structure of the structure is more complicated, due to which the heat is retained longer.
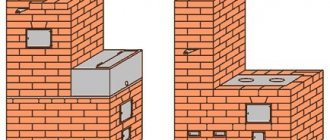
The diagram indicates the presence of a shaft in the furnace leading to the intermediate hood. Gases burn out in it - this is a mandatory requirement for a long-burning stove. It is difficult to do it yourself without special skills - you will need the help of a professional stove maker.
Brick is a heavy material. This is an additional disadvantage of the future design. Install it on the prepared base. Before a long-burning brick stove is built, we must make a foundation. Ready-made country houses rarely provide for the possibility of erecting such a foundation. The steel stove design shown above is perfect for a summer residence. Long-burning wood-burning stoves made of brick are best used for homes where permanent residence is planned.
Brick wood stoves for heating are demanding in terms of foundation construction: 50 cm underground and another 10 centimeters above its base. Additionally, on each side, the space is increased by 5 cm so that the design
How to make a long-burning stove from brick?
Externally, homemade designs are no different from conventional devices, since the main features are located inside. Construction begins from the foundation, which acts in the form of a pit about 70 cm deep and is larger in size than the stove by 10 cm on each side. A bitumen-based waterproofing is laid on the bottom, and a layer of crushed stone or broken brick is poured on top.
After this, you can begin laying the material. The solution is made from cement and sand at a ratio of 1:3. It is important to use only hardened brick, because it will be affected by temperature changes, dampness and other negative factors. Further, during the laying process, you should follow the order plan of the furnace, do not deviate from the drawing, and use measuring instruments to eliminate unevenness. The design diagram contains many additional metal elements: doors, valves, flaps, grates, etc. They must be installed exactly according to the drawing, having previously left corresponding blanks for them in the walls.
We assemble it ourselves - sequence of actions
It is most convenient to use a barrel or gas cylinder. We carefully cut off the top of them - the material will come in handy later. We first unscrew the valve in the cylinder, drain the remaining gas and leave it for several days until the smell of gas ceases. We cut out a place in the body to attach a sealed door through which the ash is removed. We cut out a circle from 5 mm metal, the diameter is slightly smaller than the inner part.
We weld a pipe in the middle for supplying oxygen. In the lower position, it should protrude 15 cm above the surface of the heating device. We weld 6 blades 5 cm high from below at a certain angle. For a model based on a gas cylinder, we use the upper part of the body, where we cut out a place for the pipe, and use a lid in the barrel for these purposes. The air supply pipe must move freely up and down. We weld legs to the bottom of the body for stability. We cut a round hole on the side of the upper part and attach a 150 mm pipe to remove smoke.
It is more difficult to make a unit from sheet iron. Accuracy in calculations and marking of all parts is required, cutting and welding. It is almost impossible to make a round-shaped device at home without special rollers for bending metal, of course, unless thin sheet metal is used, which is irrational. If it is not possible to curl the sheets, the solution would be to make a rectangular oven. A possible option is shown in the drawing.
In appearance, it resembles the well-known potbelly stove, but changes have been made to the design to increase efficiency. The main changes concern the blower. It is made of an 80 mm pipe like the letter L, but for simplicity it can be made straight. On the threaded pipe we drill holes with a diameter of 6–8 mm. We install a blind plug on the thread, turning it along the thread to regulate the combustion with great precision.
We determine the correct supply of oxygen by the hot spot on the chimney - at first it should be further away from the stove, and over time it gradually moves towards it.
A potbelly stove becomes hot during operation, so it is used not only as a heating device, but also as a cooking stove. On the outside sides we install the screen at a distance of 50 mm from the walls. There is no need to weld the ribs - the unit works effectively with a hot interior. The screen serves to protect the room from infrared rays and prevents overheating of the room. It reflects at least half of them, maintaining the optimal temperature in the heating device.