A brick stove is a time-tested way to warm up a room during the cold season and keep it warm. It is suitable both for heating a home for permanent residence, and for a summer cottage, which is visited once or twice a month. The structure of the hob and oven allows you to combine the functions of heating and a heat source for cooking in the oven. Although today more and more remote settlements are being supplied with gas, the problem of general availability of blue fuel is still acute. Even in the Moscow region, many gardening partnerships and detached estates and farms are located far from gas mains.
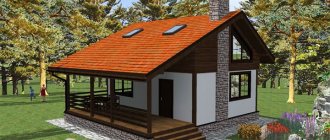
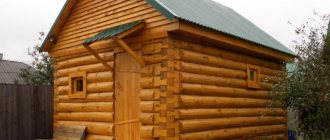
Building a brick stove with your own hands means solving the heating problem in the house using a well-proven method at the lowest cost. There are also situations when even the presence of gas on the site still does not make a brick stove a useless anachronism. This means a bathhouse. Unlike a Finnish sauna, which can be electric, a Russian bath must have a stove, and a brick stove is the traditional option, which is only recognized by convinced, consistent adherents of the art of bathing. Therefore, building a brick stove with your own hands will be useful on the farm, regardless of the conditions.
Laying a stove is not an easy task, but it is doable
In addition, there are fewer and fewer true master stove makers over time. Entrusting the installation of a stove to an untested specialist means risking not only finances, but also subsequent comfort and even fire safety. Isn't it better, in conditions of shortage, to temporarily retrain as a stove maker yourself? At the very least, you will only have yourself to blame for the mistakes you make.
Main types of stoves
Heating stove
The brick type of stove is designed for heating the house, cooking food, or for everything at once. To choose the appropriate option, you need to familiarize yourself with each variety.
Heating device
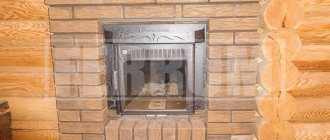
You can combine a heating stove with a fireplace or a single firebox to heat rooms. The structures can be built into interior partitions or perform a zoning function when installed in the center of the hall.
Heating type stoves are used as the main or additional heat source. Structures are most often used in the off-season or during the cold season. They are installed when there is a kitchen with a modern electric or gas stove, as well as in summer cottages.
Cooking modifications
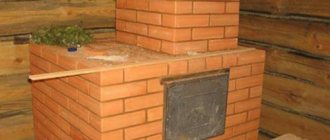
If you have knowledge and skills, it is easy to put together a hob that is designed for quick cooking or baking. The cast iron hob and back heat up quickly and accumulate heat for a long time, which allows the structure to be used for heating.
The peculiarity of the stove is its compact size, which is suitable for a summer house, a small kitchen in a private house. The device is also used when the electricity or gas supply is turned off.
Heating and cooking facilities
The advantage of this option is high-quality heating of several rooms, the ability to cook and boil water. Modifications with an oven are also used for baking, drying fruits, vegetables and herbs.
Cooking
Heating and cooking
Laying a heating and cooking stove in the case of do-it-yourself work involves its integration into the wall. The structure can be used as an independent load-bearing element - the tiles and firebox are directed towards the kitchen, and the rear part towards the living area. For an aesthetic appearance and decor of the room, the heating and cooking stove is equipped with a fireplace.
Summarizing
Having chosen a certain design of a brick kiln, you can calculate the material according to the masonry ordering scheme. Moreover the diagrams indicate in which places it is necessary to use fireclay (fire-resistant) bricks, and in which - ceramic. The drawing also describes all metal inclusions.
How much will a heating stove cost when to order it from a stove maker? A professional stove maker charges quite a lot for his services, but you don’t need a bad stove maker. Therefore, why don’t you try to build it yourself, as you can find many detailed drawings, diagrams, as well as practical recommendations for masonry.
Brick stove design
By design, there are several types of structures:
- Dutch. The Dutch channel is compact and easy to construct independently. Due to its low efficiency (40%), it is installed in a garage, country house, workshop and operated in smoldering or slow burning mode.
- Swedish. The chamber-channel Swede has an efficiency of about 60%, is compact and practical. The product requires careful selection of building materials.
- Russians. With an efficiency of 75%, they are the most difficult to work with. Only specialists should assemble these structures.
Dutch
Russian Swede
A Russian stove is often equipped in a bathhouse, residential building or two-story dacha.
Universal cooking and heating units are the most popular option in homes and cottages. They consist of an array with a firebox and air duct, a smoke outlet and a foundation.
Foundation
Foundation for the stove
The base for the stove must be laid separately from the general house foundation:
- due to the large weight of the structure, the soil sags more than under the walls of the building;
- the furnace unit has unstable linear dimensions due to heating;
- there must be a gap between the heating structure and the load-bearing walls to protect against fire;
- a separate foundation is easier to rebuild, modify and repair.
To make the foundation, rubble or brick is used, the binder is lime or cement.
It is impossible to fasten parts of the foundation with clay - it crumbles in a humid environment and cracks when heated.
Furnace array
The stove array consists of a firebox, body and smoke circuits. The optimal material for it is red solid brick. Refractory brick is suitable for lining. The body with the lining is not tied due to the difference in the thermal expansion of the elements. When constructing a furnace array, you must:
- tie stitches;
- soak red bricks for 10-15 minutes in water so that they do not take water from the solution;
- control the horizontality and diagonality of the row;
- fill the seams with mortar without excess;
- Wipe the inside of the chimney with a wash brush.
The construction of the furnace array is carried out with preliminary dry assembly. Fitting allows you to mark the structure relative to other elements of the room.
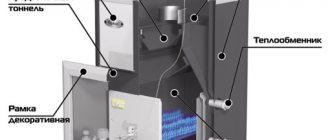
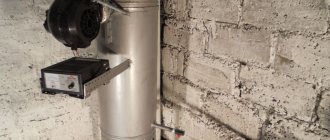
Pipe
Chimneys have a vertical arrangement and are distinguished by clear height and cross-section parameters. Depending on the location of the stove, the chimney can be:
- mounted - continues the structure in a straight position, located above the smoke vents and body;
- indigenous - you will need a separate foundation for the pipe, bring it to the stove using a sleeve in the corners;
- wall - the channel is located in the main wall of the house.
If the pipes protrude above the roof, they create an otter - an expansion structure that prevents the access of condensate. In the attic area, the chimney needs to be plastered and covered with whitewash - this makes it easier to find areas with leaks. A metal deflector (cap with legs) blocks rain and snow from entering the channel and acts as a spark arrester.
It is best to equip a country house with a small stove with a mounted smoke outlet.
Materials and devices
Brick
Kiln bricks differ from fireclay bricks; in some sources they are confused. Their common size is: building brick 250x125x65 mm, standard stove brick 230x114x40 mm . If you look at it, the stove brick is a high-quality M150, red. It is suitable for the construction of Russian and Dutch ovens. With a heat resistance of 800 ° C, it can also be used to make stones for the home, but it cools quickly and absorbs little heat, so it is used only for open fire sources where heating is not needed.
Fireclay bricks are used for the combustion chambers of furnaces with high thermal conditions: bathhouses, Swedish stoves, bell-type furnaces. Heat resistance - 1600 °C, which is enough for a home oven . Its high heat capacity makes it an excellent heat accumulator. But because of these features, the stove is not made entirely of fireclay bricks, otherwise it would quickly heat up and also cool quickly. On the outside, the masonry must be lined with ceramics, at least half a brick in size.
Fireclay clay from different deposits has different colors, but this does not affect the characteristics in any way and it is impossible to determine a quality product by appearance. The size and designations are no different from usual.
How to recognize a good brick:
- Fine-grained structure without pores or inclusions.
- When you tap a brick with a hammer, a good product has a ringing sound, while a bad product has a dull sound.
- If you drop a good brick from a height, it will shatter into large pieces, and a bad one into small pieces and dust.
When laying the internal openings of home stoves, clinker brick has proven itself well. It consists of ceramics and, despite its unprepossessing appearance, shows good heat resistance and strength . Clinker is cheaper than fireclay, but more expensive than red.
Sand
If you expect your stove to last 10 years without regular repairs, then you need to use mountain sand without impurities in the solution. Other types contain a large amount of organic matter, which leads to cracking of the seams. Clay sand is ground broken brick, the price is cheaper than mountain sand, and the quality of the masonry is in no way inferior.
Masonry mortars
When laying stoves for the home, clay and sand mortars are used. For chamotte, white kaolin and chamotte marl are used. With ceramic bricks - ground clay with refractory qualities (gray or blue Cambrian, gray kaolin). For 100 pcs. you need 40 kg of clay.
When buying clay, pay attention to the smell; if you smell it, this indicates impurities, which are not suitable for building a furnace. Before laying, you need to determine the fat content , i.e., the combination of viscosity with adhesive ability, for the correct sand ratio. Clay of the same quality, but from different deposits, differs in this indicator. To check, 1 kg of powder is filled with water to the top edge and allowed to stand for a day. Fireclay marl sours in 2 hours.
The soured clay is moistened with water and stirred until the consistency of a thick dough is achieved. The resulting composition is divided into 5 equal parts and each is mixed with sand in different proportions (10%, 30%, 50%, 70%, 100% of the volume). Then dry for 4 hours . From each sample, make sausages with a diameter of 1.5 cm, at least 30 cm, wrap them around a round object with a diameter of 5 cm and look:
- If the solution settles without cracks, then it is suitable for building any stove.
- The dry crust has torn, small cracks have appeared - the material is suitable for use.
- The cracks spread 1 mm deep - for stoves whose temperature does not rise above 300 ° C (country fireplace, barbecue).
- Fractures, deep cracks, breaks - high sand content, unsuitable for use.
Testing brick sand to determine the correct ratio will allow you to save a lot; high-quality clay is more expensive.
The working solution is made according to the same principle:
- The clay is placed in water for a day.
- The resulting mass is mixed into a dough.
- To remove lumps, use a 3x3 mm sieve.
- Based on the results of the preliminary mixing, sand is added.
- Add water until the mixture reaches the consistency of sour cream.
- The fat content is checked by wetting the trowel.
- If necessary, add a little clay or sand.
A forging of commercial clay produces 4 buckets of solution.
Furnace appliances
Stove appliances (latches, doors) are attached to the stove with mustaches that fall on the seams or with a steel skirt wrapped in 5 mm asbestos cord. The first option is the cheapest, but is not suitable for ovens, fireboxes and heat dampers, and quickly becomes unusable. And to replace it, it is necessary to disturb the masonry, which is bad for the stove.
Specifics of using the solution
How to determine the consistency of a solution
Before installing the stove yourself, you need to decide on the type of solution. In the construction of heating products the following are used:
- Lime or cement paste - the viscosity of the composition depends on the specifics of the soil. For soil with low moisture levels, a lime or lime-cement mixture is suitable. Cement is used on wet soils.
- Clay-sand mortar - for the body and smoke circuits.
- Fireclay sand mixed with refractory clay - for lining. The thickness of the seam should be minimal.
- Ready-made mixtures - stones are laid on fireclay or clay-sand compositions.
- Lime or cement-lime mortar - for binding the components of the stove in the attic.
- Cement paste - for the outer surface of the pipe.
When making your own fireclay mixture, take into account the fat content of the clay and select proportions from 1:0 to 1:3.
Features of self-finishing
It is not difficult to build a stove with your own hands for a beginner, provided that the work algorithm is followed. The main questions arise when finishing. The simplest option is to thoroughly plaster and whitewash the structure. If the brick is good, grouting and jointing is enough.
Sloppy stove walls can be disguised. Before finishing, the surface must be mopped, rubbed with bricks and allowed to dry. After plastering with a clay-sand mixture with asbestos chips, they proceed to finishing. The heating and heating-cooking structure is tiled.
Repair work
Repair depends on the complexity of the breakdown. A thorough inspection is carried out first. Operational problems are often associated with soot contamination. It is important to check and clean your chimney. If long streaks of smoke appear above the firebox, this is a sign of poor draft. The reason may be improper laying. Part of the structure must be disassembled and reassembled.
If the brick is not destroyed, this is a sign of burning raw wood. Incorrect fuel destroys the chamber and ash pan. Only dry logs are used for kindling. In summer, it is recommended to periodically check the condition of the structure. Inspection is necessary when the structure is not in use for a long time. Metal elements (latches, doors) are periodically checked for strength. If necessary, strengthen with mortar.
Possible difficulties
Removing excess solution
Without experience and practice, starting to lay a stove is not easy. In some cases, it is necessary to change the location of the floor beams, dismantle the structure, and destroy the foundation. To avoid errors, you must:
- Make a test installation on brick without mortar. This makes it easier to understand the arrangement of elements.
- Use wooden slats 5-7 mm thick to level the thickness of the brick joint.
- Calibrate the thickness if laying under jointing is performed.
- Adjust the bricks to size, number them with a marker and place them in a separate pile.
- Apply the solution in a layer of 10 to 12 mm.
- Tap the brick laid on top with a rubber mallet until it hits the batten.
- Skim off excess mixture.
- Remove the planks after installing 3-4 rows, fill the seams with mortar and immediately embroider.
The evenness of the structure horizontally and vertically is checked with a level.
Orders
Orders help the master understand in what order and how the bricks are laid out. Very often the laying is carried out without the use of a fastening mortar, but here you have to process the brick itself - cut, trim, etc. There are a number of secrets in the order:
- To make the stove look attractive, it is recommended to line it with clinker, decorative bricks, tiles or tiles;
- the first row is laid out with careful measurement of the diagonal - for this, a plumb line is attached in the center of the future chimney and oriented along it;
- every 4 rows the diagonal must be rechecked;
- to control the evenness of each row, it is worth pulling the cord, which is checked by the building level;
- It is recommended to use clay to fix bricks, as it is more resistant to elevated temperatures and retains heat longer (you can use ready-made dry mortar);
- during laying, each element is briefly soaked in a container of water;
- to reduce material consumption and time, it is best to trim the bricks that make internal ledges - the element is placed in its place and a line is drawn with a pencil, after which it is adjusted to its shape;
- The same materials must be used for bandaging the rows, otherwise, when heated, the different damage coefficient will lead to damage to the oven.
Compliance with all these points will allow you to create a reliable and high-quality design.
Laying a simple version of the stove
Independent masonry of the simplest type of stove involves the manufacture of a base and an array.
Creating a foundation
A practical concrete monolith reinforced with a metal corner along the ribs is easy to construct. When finished, the foundation should protrude 5-7 cm from the stove. Depth - no more than 75 cm, for a one-story house 50 cm is allowed, for a two-story house - 1 m. The base is not brought to the floor covering by 14 cm, covered with roofing felt or roofing felt for waterproofing.
The reinforced structure gains strength in 1-3 weeks - only after that a moisture-proof coating is installed.
Layout diagram of a Russian stove