The bathhouse is the favorite place to relax for the vast majority of people. By visiting the steam room, you can relax your soul and body, gaining strength for further work achievements. There is a room with a steam room on every second plot of land, so the question of how to properly repair a bathhouse will sooner or later interest everyone.
Repairing a bathhouse with your own hands or with the help of specialists has to be carried out in a number of cases:
- the building has been in use for a long time and problems have already appeared that cannot be ignored or solved with simple cosmetic repairs;
- There is a bathhouse on the site that has not been used for its intended purpose for a long time. In such a situation, what is needed is not a simple repair, but a complete reconstruction of the bathhouse;
- When purchasing a log house that has been in use for a long time, it is necessary to carry out repairs and partial modernization.
Most often, repairs are required in an old bathhouse that is operated in unfavorable climatic conditions, for example, with a significant difference in temperatures in summer and winter. In such conditions, the wooden components of the bathhouse are the first to suffer, that is, almost the entire structure, from log walls to shelves.
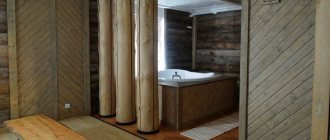
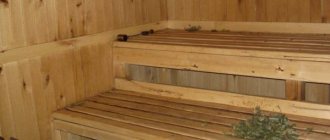
Various sauna rooms
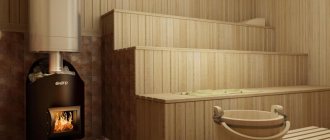
A classic bathhouse has three rooms: a steam room, a washing room and a relaxation room (often indicated as a dressing room). The insulation of a brick bath in all these three rooms differs. The most powerful thermal insulation should be in the steam room.
The average option is installed in the washing room, and in the rest room you don’t have to use special “bath” insulation schemes at all. Everything is done as in a regular living room, because the microclimate in the dressing room is the same.
Information. Not only the insulation layer differs, but also the vapor barrier. She should be especially careful in the steam room. Keep in mind that how long ecowool and other non-moisture resistant insulation will last depends on how well you did the waterproofing.
Steam room
Leaving just brick walls in the steam room is unacceptable. The wall structure will always be composite. A good option has the following layers in section:
- load-bearing brickwork walls;
- waterproofing layer;
- insulation layer;
- vapor barrier layer;
- external cladding of the steam compartment (lining, imitation timber, block house).
From these layers, the waterproofing layers between the brick wall and the insulation layer are sometimes excluded. Brick walls themselves, if they are built correctly and well waterproofed from the foundation, do not become damp. If you are not sure about the walls of your brick bathhouse, then be sure to install this additional insulation.
Material
Building materials can be divided into structural (steel, concrete, brick, stone) and thermal insulation, which have low strength and specific gravity, but they retain heat well.
Thermal conductivity and specific gravity indicators are interrelated.
That is why almost all heat insulators have a porous structure, float in water and are often combustible.
The walls of a brick bathhouse can be insulated from the inside using any heat insulators that are approved for use in interior work.
The choice of material must be made before insulating a brick bathhouse. The required material is indicated in the project.
Here is an approximate list of them:
- Polystyrene foam (foamed polystyrene). It is moisture resistant, which makes it well suited for a bath; the thermal conductivity is very low. The specific gravity is about 25 kg per cubic meter. The main disadvantage is that the material is fire hazardous and not environmentally friendly;
- Mineral wool. It is rarely used in baths, since even after a single wetness it irreversibly “shrinks” in volume. If the thermal insulation is good, it can be used in baths. The advantage in combination with brick walls is absolute fire resistance;
- Basalt slabs. In many properties they are close to mineral wool. Safer for humans;
- Organic insulation: moss, straw, sawdust. Nowadays they are almost never used, but they are often used as a backup option;
- Factory-made organic insulation materials, for example, porous cellulose boards. Their main advantage is environmental friendliness. A good option for a bath;
- PPU foam rubber. It is mainly used for pipe insulation. In rare cases, they are used to insulate houses and bathhouses. It is possible to use both ready-made elements and foam spraying from a foam generator;
- Other polymer insulation materials, of which there are many brands: Pepoplex, foamed polyethylene, magnesium oxide on acrylic resin;
The insulation can be fireproof, like the rest of the brick bathhouse. How to insulate the walls and ceiling is determined by the budget and the overall project. Of all the options for a bath, foam plastic (only it has excellent moisture resistance) and basalt slabs are most often used.
Both materials are available in the form of flat slabs.
To install them on walls, floors and ceilings, a lattice frame is always required.
The insulation itself is fragile, does not hold its shape clearly, and on top of its layer there must be a durable outer surface (for example, bath lining).
The combination of these two layers is ensured by the frame. Insulation with any slab materials is similar in technology.
This is the installation of slabs cut to the size of the frame cell, as well as their adhesive fastening.
Almost any slabs are attached with glue: foam plastic, basalt, ecowool. The choice of glue is carried out according to the recommendations of the insulation manufacturer.
Important! Working with mineral wool and insulation containing fiberglass requires special care. Work in protective equipment, a respirator, and goggles.
Working with foam plastic and cellulose porous insulation requires compliance with fire safety rules. Minor dust formation may occur during cutting. Such intensive protection as when working with glass wool is not required.
Thermal insulation of walls
Repairing baths is a labor-intensive process that requires a responsible approach. To repair an old log bathhouse, you need to carefully seal all the cracks and crevices that formed during operation. Thanks to this, the room will warm up much faster and retain heat longer.
As a rule, more cracks and crevices form on the outer parts of the wall.
This is due to the fact that they are a kind of boundary between different climatic conditions. You can seal cracks and crevices using a lot of building materials: from tow to polyurethane foam. The main thing is that any existing damage is thoroughly repaired.
Additionally, you can thermally insulate a log bath using standard insulation materials, for example, mineral wool or polystyrene foam. They can be placed under interior or exterior trim.
Frame (beacons)
Proper manufacturing of the frame is the most difficult stage of insulation. A high-quality and durable frame provides a smooth front surface made of lining.
Insulation of a brick bathhouse inside is carried out by filling the cells of a wooden or metal frame.
Other options do not apply.
The wooden frame is assembled from bars, the metal frame is assembled from a specialized galvanized profile.
A wooden frame is simple and cheap, but its strength is less than that of a metal one.
For a heavy block house, a wooden frame made of bars may not be enough. Then the cross-section of the elements must be increased or a structure combined with metal must be used.
A powerful wooden frame is only possible with a large gap for placing insulation. The choice of this gap must correspond to the thickness of the insulating board. Typical options provide a layer of 20 – 90 mm.
The quality of insulation directly depends on the thickness of the slabs. The choice of how to insulate a brick bathhouse from the inside is based on typical data for your climatic region. Recommended projects can be used. Types of connections in a wooden frame:
- Tenon and groove;
- With metal corners;
- Butt joint on nails and dowels.
The most durable and practical connection is on metal corners. Instead of nails, it is convenient to use self-tapping screws, which are purchased with metal corners.
Each T-shaped connection requires two angles and about 10 screws.
Vertical posts (beacons) and horizontal bulkheads are made from bars of the same cross-section.
The most advantageous aspect ratio is 7:5.
Such timber is produced in large quantities and can be purchased at any lumber store.
Metal frames (metal profiles)
The entire metal frame is quickly assembled from ready-made profiles, which are produced by industry specifically for this purpose. In addition to profiles, shaped elements are purchased to make connections.
If in a wooden frame you can make connections with ordinary nails, screws and glue, then in a metal frame you cannot do without specialized fittings. On a metal frame, only the insulation of a brick bathhouse is created from the inside; the scheme is not used for external insulation.
Advantages of a metal frame:
- Quick and easy assembly;
- Fireproof design;
- Suitable for insulation systems with minimal slab thickness.
Information. To insulate the bathhouse, a frame of a standard design is assembled. Without significant changes, frames for plasterboard, suspended slab ceilings and external ventilated facades are made using the same technology.
Where to start repairs
Remodeling a bathhouse begins with an audit. In the process of performing this activity, first of all, you should pay attention to the condition of the foundation. If the audit reveals serious damage to the supporting structure, for example, large cracks, then remodeling the old bathhouse is impossible. You should abandon this idea and build a new building or move the old one to another foundation.
If everything is normal with the foundation, then you should continue the inspection further, paying attention to the following points:
- the presence of cracks on the external parts of the walls;
- the condition of the insulating material (if it was used during the installation of the building);
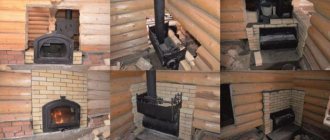
- presence of damage to the ceiling and walls. When inspecting these parts of the bathhouse, it will not be amiss to assess the condition of the chimney pipe and stove;
- High humidity has a strong impact on the condition of doors and windows. They also need to be carefully examined for the presence of deformation;
- The last thing you need to pay attention to is the interior decoration. If we talk about the need to repair the bathhouse, then the finishing elements with a probability of 99.9% have become unusable.
Based on the data obtained, it is necessary to draw up a repair plan, if necessary, including a column regarding modernization. For example, if a bathhouse was built in time immemorial, then it probably does not have running water, a full-fledged sewage system, a heat exchange system, etc.
Installation of beacons
The main element of the metal and wooden frame is the lighthouses. These are vertical bars or steel profiles that are installed strictly plumb. If the brickwork has defects and zonal deviations from the vertical surface, then the correct installation of beacons will eliminate them.
Installing beacons is the first thing you need to start with insulating a brick bathhouse from the inside; all operations are done here with your own hands. Insulation work is quite simple. They are often seen not only in bathhouses and private houses, but also in apartments.
The accuracy (deviation from the vertical surface) of a well-placed beacon is 1-3 mm. The outer lining of the bathhouse will be attached to its front surface.
Attention! For defective areas of brickwork, it is convenient to mount beacons with specialized brackets with variable length due to threads.
The lighthouse is secured to the wall with anchors. It is better to drill holes for anchors in the centers of the bricks. If the wall is plastered from the inside, then you can drill arbitrarily. Anchors are used here.
Preparing for the construction of a steam room. Sizing
To make a steam room with your own hands, the step-by-step instructions begin with the fact that when designing a steam room you need to remember:
- The height of the room is 0.2 m greater than the height of tall visitors. But extra centimeters will raise hot air and worsen the quality of steam on the shelf.
- The optimal usable area for 1 person is 0.7-1 m². It is not advisable to do more: you will need to heat it harder, as the room will cool down faster.
- The steam room must have at least 1 bed. The length of the shelves is calculated taking into account the height of the ceiling.
- The stove is placed at a distance of 26-32 cm from wooden products to ensure safety.
Drawings and dimensions of the steam room in relation to the dimensions of other rooms in the bathhouse
There are no strict rules on how to make a steam room in a bathhouse correctly. The total area of the structure depends on the space available for construction on the site and the financial capabilities of the owner. There are various options:
- Design with a dressing room. Includes a shower room, steam room, and a relaxation room with a mandatory sun lounger.
- The bathhouse may have a vestibule and a porch.
- The bathroom is located together with the washroom or separately.
- Projects may contain a winter garden, gym and swimming pool.
- Some plans combine a bathhouse and a guest house. In this case, the building may contain a bedroom with a small kitchen-living room.
The building may have a veranda and an area for seasonal pastime - barbecue, swings, outdoor pool.
Steam room in a brick bath: how to do it right
In the steam room, the air temperature is the highest during the operation of the bath, and this imposes certain requirements for thermal insulation. It should be better than in all other rooms of the bathhouse. In addition, high humidity requires the construction of hydro- and vapor barriers.
All hydro- and vapor barrier materials can be divided into film (roll, membrane) and liquid (mastics, impregnations). Insulating a steam room in a brick bath requires only rolled steam and waterproofing materials. Mastics are used only as auxiliary.
The best vapor barrier option is the use of a specialized vapor barrier membrane. They are composite polymer films. Modern manufacturers offer a huge number of ready-made membrane options in rolls.
Important! Foil membranes have especially good performance characteristics. A separate article on our website talks in detail about foil bath materials.
Steam, unlike moisture, does not spread through structures, but through the air. Insulation from it should be more airtight than waterproofing. Rolled foil material is rolled out over the surface of the insulation and frame bars and glued with construction tape.
A protected, homogeneous surface without cracks is created. Subsequently, it will only be damaged by the fastening of the casing. To provide for this point, you can use several vapor barrier layers, and not all of them should be laid on top of the bars.
Vapor barrier is necessary in the steam room. It is desirable in the washing room, since the materials for it are inexpensive. You don’t have to do it in the rest room, but brick walls have good thermal conductivity, so condensation is likely to form.
Ceiling finishing
It is also recommended to use lining to finish the ceiling of the steam room.
First step. Add lath to the load-bearing floor beams. To assemble the sheathing, use edged boards or wooden blocks. Place a waterproofing film over the sheathing. Select the sheathing pitch in accordance with the width of the insulation boards.
Second step. Fill the sheathing cells with insulation (usually basalt wool). Carefully align the insulation mats so that there are no gaps or cracks.
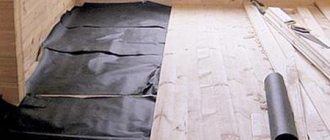
Third step. Attach a vapor barrier material to the beams on top of the insulation. Lay vapor barrier strips with a 20-30 cm overlap. Use a construction stapler to secure the material. Tape the joints with aluminum adhesive tape.
Attach vapor barrier material to the beams on top of the insulation
Fourth step. Proceed with the installation of the lining. Attach the sheets to the slats. Fix the sheets of the outermost row of sheathing at a distance of 1.5-2 cm from the wall to ensure effective air circulation in the space between the thermal insulation and the sheathing.
Start installing the lining
Cover the entire surface of the ceiling. You also need to leave a gap of 1.5-2 cm at the opposite wall.
Lining