The efficiency of a sauna stove depends on how well the gaseous products of fuel combustion are removed. Ideally, they should consist of carbon dioxide, water vapor and atmospheric nitrogen, which is inert under normal conditions. In reality, fuel combustion is rarely complete. This leads to the formation of poisonous carbon monoxide, nitrogen oxides, tar and soot. Harmful gaseous substances should not enter the steam room, even in minimal quantities, and should be completely removed to the outside through the chimney.
We offer to talk about how to make a chimney in a bathhouse, consider the diagrams for its output through the wall and ceiling, and select affordable and high-quality materials. We will leave accurate aerodynamic and thermal calculations to professional designers and will focus only on the most important installation features for the bathhouse owner.
Correct operation of the chimney
All chimneys for stoves in bathhouses operate on natural draft. It is created due to the difference in temperatures and pressures inside and outside the chimney. A well-functioning chimney with a correctly calculated throughput capacity effectively removes the products of complete and incomplete combustion. In addition, it creates a vacuum in the combustion chamber of the furnace, due to which the air necessary for combustion enters it.
A proper chimney in a bathhouse with stable draft must meet the following conditions:
- The temperature in the pipe is always higher than outside
. The walls must be sealed, and the material must prevent heat exchange with the outside air. Thermal insulation is required for that part of the chimney that runs along the street. - The head does not fall into the wind pressure zone
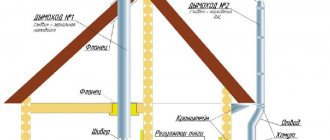
. The total height of the chimney must be at least 5 m. At a distance of up to 1.5 m from the ridge of the roof, the pipe must be 500 mm higher, from 1.5 to 3 m it must be flush. If the distance is more than 3 m, the head is raised to a straight line drawn at an angle of 10° from the ridge. When determining the height of the pipe, other obstacles must be taken into account: trees and high-rise buildings within sight. Backwater does not always occur, but only at certain wind speeds and directions. If you are installing a chimney in a bathhouse with your own hands, study this issue in more detail or entrust the calculation of the height of the pipe to specialists. - There are no deposits on the inner walls
. The design of the chimney should be as simple as possible. Any turn or bend is a place where soot will be deposited. It is necessary to provide for the possibility of cleaning the chimney. Typically, the corner shaped elements of the pipe are made in the form of a tee with a plug, which is removed to gain access to the internal space of the chimney. To prevent street debris and precipitation from getting into the chimney, its head is protected with a metal cap. The inner surface of the pipe should be as smooth as possible.
The amount and composition of deposits inside the chimney depend not only on its design, but also on the quality of the fuel and the operating conditions of the stove.
Determining the cross-section of a chimney is much easier than determining the height. The ideal cross-sectional shape from an aerodynamic point of view is round; it is easier for gases to escape through it.
Requirements for external chimneys
The safety of using a bathhouse depends on the installation of the chimney, since poor-quality installation of this element of the heating system, according to statistics from the Ministry of Emergency Situations, is one of the most common causes of fires, as well as carbon monoxide poisoning. The following requirements apply to external smoke exhaust ducts:
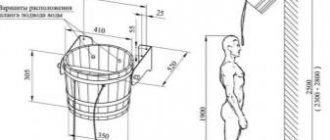
- The pipe passage along the wall of the external smoke exhaust channel is placed at a height of 1-1.5 m from the ground level or higher.
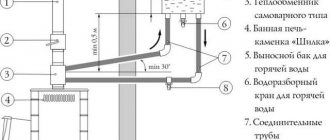
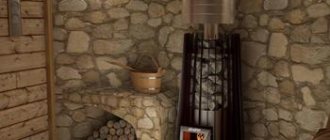
Connecting a sauna stove to an external chimney - The vertical section of the chimney is located at a distance of at least 1.5 m from the outer wall and the edge of the roof overhang of the bathhouse. The distance from the external chimney pipe to the neighboring house should not be less than 1.5-3 m.
- When laying an external chimney, no more than 3 turns of the pipe are allowed, but vertical placement is more effective.
- The total length of the horizontal sections of the pipe, which does not affect the draft force inside the chimney, is no more than 1 m.
- It is not allowed to lead the chimney pipe through the wall in places where there are attic windows, balconies and second floor windows. Chimney ducts must not be routed into closed loggias, corridors, or entrances.
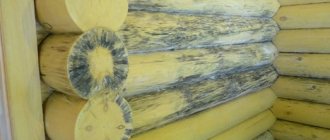
- The place where the pipe exits through the wall is equipped with a fire-resistant material, additionally insulated with non-flammable insulation.
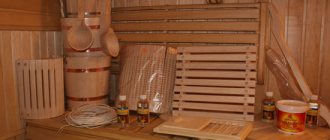
- The place where the chimney is laid inside the bathhouse is protected with metal sheets, which protect the wall material from overheating and fire.
- It is not allowed to connect sandwich pipes to the inlet pipe of the furnace; the connection is made using single-circuit elements made of stainless steel. Double-circuit systems are used on the external parts of the smoke exhaust duct.
Note! When installing it yourself, keep in mind that the minimum permissible height of chimneys for solid fuel stoves, which are most often used in bathhouses, is 5 m.
Materials
The efficiency, durability and cost of a chimney depend on the material from which it is made.
Brickwork
- a classic option, characterized by good thermal insulation and durability. However, its use is currently limited for the following reasons:
- The large mass of the structure requires a separate foundation.
- To build such a structure, you need to attract an experienced stove maker, who is extremely difficult to find.
- The cost of work and materials will be exorbitant compared to other types of chimneys.
- Due to the rectangular cross-section and the seam between the bricks, turbulences are formed in the gas flow, due to which a large amount of soot is retained in the channel. A brick chimney should be cleaned at least twice a year.
- The sauna stove is operated intermittently, and in the intervals between fireboxes the brick accumulates moisture. Accelerating the furnace requires a large amount of fuel.
One solution that partially compensates for the shortcomings of masonry is lining. If you get a bathhouse with a ready-made brick chimney, you can insert a stainless steel sleeve into it, which will significantly improve the aerodynamics of the channel and reduce the amount of deposits. Flexible pipes such as FuranFlex® are also used, designed specifically for the repair of such structures.
Metal pipe
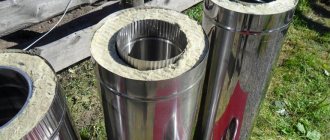
- the simplest and most affordable material suitable for self-installation of a chimney in a bathhouse. The sectional structure is assembled from individual elements. Socket connections are treated with heat-resistant sealant. The part of the chimney located in the room is assembled from a single-wall pipe. A draft adjustment slide is installed in it. Outdoor sections are made from a sandwich pipe consisting of outer and inner sleeves of different diameters, the gap between which is filled with non-combustible thermal insulation.
The advantages of such designs include:
- low dead weight;
- smooth inner surface, resistant to soot accumulation;
- stable draft and low condensation formation.
Stainless steel sandwich pipes are very popular. They are not subject to corrosion and are durable.
Vermiculite
- a lightweight porous material made from natural raw materials, used in the manufacture of chimneys relatively recently. It retains its properties at temperatures up to 1200 °C and is highly fire resistant. In terms of thermal insulation, vermiculite is superior to other materials.
External chimney type: advantages
If your steam room is not in the Far North, then the option of arranging a bathhouse with an external chimney has undoubted advantages over a bulky, expensive, difficult-to-install internal smoke exhaust channel.
The external type of chimney is so called because the pipe goes outside the room. The outlet is carried out from the stove horizontally through the wall. The vertical part is located on the street.
Advantages of the external type of chimney:
- High fire safety. The short length of the chimney in the room, one technological hole in the wall for exhaust, reduces the risk of fire by several times, in comparison with the installation of an internal chimney.
- Ease of installation. All components are assembled in stages and are sold ready-made. Installing an external pipe with your own hands does not require special skills in handling metal and does not require special tools.
- Small sizes. Since the main part of the pipe runs along the street, the room remains completely at the disposal of the steamer.
- Easy to select the desired pipe diameter and length. Pre-fabricated pipes are designed for use with specific stoves. A heating equipment consultant will help you choose the optimal diameter of the chimney pipe for your stove.
- Simplicity of installation of heat and waterproofing of wall openings. You can purchase a ready-made kit for arranging a technological hole in accordance with all rules and safety requirements. The kit includes a horizontal pipe section, two fittings (external, internal), a package with thermal insulation of the required type in the required quantity. The cost of a simple adapter of small diameter starts from 1000 rubles. The price of a branded stainless steel set reaches 3,500 rubles.
We recommend that you read: Advantages of corrugated stainless steel pipes
Ready-made chimney kits are sold both completely and in separate segments. It is convenient to use ready-made sandwich pipes (with thermal insulation).
Note! If you assemble a chimney yourself, then when choosing thermal insulation, carefully study the parameters of hygroscopicity and resistance to high temperatures.
It is recommended to purchase mineral wool with a characteristic of at least 800 degrees. Mineral wool with a heat resistance of 200-300 degrees in a humid environment quickly becomes unusable, losing its thermal insulation properties.
Through-wall installation
In practice, there are two options for passing a pipe from indoors to outdoors: through the wall and through the ceiling. The choice always remains with the stove owner, and we will tell you about the features of both schemes.
The advantages of the “through the wall” design include:
- Saving usable space
. If the bathhouse is located on the ground floor of the house, there is no need for the pipe to pass through the living spaces located above. It will not only “eat up” the usable area, but will also require compliance with a whole range of fire safety measures. Also, if you accidentally touch the pipe, you can get a serious burn. - Easy to install
. Most of the work is done outdoors. The weight of the vertical structure is practically unlimited, and it is protected from wind loads: the pipe rests on a bracket and is “tied” to the wall with clamps. Installation through the wall involves the installation of only one fire compartment. - Maintainability
. If necessary, you can always extend the pipe with additional sections. Replacing elements of the external chimney does not require work indoors.
An obvious design flaw is low efficiency. Some of the flue gas energy that could be used to heat the room is lost to the atmosphere. External chimneys often disrupt the design of buildings, and soot accumulates in their horizontal sections and at turns. Such structures need to be cleaned much more often than vertical internal smoke removal systems.
Types of chimneys for baths
There are two fundamentally different types of chimney:
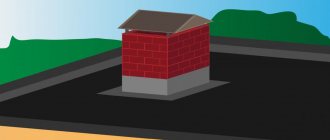
- Internal (classic). The pipe is routed through the ceiling of the room and the roof.
- External, which became widespread in our country not too long ago. When installing this type of chimney, the pipe is routed through the wall, the main part of it is routed along the street.
Internal chimney
The internal smoke exhaust device in the bathhouse is traditionally used for brick stoves. In this case, the pipe is also made of brick. Install a classic traction control valve. The channel is led vertically from the stove through the ceiling covering, then to the street through the roof.
We recommend that you read: Stainless steel air ducts for ventilation installations
This type of smoke exhaust device involves two technological openings that require thermal insulation and high-quality waterproofing. Not every person who likes their own steam room can do complex work on their own. The disadvantages of a budget bath include the bulkiness of the brick stove and pipe design. In small steam rooms, such a structure can occupy up to half the area.
An internal chimney with wells and a stove bench can also be made in a bathhouse. A warm wall will allow you to retain maximum heat, which will be useful in northern latitudes. Here it is better to hire a professional and arrange the crossings according to the requirements. At the same time, the internal chimney in the bathhouse will save money on heating.
It is much easier to install a ready-made solid fuel stove in the bathhouse and run the pipe through the wall in the bathhouse with your own hands.
Installation procedure for external chimney
- The stove is installed in the design position, the corner element is pre-mounted on the outlet pipe and the exit point through the wall is marked. The knee does not have to be at a right angle. The pipe can exit horizontally or at an angle.
- Remove excess wall material. If it is made of wood, there are usually no problems. With a brick or concrete structure you will have to tinker longer. When calculating the height and width of the opening, fire safety requirements are taken into account.
- Install a wall groove - a metal insulating flange through which a horizontal or inclined section of the pipe will pass. This can be a ready-made or home-made design. The space between the flammable materials and the flange is filled with thermal insulation. Basalt wool mats are usually used in wall openings.
- The final installation of the internal section of the chimney is carried out: the starting section, damper, corner, adapter from monopipe to sandwich and horizontal pipe.
- Mark and install supports and brackets along the facade.
- All outer sections of the chimney are assembled, including the head with an umbrella or deflector.
Making and installing a chimney with your own hands
Before making a chimney in a bathhouse through a wall, it is advisable to take measurements of the horizontal and vertical parts. According to SNiP standards, the length of the horizontal pipe should not exceed 1 m, otherwise the draft will be insufficient and fuel combustion products will enter the room.
If the stove is located too far from the wall, it is necessary to install the chimney in the bathhouse with the maximum possible rise of the inner part of the pipeline to the point where it exits into the wall. When calculating the vertical street section of the route, it is necessary to take into account that its height must be greater than the horizontal or inclined part of the pipeline. It is also undesirable to install a pipe that is too short: the height from the outlet of the nozzle from the stove to the highest point of the chimney should not be less than 5 m.
Drawing and diagrams
Based on the requirements, you will need to draw up a drawing, which should indicate how to remove the pipe in the bathhouse through the wall, the length of the horizontal or inclined section. When installing a vertical structure outside a building, fire safety requirements must also be taken into account:
- distance from the wooden wall - at least 50 cm;
- distance from the roof overhang - at least 25 cm;
- the height of the pipe above the roof is calculated so that the edge of the chimney is 50 cm above the ridge.
Drawings indicating all dimensions will help you correctly calculate the amount of material needed.
Size calculation
The internal diameter of the pipe in the bathhouse is an important indicator on which both the quality of the draft and the degree of likelihood of carbon monoxide accumulation depend. The diameter or cross-section of the pipes is calculated based on the furnace power indicator:
- for a standard furnace in a bathhouse or an industrial device up to 3.5 kW, products with a cross-section of 14x14 cm or a diameter of about 15-16 cm are used;
- a sauna stove with a power of 3.5-5.2 kW is equipped with a chimney with a cross-section of 14x20 cm or a diameter of about 20 cm;
- For more powerful heating devices, chimneys with a cross section of 14x27 cm or a diameter of at least 25 cm are recommended.
When choosing sandwich sections, you need to take into account that the specified parameters must have the internal cavity of the product.
Selecting the location of the chimney outlet
The pipe outlet through the bathhouse wall should not be located lower than 1 m from the floor. When installing inclined channels, you need to take into account the distance to the ceiling: at least 50 cm.
A hole is made in the wooden wall for the chimney. In this place it is necessary to cut the brick. The dimensions of the separating layer are 45 cm in each direction from the pipe surface. In the cutting, a passage is left for the pipeline. Its dimensions are 2-3 cm larger than the outer diameter of the pipe.
Installation
Insert a solid module with a length of at least 50 cm into the cutting hole. The pipe should be wrapped in asbestos cloth. There should be no connections inside the wall. To clean the pipe from soot and condensate, a tee with a plug at the bottom is placed on the outer edge of the horizontal part of the chimney. A module of the vertical part of the pipe is mounted in the upper hole of the tee.
The structure is fastened to the wall using brackets and metal clamps. They are placed in increments of 1-1.5 m. Separate sections are connected by inserting pipes into one another and tightening them with a connecting clamp. A cap is mounted at the upper end to protect from rain and wind.
The inner end of the section carried out through the groove is connected to the furnace pipe or a pre-laid horizontal part of the pipeline. If the cross-section of the pipe differs from the internal cross-section of the chimney, transition elements are used. Seal the connection with fire-resistant material. If desired, a module with a valve is placed between the furnace nozzle and the pipe section in the groove.
Installation through the ceiling
The advantages of venting a bathhouse chimney through the roof are:
- high efficiency, as more heat remains in the room;
- less deposits and condensation;
- stable traction.
The disadvantages of this scheme include the increased complexity of installation work. All internal flammable structures must be shielded from thermal radiation with specialized materials. It is also necessary to compare the weight of the structure with the load-bearing capacity of the furnace and, if necessary, unload the roof using brackets. The relative position of the chimney and rafters must be taken into account when designing the building, so as not to weaken the ceiling or roof.
Smoke and condensate installation
There are two schemes for assembling a chimney system from sandwich pipes:
- Along the smoke, or downwards
. This scheme prevents the escape of flue gases if the seal of the joint is broken, but may be accompanied by the escape of condensate to the outside. This scheme is used for internal installation. This eliminates the risk of carbon monoxide poisoning, and the appearance of a small amount of moisture is not critical. - Along the condensate, or with the socket up
. This scheme is used when assembling street chimneys, where the release of gas is not dangerous. A condensate collector is made at the bottom of the chimney, into which all moisture enters.
Sandwich pipes from different manufacturers may differ in the design of the socket connection. When choosing an assembly scheme, read the instructions. Manufacturers provide detailed step-by-step installation instructions.
Self-installation of a chimney for a bath
The installation method depends on what material is planned to be used for the production of the chimney. There are some rules that should be taken into account when making a chimney yourself:
- The device must not be connected to other pipes.
- The smoke exhaust structure should not have horizontal sections longer than 1 m.
- During the heating season, the sauna chimney must be cleaned at least 2 times.
- The structure must extend at least 0.5 m beyond the roof.
Installation of a steel sandwich chimney through the ceiling
The first thing to consider is the sandwich chimney. Manufacturers supply products together with a set of additional parts, which include:
- knee;
- tees;
- clamps;
- plugs;
- ceiling-passage units;
- heads;
- protective screens.
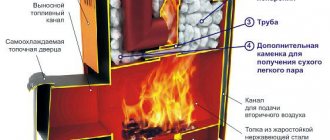
The diagram will allow you to understand the technology of installing a stainless steel chimney.
Step-by-step guide to assembling a steel chimney:
- First of all, using a plumb line, you need to mark the exit points of the pipe through the roof and ceiling structure. Next, you need to prepare a recess according to the size of the pipe. It is worth remembering that between the sandwich pipe and the wooden ceiling parts you need to leave a distance of approximately 10 cm around the perimeter of the recess.
The dimensions of the hole should be approximately 10 cm larger than the dimensions of the chimney pipe - Thermal insulation can be done using mineral wool. It will be necessary to close the place where the pipe passes through the ceiling. There is no need to worry about the cotton wool getting damp, as the elevated temperature dries it out quickly.
- You will need to take all dimensions and determine the location of installation of the unloading unit. It is recommended to do it in the attic. It will take on the load of the pipe that comes out of the ceiling. In addition, the unloading unit is able to eliminate lateral vibrations.
The unloading unit takes on the load of the pipe coming from the ceiling - If the distance between the floor base and the attic is large, then a unloading unit should be installed. If the distance is less than 1.5 m, then auxiliary supports are not required. The unloading unit can be constructed from steel angles and fasteners. The corners must be secured to the rafters. The fixation should be as reliable as possible.
- You will need to install an initial pipe on the outlet pipe of the stove. It must fit into a large pipe with an interference fit; during the purchase process you need to select the appropriate dimensions.
An initial sandwich pipe must be installed on the outlet pipe of the furnace - The narrow pipe should fit into the outlet pipe of the furnace, but it should not cover it. The pipe sections must be inserted into each other. The transition and bend areas should be additionally secured with clamps.
Places of passages and bends of pipes must be fixed with clamps - Where the pipe passes through the ceiling structure, a groove must be installed to cover the outlet recess. This will also make the chimney more stable. To the groove you need to weld a pipe of a larger diameter, which will be used as an adapter. This will increase the support area and eliminate deformation in the event of strong loads in the side part. The adapter will allow the chimney to move freely up and down. To eliminate heat loss due to loose parts, it is recommended to use mineral wool. It must be placed under the cutting piece and carefully pulled to the ceiling using nails or self-tapping screws.
To close the outlet hole in the ceiling, you need to install a groove - Holes must be prepared in the sheathing and roof covering. Next, you should seal the outlet of the smoke exhaust device. An adapter is required for this. The joints must be coated with sealant. It is recommended to place another sheet on the covering and secure it with self-tapping screws and rubber washers. The remaining cracks are treated with sealant. The pipe outlet should be 55 cm above the roof level.
The vertical position must be controlled by the building level - A fungus should be mounted at the top of the chimney.
Video: installation of a chimney from sandwich pipes through the ceiling
Installation of a ceramic chimney through the ceiling
The sequence of actions will be as follows:
- First of all, you need to prepare the place where the device will be placed. If there are any irregularities on it, they must be eliminated. Installation of chimneys is allowed on a separate base near the heating device or on its upper surface. A special adhesive mixture is used for masonry, since the solution will not be able to provide the necessary strength.
For masonry you need to use a special glue, since the solution will not be able to provide sufficient strength - You should prepare metal rods 1 m long and 5–10 mm in diameter. With their help, you will need to additionally secure the structure. This will preserve the integrity of the chimney. Next, you need to make recesses in the ceiling and roof. There is no need to make a reserve in terms of dimensions, since the device will be able to protect wooden parts from elevated temperatures.
- The next step is to install 2 halves of ceramics. The lock should be lubricated with an adhesive mixture.
The first block must be filled with adhesive mixture - Next you need to check the location of the halves. If necessary, they can be trimmed. Iron rods should be inserted into the side recesses. The gaps between the reinforcement and ceramics are filled with glue. There is no need to completely fill the cavity. The glue must be positioned so that it connects the rods and ceramics in 3-4 places.
- Thermal insulating material should be wound around the ceramic pipe and lightly tightened with iron wire or a clamp. There is no need to tighten it too much, since the heat insulator should not shrink. Pressed mineral wool is mainly used as a heat insulation material.
- The pipe will need to be installed in the recess of the ceramic, and then its location will be checked. To speed up the process, you can wrap all the pipes with insulation at once. The number of pipes corresponds to the height of the chimney.
You can check the location of the pipe using a building level - The next ceramic block is mounted with glue. Another pipe is inserted into the socket of the first one. Excess glue from the inner tube should be wiped off immediately, there should be no drips.
The lock of ceramic parts must be lubricated with glue and excess removed - The actions are carried out by analogy; during the process it is important to monitor the location of the chimney.
- To secure the chimney in the attic, you need to cut the slats according to the dimensions of the recess, install them around the perimeter of the chimney and firmly nail them to the attic.
- The roof where the chimney exits should be sealed. This is done using additional elements that are sold ready-made.
Where the chimney exits through the roof you will need to install a passage unit
Video: installation instructions for a ceramic chimney
Installing a chimney through the wall
- The first step is to determine the place where the duct will be located inside the building and the chimney pipe will be installed in the wall. To protect the inner base of the bath walls from overheating, a sheet iron screen should be installed. At the passage point, you need to prepare a hole whose dimensions exceed the diameter of the pipe.
To protect a wooden wall from overheating, you need to install a sheet metal screen - The chimney must be connected to the inlet pipe of the stove using an adapter. Next, you should put on a piece of pipe with a damper.
- The parts must be fastened with iron clamps. The joints are treated with a sealant that is not afraid of high temperatures. The chimney must be brought to the point of passing through the wall. If you need to turn the pipe and lay a horizontal section, you will need to use 45° and 90° bends.
- In the place where the structure passes through the obstacle, you need to place a fire-resistant box. It is made of iron or asbestos cement. In the free space formed between the walls of the box and the pipe, you need to place a thermal insulator that does not ignite.
- On the street side, you need to fix a part of the smoke removal system in the form of a tee, in the lower part of which there is a container for condensate.
When installing tees, you need to install brackets for support - The pipe is completed with vertical sections until the required height is reached. To fix it, you need to use iron brackets. The distance between elements is at least 1 m.
After the chimney exhaust device has been assembled, you will need to light the stove. If the smoke comes out of the firebox quickly, this means that the work was done correctly.
How to install a chimney from a bathhouse through the ground
To run a pipe through the ground, you need to insulate it. A regular layer of bitumen will not work, as the pipe will be at high temperatures. The sequence of actions will be as follows:
- You will need to prepare several lined pipes, the diameter of the first should be 5–10 cm less than the diameter of the second. One pipe must be placed inside another. It is recommended to entrust the assembly process to specialist tinsmiths.
- Pipes can be assembled from several parts. The joints are fastened with clamps. There must be 3 spacers between each clamp, otherwise the chimney structure may collapse when falling asleep.
- The joints should be treated with heat-resistant sealant.
- The outer pipe, which is located in the ground, will need to be coated with bitumen.
The instructions may seem simple, but it is recommended to entrust this work to experienced specialists.
Features of installation of internal chimneys
Making a chimney in a bathhouse through the ceiling with your own hands will be a little more difficult than through a wall.
It will be necessary to organize two fireproof sections: ceiling and roof. The arrangement of the passage through the roof is practically no different from the wall cutting. The exit point through the roof requires careful sealing, otherwise rainwater will enter the room. For this purpose, ready-made factory-made flanges of two types are used:
- Made of metal
. When choosing, you need to pay attention to compliance with the outer diameter of the pipe and the angle of inclination of the roof. It is desirable that the edge of the flange extends under the ridge of the roof. - Made from EPDM rubber
. Such seals are more universal.
Installation difficulties may arise when working in the attic due to limited space.
Installation work
The assembly of the external type of chimney begins after the installation of the stove is completed. It is easy to install - the structures consist of additional components. No special skills or special tools are required.
Instructions explaining how to make a chimney in a bathhouse through a wall:
- They find out the places where the channel will be laid inside the building and the chimney will be installed in the wall. To protect the inner surface of the bathhouse walls from heating, a metal sheet screen is installed. At the passage site, a hole is made that is larger than the diameter of the pipe.
- The chimney in the bathhouse is connected through the wall to the stove inlet pipe using an adapter. Then a piece of pipe with a valve (gate) is put on.
- Sections of the structure are connected with metal clamps, treating the joints with heat-resistant sealant. The chimney is brought to the point of passing through the wall. To turn the pipe and lay a horizontal section, bends at 45 and 90 degrees are used.
- At the point where the structure moves through the obstacle, a fire-resistant box made of sheet metal or asbestos cement is placed. A non-flammable thermal insulator is placed in the free space formed between the walls of the box and the pipe.
- On the street side, an element of the smoke removal system is installed, which has a tee, in the lower part of which there is a glass for condensate.
- The pipe is completed with vertical segments until the desired height is reached. To secure it, metal brackets are used, fixing them at intervals of at least a meter (for more details: “How to make a chimney for a bathhouse - a step-by-step device with your own hands”).
After completing the assembly, you need to light the oven. If the smoke quickly leaves the firebox, then the work has been successfully completed.
Installation of chimneys for Teplodar sauna stoves
The convenience of installing a chimney in a bathhouse depends not only on the chosen installation diagram and material, but also on the design of the stove itself. We are talking about the location of the outlet pipe. To understand what we are talking about, we suggest considering two models of sauna stoves from our production:
- "Sahara"
. The pipe onto which the starting section is put is located in the center. This arrangement allows you to easily place a samovar-type tank or a heat exchanger register when installing a chimney through the roof in a bathhouse. - "Siberia"
. The outlet pipe is shifted towards the wall where the fuel channel door is located. With this arrangement, the length of the horizontal part of the smoke removal system is reduced if it is removed through the wall. This has a positive effect on the working conditions of natural traction. A displacement towards the wall does not mean that it will not be possible to install a chimney in a bathhouse through the ceiling and install a water heater. In this case, instead of the starting section, two elbows are installed at an angle of 45° to move the section with the tank away from the wall.
Our range also includes a tank with an offset pipe, which ensures that the chimney is effectively removed from the wall at a distance sufficient for the use of a full-size ceiling cut. The inclined bottom of such a tank does not block access to the heater. The device acts as a worthy alternative to using the above design in a smoke removal system to remove the pipe from the wall.
Detailed installation diagrams and safety rules are set out in the furnace data sheets. For additional advice, please contact a representative via feedback or by phone.
How to install a chimney through a wall
The algorithm for installing a chimney through a wall is simpler than an outlet through the roof. However, there are certain installation requirements that you should know at the bathhouse planning stage:
- The technological hole for the pipe outlet in the wall of the bathhouse is made at a height of at least 1.2-1.5 m.
- The horizontal section of the pipe (from the stove to the external turn to the vertical) should not exceed 1 m. The large length of this section leads to a significant decrease in draft and rapid clogging of the chimney with combustion products.
- The vertical section of the pipe running along the outer wall of the bathhouse should not be adjacent to it by more than 1.5 m. The same distance is left when going around the roof overhang.
- The distance to neighboring buildings when leading a pipe along the street through a wall is prohibited to leave less than 1.5 m to your own building, and less than 3 m to a neighbor’s building.
- For effective smoke removal, it is prohibited to make more than 3 turns of the pipe from horizontal to vertical position.
- The total length of the vertical section must be at least 5 meters to ensure effective traction.
- The pipe has no thermal insulation in the room. After passing through the wall, the insulated sandwich comes out.
Installation of a chimney in a bathhouse through a wall is carried out as follows:
- A segment with a damper (shaver) is connected to the oven through a special adapter. The damper, like in a classic stove, regulates the draft level. Its complete overlap prevents heat from escaping into the atmosphere after the stove goes out. Each joint is treated with fire-resistant sealant and tightened with special clamps.
- A heat-protective reflector screen is installed on the wall in the area of the technological opening. The diameter of the hole is calculated so that the pipe wall does not reach the wall of the bathhouse 45 cm.
- The pipe is taken outside, covering the free space of the box in the wall with thermal insulation. The mineral wool is placed in a special metal mesh, which serves as a mechanical limiter.
- When withdrawing, the structure is continued with a tee. The lower hole of which has a plug, forming a container for collecting resin and condensate. The chimney is periodically cleaned through this hole.
- The vertical section leads straight to the roof canopy. It is bent around corners at 45 or 90 degrees. It is preferable to mount sharp corners for a smooth bend.
- The top of the chimney is decorated with a protective umbrella.
Note! All structural elements are mounted on top of each other one by one. Each subsequent one is put on top of the previous one, so as not to create thresholds along the smoke path, which will delay and accumulate combustion products.
To support the weight of the pipe, special supports are installed on the outside. In addition, after 50 cm, special brackets are installed on the wall of the house to hold the vertical structure in an immovable, fixed position.
We recommend that you read: How to calculate what size pipe section is best and most expedient to use for heating a private home
The lower supports on the outside of the bathhouse support the weight of not only the vertical section of the structure, but also fix the horizontal elbow, keeping the guide axis away from the stove.