How to build a garage from corrugated sheets with your own hands
A permanent car garage made of masonry materials is currently not very popular among motorists. There are several reasons: the duration of construction, the large estimated cost, a lot of space is required, etc. The emergence of new materials and technologies has made it possible to build garages much faster and cheaper, and in terms of ease of use they are in no way inferior to traditional options.
The construction of a metal garage is carried out in a short time and does not require huge capital investments
But it is not only the low cost and speed of construction that makes garages made of corrugated sheets so in demand. Capital garages made it possible to make them insulated, with inspection holes and space for installing equipment and tools for repairs. Old cars were difficult to start in sub-zero temperatures and required constant repairs. So the owners had to solve these problems and build permanent warm rooms. Modern cars start perfectly at any temperature, but it is impossible to repair them yourself - they require special knowledge, expensive equipment and tools. In addition, unauthorized intervention in car maintenance automatically removes the warranty, and absolutely all owners do not want this. But if there is a need, then there is no problem to insulate the garage from corrugated sheets after its construction.
How to build a garage from corrugated sheets with your own hands
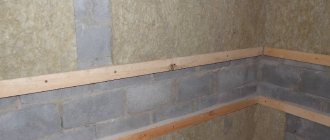
Materials used for garage insulation
How to insulate a metal garage from the inside is a question that faces the user when the garage is built, and the effect of its use does not meet the requirements for the conditions of storage and operation of the vehicle.
READ Perforated PVC corner for plaster
To insulate such structures, the following heat-insulating materials can be used: polystyrene foam, mineral wool, penoizol, polyurethane foam.
How to insulate an iron garage from the inside is decided by each user individually, based on personal preferences, the ability to do this work independently and the properties of the material used.
We make a garage from corrugated sheets with our own hands: foundation, frame, cladding
Powerful structures made of brick and reinforced concrete panels that car owners built for their “steel horses” are today giving way to frame structures.
Affordable price and ease of installation are the two main arguments in favor of a garage made of corrugated sheet metal. Durability, strength, aesthetics of the material and the possibility of insulation should also be taken into account.
It will be useful for anyone who is planning or starting to build such a garage for the first time to learn about the main stages and important features of the upcoming work. Our article will help beginners properly prepare for this process and avoid common mistakes during the assembly stages.
Features of the design of a garage made of corrugated sheets
Since we chose a profiled sheet as the lining of the garage, we need to pay due attention to its choice. Corrugated sheeting of grades C or NS (C-wall) is intended for this work. The numbers after the letter marking indicate the height of the profile “wave” in millimeters.
It is not difficult to guess that the higher the profile and the thicker the sheet, the stiffer it is, but at the same time more expensive. The savings in this case should be reasonable. Therefore, we do not recommend using cheap material of grades C-8 and C-10 for cladding. It requires more frequent installation of racks and any careless “poke” causes dents. The best option is NS-20 profiled sheet with a thickness of 0.5 mm.
Now you can move on to considering the main structural elements of the garage - the foundation, walls, gates, roof and studying the manufacturing features of each of them.
The best base option is a monolithic reinforced concrete slab. The light weight of the frame and cladding does not require digging deep trenches and erecting a powerful base. A compacted sand-crushed stone bedding 15-20 cm thick will be quite sufficient for pouring a slab foundation of the same thickness. If the groundwater lies deep enough (1.5-2.0 meters), then a recess can be made in the slab for an inspection hole. This will not greatly complicate the overall design of the formwork, which is made of boards or OSB boards placed on a frame of thick slats.
Reinforcement is carried out with a mesh of rods with a diameter of 12-14 mm, laid directly over the bedding on linings made of pieces of brick. Liners are needed to create a protective layer of concrete (5-6 cm thick) that protects the reinforcement from corrosion. To prevent the formation of cracks, it is advisable to strengthen the surface of the slab with a wire masonry mesh, recessing it 2-3 cm into a layer of fresh concrete.
Anyone who wants to build a garage from corrugated sheets with their own hands must decide when drawing up a drawing: whether its frame will be collapsible or solid. The design of fastening the racks to the foundation slab depends on this.
If in the future there is a need for dismantling, then you cannot do without embedded parts-plates concreted in the foundation. If the structure is stationary, then the lower ends of the frame posts can be embedded directly in the concrete.
After pouring concrete into the reinforcement frame of the slab, installing embedded plates for the racks and wire mesh to prevent cracks, you need to wait at least 2 weeks. During this period, the foundation will gain the necessary strength.
In order not to waste time, immediately after concreting, you can begin manufacturing the frame frames. If we are talking about a stationary garage, then the frames are placed in holes previously made in a concrete slab. When pouring the foundation, formwork is made from boards in the places where the racks are installed, leaving free space for them.
To assemble the frames, you will need a square or rectangular steel pipe, the length of which can be determined from the drawing. The cross-section of the roof racks and purlins can be any, but to save metal, its minimum value should be 40x40x2 mm or 40x60x2 mm.
It is most convenient to weld frames on a hard and flat surface. Having cut the pipe to the dimensions of the drawing, it is laid out on the site. The segments are connected to each other using welding magnets and the joints are welded.
Before installing the frame frame in concrete, do not forget to weld the open ends of the racks with plugs and treat them with bitumen mastic to prevent corrosion.
Installation rules
In order for a garage made of corrugated sheets to serve for a long time, it is necessary to follow the installation rules. To fasten the metal profile, use special self-tapping screws with an octagonal head and a sealing washer. They are made of high quality steel, then galvanized. To ensure tightness, there is a rubber washer under the metal washer.
Self-tapping screws for metal profiles and rules for their installation
When installing a profiled sheet, you must ensure that the rubber sealing gasket fits tightly to the material, but the metal should not be crushed. Screw in the screws using a hand drill at low speeds. For installation you will need a special attachment for an octagonal head, preferably a magnetized one - it’s easier to work with.
Rules for fastening sheets
When installing on walls, self-tapping screws are installed either in a groove or in a ridge - it makes no difference, but on a roof they are installed only in the ridge. When installing in a groove, hardware with a diameter of 4.8 * 28 mm is used; when installing in a ridge, the length of the screw is selected depending on its height. Add 35 mm to the wave height to obtain the minimum length. Longer fasteners can be used, shorter ones cannot.
Determining the length of the self-tapping screw for corrugated sheets when installing in a wave
The sheets are attached to the frame - to the harness. The frequency with which self-tapping screws are placed is through a wave, one row relative to the other - in a checkerboard pattern. To increase the strength of the connection between two sheets, after the sheets have been secured, additional screws are screwed in or rivets are placed at the joint.
Connecting two sheets of corrugated sheets using self-tapping screws
Now let’s talk about how to place corrugated sheets on the frame. The wave can be sent vertically or horizontally - it makes no difference. If you buy a metal profile from a manufacturer, they can make sheets of the length you need (maximum length 12 m). In this case, there will be fewer seams, and also a little less consumption (less overlaps).
When joining two sheets along a wave, one goes behind the other by 1 wave. Please note that the side waves are different - one is slightly wider, the second is slightly narrower and has a drip - a groove. The one that is narrower goes down and is overlapped by a wider one.
If there are horizontal joints, the overlap should be at least 20 cm. For better tightness, the joint is coated with roofing sealants or bitumen mastic. The sheets must be positioned so that water does not flow into the joint (the top sheet covers the bottom sheet); to do this, installation starts from the bottom and moves up.
Joints and nodes
When decorating a gable roof of a garage with corrugated sheeting, you will need a ridge element. It is sold in two-meter pieces. The ridge fragments are installed with an overlap of 20 cm; it is better to coat the joints with bitumen mastic. The fasteners are placed in the ridge in increments of 20 cm.
Attaching the ridge to the corrugated sheet on the garage roof
The joints at the corners of the garage are closed with special corners. They are fastened with small self-tapping screws 4.8 * 35 mm in increments of 25-30 cm.
There are holes at the junction of the roofing sheet and the wall sheet. They are sealed with foam, then sewing up the overhangs with corrugated sheets cut into strips or some other material. There are also sealing strips made from polyethylene foam. There are special ones for certain profiles, they repeat the shape of the wave, and there are universal ones - just a strip.
The traditional way to get rid of cracks in a garage made of metal profiles is polyurethane foam
Walls and roof
Installation of a garage frame made of metal profiles begins with the outermost end frame-truss. In the case of a non-removable structure, it is placed in prepared holes, aligned along the cord, verticality is checked and fixed with temporary ties (wooden slats driven into the ground). After this, the adjacent frame is mounted.
They are connected to each other by horizontal pipe sections using welding or self-tapping screws. In the ridge part, the frames are connected to each other by steel tubular purlins. The middle part of the farm slope can be filled with lathing made of boards, the thickness of which should be equal to the thickness of the pipes (30-40 mm).
Having installed all the frames, the installation holes in the foundation are concreted, take a break for several days, and then begin covering the garage with corrugated sheeting. It is placed vertically for better water drainage.
The sheets are attached to the longitudinal connections of the frame (pipes, corners) using self-tapping screws, screwing them into the lower part of the wave. The upper overlap is fixed with rivets for tighter contact.
The first sheet of sheathing is placed so that its lower edge of the wave is adjacent to the rack. First, fix the upper corner of the sheet, then level it and attach it to the longitudinal pipes, without touching the area where it joins the next sheet.
Having covered three walls of the garage, the corners are covered with vertical strips, which are purchased together with the ridge profile.
They can be welded from a 40x20 mm profile pipe, equipped with rotary hinges and stoppers for fixing the sashes.
The most important operation - hanging the gate - is performed in two steps. First, the hinges welded to the sashes are secured to the racks with an assembly seam. After checking the gate for absence of distortion and ease of closing, the hinges are welded with a working seam.
Installation of corrugated sheets on the roof is the same as on the walls. To simplify the work, it is better to order sheets with a length equal to the length of the roof slope. An important nuance is the use of sealant in areas where sheets join. It will protect the roof from leaks.
After completing the installation of the corrugated sheeting, a profile is attached to the ridge section to cover the joint of the slopes. To prevent rainwater from getting under the roof, a sealing tape is placed under the ridge profile.
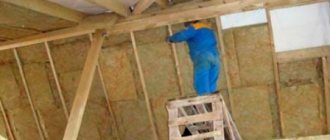
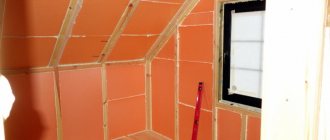
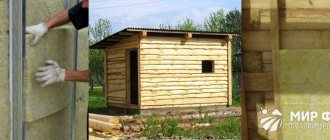
You can get rid of the discomfort caused by the strong heating of the metal in summer and the cold of winter in the garage by insulating the frame. The easiest way to do this job is using foam. A sheet thickness of 40 mm will be enough for insulation and placement between the frame posts. Polystyrene foam does not allow water vapor to pass through. This negative quality of the material in our case becomes an advantage, eliminating the need to use a vapor barrier.
Don't forget to ventilate your garage by installing grilles at the bottom and top of the side walls!
It is not necessary to fix a rigid sheet of insulation with glue. It is enough to simply insert it between the posts. From the inside of the garage, the insulation can be covered with OSB board, to which racks and shelves for tools and car accessories are securely and easily attached.
Liquid thermal insulation
Such heat insulators are multicomponent mixtures in which gas formation and polymerization occur under the influence of air.
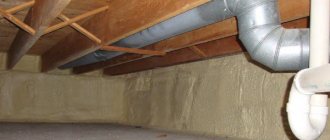
The peculiarity lies in the method of application - they are sprayed under pressure using special equipment. You can cover the surface with ultra-thin modern insulation using an ordinary brush.
The materials do not support combustion and do not emit toxins when exposed to direct flame. The advantage is that there is no need to arrange lathing for fastening - the liquid material forms a continuous layer.
If you decide to increase the energy efficiency of your garage with liquid insulation, you need to be prepared for significant costs - this is due to the application technology. A thin thermal insulator is not a cheap pleasure in itself.
Liquid polyurethane foam
The material allows you to completely insulate an iron garage (roof, ceiling, walls, gates) without forming joints, which in the future can become weak points - cold bridges.
Having given preference to this insulation, you will not have to think about additional accessories for fastening.
Due to low vapor permeability, there is no need to install vapor barrier membranes and films. To apply liquid polyurethane foam you will need a special device, which can be rented for the duration of the work.
The process of spraying liquid polyurethane foam goes like this:
Penoizol
This material is difficult to apply directly to walls, it is designed to be poured, so it can be used to insulate the attic space of a garage.
The insulation removes steam well, but it is necessary to ensure its reliable protection from moisture. Over time, it may shrink, forming cracks.
Astratek
A high-tech dispersed polymer composition is applied to the surface using a sprayer or a paint brush. When drying, the material forms a thin elastic heat-protective anti-corrosion layer, allowing you to save more usable volume in the insulated room.
When used, no cladding is required and there are no maintenance costs. A continuous layer eliminates the presence of cold bridges. The service life guaranteed by the manufacturers is about 30 years. The disadvantage is the high price.
Physical experiments demonstrating the thermal insulation properties of the Asstratek material are shown in the following video:
Do-it-yourself garage made of corrugated sheets
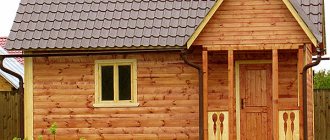
If previously it was believed that a garage must necessarily be a permanent structure made of brick or solid concrete blocks, then with the advent of such material as corrugated sheeting, the opinion of developers has changed noticeably.
Garage made of corrugated sheets
The material in question has many advantages: it is sold at an affordable price, is relatively light in weight and is extremely easy to install. At the same time, all work related to the construction of a garage from corrugated sheets can be easily done with your own hands. All you need to do is study the instructions, prepare materials and follow each step of the guide one by one.
Do-it-yourself garage made of corrugated sheets
Contents of step-by-step instructions:
Selection of location and material
When choosing a place to quickly build a metal garage on your own site, try to choose an area located closer to the exit. This way it will simply be more convenient for you, at least in terms of the fact that in winter you will have to spend less time and effort clearing the exit from snow.
At the same time, the garage should be located not very far from the house. At this point, it all again comes down to ease of use.
The construction site is pre-leveled, and the access to it is cleared of various kinds of obstacles.
To build a garage, buy corrugated wall sheeting. It is marked with the letter “C”. The marking also contains a digital designation indicating the wave height of the sheet. For example, if the sheets are marked C-20, this means that in front of you is wall corrugated sheeting, each wave of which is 20 mm high.
To create the most rigid and reliable structure, use a profiled sheet with a high wave. The most budget brands are S-8 and S-10. However, it is strictly not recommended to use such sheets for building a garage. They will require frequent installation of fasteners, as a result of which the overall tightness of the structure will noticeably decrease.
In addition, thin sheets “walk” even in light winds, making an unpleasant sound.
As for the thickness of the sheet, a corrugated sheet with a thickness of 0.5 mm is sufficient for building a garage.
In addition to corrugated sheeting, you will need to buy a number of additional materials and assemble certain tools.
Kit for self-construction of a garage from profiled sheets
- Concrete solution.
- Reinforcement bars.
- Pipes for constructing the frame.
- Pipes and angles for installing gates.
- Self-tapping screws.
- Bulgarian.
- Welding machine.
- Electric screwdriver.
- Scissors for cutting metal.
- Electric jigsaw.
The procedure for constructing a garage from corrugated sheets
The work of constructing a garage from corrugated metal sheets is carried out in several stages.
The first stage is the construction of the foundation. At this stage you have to build a solid foundation. It is better to immediately make a foundation in the form of a monolithic concrete slab. Such a base is convenient because it will simultaneously serve as a floor. Filling can be completed in 1-2 days, but you can start using the foundation no earlier than 3-5 weeks after pouring. During this time, the material will gain the necessary strength.
The second stage is assembling the frame. Metal pipes are best suited for this job. You will also need channels and corners. Racks for walls and ceilings are installed at the foundation stage. Welding is used to connect the base elements.
The third stage is fastening the sheet material. If necessary, the sheets are cut with a jigsaw into elements of the required size, after which they are attached to the frame with self-tapping screws. At this stage, it is recommended to enlist the support of at least one assistant, because the work involves simultaneous alignment of the sheets and securing them. Doing this with one hand is simply inconvenient and time-consuming.
The fourth stage is the installation of the gate. First, a frame is assembled from corners, and then metal profiled sheets are attached to it.
Finally, work is carried out on insulation and interior finishing of the garage. The order of execution depends on the preferences of the owner.
Foundation structure
DIY monolithic slab foundation
The base is poured first. While the solution gains the required strength, you will begin assembling the frame elements.
First stage. Mark the area according to the size of the future garage and dig a trench about 50 cm deep. Fill it with 10-15 cm of sand, spill it with water and compact it thoroughly.
Second phase. Prepare holes for the frame posts. The pits must have such a depth that the racks fit into them with a certain margin. The optimal depth is from 50 cm.
Third stage. Assemble the formwork around the perimeter of the base. Wood panels and boards are suitable for assembly.
Fourth stage. Lay reinforcing mesh over the area of the future foundation. For assembly, use rods with a diameter of 10-12 mm. A garage made of corrugated sheets is quite light, so a mesh with cells of 15-20 cm will be quite sufficient. Use steel wire to connect the rods.
Pouring a monolithic foundation slab
Fifth stage. Install support posts in the prepared holes. First, the part of the pipes that will be underground must be treated with bitumen mastic. Align the racks strictly vertically and strengthen them with spacers.
Sixth stage. Fill the formwork with concrete mortar prepared with a cement grade of at least M400, preferably even M500. After pouring, the solution must be pierced several times with a metal rod. Thanks to this, excess air will be removed from the fill, which will help increase its strength. Level the filling surface using the rule.
The concrete will take 3-5 weeks to mature depending on weather conditions and the quality of the original components. At this time, you can move on to other stages of work.
Preparing the frame structure
Start assembling the frame of the future building. To do this you will need a metal corner. It needs to be welded to the support posts installed at the previous stage. Secure the bars with metal plates. At this stage you will need a welding machine.
First stage. Cut the frame elements to the required length in accordance with the previously drawn up drawing.
Second phase. Weld horizontal steel bars on three sides to the support posts. Where the gate will be, do not weld the crossbars yet.
Third stage. Prepare the base for the roof. Beginners are recommended to give preference to single-pitched roofing structures. The slope will be inclined towards the rear wall of the building.
Attach metal crossbars to the opposite posts - they will serve as the roof frame. Attach the sheathing elements to them. Traditionally, unplaned boards are used. It is recommended to make the roof sheathing continuous.
Fourth stage. Prepare the garage door frame. To do this, cut a corner that is already familiar to you in accordance with the size of the future gate. You need to cut at 45 degrees. Weld the corner elements into the frame. Weld additional corners to the frame. They will serve as stiffeners. Where bolts or locks will be placed, steel plates should be welded.
Weld the hinges to the front support posts, attach the gate frame and mark the installation locations for the return hinges. Secure the hinges using welding.
Important little things
Insulated metal gates in a garage are a whole complex of measures and it does not end only with the arrangement of the inner surface of the doors. It is
equally important to correctly install the seal around the perimeter of the doors, plus take into account the accompanying factors that reduce heat loss. Let's start with the fact that when you order or choose a door for your garage, do not skimp and take a model that has a simple door
If you constantly open a whole sash, then as soon as your neighbor comes to you several times in the winter for advice, all your warmth will disappear. After all, no matter how hard you try, you won’t be able to squeeze through quickly, the open door is too big;
Let's start with the fact that when you order or choose a door for your garage, do not skimp and take a model that has a simple door. If you constantly open a whole sash, then as soon as your neighbor comes to you several times in the winter for advice, all your warmth will disappear. After all, no matter how hard you try, you won’t be able to squeeze through quickly, the open door is too big;
Doors with and without entrance doors.
Now about the compaction. It is clear that with such large dimensions it is unlikely that the shutters will fit tightly along the entire perimeter of contact with the frame of the opening. You should immediately forget about such things as self-adhesive seals for windows and ordinary doors; they will last a maximum of a week. Rubber hoses with fastening tape are produced for garage doors and other similar structures. They can be hollow or filled with some soft porous material such as foam rubber. Such a seal is fixed to the base with self-tapping screws using mounting strips or comes with the strip;
Types of rubber seals for garage doors.
- It would also be a good idea to install a curtain on the inside next to the gate. There are several options here:
- A thermal curtain that works on the principle of a fan heater and cuts off cold air at the inlet is certainly a good thing. But, firstly, such a unit itself is quite expensive. And secondly, the power of such a garage curtain starts from 2 - 3 kW, respectively, such pleasure will cost a tidy sum;
Thermal curtain.
- The next option is more loyal. A piece of tarpaulin with water-repellent impregnation is used as a curtain. In fact, this is a classic curtain. You need to stretch a metal string or baguette on top and hang your sliding canvas curtains on it;
Canvas curtains over the gates.
- Almost every motorist has been to a car wash; remember how their driveway is equipped. The curtain there is made of vertically cut soft transparent tapes, such as polyethylene. But this is not entirely polyethylene, and if you buy such a thing in a factory version, it will be expensive. It is unlikely that your garage will have the same amount of traffic as a car wash. Therefore, you can simply cut strips of thick technical polyethylene about 10 - 20 cm wide and, with a slight overlap (10 - 15 mm), staple them to a wooden strip. Next, for reliability, screw another similar rail on top, so that the polyethylene is between them, and fasten it above the entrance to the garage. Please note that any curtain should not drag on the floor; a small gap is always left;
Polyethylene curtain.
I would also like to say a few words about the lining of the gate from the inside. Izolon and lining, as you understand, are far from the only materials that can be used for such purposes. One of the most popular in garage design is OSB-3 or OSB-4, about 10 mm thick; it has decent moisture resistance and can be bought for reasonable money. If you take plywood, then in this case you need to buy the FSF brand. For those who like a warmer design, we can advise covering the inside of the doors with PVC panels. They are glued directly onto the foam plastic with liquid nails or something similar, and a edging is put on around the perimeter;
Standard OSB board.
There is one more interesting detail. I've seen advice online about insulating gates with polyurethane foam. People say that you can buy 5 - 7 cans of foam, make a frame and fill it with this foam. They promise that such insulation can supposedly last for almost 50 years. But in the open air and with minor vibration, I have seen polyurethane foam deteriorate within 3 to 5 years. Perhaps the person used some special type of foam, but in any case, I do not recommend this method to you.
Polyurethane foam and blowing gun.
https://youtube.com/watch?v=RyWgwwnY4Nk