What can you paint with?
To choose the right paint coating, you should consider 3 important nuances:
- Wear resistance. The floor, unlike walls and, especially, the ceiling, is constantly exposed to stress: people walk on it with bare or shod feet, move furniture, rub with brushes and floor mops. In order for painted logs to retain their appearance for a long time, you should choose durable, reliable paints and varnishes intended for this type of operation.
- Scope of application. The floor surface itself is a problem area in any interior, and if you have to paint a wooden floor in an unheated or, especially, open room, the situation is aggravated by temperature changes and natural phenomena such as scorching sun or rain, snow, hail. The material must be as stable as possible.
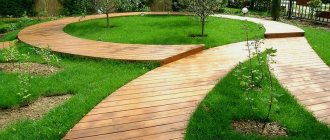
- Design. If your style or personal preferences require preserving the natural texture of the wood, you can simply apply a clear varnish - matte, satin or gloss - to the sanded floor. Another option is wax or oil, but it is best to use them as a coating for wooden floors in heated spaces - houses, apartments. In other cases, use paint for a wooden floor - dark, light, colored.
Varnish
Alkyd, acrylic, and polymer compositions are suitable for covering a wooden base. Oil and essential varnishes are not used in finishing work; they are considered furniture varnishes.
The main advantage of varnishes is that they do not hide the texture, forming a dense transparent film. Even if the foundation is tinted, it will still only highlight the appearance and not hide it. Unfortunately, the varnish layer has not only advantages, but also defects: cracks, chips. To completely hide them, puttying is required, and then coating with opaque paint.
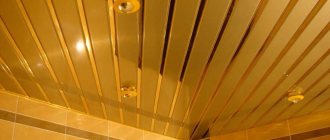
The photo shows a floor covered with glossy varnish
Wax, oil
Liquid oil and hard wax, unlike varnish or paint, do not create a noticeable film, but only block the pores of the wood. Due to this, the texture is emphasized and a waterproof barrier appears. The main disadvantage of this coating is its fragility. Oil should be renewed every year, wax - once every 2-3 years. For comparison, the varnish surface will “stand” for 10-15 years.
The photo shows oil applied to wood.
Paints, enamels
Colorful palette - what to choose
The range of paints and varnishes presented in the retail chain is distinguished by an almost unlimited range of color solutions. It is difficult for an unprepared buyer to navigate the palette of wood finishing products.
When deciding what color to paint the floor, you can focus on the classic options, which include the following colors:
- brown;
- beige;
- green;
- blue;
- orange.
If you deviate from the standards, then the following solutions will look unusual and original:
- black;
- white;
- yellow;
- red.
If the room consists of several zones, then they can be distinguished by using two types of coating with different colors.
Dispersion acrylic paint
Water-based acrylic paint belongs to the category of environmentally friendly finishing materials for interior use.
The advantages of the material are as follows:
- ease of application;
- color saturation;
- hydrophobicity;
- resistance to abrasion, ultraviolet radiation and detergents;
- affordable price.
This type of coating protects wood from dampness and prevents the formation of mold and mildew.
Oil base
Oil paint is a classic in painting. The inexpensive material has a wide range of applications for both interior and exterior work. After drying, it forms a durable shiny coating that protects the base from moisture and ultraviolet radiation. Oil-based products have more disadvantages than advantages.
These include:
- unpleasant odor;
- long drying time;
- cracks appear due to drying out.
Today this material is practically not used, because it has a short service life.
Wear-resistant paint
Wear-resistant paint for wooden floors is made on the basis of acrylic or polyurethane. These substances permeate the base throughout the entire volume, ensuring its resistance to dampness, fungus and insects.
The polymer coating retains its shape and does not deform under the influence of temperature changes and moisture. The surface film is highly durable.
The color of the coating does not fade under the influence of detergents, abrasion and solar radiation. It easily removes shoe marks, grease stains and other contaminants. Wear-resistant compounds are also used for painting open structures: verandas, terraces, gazebos.
Rubber compound
Rubber floor paint is used to treat high traffic areas, such as living rooms, corridors and verandas. Water-based formulations are made with the addition of polymer additives, which give the product high performance characteristics. After application, the paint forms a dense matte film on the base.
The material has the following advantages:
- elasticity;
- environmental Safety;
- chemical and biological inertness;
- waterproof;
- abrasion resistance;
- no odor;
- durability.
The coating is non-slip and has a deep and rich color.
Features by type of premises
Floor preparation, choice of composition, application nuances depend on where exactly the wooden floor is to be painted.
Open room
Unglazed balconies, open verandas, gazebos without walls are painted exclusively with external (street) paints and varnishes. Choose frost-resistant paints that do not fade in the sun or peel off in the rain.
The photo shows the painting of the flooring on the open veranda
Closed unheated room
In country houses, summer outbuildings, and closed gazebos, it is important that the floor can withstand not only foot traffic, but also temperature changes and high humidity. Universal compositions are suitable, but it is better to choose enamel for exterior use.
Advice! Varnish is not the best choice for cold wood floors because... even frost-resistant varnishes are less durable than the same paints.
Closed heated
The easiest way to paint wooden floors in a house or apartment. Any paint marked “For interior use” is suitable for use. They cost less because they do not contain additional strengtheners and additives. Choose odorless paints or varnishes, wax or oil.
Why wash the floor after painting?
Painting wooden floorsTypes of materials for wood processingPainting technologyMaterials for puttyNext stagesTypes of paints and varnishes
Caring for Painted Floors
The modern construction market is increasingly offering customers a variety of floor coverings that initially have a beautiful surface: laminate, parquet, self-leveling floors, etc. The article will discuss such a phenomenon as painting a wooden floor, which fades into the background in comparison with the coatings mentioned above.
Painted wooden floors do not lose their popularity because they have a number of advantages:
- beautiful appearance;
- ecological purity of wood;
- durability;
- increased fire safety;
- resistance to the negative effects of parasitic organisms, moisture, etc.
All this will not be possible if the wood is not coated with special paints and varnishes.
The wooden floor is painted in the following sequence:
- The wooden base is being prepared.
- Puttying and sanding are carried out.
- Wood coating is treated using special means.
- The surface is covered with drying oil.
- Then several layers of the selected paint and varnish material are applied.
When processing wood, you can use not only primers and drying oil, but also various mixtures to increase the fire resistance of the material and protect it from various biological organisms that feed on the boards.
Taking into account the above, we can conclude that there are two main types of impregnations:
- biocides – protect wood from a wide variety of biological influences. Painted wood is protected not only from insects, but also from the formation of mold, fungi, etc.;
- flame retardants - make the tree protected from accidental combustion. The advantage of these mixtures is that they are colorless, therefore, when applied, the appearance of the coating does not deteriorate; the protective layers are not visible in the photo and during visual inspection.
Painting technology
Now let's look at the sequence of how to beautifully paint the floor in order to prevent various mistakes during the work. It all starts with preparing the foundation. New floors simply need to be sanded and puttied if there are any defects that require this.
Brilliant results will be ensured by professional products “For wooden floors” and proven folk methods
Wooden floors are more susceptible to contamination than flooring with modern protective and decorative coatings. However, there are several ways to properly clean floors, depending on the type of board and its treatment. I'll tell you about this.
What should you consider?
Excessive moisture is unacceptable, even if the boards are varnished, since the parquet floor is laid from equally small boards.
They are tightly fitted one to another.
This cladding on a concrete or wood base has many joints that trap water and eventually destroy the wood.
Ideally, you can wash the board covering only with your hands and a soft cloth, but not with a mop!
Wood cannot be cleaned with dry products, abrasives, or undissolved soda. Hard brushes and rags will also scratch it.
A fleecy cotton cloth will remove all dirt without damaging the varnish.
When choosing which rag is best to wash the floor with, we will prefer cotton. It wrings out well, is soft, and adheres to the surface as much as possible. The result is a perfectly clean floor.
For daily cleaning, you only need to lightly moisten the mop head.
Ordinary cleaning - clean water and a damp (it should not drip) mop.
General – using diluted floor cleaner. The flooring is generously moistened with it, the cracks are washed out, and then the wet surface is wiped dry.
Unpainted flooring is the most difficult to maintain - wood absorbs dust and moisture.
Before washing, unpainted floors must be freed from debris with a vacuum cleaner. Particular attention is paid to the joints of the boards. After all, it is in these irregularities that dirt is deposited and is especially noticeable. And it’s not easy to wash it out even with a brush.
Unpainted wood deteriorates from moisture: it swells and bends.
Then the stains are examined, because different contaminants are removed in different ways.
Professional compounds will cope with many stains
Proven old ways:
- Baking soda powder removes black marks from shoes (it can be used on unpainted surfaces). You need to sprinkle baking soda on the dark mark, and then wipe the area with a damp sponge. And the grains of soda will be sucked in by the vacuum cleaner.
- You can remove any stain from wood with alcohol or vodka. Then use a sponge and soda to clean off the mark.
- You must first wash sticky stains with a solution of ammonia; it will easily remove them. Then remove the remaining sticky substance with a spatula.
Having eliminated all stains, you can begin general washing.
Here's what's best for cleaning floors if they're unpainted:
- take lime and sand (you need to mix 50g and 150g, respectively);
- Add 4 liters of water to the mixture;
- then wash the unpainted boards with a soft brush.
We recommend: Effective methods for cleaning tile joints
This solution will perfectly clean unpainted wood flooring and also disinfect it. After drying, vacuum the floor.
Baking soda and vinegar are age-old products for cleaning and disinfecting plank floors.
Soda solution is a more affordable solution. Dilute half a pack of baking soda with 4 liters of water. Then wash the boards with a brush.
Vinegar and ammonia (2 tablespoons in 5 liters of water) - this composition can be used to wash the floors in the store and at home. It will ideally remove dirt from an unpainted wooden surface.
Let's look at how to properly wash floors after renovation:
- Sweep up various debris with a broom;
- Use a vacuum cleaner to completely remove construction dust from the boardwalk. Now the ingrained dirt is already visible on it, as well as stains from paint, glue, plaster;
A special product and a hard sponge will make the work easier.
- We use products from the “Everything for Repair” line. Using these universal developments, you can quickly eliminate all repair debris.
We suggest you familiarize yourself with: Fuchsia indoor plant
Popular advice on how to wash floors after renovation offers proven compositions from available ingredients:
- Using sandpaper, carefully remove traces of glue without removing the paint;
- use a brush to clean off drops of plaster and lime;
- a glass of kerosene or gasoline in a bucket of water will refresh the wood after repair;
- diluted vinegar will immediately eliminate the acrid kerosene smell.
After washing, the surface is waxed - this is its protective layer.
The cleaned flooring is treated with a moisture-protecting agent with the addition of wax or silicone (the price of this composition is reasonable).
Brightly colored flooring may fade if not washed properly.
Painted floors are easier to clean. After all, dirt does not eat into the wood due to the monolithic layer of paint:
- Dilute vinegar or ammonia in water (1 spoon per 1 liter) and moisten a mop sponge or rag with the resulting solution;
- The mop should glide without leaving the surface. The correct way to wash the floor is to move the mop like a sailor: “figure eight”;
- For shine, you can make a solution of 2 tablespoons of vinegar, 1 tablespoon of preparation for the shine of cabinet furniture and 2 liters of water.
It is not recommended to rub the surface with wax or oil-containing substances, since painted wood does not absorb them, and instead of shine, sticky dirt will soon form.
Household chemicals are the solution to the problem of how to quickly clean the floors at home.
Stains from painted boards are removed locally with alcohol. Then “For the floor” products are used - they thoroughly wash the entire surface.
Such moistening is permissible only during “general” cleaning, and not daily
Urine marks can also be washed off. You will need:
- Dry cloth. Urine from a baby or pet becomes embedded in the wood structure. Therefore, it is immediately collected with a dry cloth.
- Dish detergent. Then gently wash the stain with dish soap.
- Ammonia. Next, wipe with ammonia diluted in a glass of warm water. It will return shine and uniformity to the surface.
- Vinegar. But washing the floor with vinegar and water (1:10) will eliminate the unpleasant odor and refresh the color of the painted boards.
The use of chlorine-containing products on a painted surface is undesirable: the smell will disappear, but the surface will brighten forever.
The final stage is to wipe the floor dry.
How to wash parquet
Expensive, exquisite parquet flooring must be washed from dirt carefully and preferably with your own hands. After all, its protection from damage is important. Often parquet flooring is not varnished, but simply rubbed carefully and regularly.
Lacquered parquet flooring should not be cleaned with dry powders to avoid scratching the varnish. And you need to regularly refresh it with polish.
The most affordable and simplest type of finishing for wooden floors is painting. But the work doesn't end there.
The next step is to consolidate the decorative and protective properties of the new coating. Before this, you should not enter the room so as not to spoil the applied decorative layer.
One way to extend its life is to wash the floor after painting.
Even though a freshly painted floor is nice and shiny, it still needs cleaning
The new coatings are completely clean and shiny.
It seems that cleaning them is completely unnecessary.
This is true for most varnishes and other products used to coat indoor surfaces: they do not require additional processing.
Floors painted with oil dyes must go through the preparation stage for use.
These environmentally friendly materials are made from natural ingredients.
They do not have a suffocating odor and are pleasant to work with. They last up to 5-7 years and have a low cost.
The main component of oil paints is drying oil; it is usually made on the basis of natural oils, with the addition of pigments. Also, artificially synthesized ingredients or combinations thereof can be used in production.
Therefore, after drying, a thin greasy layer appears on the surface. This is what needs to be removed.
We recommend: House cleaning wipes for antibacterial treatment
This action will prevent feet and other objects from sticking to the floor, will give the surface an attractive, shiny appearance, facilitate further maintenance and extend its service life.
Slightly acidic solutions of vinegar or homemade kvass added to warm water will help clean floors from the oil layer.
Do not wash a painted floor for the first time using detergents or soda. These components will destroy the surface layer of fresh paint, it will fade and may even begin to peel off.
Why do floors stick?
What tools will you need?
Painting a floor is not much different from any other painting job, but the set of tools and necessary things is a little wider.
- Ditch, roller, brush. The roller, which is convenient to squeeze out in the tray, provides quick beauty over a large area. It’s more convenient to use a brush to carefully paint the joints behind the walls and go around the pipes.
- Masking tape. Paper tape will help protect walls, pipes and other elements that should not be painted.
- Wood putty, spatula. For smoothing out irregularities, sealing cracks and seams.
- Chisel. It has the opposite effect of putty - it helps to remove unnecessary protrusions.
- Primer. Used as a preliminary layer, improves adhesion, creates additional protection for wood.
- Solvent. It will help clean your brush and hands after work and remove random stains.
You may also need:
- Construction hairdryer. Effectively removes complex old coatings such as oil paint, even if the number of layers is more than 1-2.
- Grinding or scraping machine. For restoration of parquet before varnishing or waxing.
Recommendations for preparation
The final quality of work depends more than 50% on the preparatory stage. First of all, remove from the room everything that could interfere with painting (furniture, equipment). Clear the perimeter of the floor from baseboards.
A wooden floor treated with paint or varnish that has already begun to peel must be restored to its original condition - this is the only way that subsequent fresh layers will lie evenly on it. This can be done using heating (hair dryer), grinding, chemicals (special removers).
If the coating holds tightly, it is enough to sand the floor to a satisfactory condition and you can proceed to further actions.
- Masking large irregularities. If there are wide gaps between the lags, planks cut to width are tightly inserted into them. After the “patch” has taken its place, it is planed and sanded flush with the floor.
- Leveling out minor flaws. Armed with wood putty and a spatula (it’s better to have two on hand: a soft rubber one and a hard metal one), cover cracks, chips and other defects. Let the putty dry and sand with fine sandpaper.
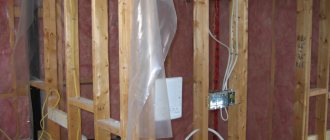
- Protection before painting. Priming is an important step for wood. It is necessary not so much for better adhesion, but for additional protection. The primer penetrates deeply into the wood fibers, providing a barrier against pests, fire, fungus, and destruction.
How to paint yourself?
Painting a wood floor is no more difficult (and maybe easier!) than any other surface. The main thing is to follow simple step-by-step instructions:
- Cover all areas that need to be protected from pigment with paper tape. Including walls adjacent to floor boards.
- Open a can of paint and stir the contents well to evenly distribute the fillers. Pour some into a cuvette.
- Use a small thin roller or a suitable brush to outline the room along the walls.
- Use a large roller to paint the entire floor area, moving from the far corner to the exit. Leave until completely dry.
- Apply a second coat of paint, repeating steps 3 and 4.
Important! If you plan to install floor skirting boards to be painted in the color of the floor, they are installed immediately after the preparatory work and painted simultaneously with the boards.
After completing all work, give the paint at least 24 hours - during this time the coating will become harder and will not be scratched if accidentally hit by furniture.
Advice! Before moving furniture in, check the quality of the floor paint: if, when the boards have dried, the material has run off a little and bald spots have formed, it is better to cover them up right away.
To make sure that anyone can handle painting and not miss a single stage of the work, watch the video:
Stage 1: assessing the condition
The first thing you need to do is assess the condition of the floor before painting. Remains of the previous paint will need to be removed.
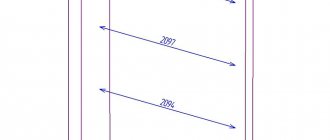
Another important point is the humidity of the room and floor surface. It can be easily identified using plastic tape. Leave it on the floor for about 24 hours and check the result. Condensation on the outer part of the tape indicates increased humidity in the room. Before you begin painting, the humidity will have to be lowered. Eliminating sources of moisture, systematic ventilation, and organizing proper ventilation will help.
Which bathroom floor tiles are better?
Tile is one of the most popular ways to finish a bathroom floor. It is the most practical, affordable, durable and can be combined with most styles - especially since now there are elements made to look like wood on sale. Manufacturers offer such a variety of products that it can be difficult to choose just one. Which bathroom floor tiles are better? Let's figure it out together.
If moisture appears on the inside of the tape, the problem is the moisture content of the concrete. This is usually solved using heaters. You can use a popular life hack: leave bags of salt in the room to absorb excess moisture.
Check your paint instructions to determine the appropriate temperature range for painting your floor.
Features of applying varnish
On the one hand, it may seem that varnishing is no different from painting. But in reality the processes differ markedly from each other.
Firstly, if it is better to take a roller for paint, then for varnish it is better to use a soft, wide brush. Secondly, it is important to varnish at a temperature of 15-25 degrees above zero.
Let's get started:
- Carefully move the polish around inside the can. If you plan to use a brush, you don’t have to pour the contents into the tray.
- Apply the first coat along the grain of the wood, carefully going through each joist and spreading the varnish thinly. Leave until completely dry (time indicated on the package).
- After the first layer, you may notice that the fibers have risen a little - take a block, fine sandpaper and go over the entire floor area to remove unevenness.
- Carefully remove any accumulated dust using a vacuum cleaner and a clean cloth. It is recommended to wash a smooth polished floor 2-3 times.
- Apply a second coat of varnish.
- Sand and wash the floor again.
- Apply a third coat of varnish. It is essential for pine floors. Hardwood can only be coated twice.
Important! The finishing coating is not sanded: to remove the sticky layer, it is enough to wash the floor after drying with a soap solution.
Detailed video instructions will help you put everything in its place:
Painted floor
This will be an excellent budget renovation option for those who want to change something without putting in a lot of effort. The advantage is that the modern market offers a huge number of variations of paints, different shades and textures. Therefore, you can choose any color, as well as a pattern, depending on your imagination. You can make the floor plain or classic in the form of a chessboard, draw a beautiful pattern: zigzags, diamonds, circles. Or make a bright floor, although in this case there is always a risk that excessive brightness will distract attention.
It should be noted that everything needs to be selected depending on the rest of the interior, furniture, its direction, style and appearance. This is most important: the classics go with calmer, muted tones and patterns; for fusion, you can choose an extraordinary pattern, as well as color.
Painted flooring was all the rage in the 18th century, followed by carpeting, but we're glad to see it's coming back into fashion.
I would like to say that many are accustomed to thinking that painted floors are the privilege of only country houses or those made in a classic style. This is actually a misconception. This flooring is suitable for both the above buildings and a modern apartment created according to classical canons. And it will even fit perfectly into the interior of a cafe or any other public institution. But it is important to prepare the floor well, because without doing it properly, the result will not look good enough. Before painting, it is important to sand it well so that the surface is smooth. Therefore, it is better if a professional handles the work, or at least consult with him first and discuss all issues of interest.
Original painting ideas
The easiest way to make a monochromatic floor covering is to simply paint it one color around the entire perimeter. But if you want something more original, you can arm yourself with patience and create a unique pattern.
For example, alternating white and wooden diamonds: simple, fast, impressive. First of all, paint some of the squares white, then cover the entire area with a couple of layers of varnish.
The photo shows an unusual way of painting the floor
Geometric 3D painting looks no less original - to implement it you don’t even need to have artistic talent, you just need to figure out where and what shade to apply.
Are you afraid of making a mistake when modeling manually? Use stencils! You can purchase ready-made ones or order them from a printing house to suit your taste.
One last idea - add some color! The technique of multi-colored staining looks best on small-format floors, such as parquet. The only negative is that you will have to tint many shades to get a spectacular result.
Floor paint is a budget-friendly, but nonetheless workable option for finishing boards. By choosing the right composition and following all the recommendations, you will create a durable floor covering with your own hands.
Stage 4: paint
Painting the floor yourself is done using a roller, brushes or sprayer. To paint the corners you will need narrow brushes. Choose a tool based on the characteristics of the coloring composition.
Make sure that the layers of paint applied are not too dry and thick, apply with strokes, rub over the surface. Before applying a new layer, be sure to wait for the previous one to dry. 2-3 thin layers dry faster and look better than one thick one.
We start the painting process opposite the door against the wall, otherwise you may accidentally drive yourself into a corner.
Which is better - porcelain stoneware or floor tiles?
Renovating an apartment or house often involves installing new flooring. If we talk about wet areas, as well as rooms where heavy dirt is possible, tiles would be the best choice. However, the variety of its types and the wide range of specialized stores can confuse a non-professional. Which is better - porcelain tiles or ceramic floor tiles? We will talk about this in our article.